> For the complete documentation index, see [llms.txt](https://docs.maiagent.ai/llms.txt). Markdown versions of documentation pages are available by appending `.md` to page URLs; this page is available as [Markdown](https://docs.maiagent.ai/maiagent-user-guide/en/org/roles/role-permission.md).

# Role Permission Management

### Role Concept <a href="#role-concept" id="role-concept"></a>

A **Role** is a functional unit within the organization with freely configurable member composition:

* Members assigned to a role can come from any member within the organization
* A single member can inherit multiple roles simultaneously, enabling flexible permission management
* Each role has independent permission settings to accommodate different scenarios

{% hint style="info" %}
**Simple explanation:**

A role is like a company "department" or "position," such as Customer Service, Marketing, or Manager. You first define what each department can do, then add employees to the corresponding department.
{% endhint %}

***

### Role Type Descriptions <a href="#role-types" id="role-types"></a>

MaiAgent platform roles are divided into three types:

#### Owner Role (Owner Role) <a href="#owner-role" id="owner-role"></a>

**Definition:** The highest-permission role automatically granted to the organization creator

{% hint style="info" %}
**Simple explanation:**

Like the company's "CEO" or "system administrator" -- can manage everything, view all data, with no restrictions.
{% endhint %}

**Characteristics:**

* Has full access to all resources without additional assignment
* Can manage all settings within the organization, including roles, members, and permissions
* An organization can have multiple owners
* The owner role can be assigned to or removed from other members

{% hint style="warning" %}
The owner role has the highest permissions. Assign it carefully and only to personnel who truly need to manage the entire system.
{% endhint %}

#### Default Role (Default Role) <a href="#default-role" id="default-role"></a>

**Definition:** A base role automatically held by all organization members, giving members basic permissions before other roles are assigned

{% hint style="info" %}
**Simple explanation:**

Like a company "employee badge" -- everyone automatically gets one when they join the company, ensuring new hires can use basic features without waiting for configuration.
{% endhint %}

**Characteristics:**

* All organization members automatically receive the default role's permissions
* Provides the most basic platform access permissions (such as Q\&A functionality)
* Cannot be batch-assigned via Excel
* Administrators can customize the default role's permission scope
* Members cannot be manually assigned (the system automatically assigns it to all members)

{% hint style="warning" %}
**Recommended configuration:**

The default role should only have "minimum" permissions to prevent new members from making accidental changes. Other permissions should be distributed through "custom roles."
{% endhint %}

#### Custom Role (Custom Role) <a href="#custom-role" id="custom-role"></a>

**Definition:** Roles manually or batch-assigned to specific members by administrators

{% hint style="info" %}
**Simple explanation:**

Like the various "departments" or "positions" in a company (Customer Service, Marketing, Manager, etc.), with different permissions granted based on job requirements.
{% endhint %}

**Characteristics:**

* Requires active assignment by an administrator
* Different permission combinations can be configured for different responsibilities
* Supports batch assignment for convenient large-scale member management
* Members immediately receive corresponding permissions upon assignment

**Permission calculation method:**

```
Member's final permissions = Default Role permissions + All Custom Role permissions
```

**Example:**

* Member A is assigned to the "Customer Service" role → Gains Q\&A permissions + Conversation permissions
* Member A is also assigned to the "Testing Team" role → Additionally gains AgentOps permissions
* Member A's final permissions: Default permissions + Customer Service permissions + Testing Team permissions

{% hint style="info" %}
If using EIP login, roles can be automatically synced from the enterprise system. See [Third-Party Login (SSO)](/maiagent-user-guide/en/org/sso.md) for details.
{% endhint %}

***

### Edit Role Permissions <a href="#edit-role-permissions" id="edit-role-permissions"></a>

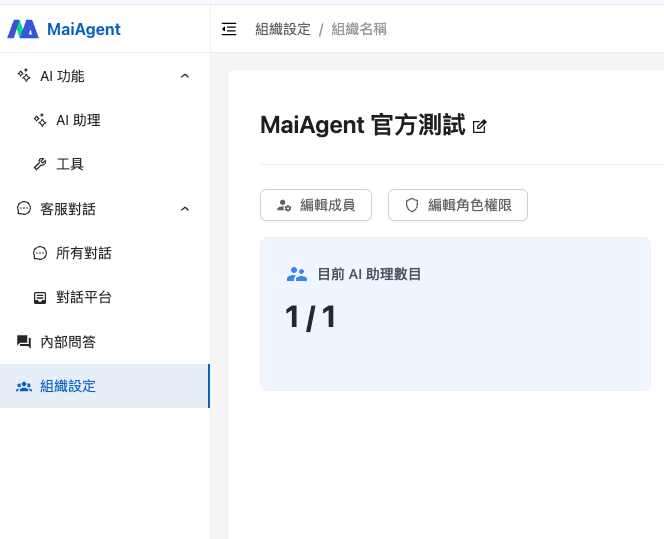
Within the organization, click "<mark style="color:blue;">Edit Role Permissions</mark>" to configure permissions for members of that role.

<figure><img src="https://1593648278-files.gitbook.io/~/files/v0/b/gitbook-x-prod.appspot.com/o/spaces%2Fmzb5NG9GDzFP2YDKeYVl%2Fuploads%2Fgit-blob-7a975283a62bb8d6a763f021934cf66ac249c164%2F%E6%88%AA%E5%9C%96%202025-04-25%20%E4%B8%AD%E5%8D%8812.34.17.png?alt=media" alt=""><figcaption></figcaption></figure>

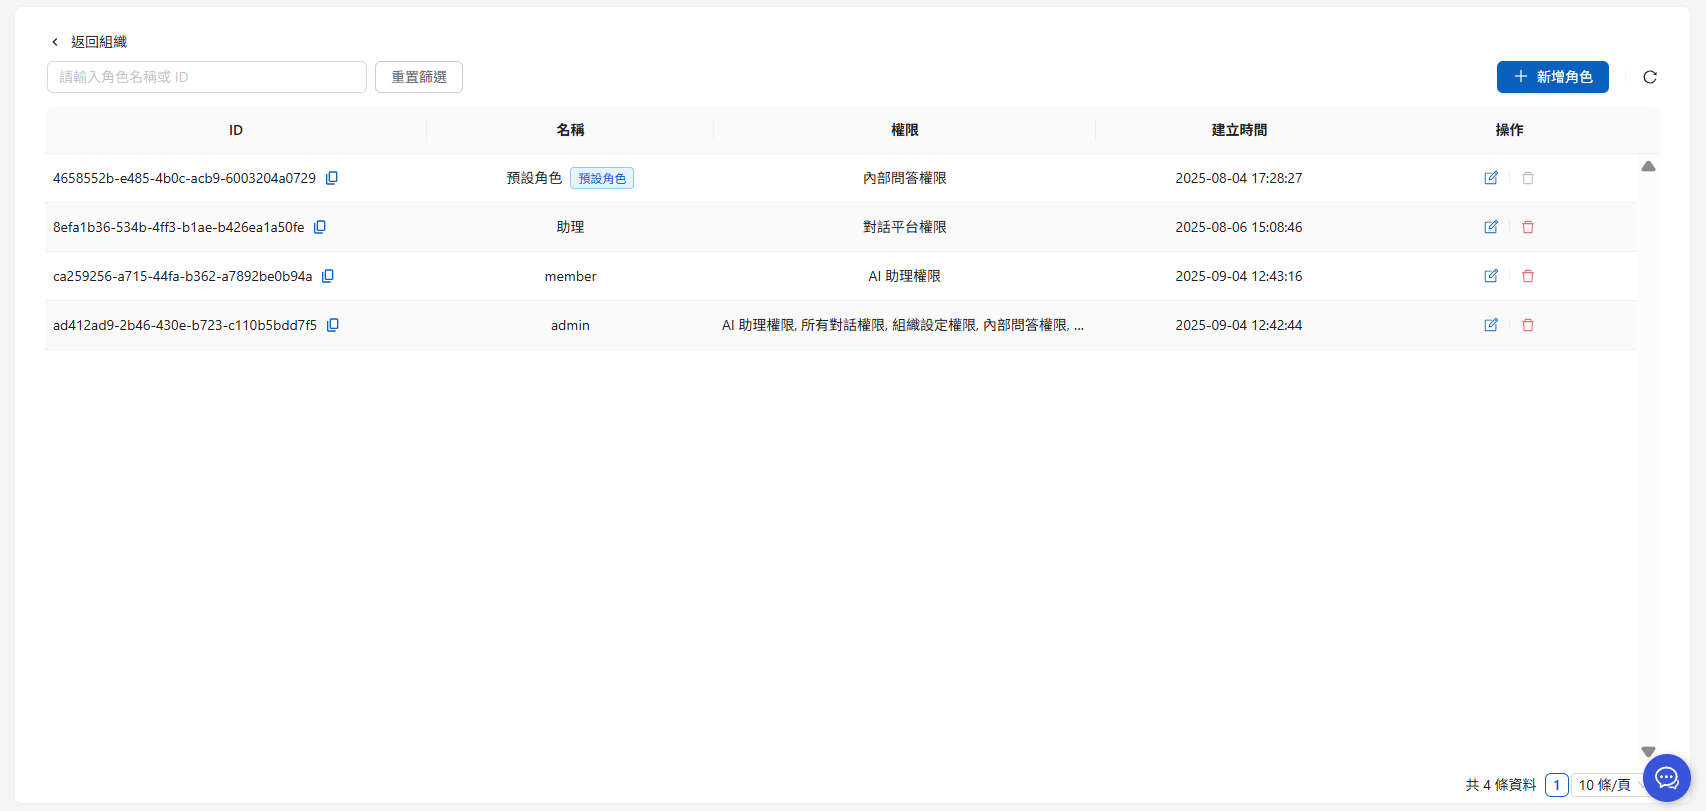
On the role permissions page, you can:

* <mark style="color:blue;">Add Role</mark>: Create a role for the organization (e.g., Marketing Department). When new members join, applying the role automatically grants them the corresponding permissions
* <mark style="color:blue;">Edit Role</mark>: Modify role name, description, or department information
  * <mark style="color:blue;">Role Permissions</mark>: Configure the feature modules and operation scope available to the role
  * <mark style="color:blue;">Assign Members</mark>: Add organization members to the specified role for unified permission management
  * <mark style="color:blue;">Assign AI Assistants</mark>: Assign AI Assistants the role can operate
  * <mark style="color:blue;">Assign Knowledge Bases</mark>: Assign knowledge bases the role can access
  * <mark style="color:blue;">Assign Conversation Platforms</mark>: Assign conversation platforms the role can use
  * <mark style="color:blue;">Assign Skills</mark>: Assign the skills the role can read, configure read/edit/delete permissions for each skill, and specify whether new skills can be added (see [Skill Management: Control Skill Visibility and Permissions by Role](/maiagent-user-guide/en/skills/skills-management.md#skill-role-visibility))
* <mark style="color:blue;">Delete Role</mark>: Remove roles that are no longer in use to keep the organization's permission structure clean
* <mark style="color:blue;">Batch Features</mark>: Batch add members to the organization or batch assign roles to members via Excel (see [Member Management: Batch Member and Permission Management](https://docs.maiagent.ai/maiagent-user-guide/en/org/roles/pages/gEVCBLlgrbsFwGlsxU0f#進階操作批次成員與權限管理))

<figure><img src="https://1593648278-files.gitbook.io/~/files/v0/b/gitbook-x-prod.appspot.com/o/spaces%2Fmzb5NG9GDzFP2YDKeYVl%2Fuploads%2Fgit-blob-9547cec3921fd6b0d51b50f21d4a7bf09531c0c2%2F%E8%9E%A2%E5%B9%95%E6%93%B7%E5%8F%96%E7%95%AB%E9%9D%A2%202025-09-04%20124330.png?alt=media" alt=""><figcaption><p>Role permission settings diagram</p></figcaption></figure>

{% hint style="info" %}
**Role settings tab notes**

* **Owner Role**: Resource assignment tabs such as "Assign AI Assistants," "Assign Knowledge Bases," "Assign Conversation Platforms," and "Assign Skills" are disabled because the owner role automatically has access to all resources
* **Default Role**: The "Assign Members" tab is disabled because the default role is automatically assigned to all members
  {% endhint %}

***

### Permission Levels <a href="#permission-levels" id="permission-levels"></a>

MaiAgent uses a **hierarchical permission architecture** with permissions divided into **main permissions** and **sub-permissions**:

{% hint style="info" %}
**What is a "hierarchical permission architecture"?**

It is like a folder structure:

* **Main permission** = Main folder (e.g., "AI Features")
* **Sub-permission** = Subfolder (e.g., "AI Assistants," "Knowledge Bases," "Crawlers")

**How it works:**

* Checking a main permission automatically includes all sub-permissions
* You can also check only specific sub-permissions for more granular control
  {% endhint %}

#### Permission Structure Overview <a href="#permission-structure-overview" id="permission-structure-overview"></a>

<table><thead><tr><th width="180">Main Permission</th><th width="200">Sub-Permission</th><th>Description</th></tr></thead><tbody><tr><td><strong>MaiGPT Permission</strong></td><td>-</td><td>Controls access to MaiGPT features</td></tr><tr><td><strong>AI Feature Permission</strong></td><td>AI Assistant Permission</td><td>Controls viewing and operations on the "AI Assistants" tab</td></tr><tr><td>Knowledge Base Permission</td><td>Controls viewing and operations on the "Knowledge Bases" tab</td><td></td></tr><tr><td>Crawler Permission</td><td>Controls access to crawler features</td><td></td></tr><tr><td>Tool Permission</td><td>Controls access to tool management features</td><td></td></tr><tr><td><strong>AgentOps Permission</strong></td><td>Test Set Permission</td><td>Controls viewing and operations on test set features</td></tr><tr><td>Automated Testing Permission</td><td>Controls access to automated testing features</td><td></td></tr><tr><td><strong>Customer Service Conversation Permission</strong></td><td>All Conversations Permission</td><td>Controls viewing and operations on the "All Conversations" tab</td></tr><tr><td>Conversation Platform Permission</td><td>Controls viewing and operations on the "Conversation Platforms" tab</td><td></td></tr><tr><td>Contact Permission</td><td>Controls access to contact management features</td><td></td></tr><tr><td><strong>Agent Marketplace Permission</strong></td><td>-</td><td>Controls viewing and operations on the "Agent Marketplace" tab</td></tr><tr><td><strong>AI Gateway Permission</strong></td><td>-</td><td>Controls whether AI Gateway appears in the left menu and whether members can access its pages</td></tr><tr><td><strong>Meeting Records Permission</strong></td><td>Live Transcription Permission</td><td>Controls whether users can create new meetings and start recording</td></tr><tr><td>Meeting List Permission</td><td>Controls whether users can view the meeting list and details, and download meetings</td><td></td></tr><tr><td><strong>Meeting Record Management Permission</strong></td><td>-</td><td>Controls the meeting records users can view: when unchecked, users can only view meetings they participated in; when checked, users can view all meetings in the organization (see <a href="/maiagent-user-guide/en/meeting-records/access-control.md">Meeting Access Permissions</a>)</td></tr><tr><td><strong>Developer Permission</strong></td><td>API Call Log Permission</td><td>Controls viewing of API call logs</td></tr><tr><td><strong>Organization Permission</strong></td><td>Organization Overview Permission</td><td>Controls viewing of the organization overview page</td></tr><tr><td>Activity Log Permission</td><td>Controls viewing of activity log features</td><td></td></tr></tbody></table>

{% hint style="info" %}
**Permission level notes**

* Checking a main permission automatically includes all sub-permissions under it
* You can also check only specific sub-permissions for more granular permission control
* A user's final permissions are the sum of the system default role and custom role permissions
  {% endhint %}

#### Permission Configuration Instructions <a href="#permission-settings" id="permission-settings"></a>

1. Add a role and assign permissions

Click "<mark style="color:blue;">Add Role</mark>" in the upper right corner to enter a name for the new role and check the permissions the role should have.

<figure><img src="https://1593648278-files.gitbook.io/~/files/v0/b/gitbook-x-prod.appspot.com/o/spaces%2Fmzb5NG9GDzFP2YDKeYVl%2Fuploads%2Fgit-blob-dad561e86191c3565a4403894f91fe41119d2a0e%2F%E6%88%AA%E5%9C%96%202025-04-25%20%E4%B8%AD%E5%8D%8812.35.29.png?alt=media" alt=""><figcaption></figcaption></figure>

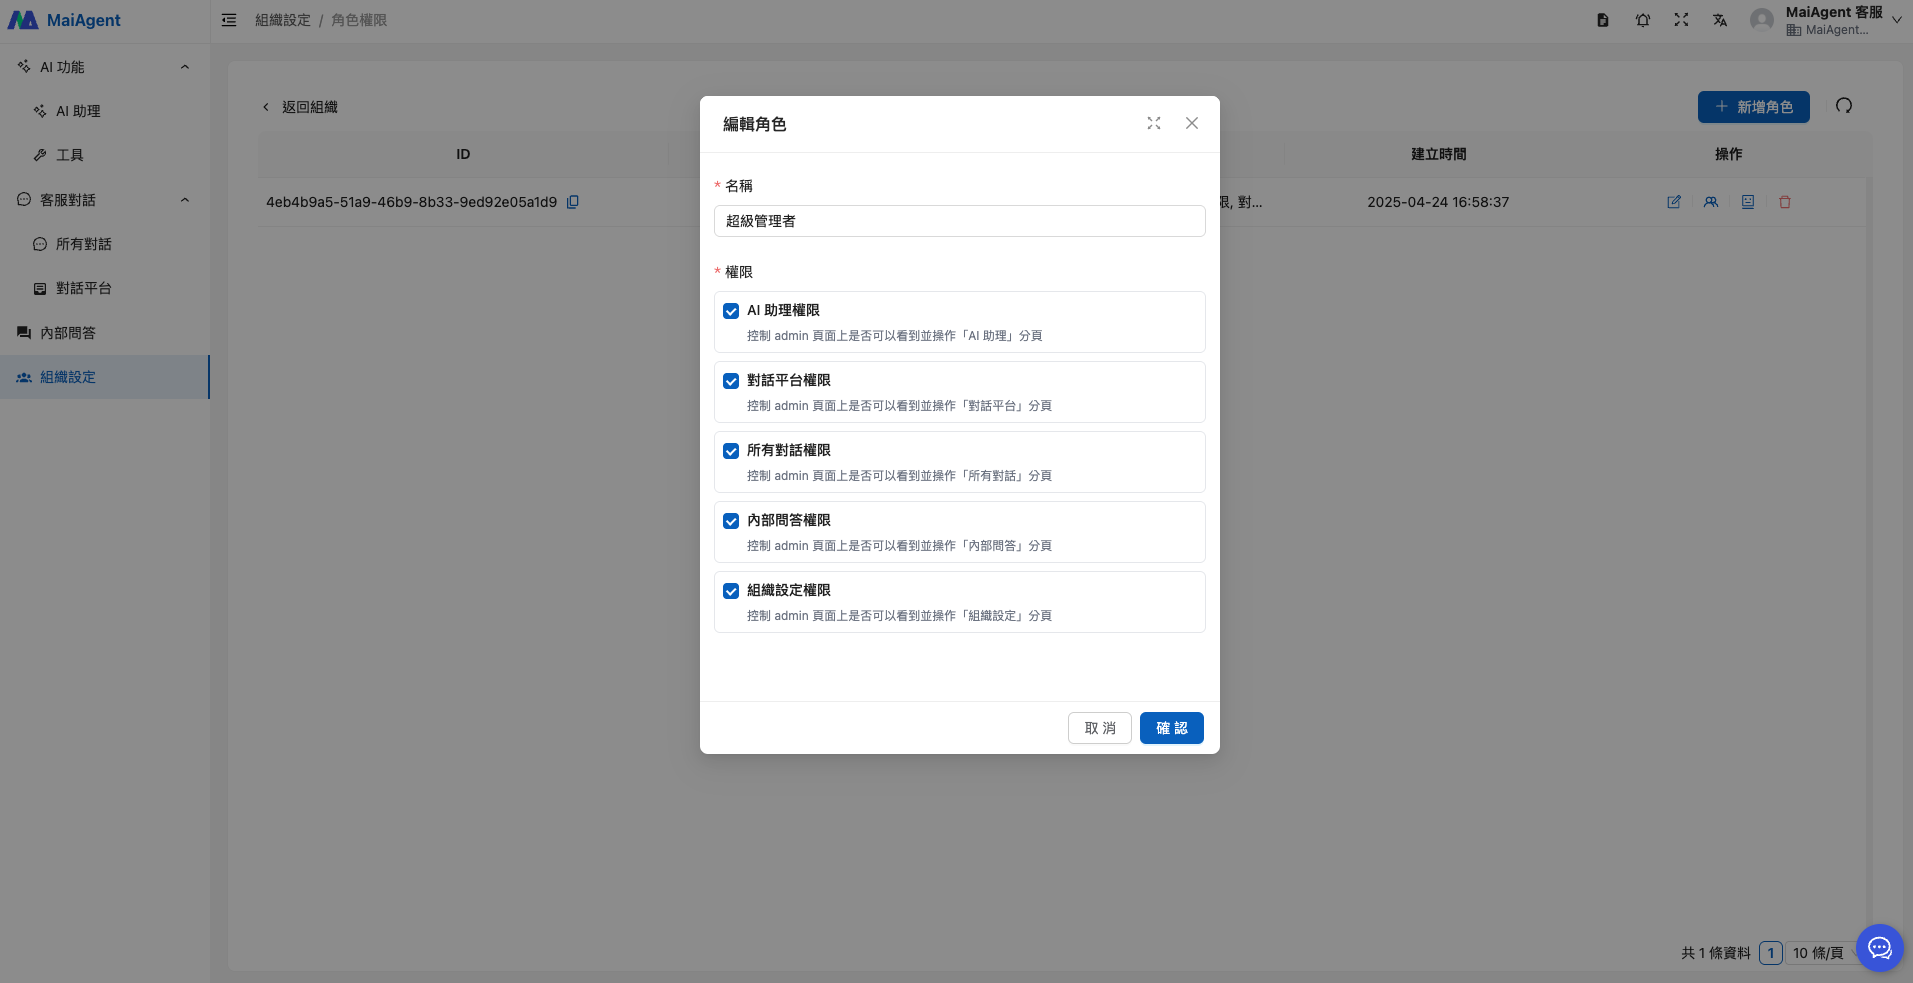
2. Edit name and permissions

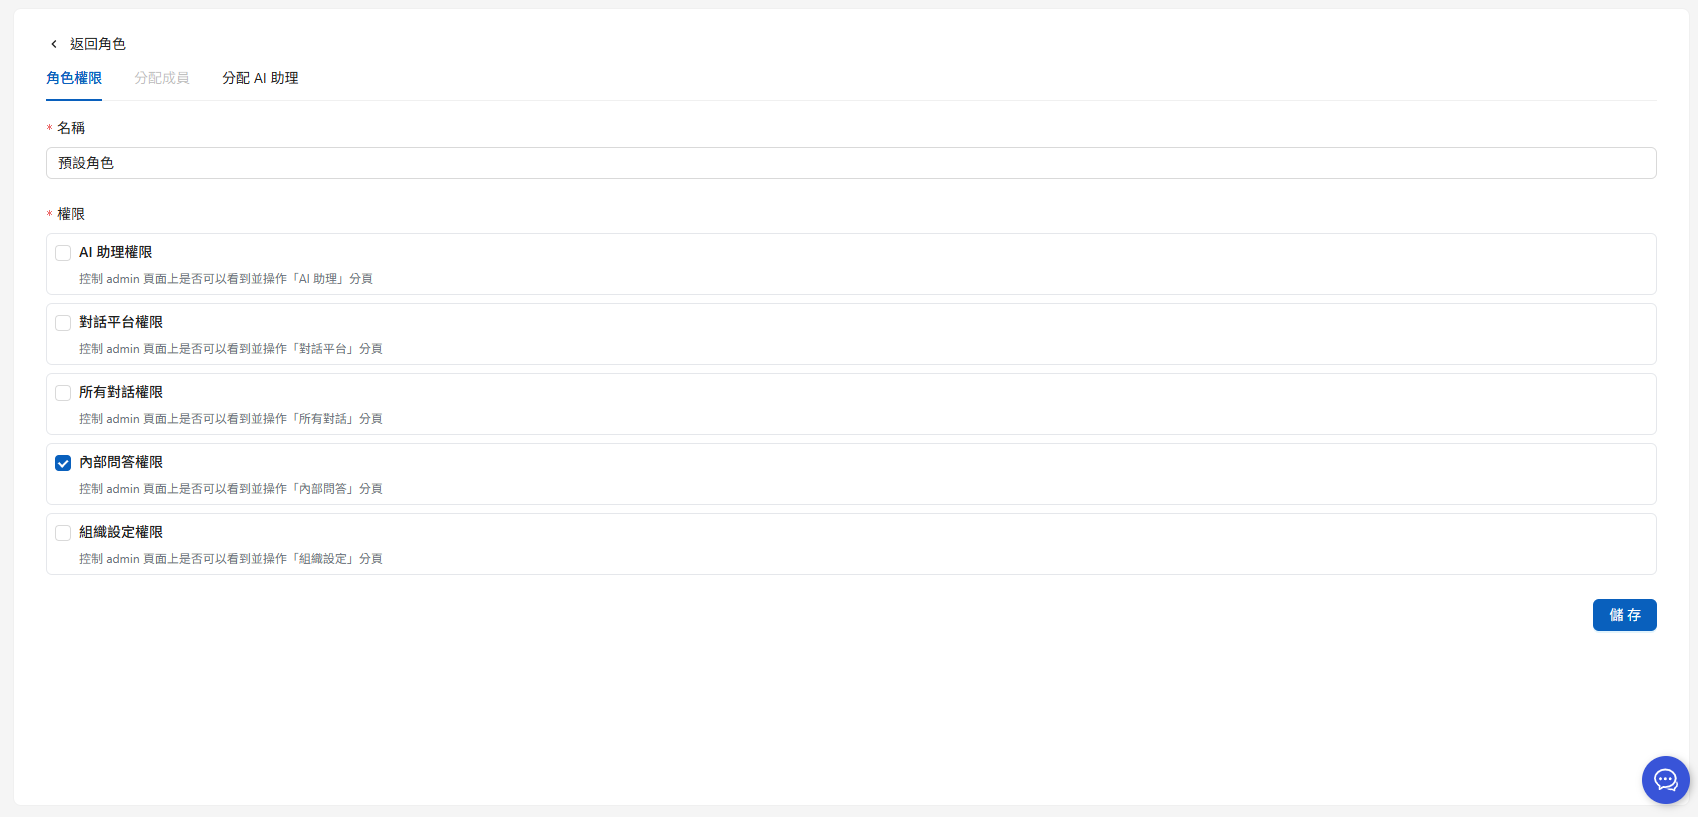
Enter the editing page to edit the role name and re-check the permissions the role should have.

<figure><img src="https://1360999650-files.gitbook.io/~/files/v0/b/gitbook-x-prod.appspot.com/o/spaces%2F6v6TNkkOQVfRYfcNirHL%2Fuploads%2Fgit-blob-8e7e84d5ff15c6546152be890d61ab6a5ba00e98%2Fimage%20(222).png?alt=media" alt=""><figcaption></figcaption></figure>

Based on the role definition, you can decide whether organization members can view or use related feature tabs in the left menu. Use checkboxes to enable/disable each permission, then click the "<mark style="color:blue;">Save</mark>" button in the lower right to apply the settings.

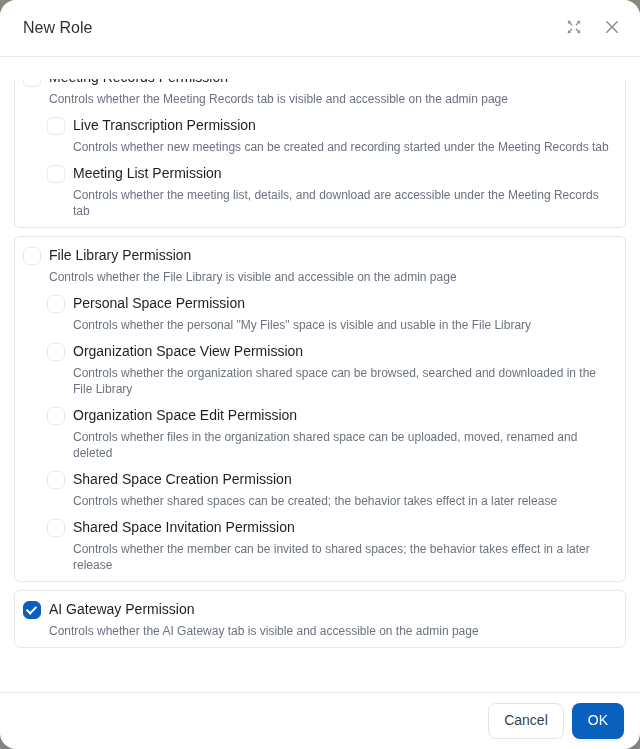
#### Enable AI Gateway for a Specific Role <a href="#enable-ai-gateway-for-role" id="enable-ai-gateway-for-role"></a>

If only model administrators in your company need access to AI Gateway, enable the permission only for their role:

1. Go to <mark style="color:blue;">Organization Settings</mark>, then open <mark style="color:blue;">Role Permissions</mark>.
2. To create a role, click <mark style="color:blue;">Add Role</mark> and enter a role name. You can also edit the <mark style="color:blue;">Role Permissions</mark> of an existing role.
3. Check <mark style="color:blue;">AI Gateway Permission</mark>, then click <mark style="color:blue;">Confirm</mark>. In the English interface, the button is labeled <mark style="color:blue;">OK</mark>.
4. Assign the model administrators to this role. After members sign back in to the admin console, AI Gateway appears in the left menu. Members without this permission cannot see the menu or directly access the related pages, and the system also rejects their AI Gateway API requests.

<figure><img src="https://1360999650-files.gitbook.io/~/files/v0/b/gitbook-x-prod.appspot.com/o/spaces%2F6v6TNkkOQVfRYfcNirHL%2Fuploads%2Fgit-blob-87a186a534fe69fc7247cfb7c71bdd9067dff353%2Fai-gateway-role-permission.png?alt=media" alt="AI Gateway Permission selected in the role permissions dialog"><figcaption><p>Select AI Gateway Permission so members with this role can see and access AI Gateway</p></figcaption></figure>

{% hint style="info" %}
A member's final permissions are the sum of the default role and all custom-role permissions. If a member can still see AI Gateway, check their other assigned roles as well.
{% endhint %}

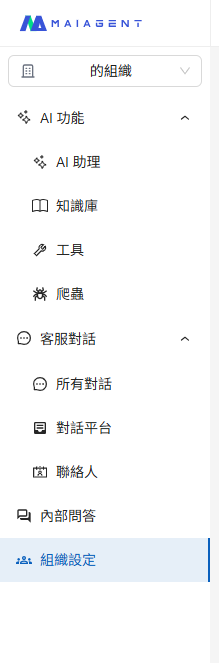
<div><figure><img src="https://1593648278-files.gitbook.io/~/files/v0/b/gitbook-x-prod.appspot.com/o/spaces%2Fmzb5NG9GDzFP2YDKeYVl%2Fuploads%2Fgit-blob-0783b87df996b84d88fde0fcbf55926789f81eb5%2Fimage.png?alt=media" alt=""><figcaption><p>Left menu page</p></figcaption></figure> <figure><img src="https://1593648278-files.gitbook.io/~/files/v0/b/gitbook-x-prod.appspot.com/o/spaces%2Fmzb5NG9GDzFP2YDKeYVl%2Fuploads%2Fgit-blob-bf24dfee27f455c732ba32d0f28059823e729872%2Fimage.png?alt=media" alt=""><figcaption><p>Role permission settings page</p></figcaption></figure></div>

***

### Permission Use Cases <a href="#permission-use-cases" id="permission-use-cases"></a>

Suppose an enterprise uses MaiAgent to build a customer service system:

#### Scenario 1: New Customer Service Agent <a href="#use-case-new-agent" id="use-case-new-agent"></a>

Grant only "**Q\&A Permission**"

* **Reason**: They just joined and need to quickly learn product knowledge and company policies
* **Prevention**: Prevents the agent from accidentally deleting customer conversation records or modifying important AI Assistant settings while still unfamiliar

#### Scenario 2: Senior Customer Service Agent <a href="#use-case-senior-agent" id="use-case-senior-agent"></a>

"Q\&A Permission" + "Customer Service Conversation Permission (All Conversations)"

* **Reason**: Experienced and needs to help handle complex complaints and guide new agents
* **Prevention**: AI feature permissions are still withheld to prevent service agents from accidentally modifying AI Assistant settings, which could cause all customers to receive incorrect responses

#### Scenario 3: AI Assistant Administrator <a href="#use-case-ai-admin" id="use-case-ai-admin"></a>

"AI Feature Permission" + "AgentOps Permission"

* **Reason**: Responsible for managing and optimizing AI Assistant response quality
* **Prevention**: Customer service conversation permissions are withheld to avoid access to customer privacy data

***

### Assign Members <a href="#assign-members" id="assign-members"></a>

You can assign created roles to members in your organization:

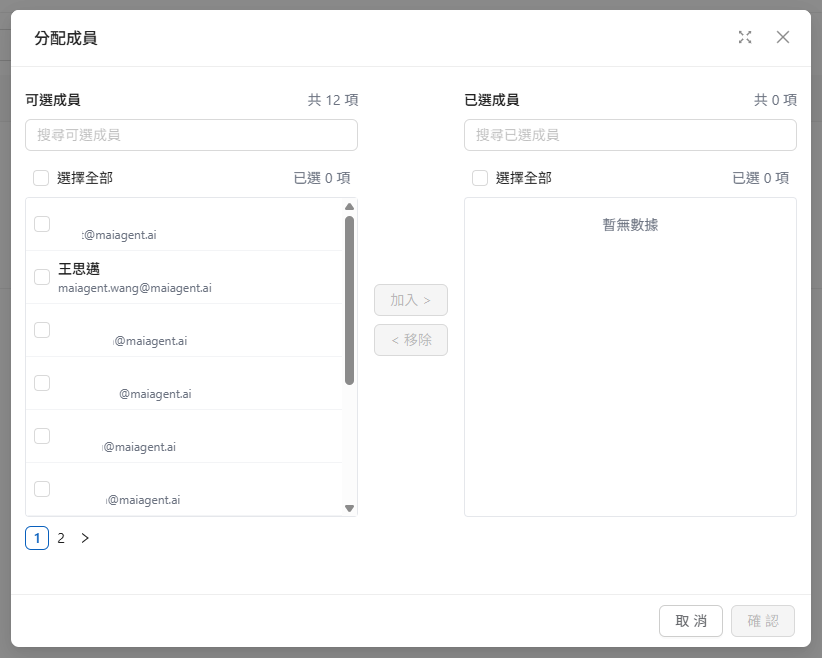
1. Navigate to the Assign Members page
2. Click the "<mark style="color:blue;">+ Assign Members</mark>" button

<figure><img src="https://1593648278-files.gitbook.io/~/files/v0/b/gitbook-x-prod.appspot.com/o/spaces%2Fmzb5NG9GDzFP2YDKeYVl%2Fuploads%2Fgit-blob-b3104a6291189bc44c585c77c3cc8c94797960ff%2F%E6%96%B0%E5%A2%9E%E7%B5%84%E7%B9%94%E6%88%90%E5%93%A1%20(2).png?alt=media" alt=""><figcaption></figcaption></figure>

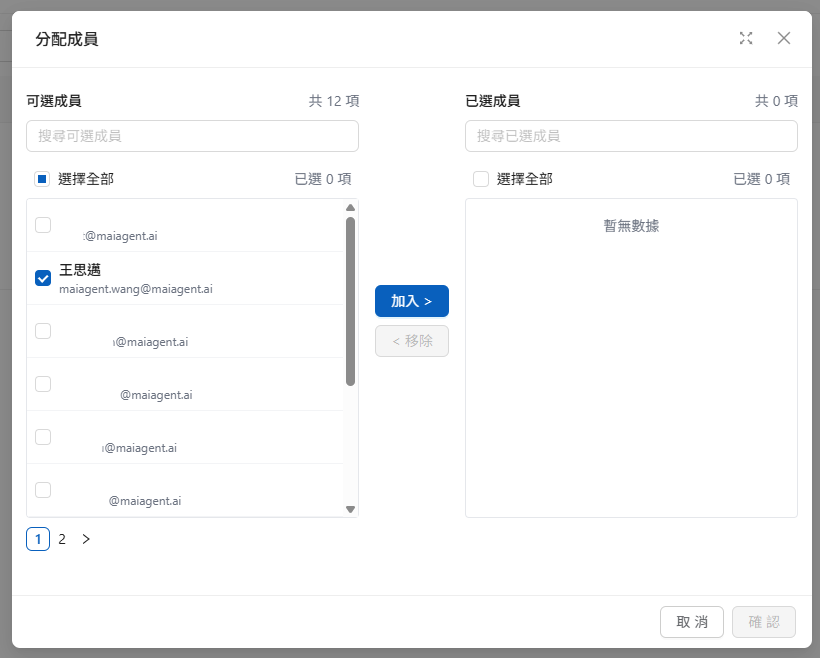
3. Select the members to add and click the "<mark style="color:blue;">Add ></mark>" button in the center
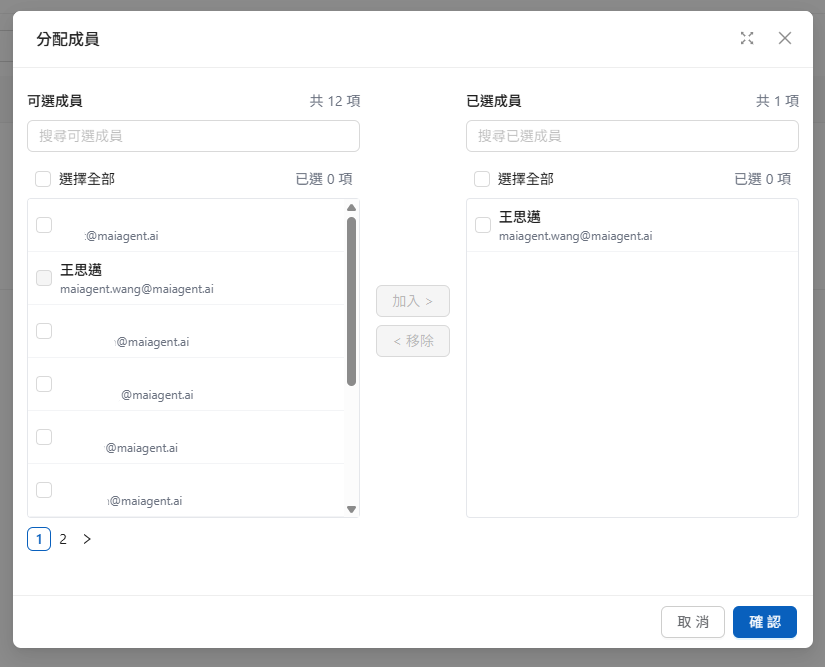
4. Click the "<mark style="color:blue;">Confirm</mark>" button in the lower right to complete the configuration

<div><figure><img src="https://1593648278-files.gitbook.io/~/files/v0/b/gitbook-x-prod.appspot.com/o/spaces%2Fmzb5NG9GDzFP2YDKeYVl%2Fuploads%2Fgit-blob-36547435fc643a09591d13cfa3d9efbe12e28b78%2F%E8%9E%A2%E5%B9%95%E6%93%B7%E5%8F%96%E7%95%AB%E9%9D%A2%202025-09-04%20142922.png?alt=media" alt=""><figcaption><p>Select members to add</p></figcaption></figure> <figure><img src="https://1593648278-files.gitbook.io/~/files/v0/b/gitbook-x-prod.appspot.com/o/spaces%2Fmzb5NG9GDzFP2YDKeYVl%2Fuploads%2Fgit-blob-08c284c6fca180484427fc56972522a9ed230c69%2F%E8%9E%A2%E5%B9%95%E6%93%B7%E5%8F%96%E7%95%AB%E9%9D%A2%202025-09-04%20143151.png?alt=media" alt=""><figcaption><p>Click Add</p></figcaption></figure> <figure><img src="https://1593648278-files.gitbook.io/~/files/v0/b/gitbook-x-prod.appspot.com/o/spaces%2Fmzb5NG9GDzFP2YDKeYVl%2Fuploads%2Fgit-blob-b8d25203866b826023d42962551ebf6149bc4f3e%2Fimage.png?alt=media" alt=""><figcaption><p>Addition complete, click Confirm</p></figcaption></figure></div>

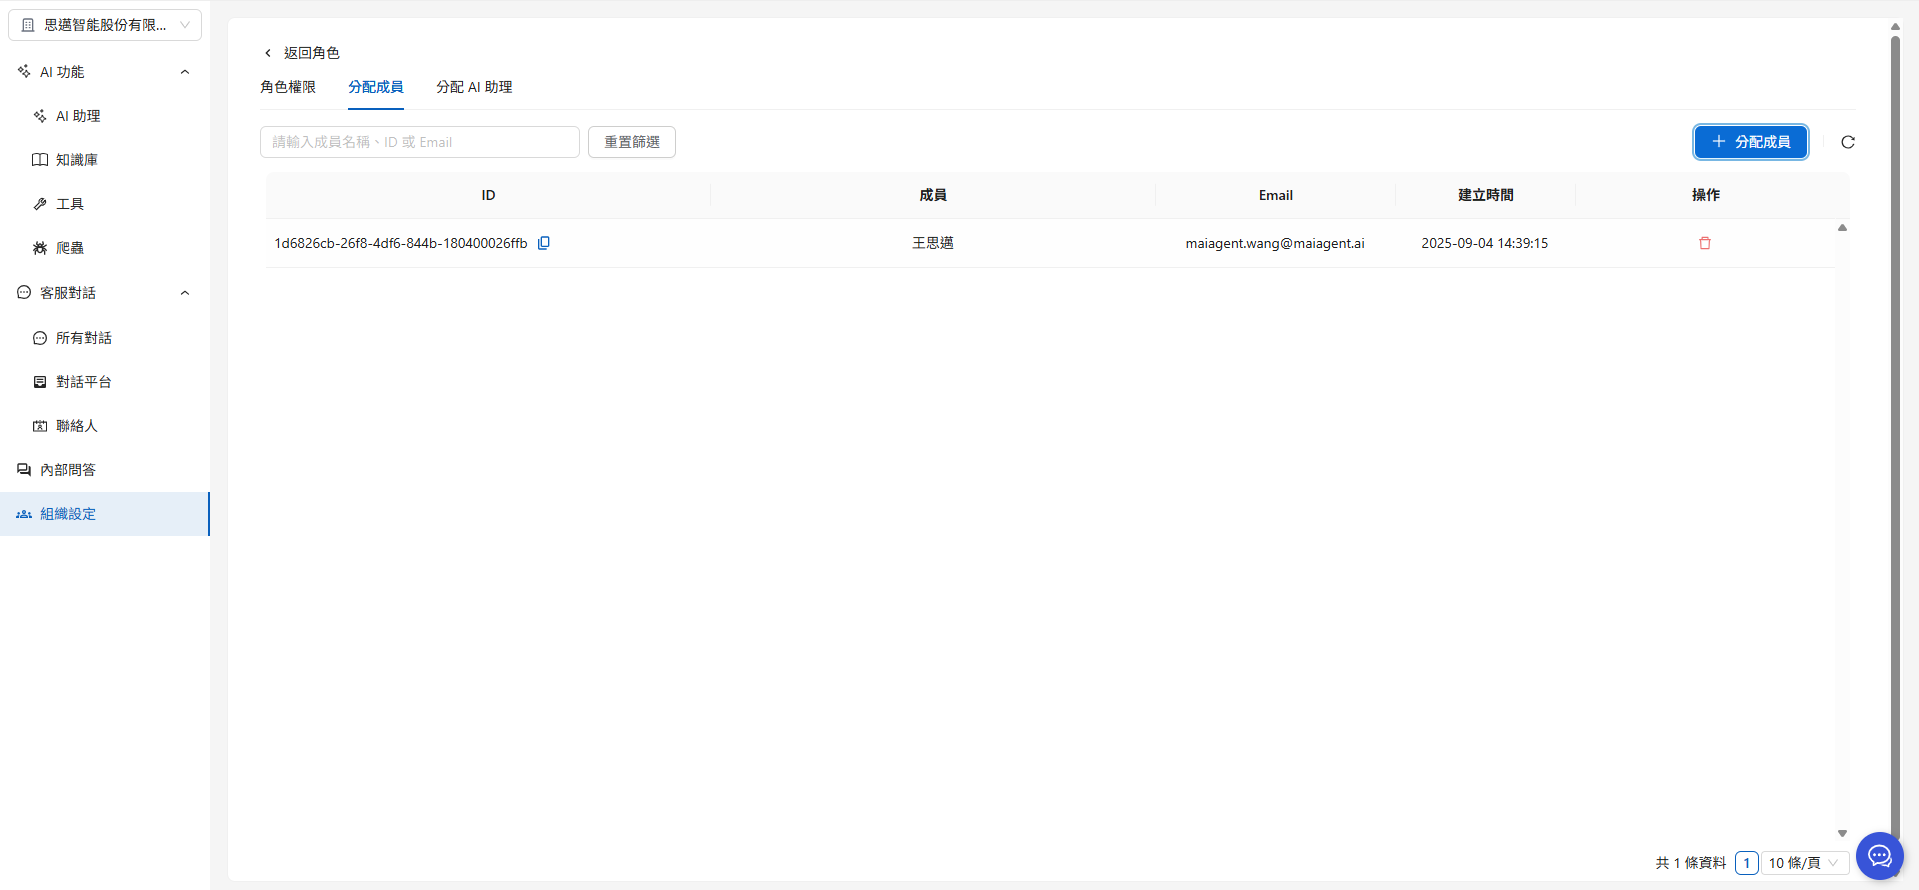
The newly added members will appear in the member list.

<figure><img src="https://1593648278-files.gitbook.io/~/files/v0/b/gitbook-x-prod.appspot.com/o/spaces%2Fmzb5NG9GDzFP2YDKeYVl%2Fuploads%2Fgit-blob-8eedab66df00e193bba1dc59a334947650fe0127%2Fimage.png?alt=media" alt=""><figcaption></figcaption></figure>

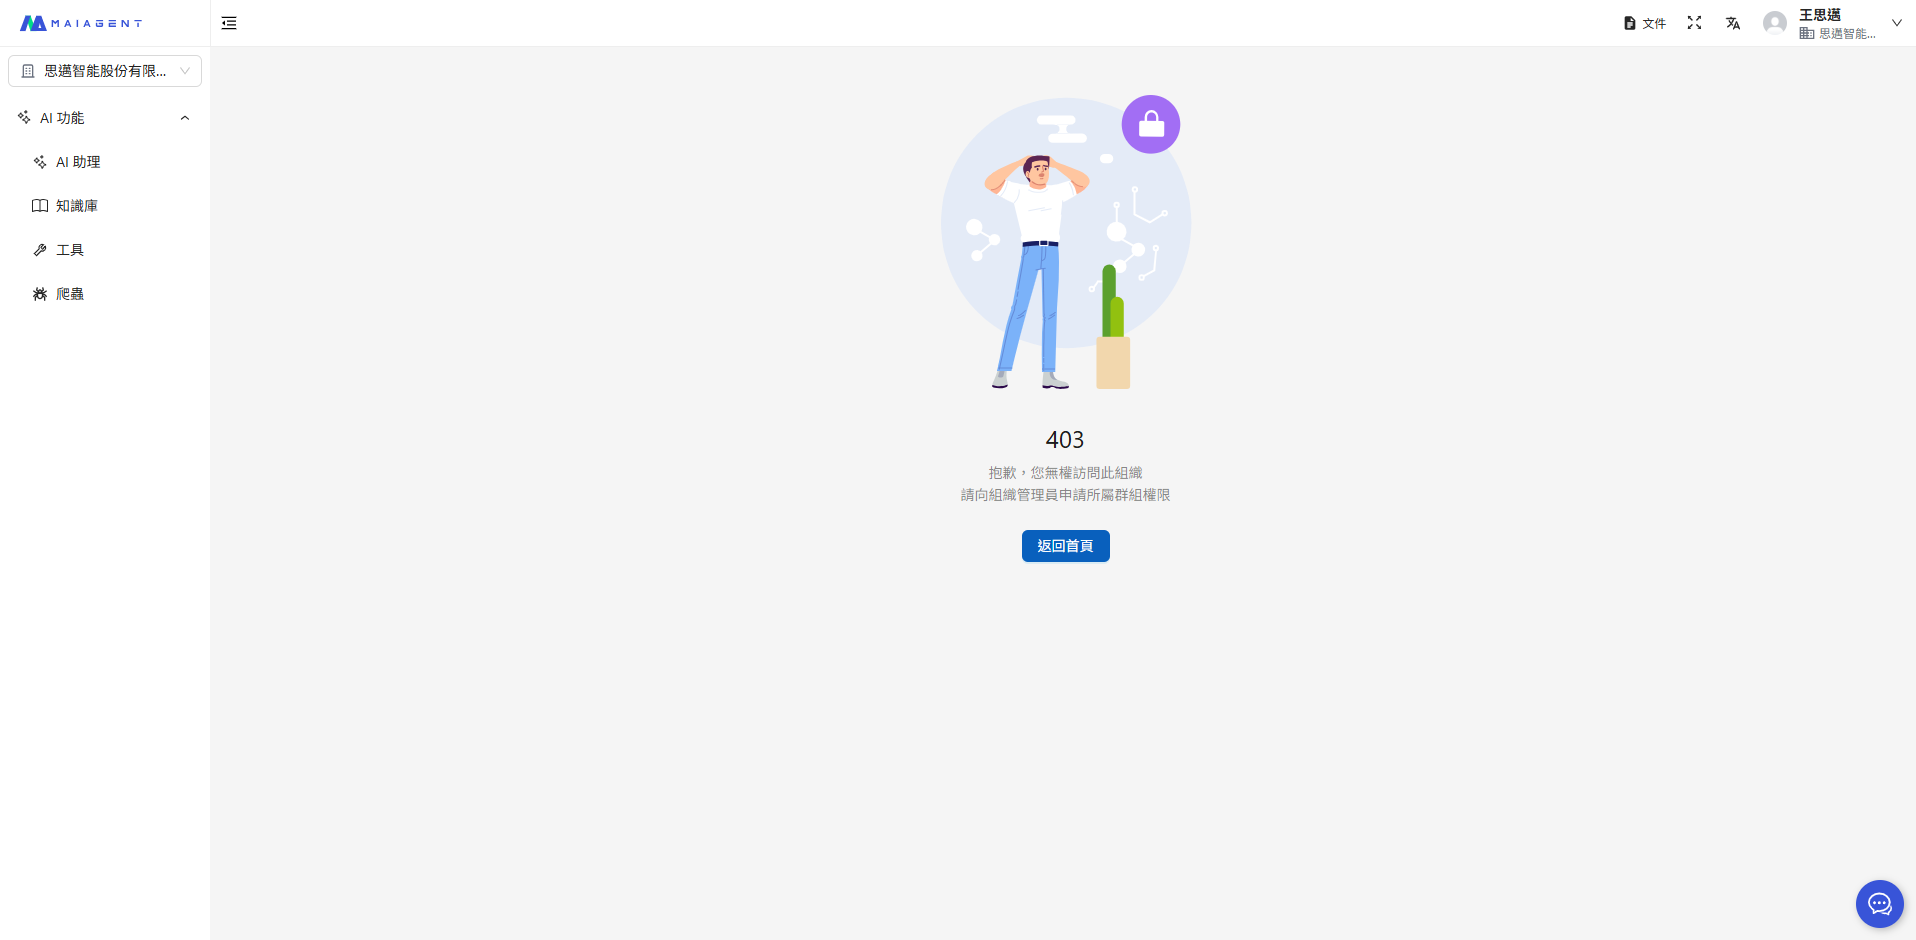
After addition, since the member only has AI Assistant permissions, the left menu will only show the AI Assistant feature menu. Other features like customer service conversations and organization settings will not appear in the left menu. When a member navigates to a feature they do not have permission to access, a no-permission notice will appear:

<div><figure><img src="https://1593648278-files.gitbook.io/~/files/v0/b/gitbook-x-prod.appspot.com/o/spaces%2Fmzb5NG9GDzFP2YDKeYVl%2Fuploads%2Fgit-blob-aeeba7c85790addbde803ff76419df613991d6a8%2Fimage.png?alt=media" alt=""><figcaption><p>Updated permission page</p></figcaption></figure> <figure><img src="https://1593648278-files.gitbook.io/~/files/v0/b/gitbook-x-prod.appspot.com/o/spaces%2Fmzb5NG9GDzFP2YDKeYVl%2Fuploads%2Fgit-blob-b932395e30752c688534003935d5f76603a04eaf%2Fimage.png?alt=media" alt=""><figcaption><p>No permission notice</p></figcaption></figure></div>

This way, the member can only use the AI Assistant feature and cannot make any other changes.

{% hint style="info" %}
Need to batch-assign roles to multiple members? See [Member Management: Batch Member and Permission Management](https://docs.maiagent.ai/maiagent-user-guide/en/org/roles/pages/gEVCBLlgrbsFwGlsxU0f#進階操作批次成員與權限管理).
{% endhint %}

***

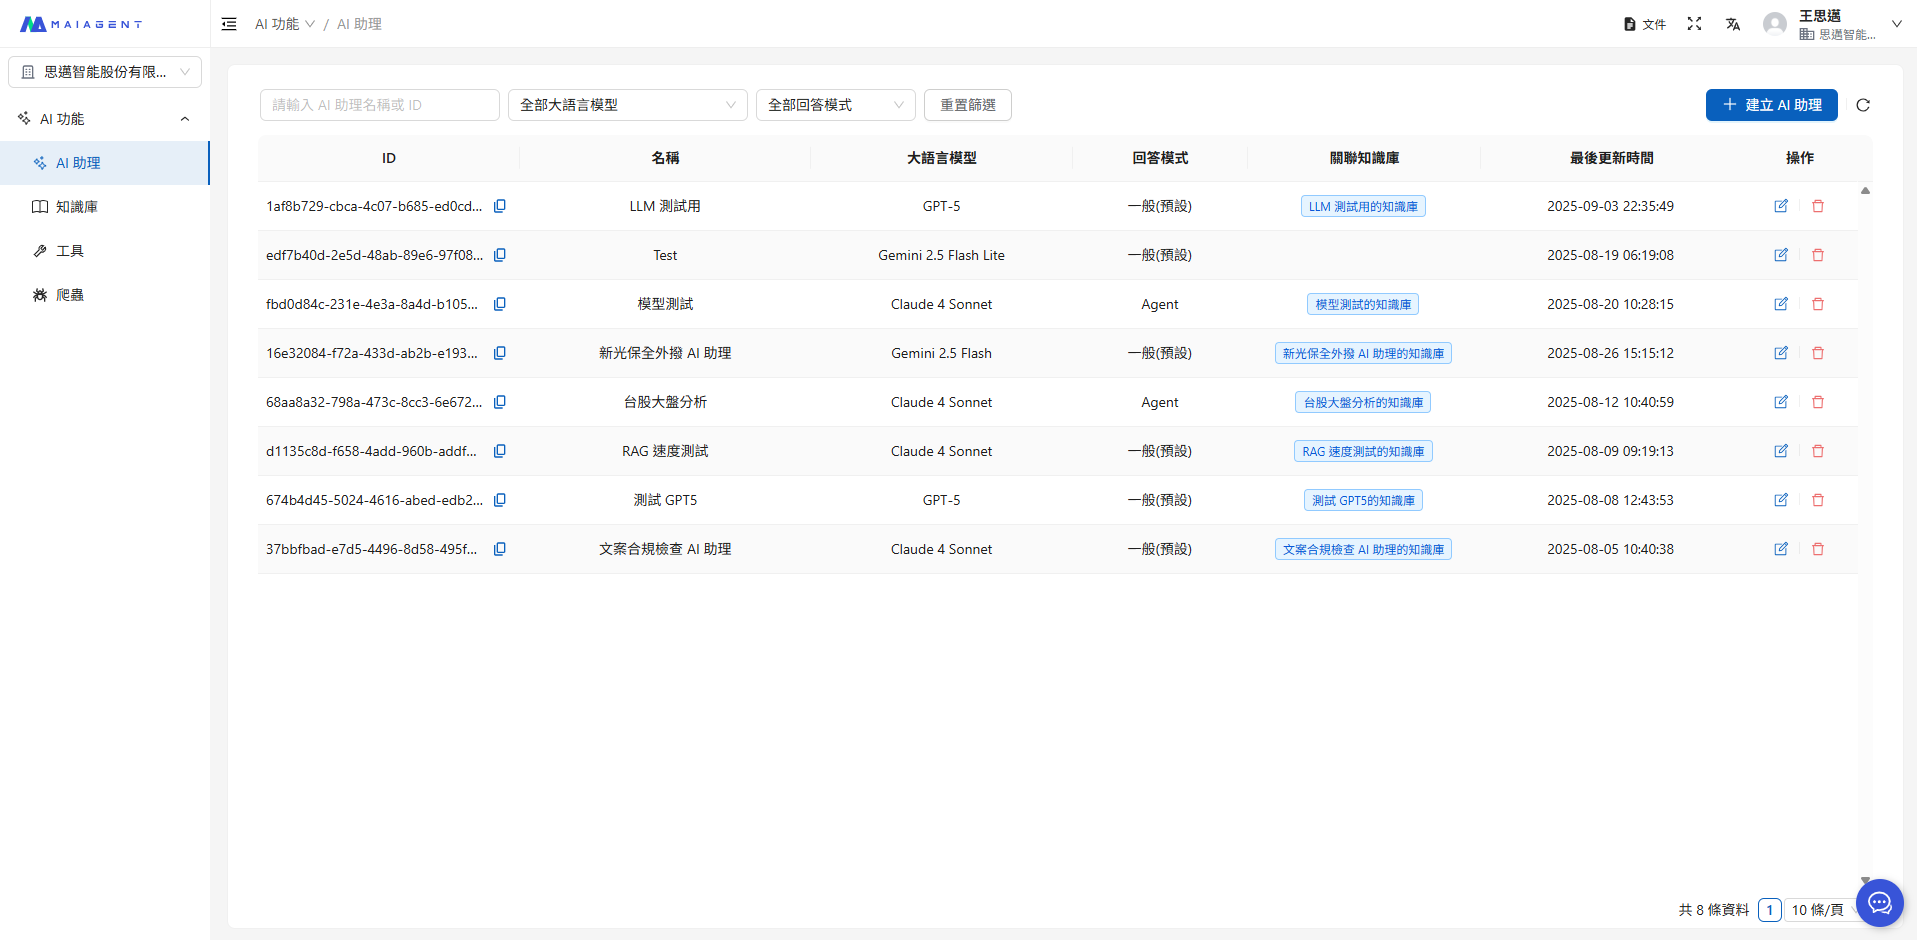
### Assign AI Assistants <a href="#assign-chatbots" id="assign-chatbots"></a>

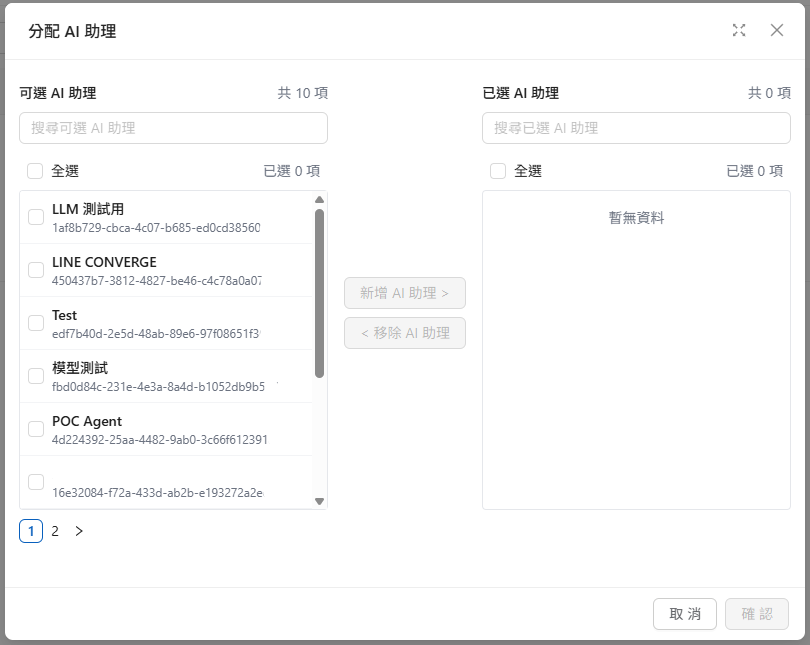
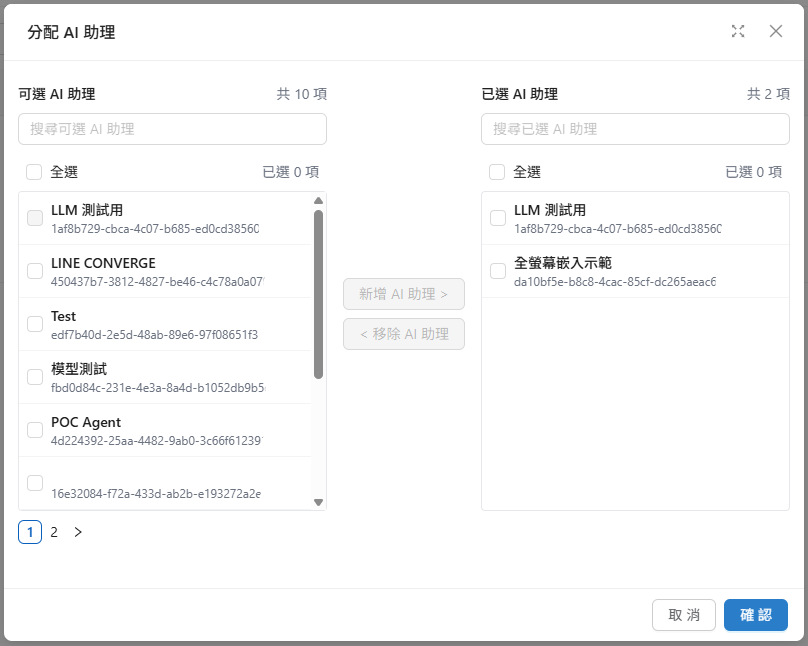
You can restrict which AI Assistants a role can use, ensuring knowledge base data is properly separated by role permissions:

1. Navigate to the "<mark style="color:blue;">Assign AI Assistants</mark>" page
2. Click the "<mark style="color:blue;">+ Assign AI Assistants</mark>" button

<figure><img src="https://1593648278-files.gitbook.io/~/files/v0/b/gitbook-x-prod.appspot.com/o/spaces%2Fmzb5NG9GDzFP2YDKeYVl%2Fuploads%2Fgit-blob-9ff2a8eba77bdcdf9c2cda579ef4f524c1096c4e%2F%E6%96%B0%E5%A2%9E%E7%B5%84%E7%B9%94%E6%88%90%E5%93%A1%20(3).png?alt=media" alt=""><figcaption></figcaption></figure>

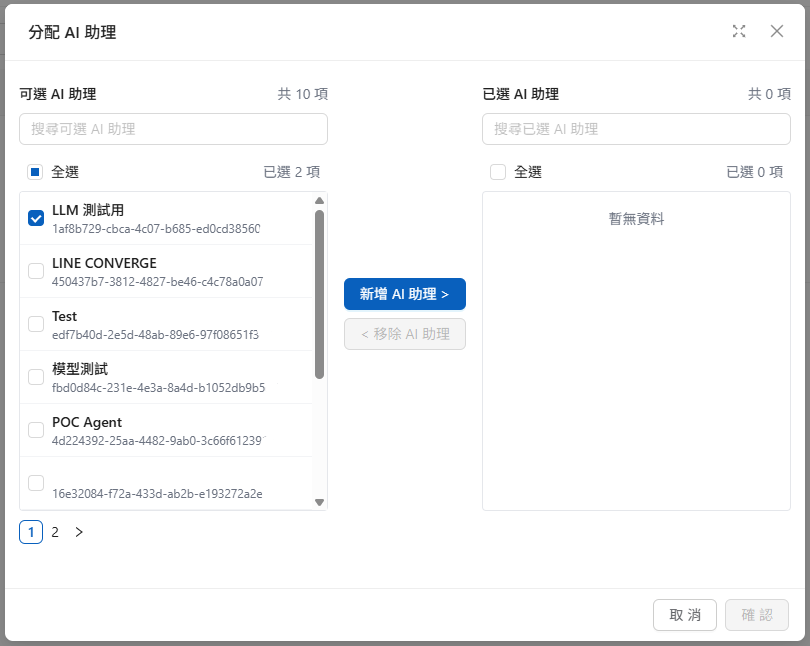
3. Select the AI Assistants to add and click the "<mark style="color:blue;">Add ></mark>" button in the center
4. Click the "<mark style="color:blue;">Confirm</mark>" button in the lower right to complete the configuration

<div><figure><img src="https://1593648278-files.gitbook.io/~/files/v0/b/gitbook-x-prod.appspot.com/o/spaces%2Fmzb5NG9GDzFP2YDKeYVl%2Fuploads%2Fgit-blob-e74fbf807830171ad39b2f04e86197a19dc9c54a%2F%E8%9E%A2%E5%B9%95%E6%93%B7%E5%8F%96%E7%95%AB%E9%9D%A2%202025-09-04%20145640.png?alt=media" alt=""><figcaption><p>Select AI Assistants to add</p></figcaption></figure> <figure><img src="https://1593648278-files.gitbook.io/~/files/v0/b/gitbook-x-prod.appspot.com/o/spaces%2Fmzb5NG9GDzFP2YDKeYVl%2Fuploads%2Fgit-blob-e26142170b1eab88b4369102e908b8f60589daed%2F%E8%9E%A2%E5%B9%95%E6%93%B7%E5%8F%96%E7%95%AB%E9%9D%A2%202025-09-04%20145705.png?alt=media" alt=""><figcaption><p>Click the center Add AI Assistant button</p></figcaption></figure> <figure><img src="https://1593648278-files.gitbook.io/~/files/v0/b/gitbook-x-prod.appspot.com/o/spaces%2Fmzb5NG9GDzFP2YDKeYVl%2Fuploads%2Fgit-blob-dabf9685dcea42a7f524261060e7d40e0c1b1556%2F%E8%9E%A2%E5%B9%95%E6%93%B7%E5%8F%96%E7%95%AB%E9%9D%A2%202025-09-04%20145716.png?alt=media" alt=""><figcaption><p>Addition complete, click Confirm</p></figcaption></figure></div>

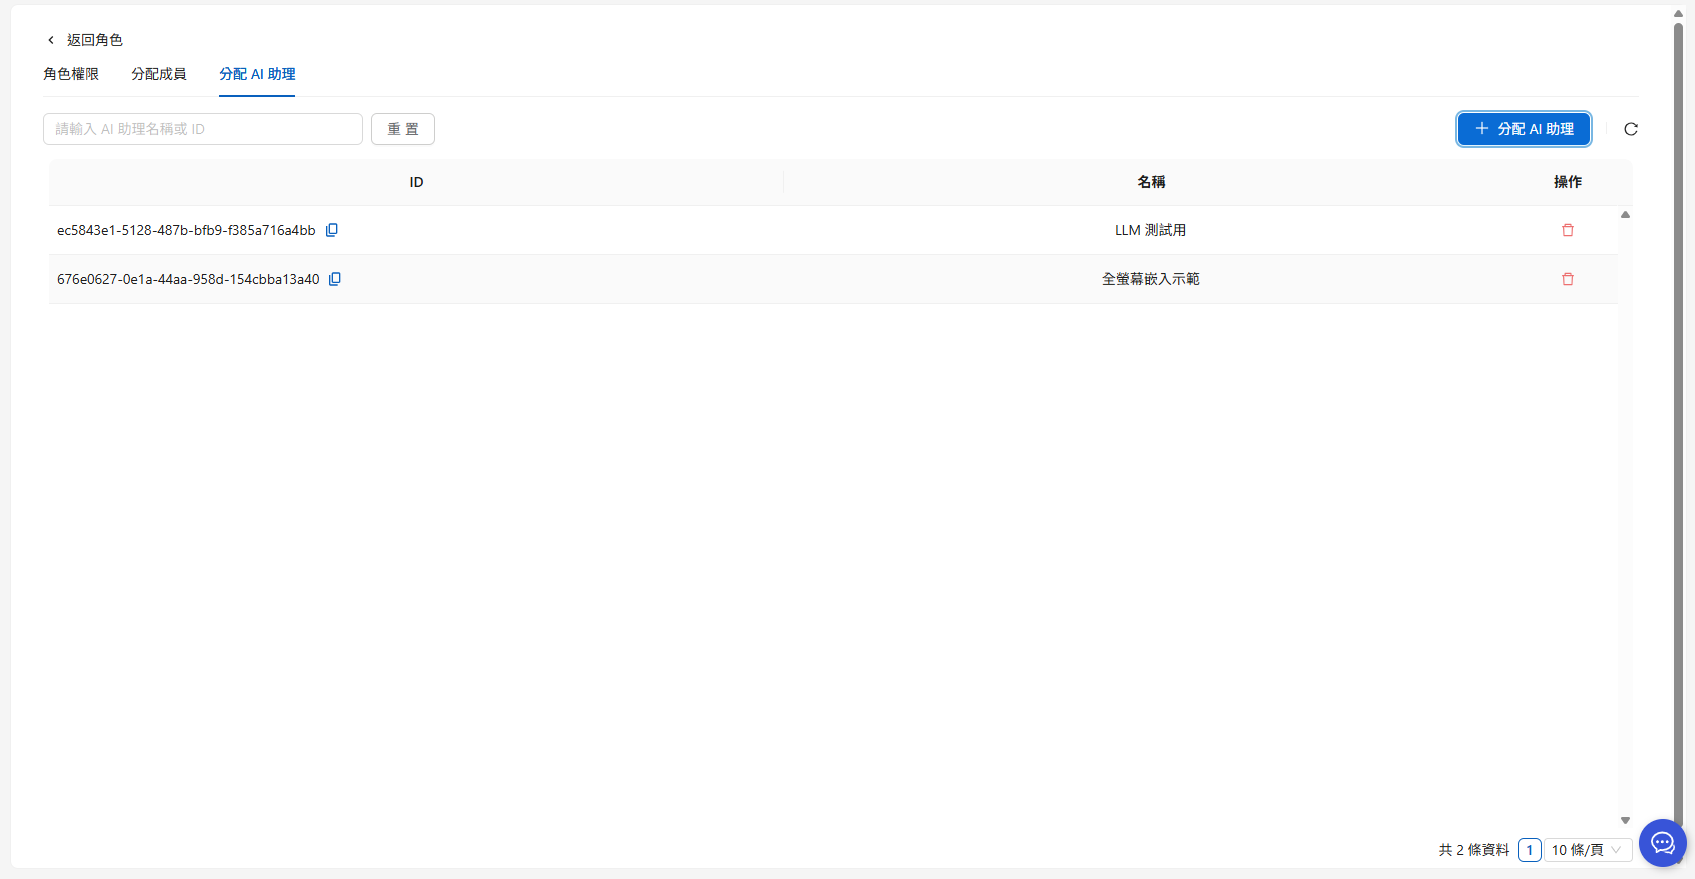
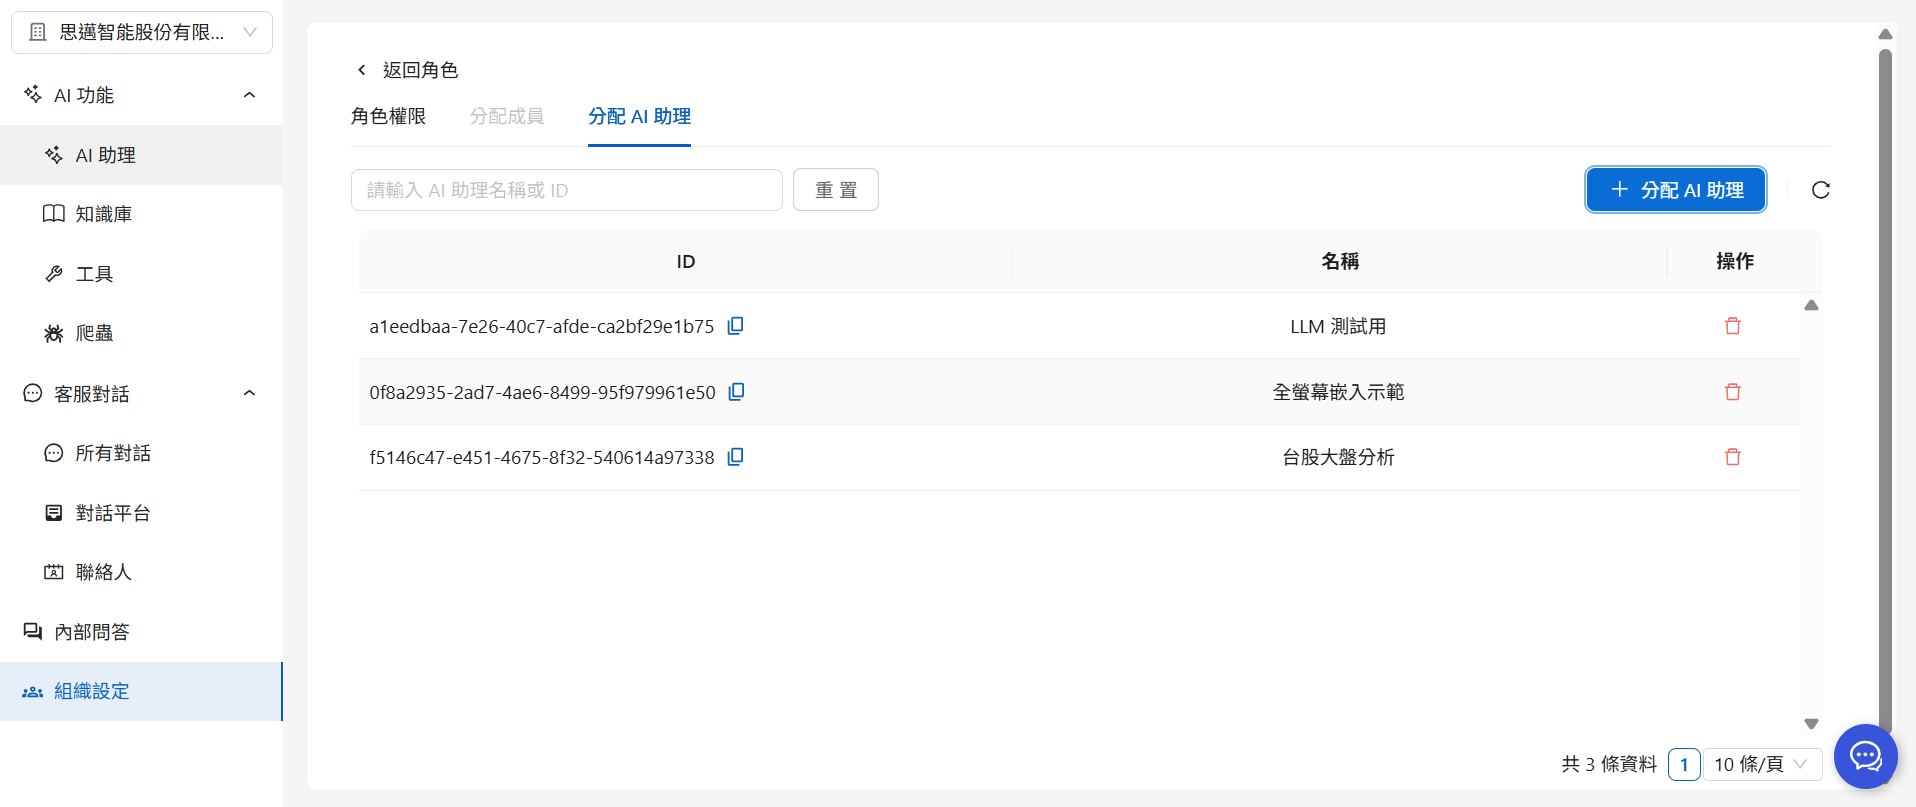
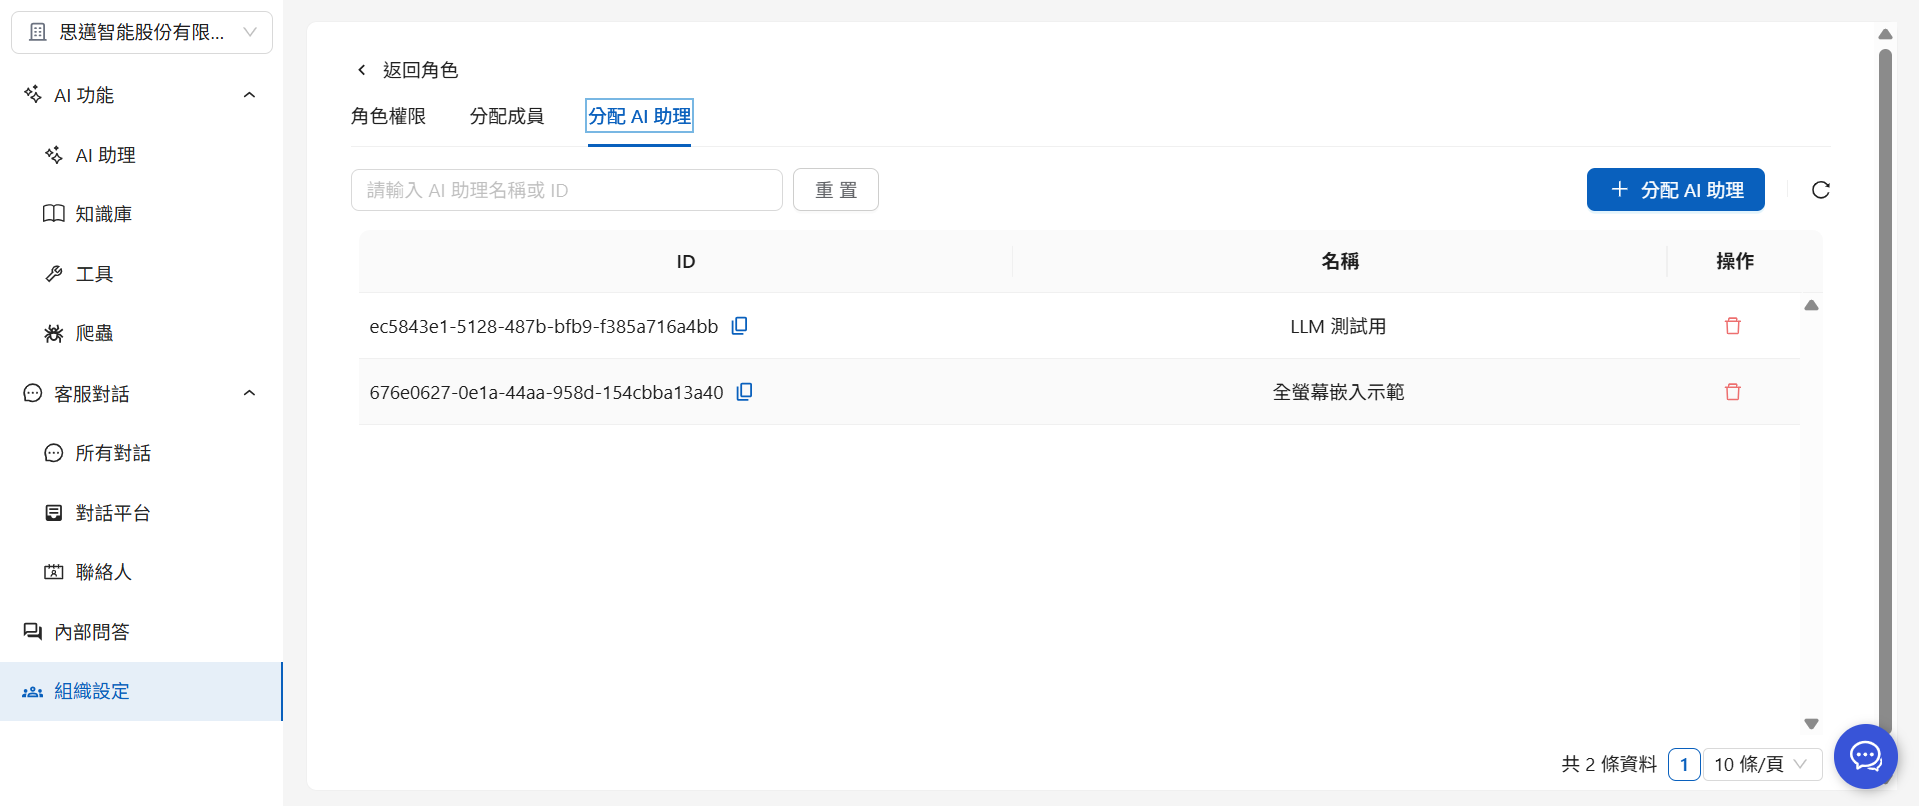
After addition, the selected AI Assistants will appear in the list:

<figure><img src="https://1593648278-files.gitbook.io/~/files/v0/b/gitbook-x-prod.appspot.com/o/spaces%2Fmzb5NG9GDzFP2YDKeYVl%2Fuploads%2Fgit-blob-424c73c0f017d69b29da22fa0d87f2f565cc0bc0%2Fimage.png?alt=media" alt=""><figcaption></figcaption></figure>

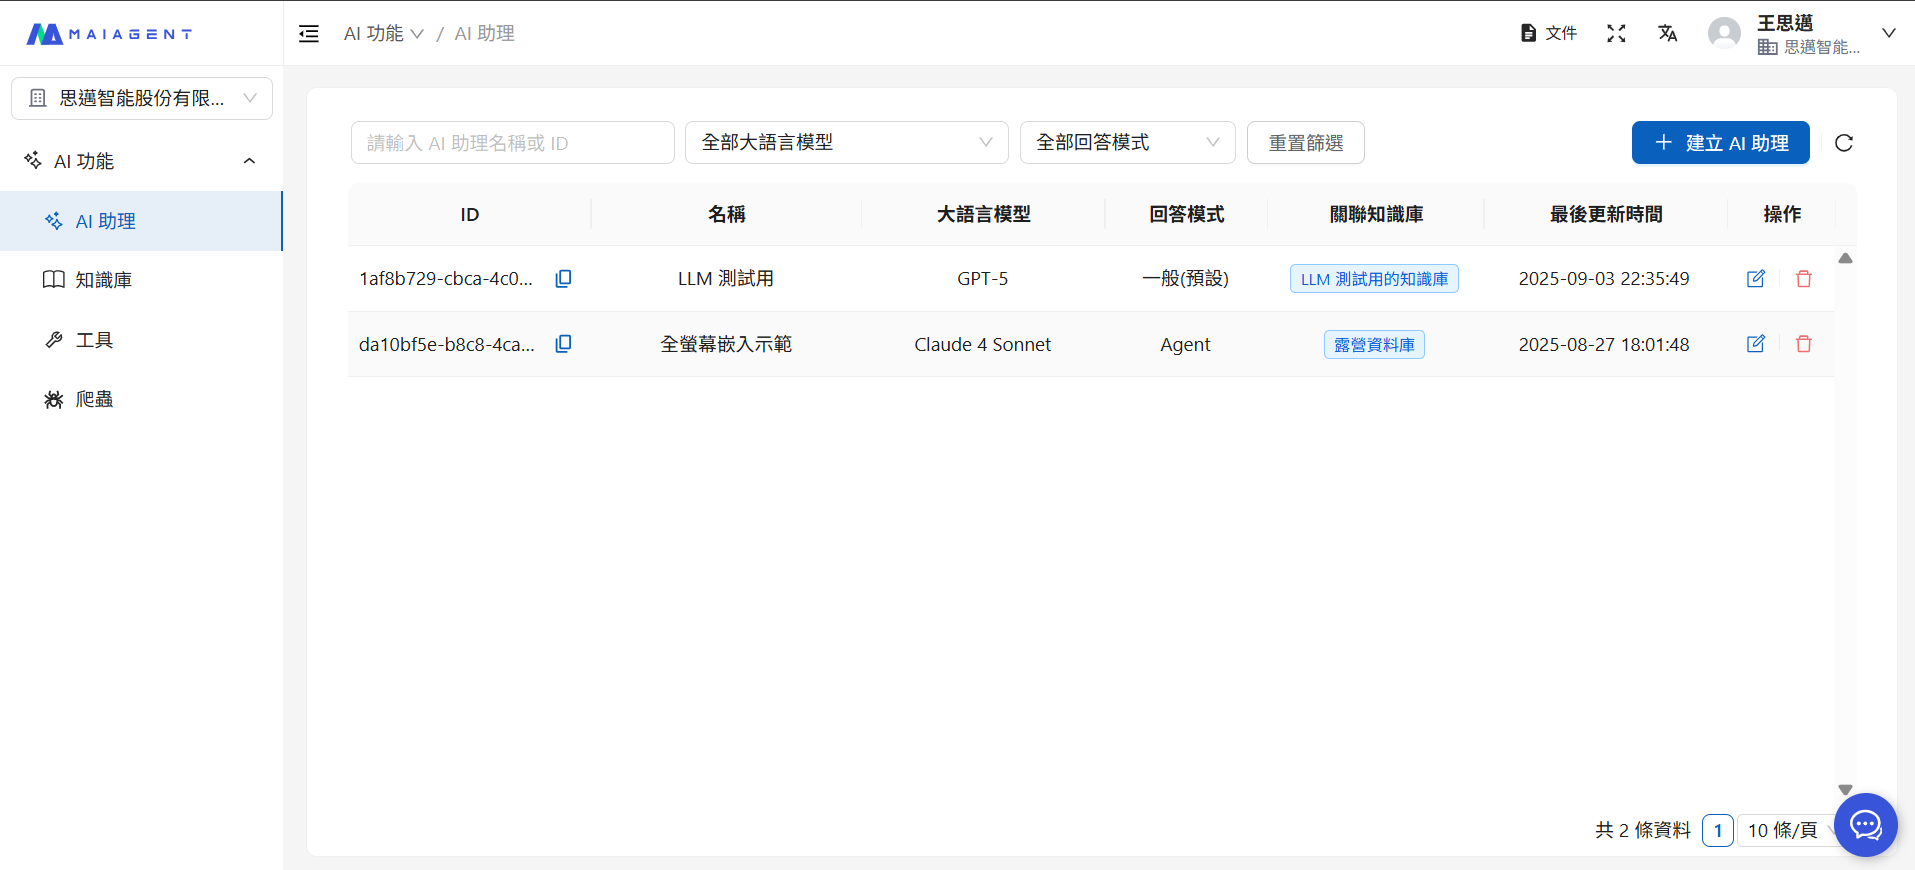
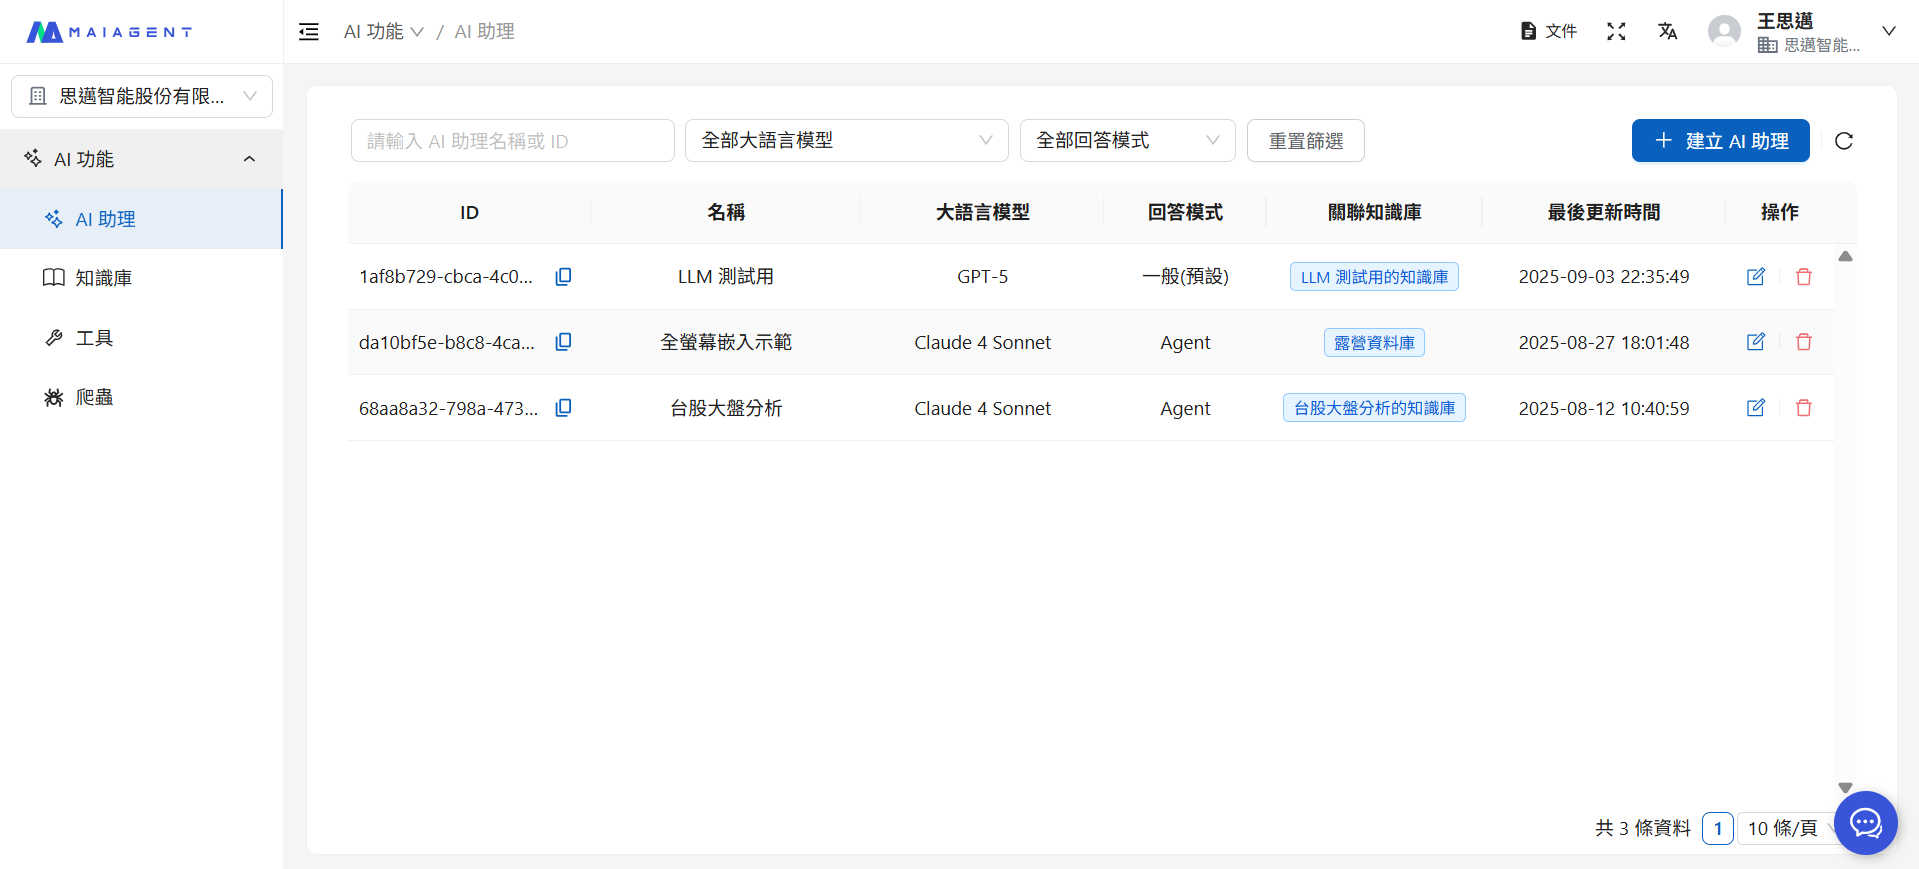
After completion, users with this role can only view and use the assigned AI Assistants:

<figure><img src="https://1593648278-files.gitbook.io/~/files/v0/b/gitbook-x-prod.appspot.com/o/spaces%2Fmzb5NG9GDzFP2YDKeYVl%2Fuploads%2Fgit-blob-0c6c85f1d10a3c86b839f709492fc5083bdf97d3%2Fimage.png?alt=media" alt=""><figcaption></figcaption></figure>

{% hint style="info" %}
The owner role automatically has access to all AI Assistants without manual assignment.
{% endhint %}

***

### Assign Knowledge Bases <a href="#assign-knowledge-bases" id="assign-knowledge-bases"></a>

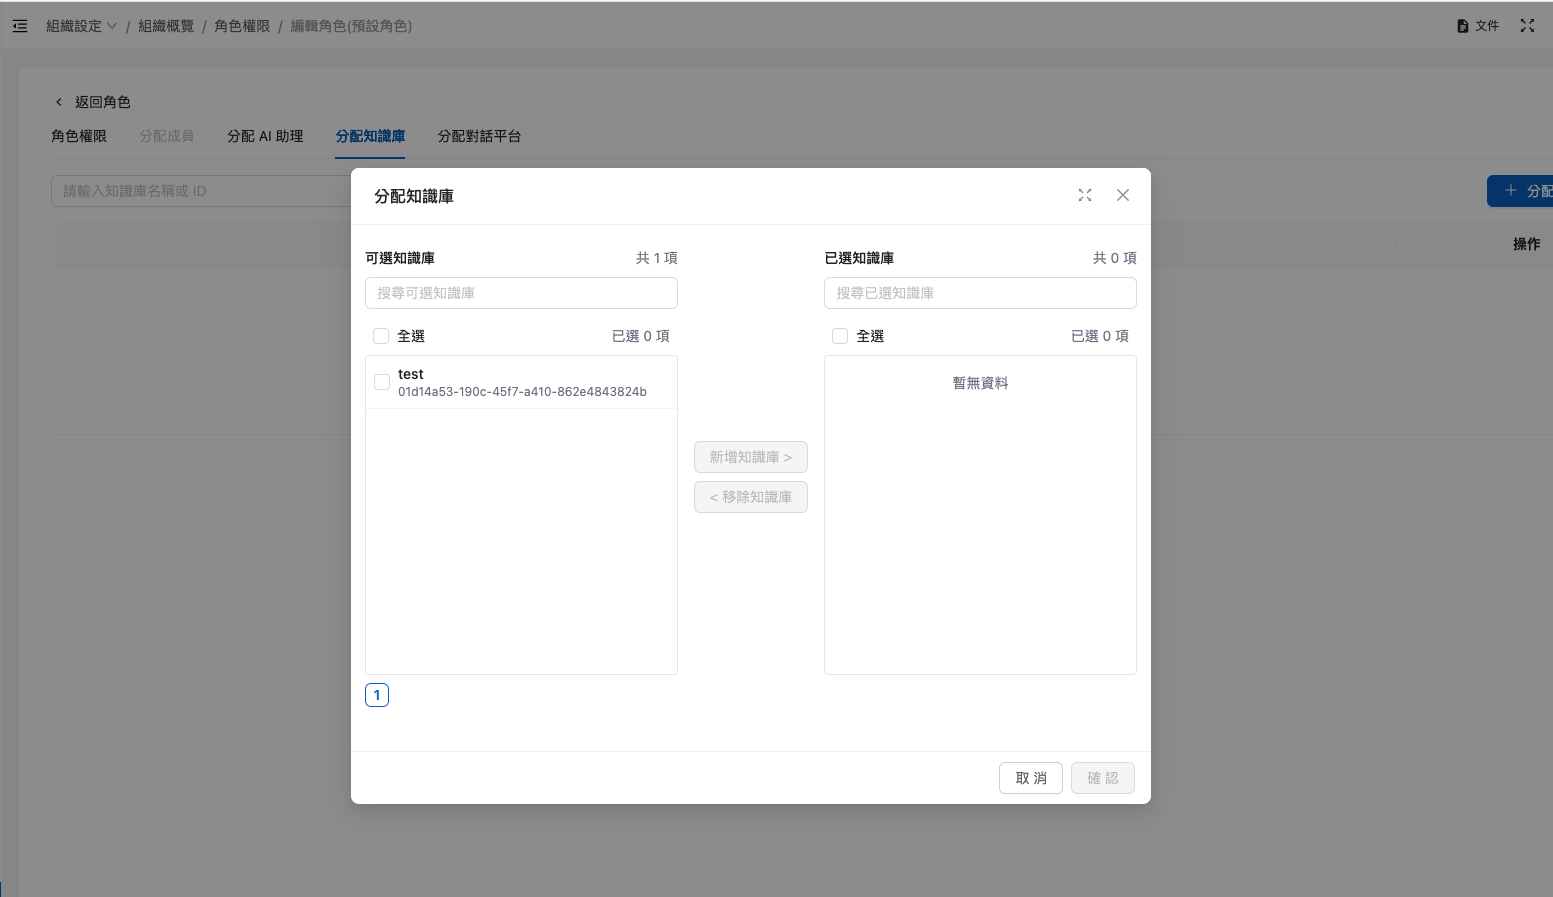
You can restrict which knowledge bases a role can access, ensuring sensitive data is only accessible to specific roles:

1. Navigate to the "<mark style="color:blue;">Assign Knowledge Bases</mark>" page
2. Click the "<mark style="color:blue;">+ Assign Knowledge Bases</mark>" button

<figure><img src="https://1360999650-files.gitbook.io/~/files/v0/b/gitbook-x-prod.appspot.com/o/spaces%2F6v6TNkkOQVfRYfcNirHL%2Fuploads%2Fgit-blob-72ad6d9cc82f7f49be5f647154ebb4f4052a018b%2F%E6%88%AA%E5%9C%96%202025-12-10%20%E4%B8%8B%E5%8D%883.28.14.png?alt=media" alt=""><figcaption></figcaption></figure>

3. Select the knowledge bases to add and click the "<mark style="color:blue;">Add ></mark>" button in the center
4. Click the "<mark style="color:blue;">Confirm</mark>" button in the lower right to complete the configuration

After addition, the selected knowledge bases will appear in the list.

**Use cases:**

* **R\&D Department**: Can only access technical documentation knowledge bases
* **Sales Department**: Can only access product description and pricing knowledge bases
* **HR Department**: Can only access employee handbook knowledge bases

{% hint style="info" %}
The owner role automatically has access to all knowledge bases without manual assignment.
{% endhint %}

***

### Assign Conversation Platforms <a href="#assign-inboxes" id="assign-inboxes"></a>

You can restrict which conversation platforms a role can use, assigning different teams to different customer service channels:

1. Navigate to the "<mark style="color:blue;">Assign Conversation Platforms</mark>" page
2. Click the "<mark style="color:blue;">+ Assign Conversation Platforms</mark>" button

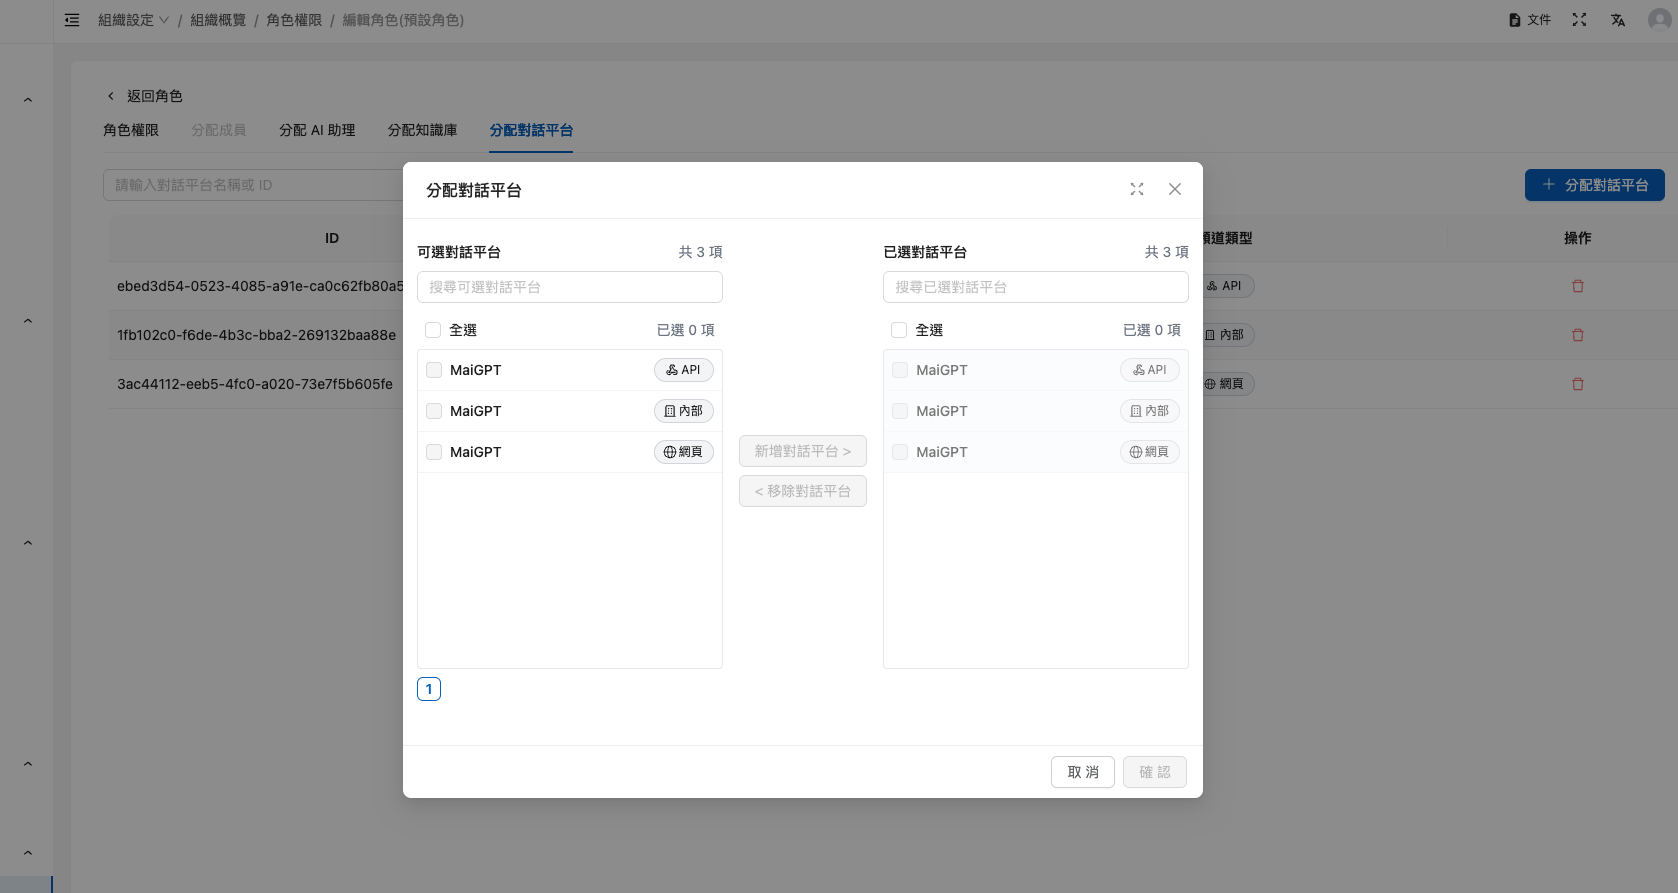
<figure><img src="https://1360999650-files.gitbook.io/~/files/v0/b/gitbook-x-prod.appspot.com/o/spaces%2F6v6TNkkOQVfRYfcNirHL%2Fuploads%2Fgit-blob-03e43b011a67553fc83ff974bbfefe4f6a42b47e%2F%E6%88%AA%E5%9C%96%202025-12-10%20%E4%B8%8B%E5%8D%883.28.49.png?alt=media" alt=""><figcaption></figcaption></figure>

3. Select the conversation platforms to add and click the "<mark style="color:blue;">Add ></mark>" button in the center
4. Click the "<mark style="color:blue;">Confirm</mark>" button in the lower right to complete the configuration

After addition, the selected conversation platforms will appear in the list.

**Use cases:**

* **LINE Customer Service Team**: Can only access the LINE conversation platform
* **Website Customer Service Team**: Can only access the Web Chat conversation platform
* **VIP Customer Service Team**: Can access all conversation platforms

{% hint style="info" %}
The owner role automatically has access to all conversation platforms without manual assignment.
{% endhint %}

***

### Default Role <a href="#default-role-setting" id="default-role-setting"></a>

<figure><img src="https://1593648278-files.gitbook.io/~/files/v0/b/gitbook-x-prod.appspot.com/o/spaces%2Fmzb5NG9GDzFP2YDKeYVl%2Fuploads%2Fgit-blob-50690b7ae204091c72ebc773e4f37365032afbe9%2Fimage.png?alt=media" alt=""><figcaption></figcaption></figure>

The default role is automatically generated when the organization is created and serves as the base role for all users. When applying user role configurations, if no specific role is assigned, the system will automatically apply all permission settings from the default role.

> It is recommended to set the default role permissions to the minimum level to prevent default role settings from overriding other role configurations

***

### Permission Handling <a href="#permission-handling" id="permission-handling"></a>

When a user is assigned to multiple roles simultaneously, MaiAgent uses the following permission handling logic:

#### Permission Union Principle (Union Principle) <a href="#permission-union-principle" id="permission-union-principle"></a>

**Uses the "maximum permission" strategy:** The user will receive the union of all role permissions, meaning they will have the broadest possible operation permissions.

{% hint style="info" %}
**Simple explanation:**

When a member belongs to multiple roles simultaneously, they receive the union of all role permissions rather than only the permissions of a single role.
{% endhint %}

**Example:**

```
Member B has the following roles simultaneously:
├─ Customer Service Role: Q&A Permission + All Conversations Permission
└─ Marketing Role: AI Feature Permission (AI Assistants) + All Conversations Permission

→ Member B's effective permissions: Q&A Permission + All Conversations Permission + AI Assistant Permission
   (Duplicate permissions are not stacked; they are counted only once)
```

<figure><img src="https://1593648278-files.gitbook.io/~/files/v0/b/gitbook-x-prod.appspot.com/o/spaces%2Fmzb5NG9GDzFP2YDKeYVl%2Fuploads%2Fgit-blob-0acf4935e240d8735ff6ef35be56b48b883d476c%2Fplayma%20(11).png?alt=media" alt=""><figcaption></figcaption></figure>

#### Permission Application Order <a href="#permission-apply-order" id="permission-apply-order"></a>

The system calculates permissions in the following order:

```
Step 1: Apply "Default Role" permissions
        ↓ (Automatic, all members have this)
Step 2: Apply "Custom Role A" permissions
        ↓ (Administrator assigned)
Step 3: Apply "Custom Role B" permissions
        ↓ (Administrator assigned)
Final Permissions = Step 1 + Step 2 + Step 3
```

<figure><img src="https://1593648278-files.gitbook.io/~/files/v0/b/gitbook-x-prod.appspot.com/o/spaces%2Fmzb5NG9GDzFP2YDKeYVl%2Fuploads%2Fgit-blob-edd15e090b569de26e3b7557531619ada7b6afb1%2Fplayma%20(5).png?alt=media" alt=""><figcaption></figcaption></figure>

1. **Default role** (automatically assigned)
   * Automatically generated when the organization is created
   * Default role permissions are automatically applied to all users
2. **Custom roles** (in assignment order)
   * Roles assigned later are combined with existing permissions
   * They do not override existing permissions; they only add permissions

{% hint style="warning" %}
**Key points:**

* Roles assigned later **do not override** existing permissions
* They only **add** more permissions
* You cannot **reduce** permissions by assigning a new role

**To reduce someone's permissions, you must:**

1. Remove the member from that role, or
2. Modify the role's permission settings
   {% endhint %}

#### Role Union Example <a href="#role-union-example" id="role-union-example"></a>

**Scenario:**

* The default role is associated with three AI assistants
* The custom role is associated with only two AI assistants

<div><figure><img src="https://1593648278-files.gitbook.io/~/files/v0/b/gitbook-x-prod.appspot.com/o/spaces%2Fmzb5NG9GDzFP2YDKeYVl%2Fuploads%2Fgit-blob-f47ba5e92e8929b76d33612db1965dd2e12acc02%2Fimage.png?alt=media" alt=""><figcaption><p>Default role</p></figcaption></figure> <figure><img src="https://1593648278-files.gitbook.io/~/files/v0/b/gitbook-x-prod.appspot.com/o/spaces%2Fmzb5NG9GDzFP2YDKeYVl%2Fuploads%2Fgit-blob-61026ebb12a7688dcb50445a3a8d66bed58b6817%2Fimage.png?alt=media" alt=""><figcaption><p>Custom role</p></figcaption></figure></div>

**Result:** Even if the user has been assigned to the custom role, their permissions still include the settings associated with the default role, allowing them to use all three AI assistants.

<figure><img src="https://1593648278-files.gitbook.io/~/files/v0/b/gitbook-x-prod.appspot.com/o/spaces%2Fmzb5NG9GDzFP2YDKeYVl%2Fuploads%2Fgit-blob-5541e4d6b9d2a5c2b182f708cd5cfb9c4fc39fef%2Fimage.png?alt=media" alt=""><figcaption></figcaption></figure>

{% hint style="info" %}
This is why we recommend setting the default role's permissions to the minimum to avoid affecting permission controls for other roles.
{% endhint %}

#### Permission Removal <a href="#permission-removal" id="permission-removal"></a>

When a user is removed from a role:

* **Custom role removed**: The user loses the permissions specific to that role but retains permissions from other roles
* **Default role cannot be removed**: All users always belong to the default role
* **Permission check**: The system recalculates the user's effective permissions

**Example:**

```
Member A's original permissions: Q&A + AI Features + Customer Service Conversations
                               ↓
Remove the "AI Feature Development" role
                               ↓
Member A's effective permissions: Q&A + Customer Service Conversations
```

***

### Troubleshooting <a href="#troubleshooting" id="troubleshooting"></a>

#### Common Issue: A User Cannot See Expected Features or Can Use Features Beyond What Is Expected <a href="#faq-user-cannot-see-expected-features" id="faq-user-cannot-see-expected-features"></a>

1. Check all roles the user belongs to, including whether the default role has been granted excessive permissions
2. Ask the user to clear their browser cache and log in again

#### Permission Audit Recommendations <a href="#permission-audit-recommendations" id="permission-audit-recommendations"></a>

* Regularly review whether user role assignments are appropriate
* Remove all role assignments from former members

***

### FAQ <a href="#faq" id="faq"></a>

#### Q: How Can I Give New Members More Permissions? <a href="#faq-grant-more-permissions" id="faq-grant-more-permissions"></a>

Administrators can assign additional roles to members in the following ways:

* **Individual member**: Click the member in the member list and manually add roles
* **Batch assignment**: Use the [Member Management: Batch Member and Permission Management](https://docs.maiagent.ai/maiagent-user-guide/en/org/roles/pages/gEVCBLlgrbsFwGlsxU0f#進階操作批次成員與權限管理) feature to assign roles to multiple people at once through Excel
* **EIP automatic synchronization**: If you log in with EIP, configure roles on the EIP side to synchronize them automatically at login ([Third-Party Login (SSO)](/maiagent-user-guide/en/org/sso.md))

#### Q: Why Can't the Default Role Be Assigned in Batches Through Excel? <a href="#faq-default-role-excel-batch" id="faq-default-role-excel-batch"></a>

The default role is the base role automatically granted to all members. The system assigns it to every member automatically, so it neither needs nor allows assignment through Excel.

#### Q: Why Can't AI Assistants, Knowledge Bases, or Conversation Platforms Be Assigned to the Owner Role? <a href="#faq-owner-role-cannot-assign-resources" id="faq-owner-role-cannot-assign-resources"></a>

The owner role has full access to all resources and does not require additional assignments. The system automatically grants the owner role access to every resource in the organization.

#### Q: What Does the Permission Hierarchy Mean? <a href="#faq-permission-hierarchy-meaning" id="faq-permission-hierarchy-meaning"></a>

MaiAgent permissions use a parent-child hierarchy. For example, "AI Feature Permission" is a parent permission that includes child permissions such as "AI Assistant Permission," "Knowledge Base Permission," "Crawler Permission," and "Tool Permission." Selecting a parent permission automatically includes all of its child permissions, or you can select only specific child permissions for more granular control.


---

# Agent Instructions
This documentation is published with GitBook. GitBook is the documentation platform designed so that both humans and AI agents can read, navigate, and reason over technical content effectively. Learn more at gitbook.com.

## Querying This Documentation
If you need additional information that is not directly available in this page, you can query the documentation dynamically by asking a question.

Perform an HTTP GET request on the current page URL with the `ask` query parameter, and the optional `goal` query parameter:

```
GET https://docs.maiagent.ai/maiagent-user-guide/en/org/roles/role-permission.md?ask=<question>&goal=<endgoal>
```

`ask` is the immediate question: it should be specific, self-contained, and written in natural language.
`goal` is optional and describes the broader end goal you are ultimately trying to accomplish on behalf of the user. GitBook uses it to tailor the answer towards what is most useful for that goal.

The response will contain a direct answer to the question and relevant excerpts and sources from the documentation.

Use this mechanism when the answer is not explicitly present in the current page, you need clarification or additional context, or you want to retrieve related documentation sections.