> For the complete documentation index, see [llms.txt](https://docs.maiagent.ai/llms.txt). Markdown versions of documentation pages are available by appending `.md` to page URLs; this page is available as [Markdown](https://docs.maiagent.ai/maiagent-user-guide/ja/org/sso/sso-saml.md).

# SAML 連携

SAML 2.0 プロトコルを通じて、Azure AD、Okta、Google Workspace などの ID プロバイダーと連携します

SAML（Security Assertion Markup Language）は、エンタープライズ向けアプリケーションで広く採用されている標準の認証プロトコルです。

**対象ユーザー**：SAML ID プロバイダー（Microsoft Entra ID / Azure AD、Okta、Google Workspace など）を構築済みの企業

**主なメリット**：

* 業界標準のプロトコルで、互換性が高い
* Email でユーザーを識別し、初回ログイン時にアカウントを自動作成します（読み取るのは Email と表示名のみで、グループや部署などのその他の属性は読み取りません）
* 多要素認証（MFA）と連携できます
* シングルログアウト（Single Logout, SLO）に対応しています

## 設定手順 <a href="#setup-steps" id="setup-steps"></a>

### 1. MaiAgent の管理画面で IdP 情報を入力する <a href="#step-1-fill-idp-info" id="step-1-fill-idp-info"></a>

認証タイプとして <mark style="color:blue;">SAML</mark> を選択したら、まず <mark style="color:blue;">認証ソース名</mark>（SP エンドポイント URL の生成に使用されます。例：`my-company`）を入力し、次に以下の 2 つのモードから**どちらか一方**を選んで IdP の設定を入力します。2 つのモードを同時に入力することはできず、同時に入力すると保存できません。

| モード            | 入力するフィールド                                                                                                                                               | 適した状況                                                                                                                                             |
| -------------- | ------------------------------------------------------------------------------------------------------------------------------------------------------- | ------------------------------------------------------------------------------------------------------------------------------------------------- |
| A：Metadata URL | <mark style="color:blue;">IdP Metadata URL</mark>                                                                                                       | IdP が一般に読み取り可能なメタデータ URL を提供している場合（例：Microsoft Entra ID）。保存時にシステムがダウンロードして解析し、Entity ID、SSO URL、証明書を自動的に取得します。MaiAgent からこの URL に接続できない場合は保存できません |
| B：手動設定         | <mark style="color:blue;">IdP Entity ID</mark>、<mark style="color:blue;">IdP SSO URL</mark>、<mark style="color:blue;">IdP X.509 証明書</mark>（3 つすべて入力が必要） | IdP からメタデータファイルしかダウンロードできず、メタデータ URL がない場合（例：Google Workspace）。証明書は、PEM 内の `BEGIN CERTIFICATE`／`END CERTIFICATE` の間にある base64 の内容を貼り付けてください       |

<mark style="color:blue;">メールドメイン</mark>は任意です。設定すると、このドメインのメールアドレスを持つメンバーがログインページでメールアドレスを入力した際に、自動的にこの SAML ログインへ誘導されます。

### 2. SP（MaiAgent 側）の情報を取得する <a href="#step-2-get-sp-info" id="step-2-get-sp-info"></a>

認証ソース名を入力すると、システムが以下の SP 情報を自動的に生成し、設定ページに表示します：

| SP フィールド                       | 形式                                            | 説明             |
| ------------------------------ | --------------------------------------------- | -------------- |
| Entity ID（エンティティ識別子）           | `https://{ドメイン}/accounts/saml/{名前}/metadata/` | IdP の設定用に提供します |
| ACS URL（アサーションコンシューマーサービス URL） | `https://{ドメイン}/accounts/saml/{名前}/acs/`      | IdP の設定用に提供します |
| Login URL（ログイン URL）            | `https://{API ドメイン}/auth/saml/{名前}/login/`    | SAML ログインの入口   |

3 つの値にはそれぞれ役割があります。Entity ID は、IdP から見た MaiAgent の識別名です。ACS URL（Assertion Consumer Service）は、ユーザーが IdP でログインに成功した後、IdP が署名済みの SAML レスポンスを MaiAgent に送り返す URL で、MaiAgent はここで検証してログインを完了します。IdP は事前に登録された URL にしか送信しないため、末尾の `/` を含めてそのまま貼り付けてください。Login URL は、ユーザーが SSO ログインを開始する入口であり、IdP に入力する必要はありません。技術的な詳細は、技術担当者向けマニュアルの [SAML SSO シングルサインオン連携](https://docs.maiagent.ai/tech/identity-and-access/sso-overview/saml-sso)をご覧ください。

{% hint style="info" %}
SP 情報のエリアには <mark style="color:blue;">コピー</mark> ボタンがあり、URL をそのまま IdP の設定画面にコピーできます。
{% endhint %}

### 3. ID プロバイダー（IdP）で MaiAgent アプリケーションを設定する <a href="#step-3-configure-idp" id="step-3-configure-idp"></a>

**Microsoft Entra ID（Azure AD）** を例に説明します：

1. [Azure Portal](https://portal.azure.com/) にログインし、<mark style="color:blue;">Microsoft Entra ID</mark> > <mark style="color:blue;">エンタープライズ アプリケーション</mark>に進みます
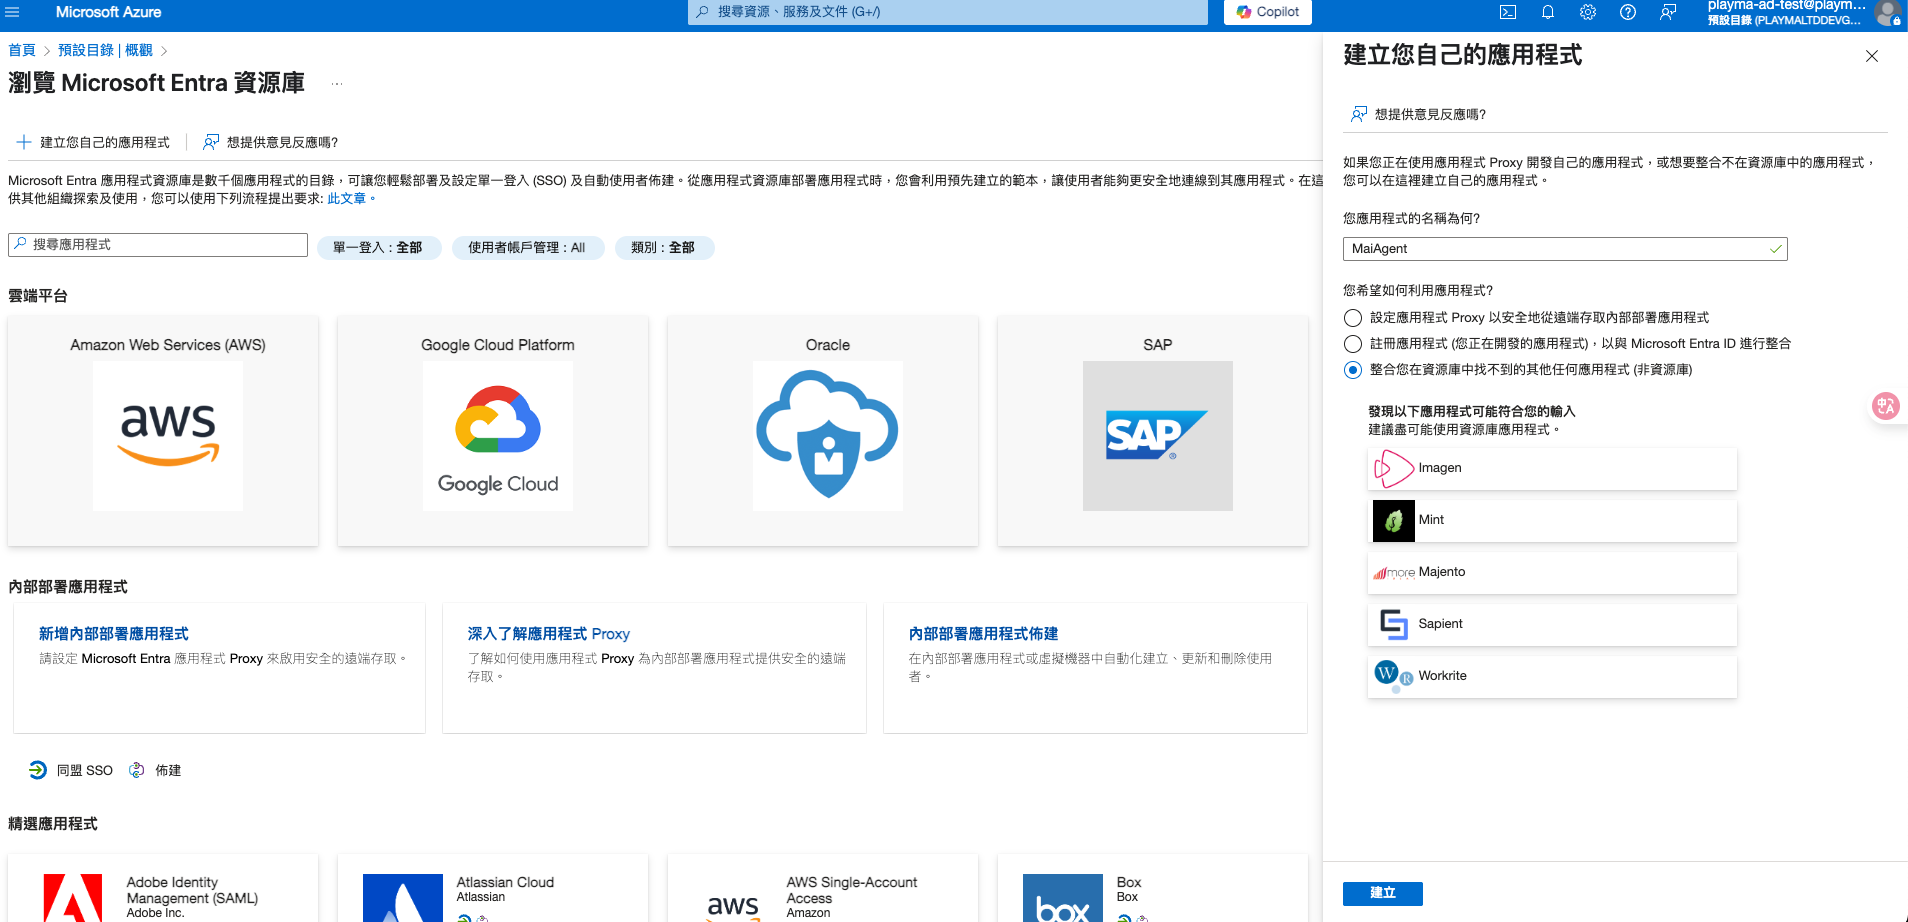
2. <mark style="color:blue;">新しいアプリケーション</mark> > <mark style="color:blue;">独自のアプリケーションの作成</mark>をクリックします
3. 「**ギャラリーに見つからないその他のアプリケーションを統合します（ギャラリー以外）**」を選択します

<figure><img src="https://2584873290-files.gitbook.io/~/files/v0/b/gitbook-x-prod.appspot.com/o/spaces%2FTvHx8hgwYGDTLD3A7xoW%2Fuploads%2Fgit-blob-0635609d8cfbc379308c3c09cf2d36b4bf5feccd%2Fsso-azure-01-create-enterprise-app.png?alt=media" alt="エンタープライズ アプリケーションの作成"><figcaption><p>Azure AD でカスタムのエンタープライズ アプリケーションを作成する</p></figcaption></figure>

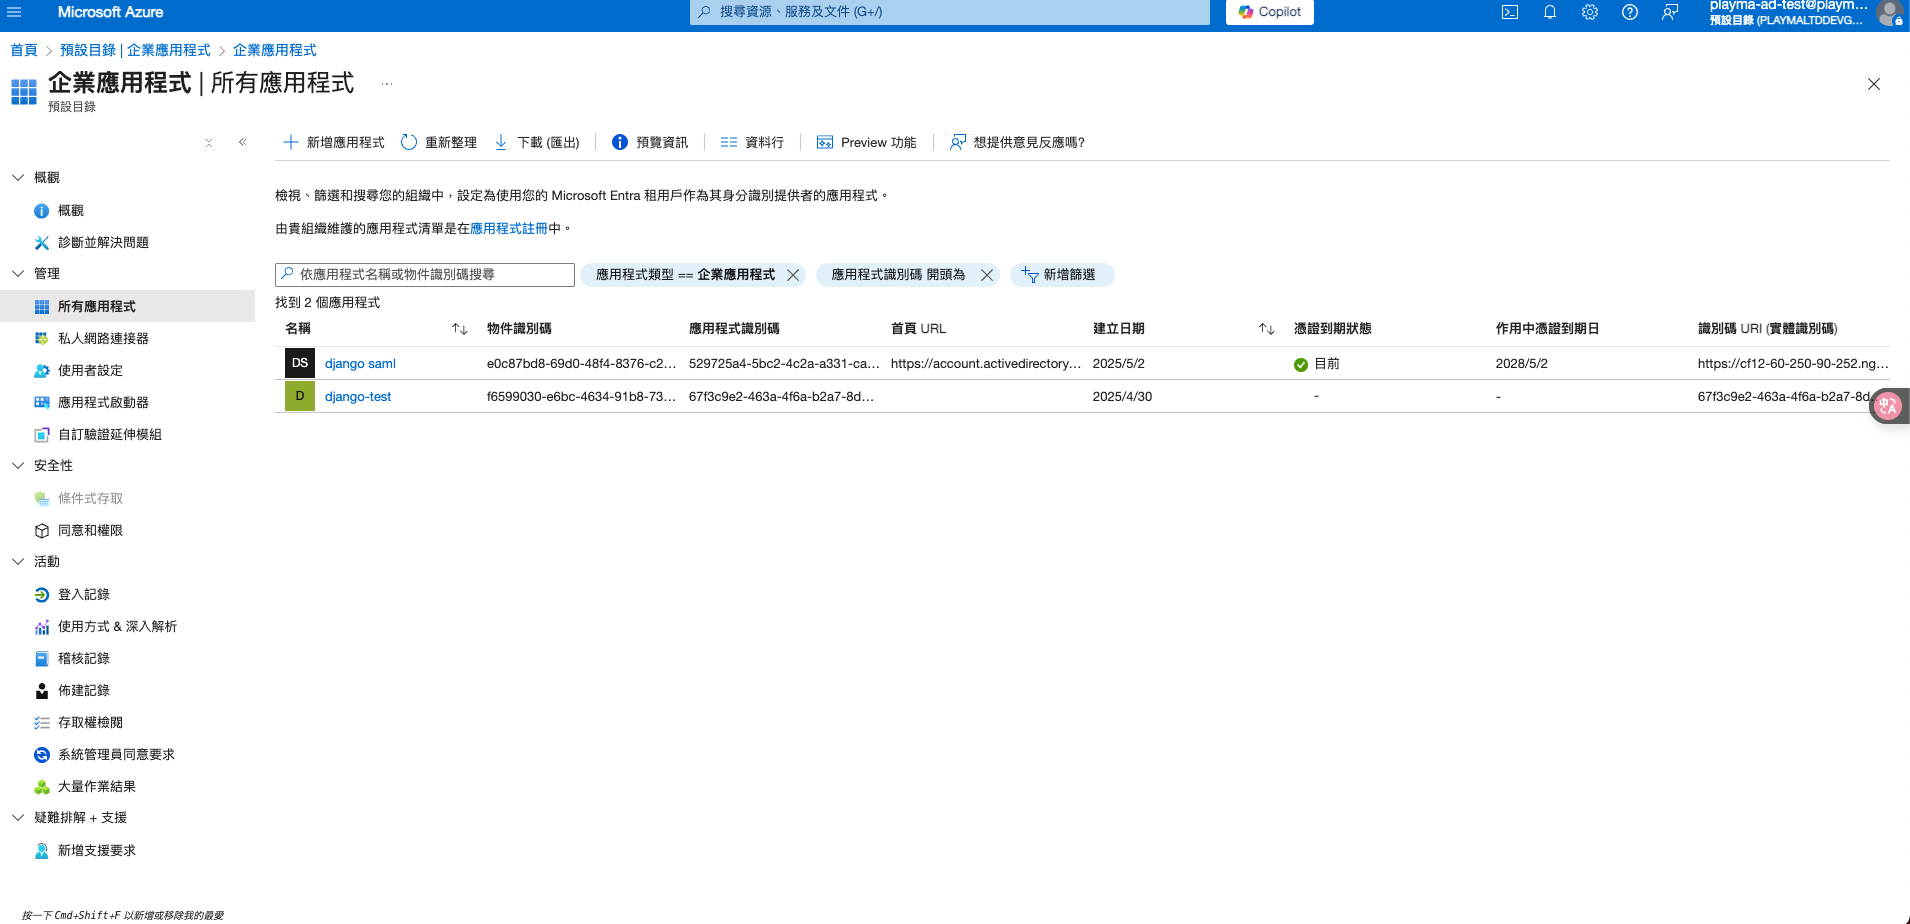
4. 作成したばかりのエンタープライズ アプリケーションを選択します

<figure><img src="https://2584873290-files.gitbook.io/~/files/v0/b/gitbook-x-prod.appspot.com/o/spaces%2FTvHx8hgwYGDTLD3A7xoW%2Fuploads%2Fgit-blob-7a355995c181ba03d74f063a04cf14f33a36c292%2Fsso-azure-02-select-enterprise-app.png?alt=media" alt="エンタープライズ アプリケーションの選択"><figcaption><p>対象のエンタープライズ アプリケーションを選択する</p></figcaption></figure>

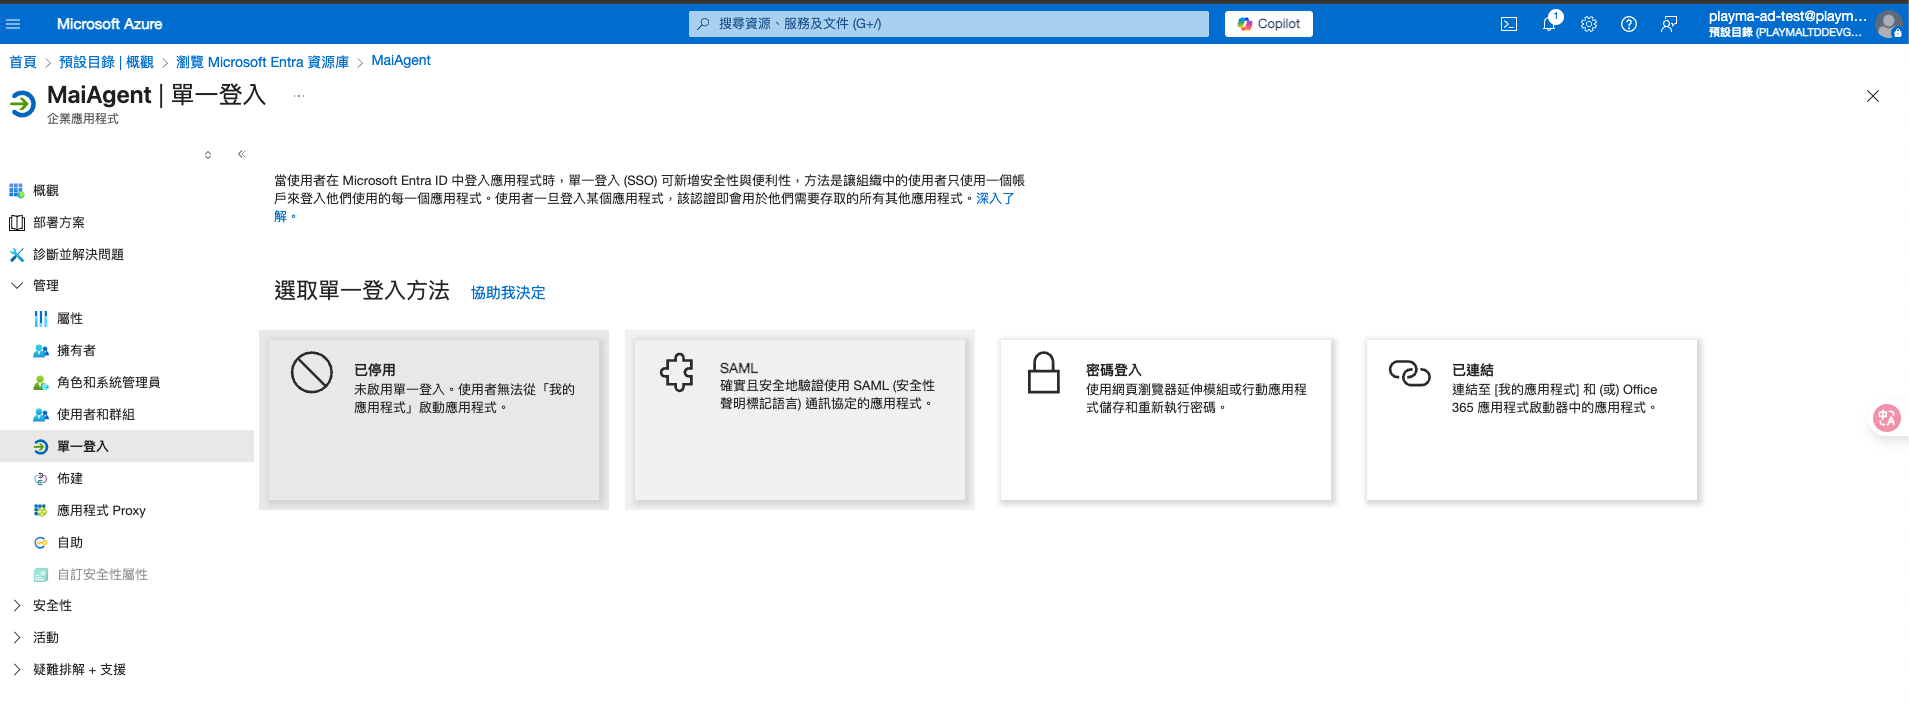
5. エンタープライズ アプリケーションを開き、左側の <mark style="color:blue;">シングル サインオン</mark> > <mark style="color:blue;">SAML</mark> をクリックします

<figure><img src="https://2584873290-files.gitbook.io/~/files/v0/b/gitbook-x-prod.appspot.com/o/spaces%2FTvHx8hgwYGDTLD3A7xoW%2Fuploads%2Fgit-blob-833772e0e67721e2176efc5172b2b60aea3a66ff%2Fsso-azure-03-sso-saml.png?alt=media" alt="SAML の選択"><figcaption><p>シングルサインオンの方式として SAML を選択する</p></figcaption></figure>

6. <mark style="color:blue;">基本的な SAML 構成</mark>セクションに、MaiAgent の SP 情報を入力します：
   * **識別子（エンティティ ID）**：MaiAgent が生成した Entity ID を入力します
   * **応答 URL（アサーション コンシューマー サービス URL）**：MaiAgent が生成した ACS URL を入力します
7. 設定を保存します

### 4. IdP から設定値を取得して MaiAgent に入力する <a href="#step-4-fill-idp-values-back" id="step-4-fill-idp-values-back"></a>

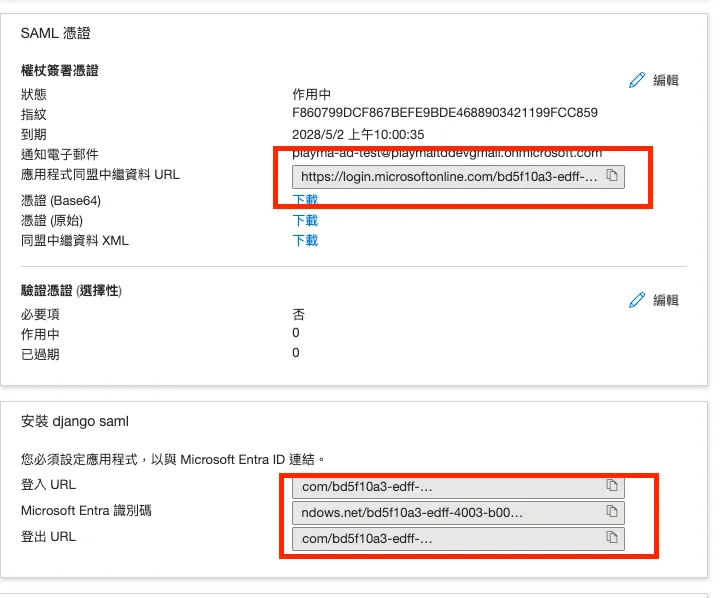
Azure AD の <mark style="color:blue;">SAML でシングル サインオンをセットアップします</mark>ページの下部で以下の情報を探し、[手順 1](#step-1-fill-idp-info) のモードに従って、どちらか一方を MaiAgent の管理画面の SAML 設定フォームに入力します：

| モード   | Azure AD のフィールド                       | 対応する MaiAgent のフィールド |
| ----- | ------------------------------------- | -------------------- |
| A（推奨） | アプリのフェデレーション メタデータ URL                | IdP Metadata URL     |
| B     | Microsoft Entra 識別子                   | IdP Entity ID        |
| B     | ログイン URL                              | IdP SSO URL          |
| B     | SAML 証明書セクションからダウンロードした「証明書 (Base64)」 | IdP X.509 証明書        |

モード A を使用する場合は、IdP Metadata URL のみを入力し、他の 3 つのフィールドは空のままにします。

<figure><img src="https://2584873290-files.gitbook.io/~/files/v0/b/gitbook-x-prod.appspot.com/o/spaces%2FTvHx8hgwYGDTLD3A7xoW%2Fuploads%2Fgit-blob-73eb33f62fc8b287844c32ca6fca687e5b511450%2Fsso-azure-05-idp-info.png?alt=media" alt="IdP 情報"><figcaption><p>Azure AD から Microsoft Entra 識別子、ログイン URL、メタデータ URL を取得する</p></figcaption></figure>

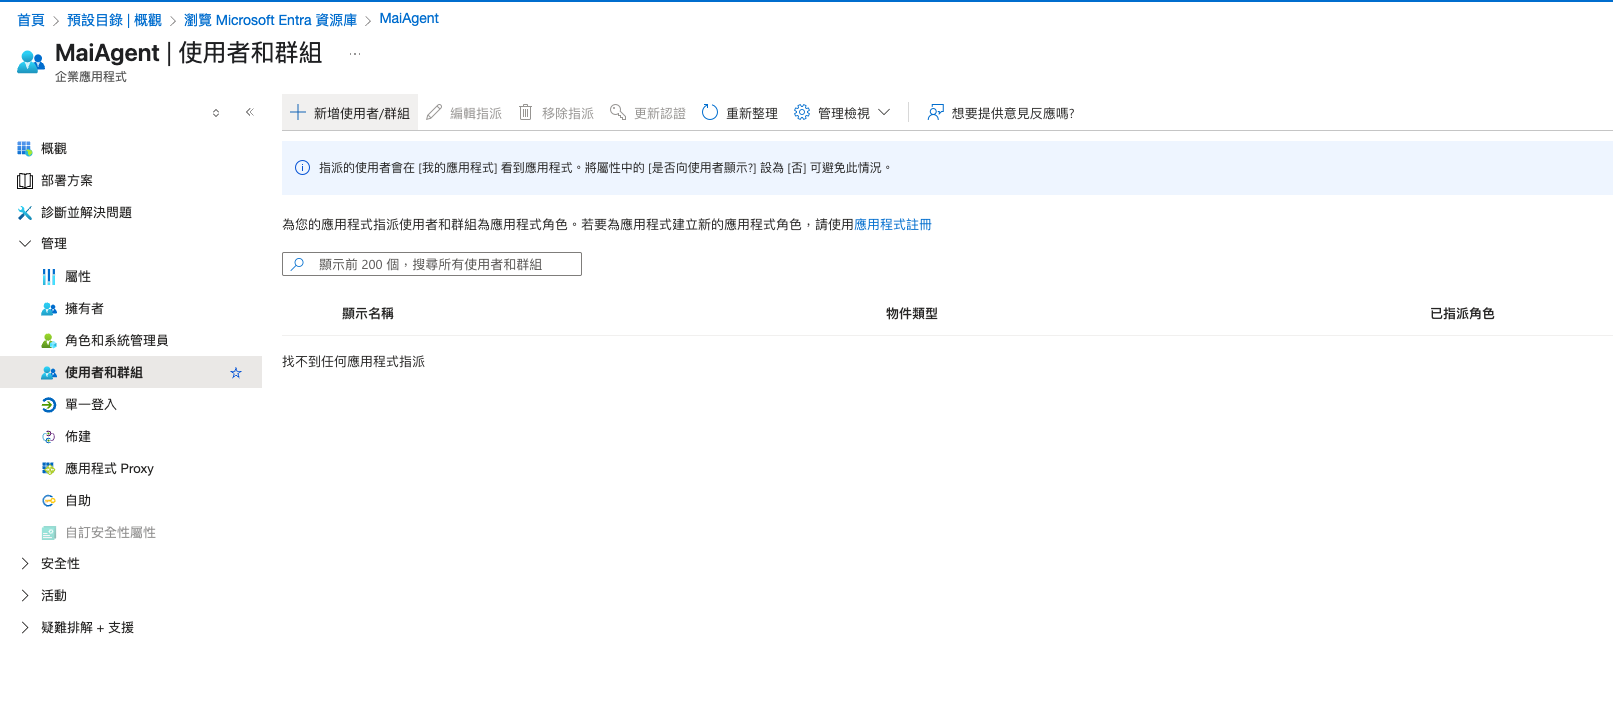
### 5. ユーザーとグループを割り当てる <a href="#step-5-assign-users-groups" id="step-5-assign-users-groups"></a>

Azure AD のエンタープライズ アプリケーションで <mark style="color:blue;">ユーザーとグループ</mark> > <mark style="color:blue;">ユーザーまたはグループの追加</mark>をクリックし、MaiAgent にアクセスする必要がある従業員やグループを追加します。

<figure><img src="https://2584873290-files.gitbook.io/~/files/v0/b/gitbook-x-prod.appspot.com/o/spaces%2FTvHx8hgwYGDTLD3A7xoW%2Fuploads%2Fgit-blob-1712c334ffa9fc2b078865f6808ab6ae12aec56f%2Fsso-azure-06-add-users-groups.png?alt=media" alt="ユーザーとグループの追加"><figcaption><p>MaiAgent にアクセスする必要がある従業員やグループをエンタープライズ アプリケーションに追加する</p></figcaption></figure>

### 6. 保存して確認する <a href="#step-6-save-and-confirm" id="step-6-save-and-confirm"></a>

MaiAgent の管理画面で <mark style="color:blue;">保存</mark> ボタンをクリックすると、<mark style="color:blue;">認証方式の変更の確認</mark>ウィンドウが表示されます。IdP 側の設定が完了していることを確認してから <mark style="color:blue;">変更を確認</mark> を押すと、設定が完了します。

{% hint style="warning" %}
SAML を有効にしても、パスワードを設定済みのメンバーは引き続き Email とパスワードでログインできます。システムがパスワードログインを自動的に無効にすることはありません。特定のメンバーがパスワードで組織にアクセスできないようにしたい場合や、退職時の無効化を自動化したい場合は、[退職・メンバーの無効化](https://docs.maiagent.ai/maiagent-user-guide/ja/org/sso.md#offboarding)をご覧ください。
{% endhint %}

## SAML 属性マッピング <a href="#saml-attribute-mapping" id="saml-attribute-mapping"></a>

MaiAgent が SAML レスポンスから読み取る属性は、**Email**（必須。アカウントの識別に使用）と**表示名**の 2 つだけです。マッピングのルールは固定で、管理画面でカスタマイズすることはできません。グループ、部署、役職などのその他の属性は読み取られず、ロールも同期されません。

* **Email**：Microsoft Entra ID と ADFS はデフォルトの出力のまま利用できます。その他の IdP では、Email 属性が送信されていることを確認するか、NameID の形式を emailAddress に設定してください。利用できる 3 種類の Email の取得元と読み取りの順序については、技術担当者向けマニュアル [SAML SSO シングルサインオン連携](https://docs.maiagent.ai/tech/identity-and-access/sso-overview/saml-sso)の第 2.2 節「ユーザー属性のマッピング」をご覧ください。
* **表示名**：初回ログインでアカウントを作成する際にのみ書き込まれます。表示名が送信されていない場合は、Email の @ より前の文字列が使用されます。その後 IdP 側で名前を変更しても、MaiAgent には同期されません。

## その他の SAML IdP の設定 <a href="#other-saml-idp-settings" id="other-saml-idp-settings"></a>

MaiAgent の SAML 連携は Microsoft Entra ID に限りません。SAML 2.0 標準プロトコルに対応した ID プロバイダーであれば、連携できます。一般的な IdP には次のようなものがあります：

* **Okta**：Applications で SAML 2.0 App を追加します
* **Google Workspace**：Admin Console > Security > SSO で設定します
* **ADFS**：Relying Party Trusts で追加します。詳しい手順は [ADFS 連携](https://docs.maiagent.ai/maiagent-user-guide/ja/org/sso/sso-saml/sso-saml-adfs.md)をご覧ください

設定の考え方は同じです。MaiAgent の SP 情報（Entity ID、ACS URL）を IdP に入力し、次に IdP の情報を MaiAgent に入力します。Metadata URL がある場合は Metadata URL のみを入力し（モード A）、ない場合は Entity ID、SSO URL、X.509 証明書を入力します（モード B）。

## SAML のセキュリティ機能 <a href="#saml-security-features" id="saml-security-features"></a>

* SAML 2.0 HTTP Redirect Binding に対応しています
* Session Index による追跡で、ログアウト操作の正確性を確保します
* NameID の形式に emailAddress を使用し、ユーザー識別の一貫性を確保します
* ログイン Cookie の設定：`Secure=True`、`SameSite=None`、`HttpOnly=True`、有効期間は 5 分

## 設定フィールド早見表 <a href="#settings-quick-reference" id="settings-quick-reference"></a>

| フィールド            | 必須        | 形式                                          | 例                                                                                         |
| ---------------- | --------- | ------------------------------------------- | ----------------------------------------------------------------------------------------- |
| 認証ソース名           | はい        | 小文字の英数字 + ハイフン、最大 31 文字                     | `my-company`                                                                              |
| IdP Metadata URL | モード A で必須 | HTTPS URL                                   | `https://login.microsoftonline.com/.../federationmetadata/2007-06/federationmetadata.xml` |
| IdP Entity ID    | モード B で必須 | URI                                         | `https://sts.windows.net/{tenant-id}/`                                                    |
| IdP SSO URL      | モード B で必須 | HTTPS URL                                   | `https://login.microsoftonline.com/{tenant-id}/saml2`                                     |
| IdP X.509 証明書    | モード B で必須 | PEM 内の BEGIN／END CERTIFICATE の間の base64 の内容 | `MIID...`                                                                                 |
| メールドメイン          | いいえ       | ドメイン形式                                      | `company.com`                                                                             |

{% hint style="info" %}
モード A とモード B はどちらか一方のみ入力してください。同時に指定することはできません。
{% endhint %}


---

# Agent Instructions
This documentation is published with GitBook. GitBook is the documentation platform designed so that both humans and AI agents can read, navigate, and reason over technical content effectively. Learn more at gitbook.com.

## Querying This Documentation
If you need additional information that is not directly available in this page, you can query the documentation by asking a question.

Perform an HTTP GET request on the following URL with the `ask` and `goal` query parameters:

```
GET https://docs.maiagent.ai/maiagent-user-guide/ja/org/sso/sso-saml.md?ask=<question>&goal=<user_goal>
```

`ask` is the immediate question: it should be specific, self-contained, and written in natural language.
`goal` is what the user is ultimately trying to achieve, the reason they need the answer. Sharing it helps GitBook give you a better, more relevant answer. A goal is most helpful when it describes the outcome the user wants rather than restating the question. For example, with `ask=how do I create an API token`, a goal like `automate deployments from our CI pipeline` lets GitBook tailor the answer to that use case.

The response will contain a direct answer to the question and relevant excerpts and sources from the documentation.

Use this mechanism when the answer is not explicitly present in the current page, you need clarification or additional context, or you want to retrieve related documentation sections.