> For the complete documentation index, see [llms.txt](https://docs.maiagent.ai/llms.txt). Markdown versions of documentation pages are available by appending `.md` to page URLs; this page is available as [Markdown](https://docs.maiagent.ai/maiagent-user-guide/ja/conversations/web-chat/website.md).
# 対話プラットフォーム連携:Web サイト
## 一、設定ページを開く
### 1. 経路一:Webカスタマーサポート対話を追加する
左側メニューの「カスタマーサポート対話 > 対話プラットフォーム」をクリックし、右上の「+対話プラットフォームを連携」をクリックして、プラットフォーム「Website」を選択します。
### 2. 経路二:AIアシスタントに関連付けられた対話プラットフォーム
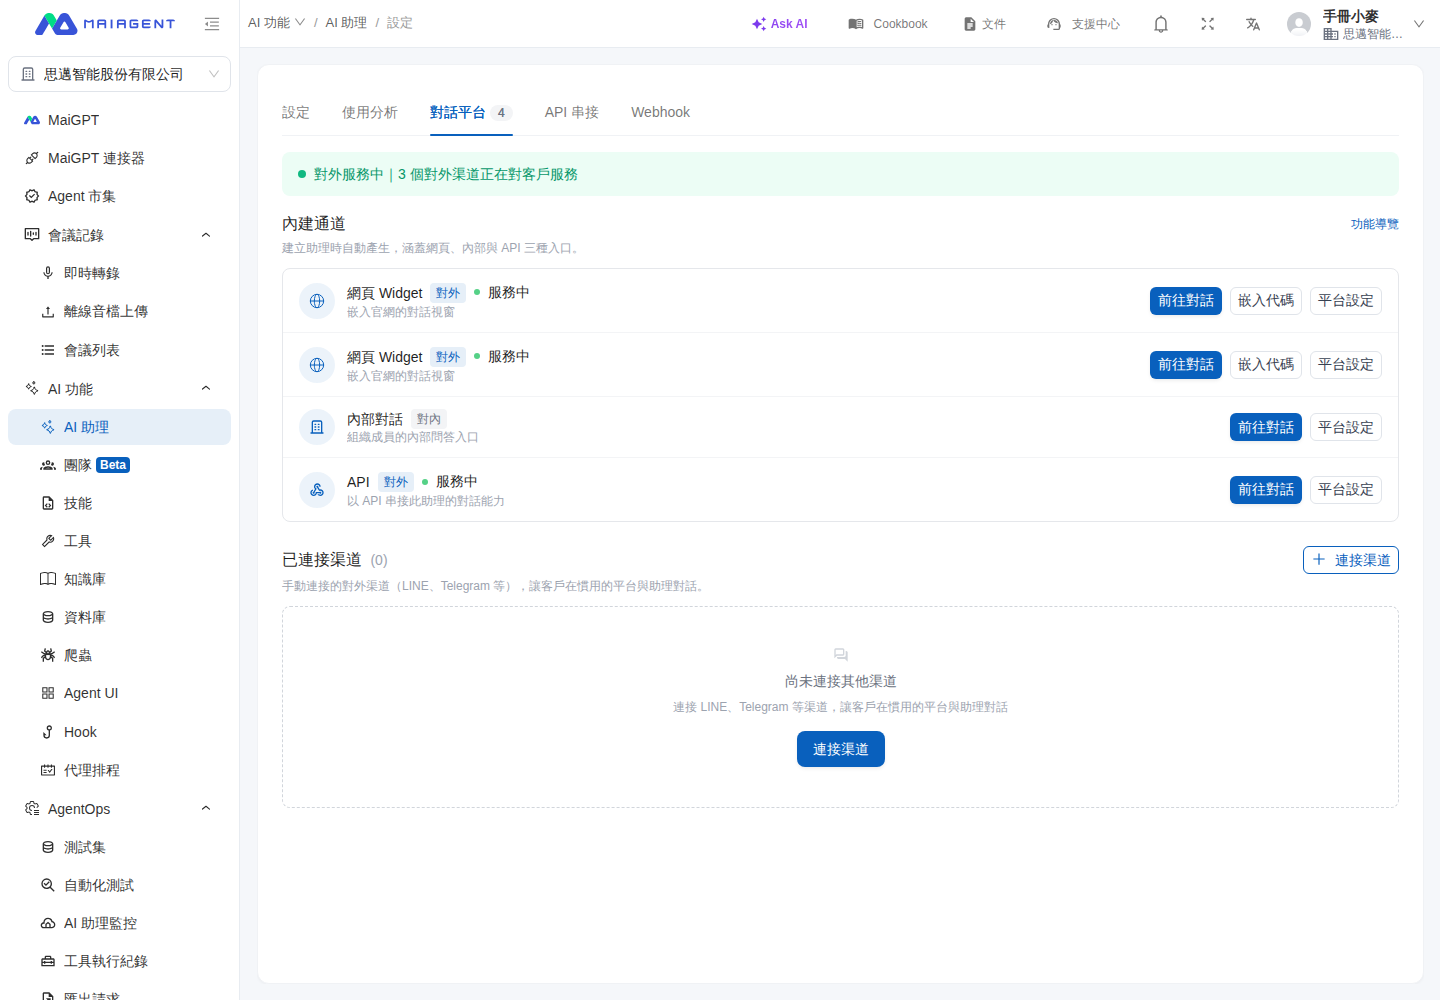
左側の機能欄で AI機能 → AIアシスタント の順に進み、設定するアシスタントを選択して、対話プラットフォームタブに切り替えます。調整するWeb対話プラットフォームを見つけ、プラットフォーム設定をクリックします。
{% hint style="info" %} AIアシスタント設定に戻るは、AIアシスタントの 対話プラットフォームタブからアクセスした場合にのみ表示されます。左側メニューの 対話プラットフォームから直接アクセスした場合、ページは従来のナビゲーションのままです。
{% endhint %}
#### 利用シーン:Webカスタマーサポートの調整後にアシスタントへ戻る
カスタマーサポートの責任者が「製品相談アシスタント」のWebカスタマーサポート設定を更新するとします。このAIアシスタントの 対話プラットフォームタブで プラットフォーム設定をクリックし、調整が完了したら AIアシスタント設定に戻るをクリックします。同じアシスタントの対話プラットフォーム一覧に戻り、ほかのカスタマーサポート窓口の確認を続けられるため、AIアシスタント一覧から探し直す必要はありません。
### 3. 経路三:対話プラットフォームの操作
左側機能欄の「カスタマーサポート対話 > 対話プラットフォーム」で、設定したいAIアシスタントを選択し、「操作」アイコンをクリックすると、対話プラットフォームの設定画面を開くことができます。
## 二、基本設定
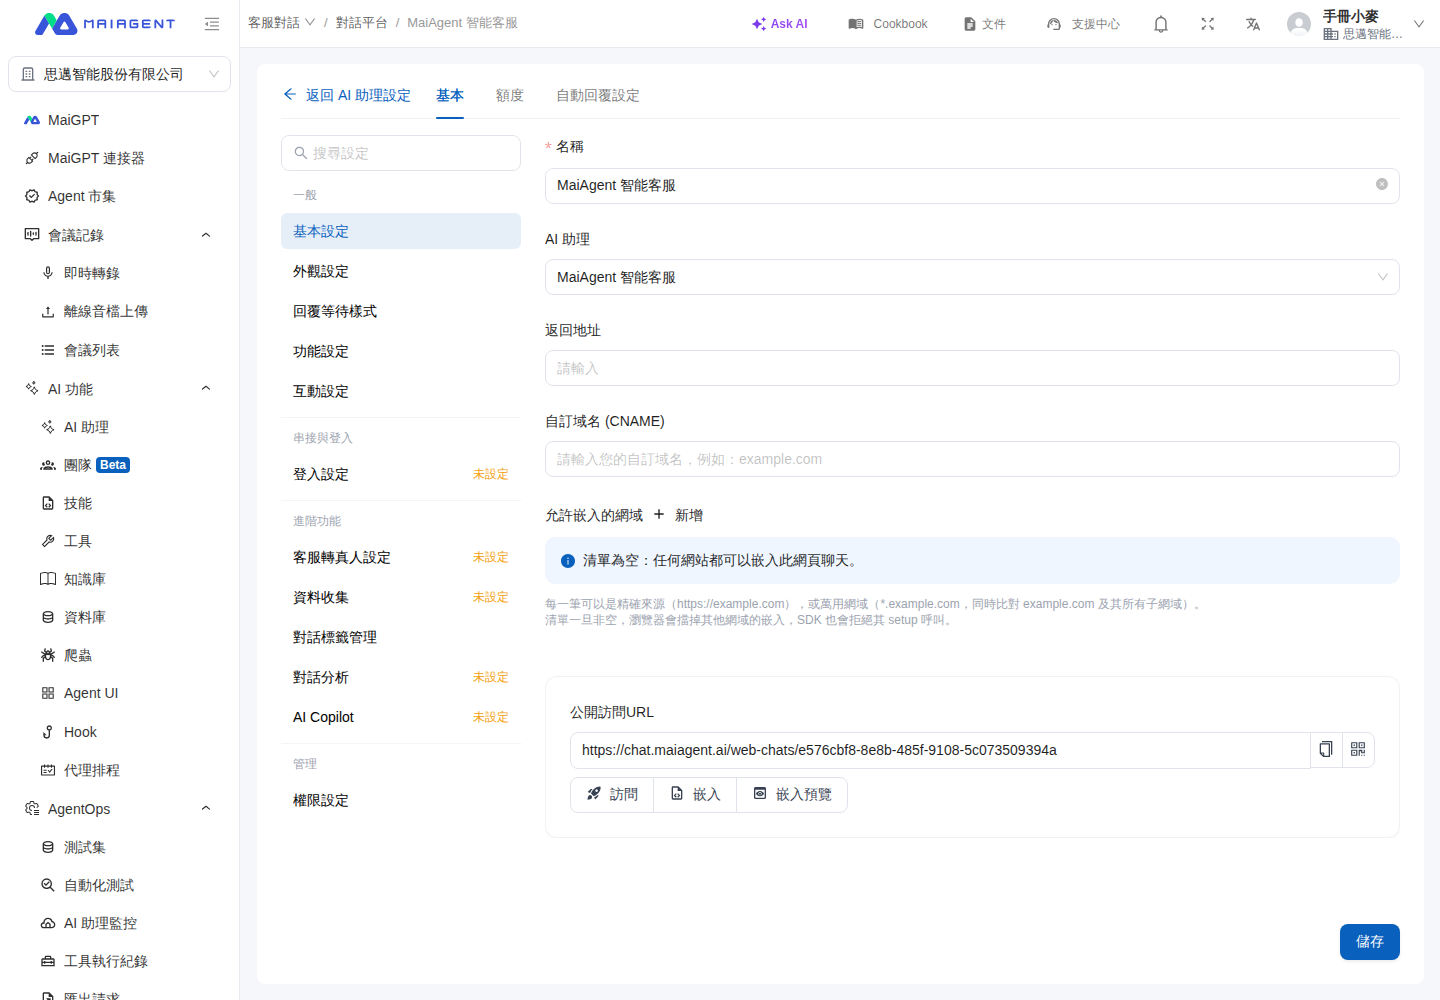
「基本」タブの「一般」グループにある5つのカテゴリについては、それぞれ専用ページで詳しく説明しています。
### 1. 基本設定
プラットフォーム名、AIアシスタント、戻り先URL、カスタムドメイン、埋め込みを許可するドメイン、公開アクセスURL、3種類の埋め込み方法については、[基本設定](/maiagent-user-guide/ja/conversations/platform-settings/basic-settings.md)をご覧ください。
#### 埋め込みを許可するドメイン
埋め込み許可リストの仕組み、設定手順、有効化前のチェックリストについては、[基本設定:埋め込みを許可するドメイン](/maiagent-user-guide/ja/conversations/platform-settings/basic-settings.md#allowed-embed-origins)をご覧ください。
### 2. 外観設定
Logo、アバター、表示設定、ライト/ダークテーマの配色については、[外観設定](/maiagent-user-guide/ja/conversations/platform-settings/appearance-settings.md)をご覧ください。
### 3. 機能設定
有効化、ファイルのアップロード許可、引用文書、OCR、ツール表示モード、質問集オプションの表示モード、AI認識設定については、[機能設定](/maiagent-user-guide/ja/conversations/platform-settings/function-settings.md)をご覧ください。
### 4. インタラクション設定
冒頭メッセージ、対話開始時の質問、冒頭メッセージの選択肢をAgentのコンテキストに含める設定、対話表示設定、満足度アンケート、クォータ超過時のメッセージについては、[インタラクション設定](/maiagent-user-guide/ja/conversations/platform-settings/interaction-settings.md)をご覧ください。
#### 冒頭メッセージの選択肢をAgentのコンテキストに含める
有効化前後の違い、利用シーン、注意事項については、[インタラクション設定:冒頭メッセージの選択肢をAgentのコンテキストに含める](/maiagent-user-guide/ja/conversations/platform-settings/interaction-settings.md#include-greeting-in-context)をご覧ください。
### 5. ログイン設定
**SSOログインソースの設定**
* MaiAgentは現在、Keycloakとの連携によりSSO(Single Sign-On)サービスを利用できます
* 「ログインソース」ドロップダウンメニューで切り替えます
* 認証方式としてMaiagentまたはKeycloakを選択します
**埋め込み側からログインせずに対話する**
Web Chatを自社のWebサイトに埋め込み、ユーザーがすでにそのサイトにログインしている場合は、「埋め込み側でSource IDを使用したログイン不要の対話を許可」を有効にすると、ユーザーはすぐに対話できます。設定方法と署名連携については、[連絡先のSource IDによるログイン不要の対話](/maiagent-user-guide/ja/conversations/web-chat/source-id-access.md)をご覧ください。
## 三、自動応答設定
ここでは、ボットが応答する時間帯を設定できます。
* 日付の横にあるスイッチをクリックし、週のうち応答する曜日を選択します。
* 開始時刻と終了時刻を選択して、時間帯を設定します。
* 複数の時間帯を設定する場合は、「+時間帯を追加」をクリックして時間帯を追加し、設定します。
---
# Agent Instructions
This documentation is published with GitBook. GitBook is the documentation platform designed so that both humans and AI agents can read, navigate, and reason over technical content effectively. Learn more at gitbook.com.
## Querying This Documentation
If you need additional information that is not directly available in this page, you can query the documentation dynamically by asking a question.
Perform an HTTP GET request on the current page URL with the `ask` query parameter, and the optional `goal` query parameter:
```
GET https://docs.maiagent.ai/maiagent-user-guide/ja/conversations/web-chat/website.md?ask=&goal=
```
`ask` is the immediate question: it should be specific, self-contained, and written in natural language.
`goal` is optional and describes the broader end goal you are ultimately trying to accomplish on behalf of the user. GitBook uses it to tailor the answer towards what is most useful for that goal.
The response will contain a direct answer to the question and relevant excerpts and sources from the documentation.
Use this mechanism when the answer is not explicitly present in the current page, you need clarification or additional context, or you want to retrieve related documentation sections.