> For the complete documentation index, see [llms.txt](https://docs.maiagent.ai/llms.txt). Markdown versions of documentation pages are available by appending `.md` to page URLs; this page is available as [Markdown](https://docs.maiagent.ai/maiagent-user-guide/ja/build/choose-channel/web-chat/maigpt-embed.md).

# MaiGPT のウィンドウモードでの埋め込み

MaiGPT ウィンドウモードで ChatGPT スタイルの完全な会話インターフェースをウェブサイトに直接埋め込み、Deep Research やツール選択を利用できます。

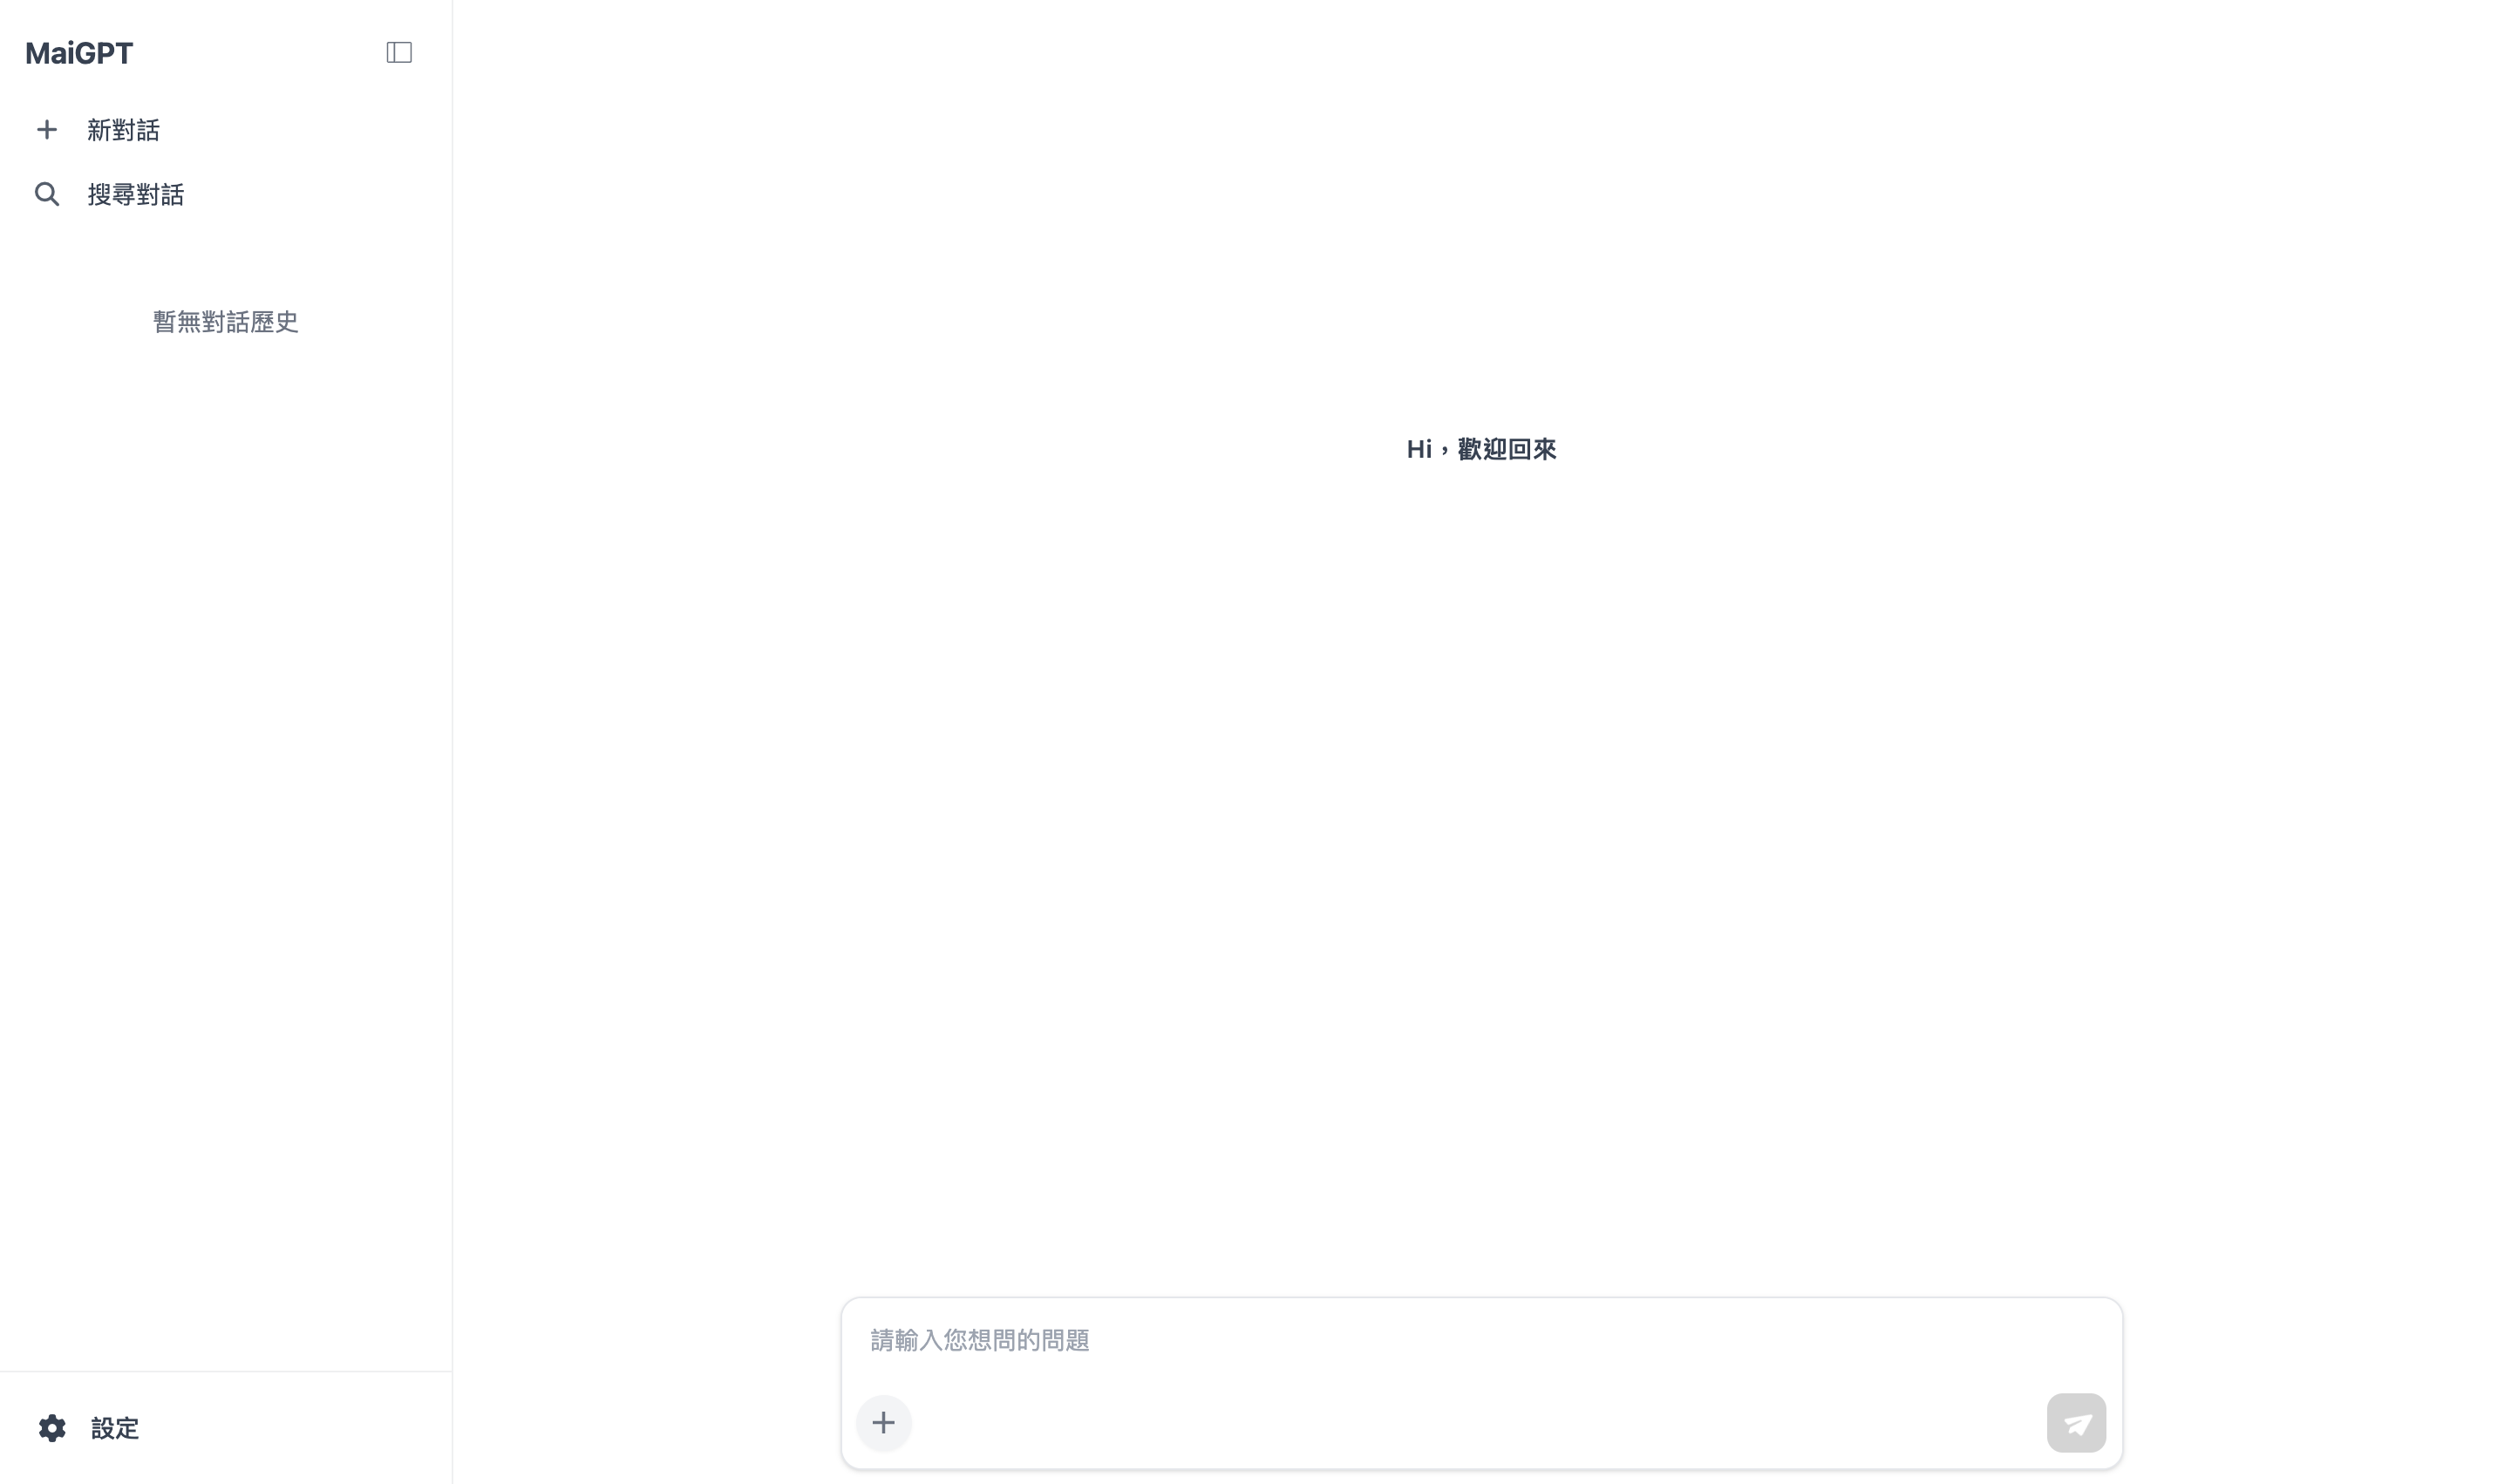
MaiAgent の Web Chat SDK に、一般的な「右下のフローティングボタン」に加えて **MaiGPT ウィンドウモード**が追加されました。**ChatGPT スタイルの完全な会話インターフェース**（左側の会話履歴リスト + 右側のメイン会話エリア）を、自社ページの任意の場所に直接埋め込めます。隅に配置する小さなウィジェットではなく、ページのメイン UI として使用できます。

{% hint style="info" %}
このページでは、自社サイトに MaiGPT ウィンドウモードを埋め込む方法を説明します。Web Chat チャネルをまだ作成していない場合は、先に [チャネル連携：ウェブサイト](https://docs.maiagent.ai/maiagent-user-guide/ja/build/choose-channel/web-chat/website.md) を参照し、基本設定を完了してください。
{% endhint %}

{% hint style="warning" %}
**MaiGPT ウィンドウモードと MaiGPT 製品は異なります。** ウィンドウモードは Web Chat の表示形式のみを決定します。適用先の Agent の Web Chat が持つロール指示、モデル、ツールが使用されます。組織に組み込まれている [MaiGPT](https://docs.maiagent.ai/maiagent-user-guide/ja/work/maigpt.md) は、組織メンバーがログインして利用するワークスペースであり、両者は別のものです。
{% endhint %}

## <mark style="color:blue;">どこから始める？埋め込みコードの取得</mark> <a href="#where-to-start" id="where-to-start"></a>

このページで使用する埋め込みコードは、[基本設定](https://docs.maiagent.ai/maiagent-user-guide/ja/build/conversation-settings/platform-settings/basic-settings.md#public-url-and-embed) から取得します。次の手順で操作してください。

{% stepper %}
{% step %}

### チャネル設定を開く

「 <mark style="color:blue;">カスタマーサポート会話 > チャネル</mark> 」で Web Chat チャネルを選択し、「 <mark style="color:blue;">操作</mark> 」をクリックして設定ページを開きます。
{% endstep %}

{% step %}

### 「埋め込み」をクリックする

<mark style="color:blue;">基本設定</mark>で公開アクセス URL のセクションを探し、「 <mark style="color:blue;">埋め込み</mark> 」ボタンをクリックして埋め込みダイアログを開きます。

<figure><img src="https://2584873290-files.gitbook.io/~/files/v0/b/gitbook-x-prod.appspot.com/o/spaces%2FTvHx8hgwYGDTLD3A7xoW%2Fuploads%2Fgit-blob-6651b11c4e50542297b13ca2af596a8a6bc1e51b%2Fmaigpt-embed-start-2-embed-button.png?alt=media" alt="基本設定の埋め込みボタン"><figcaption><p>基本設定 > 埋め込み</p></figcaption></figure>
{% endstep %}

{% step %}

### MaiGPT の埋め込み方式を選択する

ダイアログ上部で 3 種類の埋め込み方式を切り替え、「 <mark style="color:blue;">MaiGPT</mark> 」を選択します。

| 埋め込み方式     | 説明                                        |
| ---------- | ----------------------------------------- |
| JavaScript | `<script>` で読み込む、最も一般的な方式です               |
| Iframe     | `<iframe>` で直接埋め込みます                      |
| **MaiGPT** | **このページで紹介する ChatGPT スタイルの完全なインターフェースです** |

左側では、埋め込みコンテナ（`targetElement`）、言語（`locale`）、タイトル（`maigptTitle`）を調整できます。

<figure><img src="https://2584873290-files.gitbook.io/~/files/v0/b/gitbook-x-prod.appspot.com/o/spaces%2FTvHx8hgwYGDTLD3A7xoW%2Fuploads%2Fgit-blob-389bc6aca11714bc271f35f3c015e9f6d8c81179%2Fmaigpt-embed-start-3-maigpt-tab.png?alt=media" alt="埋め込みダイアログで MaiGPT を選択すると、右側にコードプレビューがリアルタイムで表示されます"><figcaption><p>埋め込みダイアログ > MaiGPT を選択 > 右側のリアルタイムコードプレビュー</p></figcaption></figure>
{% endstep %}

{% step %}

### コードをコピーしてウェブサイトに貼り付ける

右側の<mark style="color:blue;">コードプレビュー</mark>は、左側の設定に合わせてリアルタイムで更新されます。「 <mark style="color:blue;">コピー</mark> 」をクリックすると、次のような埋め込みコードを取得できます。

```html
<script>
  window.maiagentChatbotConfig = {
    webChatId: '你的 Web Chat ID',
    baseUrl: 'https://你的-maiagent-網域/web-chats',
    enabledWindowModes: ['maigpt'],
    targetElement: '#maigpt-container',
  }
</script>
<script src="https://你的-maiagent-網域/js/embed.min.js" defer></script>
```

各パラメータと 2 種類のレイアウト（コンテナへの埋め込み / 右下の全画面表示ボタン）の詳しい説明は、後述の [3. 埋め込み設定](#embed-setup) を参照してください。
{% endstep %}
{% endstepper %}

## <mark style="color:blue;">1. MaiGPT ウィンドウモードとは？</mark> <a href="#what-is-maigpt-mode" id="what-is-maigpt-mode"></a>

Web Chat SDK には 4 種類のウィンドウモードがあり、埋め込み設定の `enabledWindowModes` で指定します。

<table><thead><tr><th width="140">ウィンドウモード</th><th>説明</th></tr></thead><tbody><tr><td><code>floating</code></td><td>デフォルトモードです。右下のフローティングボタンをクリックすると会話ウィンドウが開きます。一般的なカスタマーサポートに適しています。</td></tr><tr><td><code>sidebar</code></td><td>サイドバーモードです。ページの端から会話ウィンドウがスライド表示されます。</td></tr><tr><td><code>inline</code></td><td>インラインモードです。ページのコンテンツ領域に会話ウィンドウを埋め込みます。</td></tr><tr><td><code>maigpt</code></td><td><strong>このページで紹介するモード</strong>です。ChatGPT スタイルの完全なインターフェースで、会話履歴リストがデフォルトで展開され、ページのメイン UI として使用できます。</td></tr></tbody></table>

MaiGPT ウィンドウモードには、次の特徴があります。

<figure><img src="https://2584873290-files.gitbook.io/~/files/v0/b/gitbook-x-prod.appspot.com/o/spaces%2FTvHx8hgwYGDTLD3A7xoW%2Fuploads%2Fgit-blob-40da32c6e68a4607ef47a4430950a10cbb1765b5%2Fmaigpt-embed-overview.png?alt=media" alt="MaiGPT ウィンドウモードのインターフェース全体"><figcaption><p>MaiGPT ウィンドウモード：左側の会話履歴リスト + 右側のメイン会話エリア（ChatGPT スタイル）</p></figcaption></figure>

* **完全なインターフェース**：iframe が指定のコンテナ（またはブラウザウィンドウ全体）を満たし、左側に会話履歴リスト、右側にメイン会話エリアを表示します
* **フローティングボタンなし・最小化不可**：埋め込み後はページのメインコンテンツとなり、隅に折りたたまれたボタンは表示されません
* **会話履歴をデフォルトで展開**：ユーザーはアクセス直後から過去の会話履歴を確認できます
* **高度な機能へのアクセス**：入力エリアから [Deep Research](#deep-research) と[ツールの切り替え](#tool-toggle)を利用できます

## <mark style="color:blue;">2. 前提条件</mark> <a href="#prerequisites" id="prerequisites"></a>

MaiGPT ウィンドウモードを埋め込む前に、次の点を確認してください。

1. **MaiAgent のバージョンが MaiGPT ウィンドウモードに対応していること**：MaiGPT ウィンドウモードは Web Chat SDK の新機能です。SDK（`embed.min.js`）とバックエンドの両方が MaiGPT 対応バージョンである場合に、埋め込みダイアログに「 <mark style="color:blue;">MaiGPT</mark> 」オプションが表示されます。
2. **Web Chat チャネルを作成済みであること**：そのチャネルの **Web Chat ID** を取得してください（[チャネル連携：ウェブサイト](https://docs.maiagent.ai/maiagent-user-guide/ja/build/choose-channel/web-chat/website.md)を参照）。
3. **埋め込みスクリプトを取得していること**：チャネル設定ページの「 <mark style="color:blue;">埋め込み</mark> 」ボタンをクリックして、埋め込みコードを取得してください。

{% hint style="info" %}
MaiAgent のクラウドサービス（`chat.maiagent.ai`）には MaiGPT ウィンドウモードが組み込まれており、そのまま利用できます。プライベート環境へのデプロイや古いバージョンでは、埋め込みダイアログに「 <mark style="color:blue;">MaiGPT</mark> 」オプションが表示されない場合があります。先に MaiAgent に確認し、対応バージョンにアップグレードしてください。
{% endhint %}

## <mark style="color:blue;">3. 埋め込み設定</mark> <a href="#embed-setup" id="embed-setup"></a>

### 1. 基本の埋め込みコード <a href="#basic-embed-code" id="basic-embed-code"></a>

埋め込みダイアログからコピーしたコードをそのまま使用できます（前述の[埋め込みコードの取得](#where-to-start)を参照）。ウェブサイトの `</body>` タグの直前に貼り付けてください。`enabledWindowModes` は配列で、**最初の要素がデフォルトのウィンドウモード**になります。MaiGPT ウィンドウモードを使用する場合は、`'maigpt'` を先頭に配置してください。

### 2. 2 種類の埋め込み方式 <a href="#two-embed-methods" id="two-embed-methods"></a>

`targetElement` を設定するかどうかで、MaiGPT の表示方法が決まります。

* **指定コンテナへの埋め込み**（`targetElement` を設定）：指定領域に MaiGPT が常駐し、ページのメインコンテンツになります。フローティングボタンは表示されず、ウィンドウモードの切り替えもできません。AI ポータルやシステムのメインワークスペースに適しています。
* **右下のボタンから全画面で開く**（`targetElement` を設定しない）：ページ右下にボタンが表示され、クリックすると MaiGPT が全画面で開きます。右上から閉じるとボタンに戻ります。既存のレイアウトを変更せず、入口だけを追加したい場合に適しています。

<figure><img src="https://2584873290-files.gitbook.io/~/files/v0/b/gitbook-x-prod.appspot.com/o/spaces%2FTvHx8hgwYGDTLD3A7xoW%2Fuploads%2Fgit-blob-fc00704a20ae5555852e51623ca7e220b7e0939f%2Fmaigpt-embed-fullscreen-button.png?alt=media" alt="targetElement を設定しない場合、SDK が右下にフローティングボタンを表示します"><figcaption><p><code>targetElement</code> を設定しない場合、ページ右下にボタンが表示され、クリックすると全画面で開きます</p></figcaption></figure>

両方式の完全なコード、コンテナの高さ要件、コンテナが見つからない場合の動作、SPA への埋め込み方法については、開発者向け技術マニュアルの [MaiGPT モードの埋め込み](https://docs.maiagent.ai/tech/serve/web-chat-sdk/web-chat-maigpt-mode)を参照してください。

## <mark style="color:blue;">4. 設定パラメータ</mark> <a href="#config-reference" id="config-reference"></a>

埋め込みダイアログが生成するコードには、必要なフィールドが含まれています。`webChatId` と `baseUrl` は必須で、不足すると MaiGPT は表示されません。`enabledWindowModes` は `['maigpt']` に設定されます。左側で調整できる `targetElement`（埋め込みコンテナ）、`locale`（言語）、`maigptTitle`（サイドバーのタイトル、デフォルト表示は `MaiGPT`）は、いずれも任意です。

全フィールドの型と説明は、技術マニュアルの [MaiGPT モードの埋め込み：全パラメータ一覧](https://docs.maiagent.ai/tech/serve/web-chat-sdk/web-chat-maigpt-mode#config-reference)を参照してください。旧フィールドの `defaultWindowMode` は現在推奨されていません。代わりに `enabledWindowModes` を使用してください。

## <mark style="color:blue;">5. インターフェースと機能</mark> <a href="#ui-features" id="ui-features"></a>

### 1. 会話履歴リスト <a href="#conversation-history" id="conversation-history"></a>

MaiGPT ウィンドウモードの左側には、ChatGPT スタイルの会話履歴リストが常駐し、デフォルトで展開されています。ユーザーは次の操作ができます。

* 過去の会話の閲覧と切り替え
* 新しい会話の開始
* サイドバーの折りたたみ / 展開

### 2. Deep Research <a href="#deep-research" id="deep-research"></a>

MaiGPT ウィンドウモードで開くと、入力エリアに **Deep Research** への入口が表示されます。ユーザーが Deep Research をクリックしてからメッセージを送信すると、Agent がそのメッセージに対して Deep Research を実行します。

Deep Research の状態は、`未使用 → 有効化済み → 実行中 → 完了 / 失敗` の順に変化します。

{% hint style="info" %}
Deep Research の実行中は、再度開始できません。「完了」または「失敗」になってから、再び有効化できます。
{% endhint %}

### 3. ツールの切り替え <a href="#tool-toggle" id="tool-toggle"></a>

MaiGPT ウィンドウモードで開いていて、Agent にツールが接続されている場合、ユーザーはツールメニューで今回使用するツールにチェックを入れられます。送信するメッセージでは、選択したツールを使用するよう指定されます。何も選択しない場合は、Agent が利用可能なすべてのツールから判断します。選択は現在の会話にのみ適用されます。

### 4. 設定メニュー <a href="#settings-menu" id="settings-menu"></a>

左下の<mark style="color:blue;">設定</mark>をクリックすると、設定メニューが開きます。表示される項目は、その Web Chat のバックエンド設定によって異なり、次の項目が含まれる場合があります。

* **テキスト言語**：インターフェースの言語を切り替えます。選択後は、その言語で回答するようプラットフォームから Agent にも指示されます（[AI の回答言語の決まり方](https://docs.maiagent.ai/maiagent-user-guide/ja/build/agent/multi-language-support.md#reply-language)を参照）。ここで言語を切り替えても、新しい会話は開始されません
* **文字サイズ**：小 / 中 / 大（バックエンドで文字サイズ切り替え機能を有効にする必要があります）
* **テーマモード**：自動 / ライト / ダーク（バックエンドでテーマモード切り替えを有効にする必要があります）
* **音声言語**：音声入力に使用する言語です

<figure><img src="https://2584873290-files.gitbook.io/~/files/v0/b/gitbook-x-prod.appspot.com/o/spaces%2FTvHx8hgwYGDTLD3A7xoW%2Fuploads%2Fgit-blob-df95f8609d6e5be9f3815f068b7deba7e5a66872%2Fmaigpt-embed-settings.png?alt=media" alt="MaiGPT ウィンドウモードの設定メニュー"><figcaption><p>設定メニュー（実際の項目はバックエンド設定によって異なります）</p></figcaption></figure>

## <mark style="color:blue;">6. 注意事項</mark> <a href="#notes" id="notes"></a>

{% hint style="info" %}

* **レスポンシブ対応**：MaiGPT のレイアウトはデスクトップとモバイルに対応し、ダークモードも利用できます。
* **既存モードとの互換性**：MaiGPT は追加のウィンドウモードで、既存の `floating` / `sidebar` / `inline` モードの動作には影響しません。既存の連携を変更する必要はありません。
  {% endhint %}


---

# Agent Instructions
This documentation is published with GitBook. GitBook is the documentation platform designed so that both humans and AI agents can read, navigate, and reason over technical content effectively. Learn more at gitbook.com.

## Querying This Documentation
If you need additional information that is not directly available in this page, you can query the documentation by asking a question.

Perform an HTTP GET request on the following URL with the `ask` and `goal` query parameters:

```
GET https://docs.maiagent.ai/maiagent-user-guide/ja/build/choose-channel/web-chat/maigpt-embed.md?ask=<question>&goal=<user_goal>
```

`ask` is the immediate question: it should be specific, self-contained, and written in natural language.
`goal` is what the user is ultimately trying to achieve, the reason they need the answer. Sharing it helps GitBook give you a better, more relevant answer. A goal is most helpful when it describes the outcome the user wants rather than restating the question. For example, with `ask=how do I create an API token`, a goal like `automate deployments from our CI pipeline` lets GitBook tailor the answer to that use case.

The response will contain a direct answer to the question and relevant excerpts and sources from the documentation.

Use this mechanism when the answer is not explicitly present in the current page, you need clarification or additional context, or you want to retrieve related documentation sections.