> For the complete documentation index, see [llms.txt](https://docs.maiagent.ai/llms.txt). Markdown versions of documentation pages are available by appending `.md` to page URLs; this page is available as [Markdown](https://docs.maiagent.ai/maiagent-user-guide/ja/build/choose-channel/slack.md).

# 会話プラットフォーム連携：Slack

Slack チャネルの連携：App Manifest で Slack App を作成し、Bot の権限と Event Subscriptions を設定して、従業員が Slack のダイレクトメッセージやチャンネルで Agent と会話できるようにします。

## 連携前の確認事項 <a href="#pre-integration-checklist" id="pre-integration-checklist"></a>

* [MaiAgent プラットフォーム](https://admin.maiagent.ai/)で「AI アシスタント」を作成済みであること
* Slack ワークスペースの管理者権限を持っていること

## クイックインストール：App Manifest の使用 <a href="#quick-install-app-manifest" id="quick-install-app-manifest"></a>

[Slack API](https://api.slack.com/apps) にアクセスし、<mark style="color:blue;">Create New App</mark> をクリックして <mark style="color:blue;">From a manifest</mark> を選択し、インストール先のワークスペースを選びます。<mark style="color:blue;">YAML</mark> タブに切り替え、以下の Manifest 全体を貼り付けます。

```yaml
display_information:
  name: MaiAgentBot
features:
  app_home:
    messages_tab_enabled: true
    messages_tab_read_only_enabled: false
  bot_user:
    display_name: MaiAgentBot
    always_online: false
oauth_config:
  scopes:
    bot:
      - chat:write
      - users:read
      - im:history
      - channels:history
      - groups:history
      - files:read
      - app_mentions:read
settings:
  org_deploy_enabled: false
  socket_mode_enabled: false
  token_rotation_enabled: false
```

`MaiAgentBot` は名前の例です。作成前に `display_information.name` と `features.bot_user.display_name` を変更できます。

{% hint style="info" %}
Manifest で App を作成した場合、以下の詳細手順の手順一から手順三（App の作成、scopes の設定、App Home の有効化）は省略できます。手順四から MaiAgent でチャネルを作成し、Webhook URL を取得した後、手順五の Event Subscriptions を設定する必要があります。Request URL は、MaiAgent でチャネルを作成してから生成されます。
{% endhint %}

## 手順一：Slack App の作成 <a href="#step-create-slack-app" id="step-create-slack-app"></a>

### 1. Slack API にアクセスして App を作成 <a href="#step-go-to-slack-api" id="step-go-to-slack-api"></a>

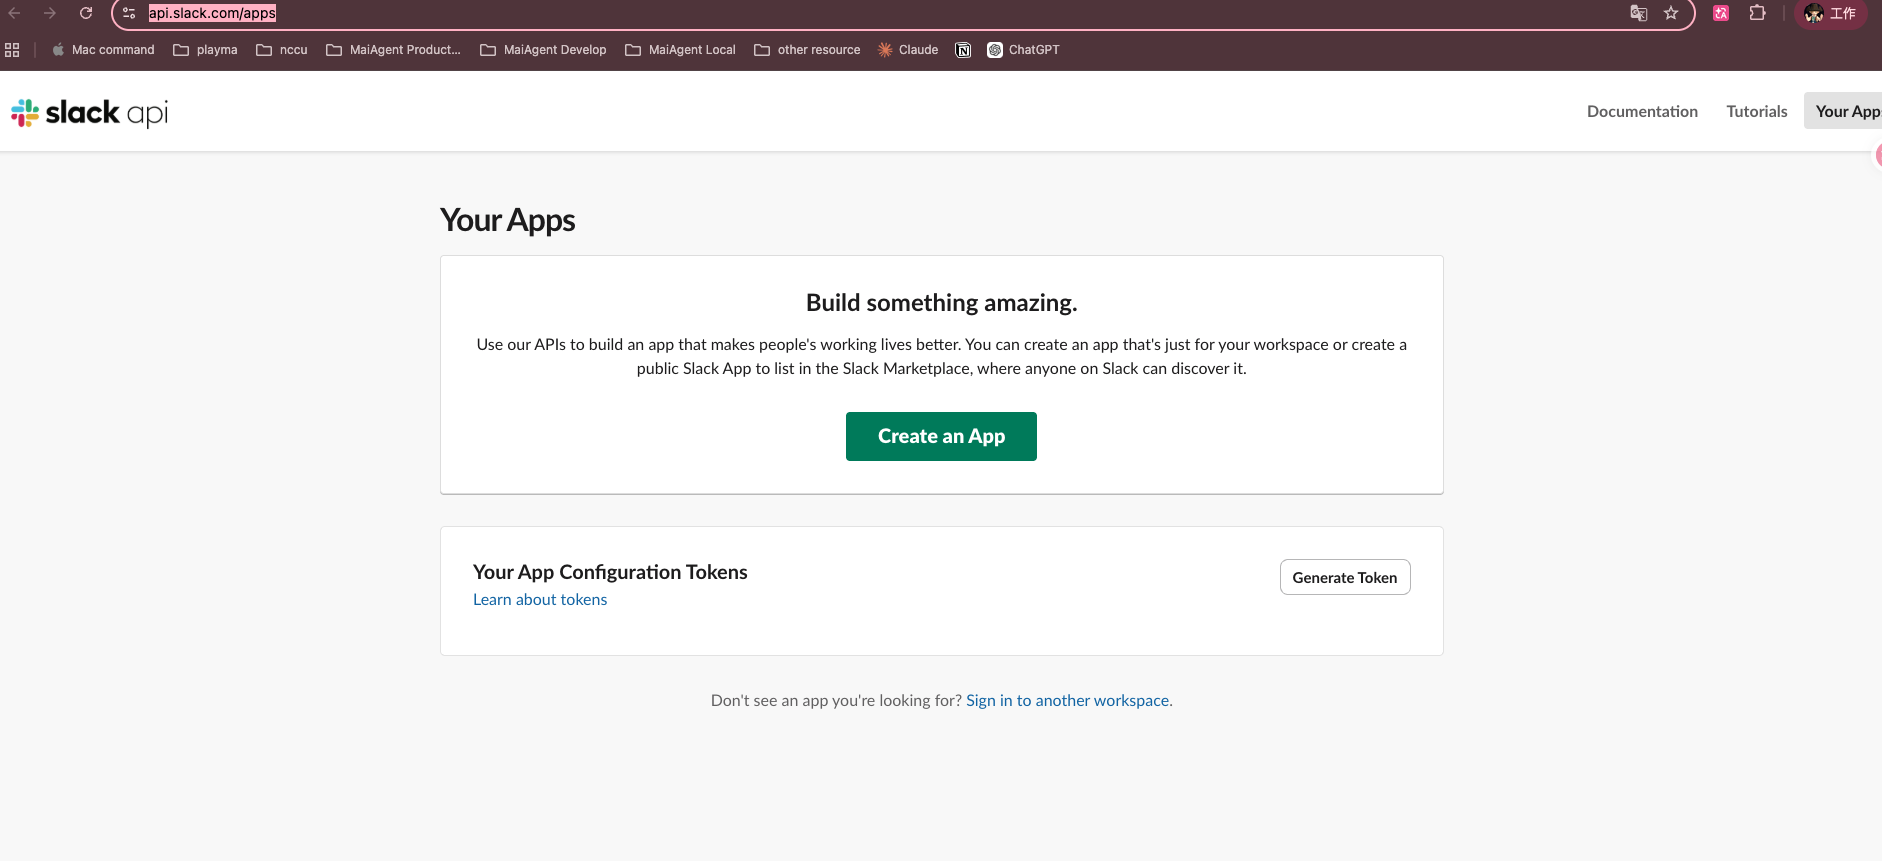
<https://api.slack.com/apps> にアクセスし、<mark style="color:blue;">Create an App</mark> をクリックします。

<figure><img src="https://2584873290-files.gitbook.io/~/files/v0/b/gitbook-x-prod.appspot.com/o/spaces%2FTvHx8hgwYGDTLD3A7xoW%2Fuploads%2Fgit-blob-ce0387658ad808d5a696fcaf41634fbc7876aab5%2Fslack-api-your-apps.png?alt=media" alt=""><figcaption><p>Slack API — Your Apps ページ</p></figcaption></figure>

### 2. From scratch を選択 <a href="#step-create-from-scratch" id="step-create-from-scratch"></a>

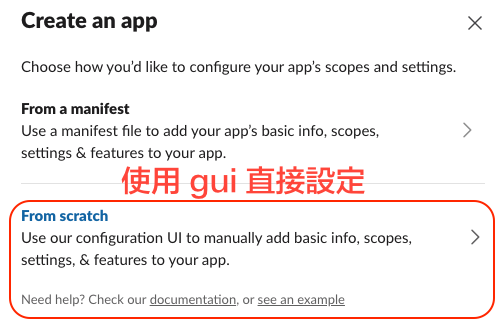
<mark style="color:blue;">From scratch</mark> を選択し、グラフィカルインターフェースで手動設定します。

<figure><img src="https://2584873290-files.gitbook.io/~/files/v0/b/gitbook-x-prod.appspot.com/o/spaces%2FTvHx8hgwYGDTLD3A7xoW%2Fuploads%2Fgit-blob-ef198579b66f80f26f2a9ff794bb4f55b74c9da2%2Fslack-create-app-scratch.png?alt=media" alt=""><figcaption><p>作成方法として From scratch を選択</p></figcaption></figure>

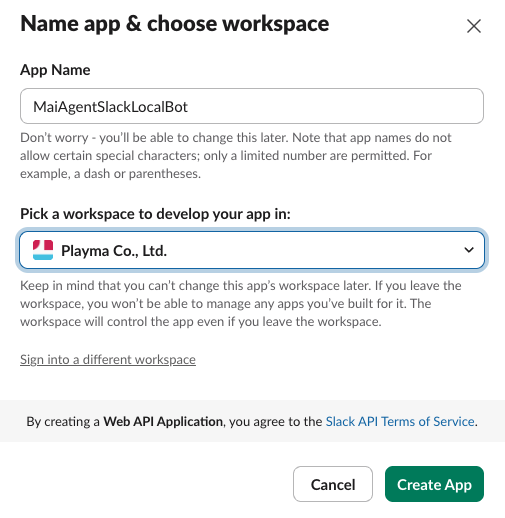
### 3. App 名とワークスペースを入力 <a href="#step-fill-app-name-and-workspace" id="step-fill-app-name-and-workspace"></a>

App 名（例：`MaiAgentBot`）を入力し、インストール先の Slack ワークスペースを選択して、<mark style="color:blue;">Create App</mark> をクリックします。

<figure><img src="https://2584873290-files.gitbook.io/~/files/v0/b/gitbook-x-prod.appspot.com/o/spaces%2FTvHx8hgwYGDTLD3A7xoW%2Fuploads%2Fgit-blob-0608dfa14ee9002008deb49bc7af2d9491057e78%2Fslack-create-app-name.png?alt=media" alt=""><figcaption><p>App 名を入力してワークスペースを選択</p></figcaption></figure>

### 4. Signing Secret を取得 <a href="#step-get-signing-secret" id="step-get-signing-secret"></a>

作成後、<mark style="color:blue;">Basic Information</mark> ページを開き、**App Credentials** セクションで <mark style="color:blue;">Signing Secret</mark> を探します。<mark style="color:blue;">Show</mark> をクリックして、後で使うためにコピーしておきます。

***

## 手順二：Bot の権限設定 <a href="#step-configure-bot-permissions" id="step-configure-bot-permissions"></a>

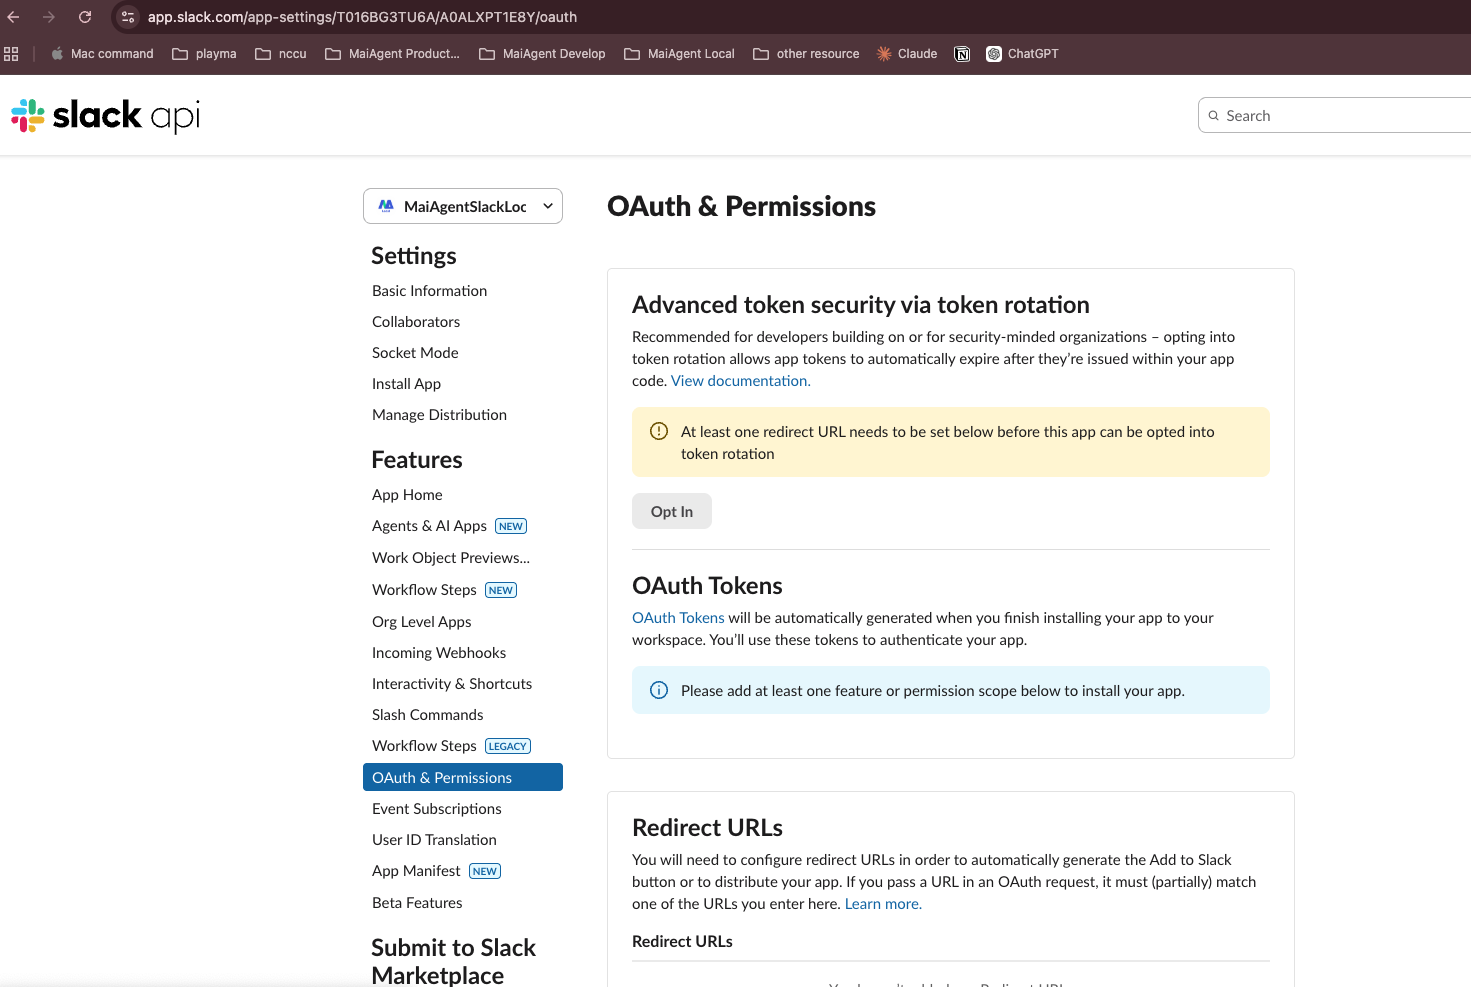
### 1. OAuth & Permissions を開く <a href="#step-go-to-oauth-permissions" id="step-go-to-oauth-permissions"></a>

左側のメニューで <mark style="color:blue;">OAuth & Permissions</mark> をクリックします。

<figure><img src="https://2584873290-files.gitbook.io/~/files/v0/b/gitbook-x-prod.appspot.com/o/spaces%2FTvHx8hgwYGDTLD3A7xoW%2Fuploads%2Fgit-blob-ccce8cfe52662eba88dc58278f7ab3fb48e34e29%2Fslack-oauth-permissions.png?alt=media" alt=""><figcaption><p>OAuth &#x26; Permissions ページ</p></figcaption></figure>

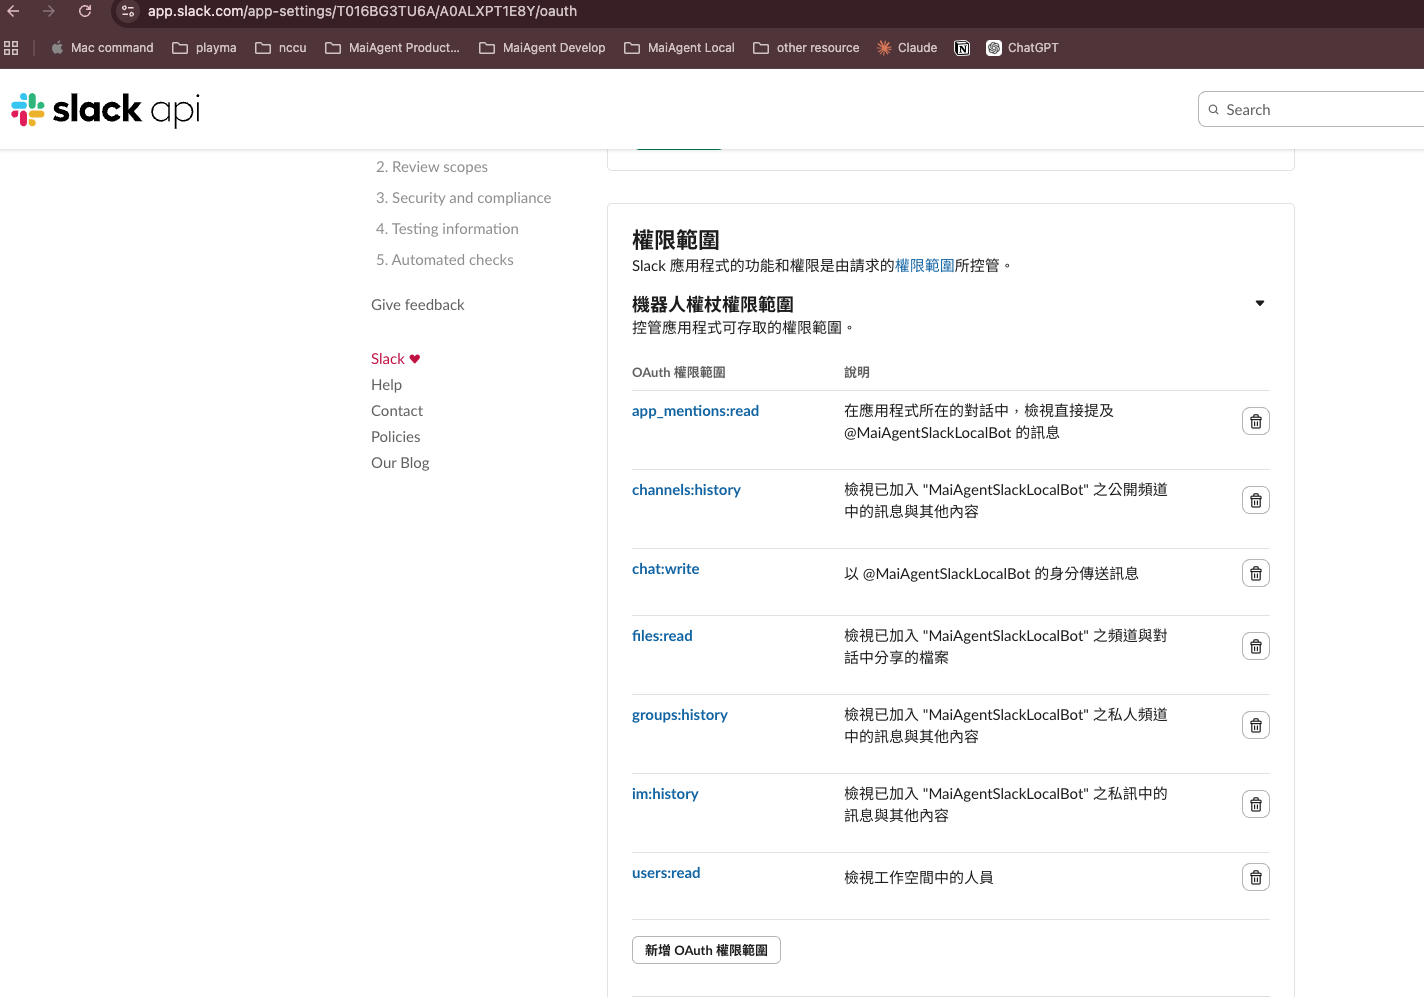
### 2. Bot Token Scopes を追加 <a href="#step-add-bot-token-scopes" id="step-add-bot-token-scopes"></a>

**Bot Token Scopes** セクションまで下にスクロールし、<mark style="color:blue;">Add an OAuth Scope</mark> をクリックして、以下の権限を順に追加します。

| Scope               | 説明                           |
| ------------------- | ---------------------------- |
| `app_mentions:read` | Bot が @ メンションされたメッセージを読み取ります |
| `channels:history`  | パブリックチャンネルのメッセージ履歴を読み取ります    |
| `chat:write`        | メッセージを送信します                  |
| `files:read`        | ファイル（画像・ドキュメント）を読み取ります       |
| `groups:history`    | プライベートチャンネルのメッセージ履歴を読み取ります   |
| `im:history`        | ダイレクトメッセージの履歴を読み取ります         |
| `mpim:history`      | グループダイレクトメッセージの履歴を読み取ります     |

<figure><img src="https://2584873290-files.gitbook.io/~/files/v0/b/gitbook-x-prod.appspot.com/o/spaces%2FTvHx8hgwYGDTLD3A7xoW%2Fuploads%2Fgit-blob-ad151db9b82446f54dd72069c0a929050cc67403%2Fslack-bot-scopes.png?alt=media" alt=""><figcaption><p>Bot Token Scopes の権限設定</p></figcaption></figure>

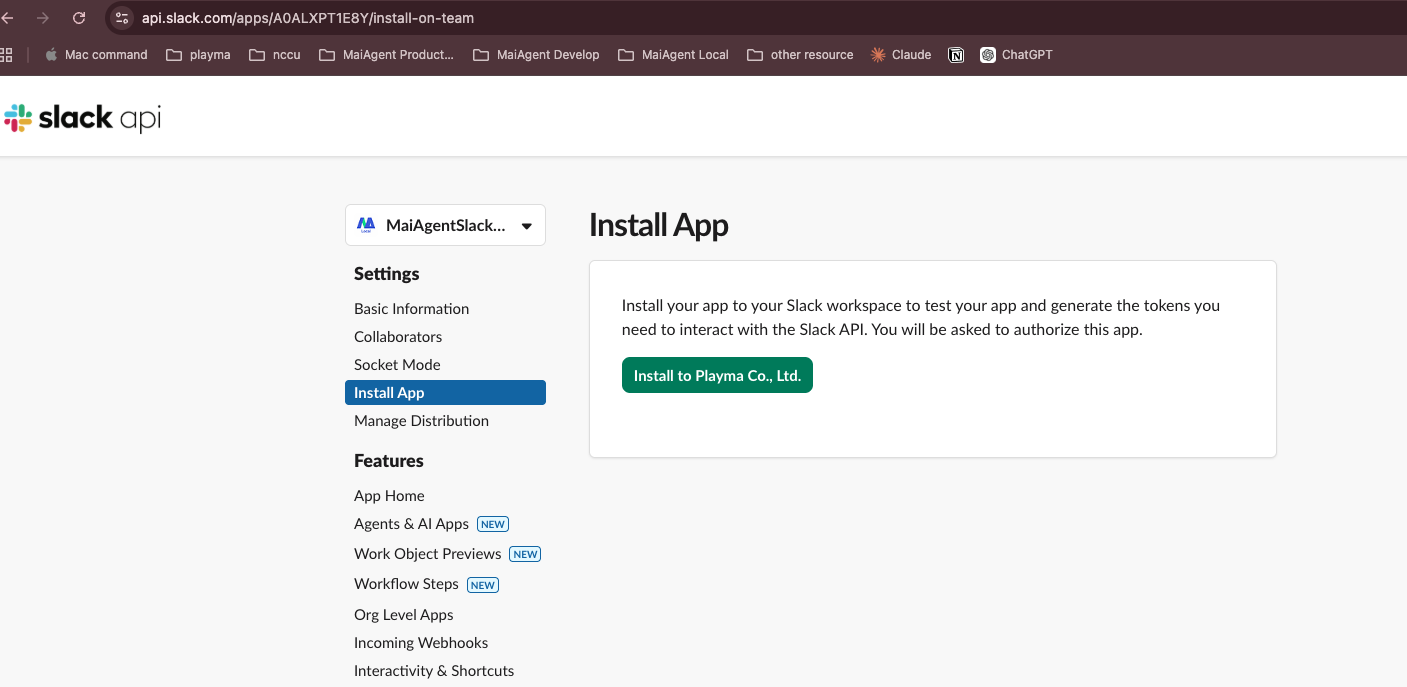
### 3. ワークスペースに App をインストール <a href="#step-install-app-to-workspace" id="step-install-app-to-workspace"></a>

ページ上部に戻り、<mark style="color:blue;">Install to Workspace</mark>（または Reinstall to Workspace）をクリックします。

<figure><img src="https://2584873290-files.gitbook.io/~/files/v0/b/gitbook-x-prod.appspot.com/o/spaces%2FTvHx8hgwYGDTLD3A7xoW%2Fuploads%2Fgit-blob-5b4dc93fd2fa5c1286e543b1825cfd92049da9e9%2Fslack-install-app.png?alt=media" alt=""><figcaption><p>Install App ページ</p></figcaption></figure>

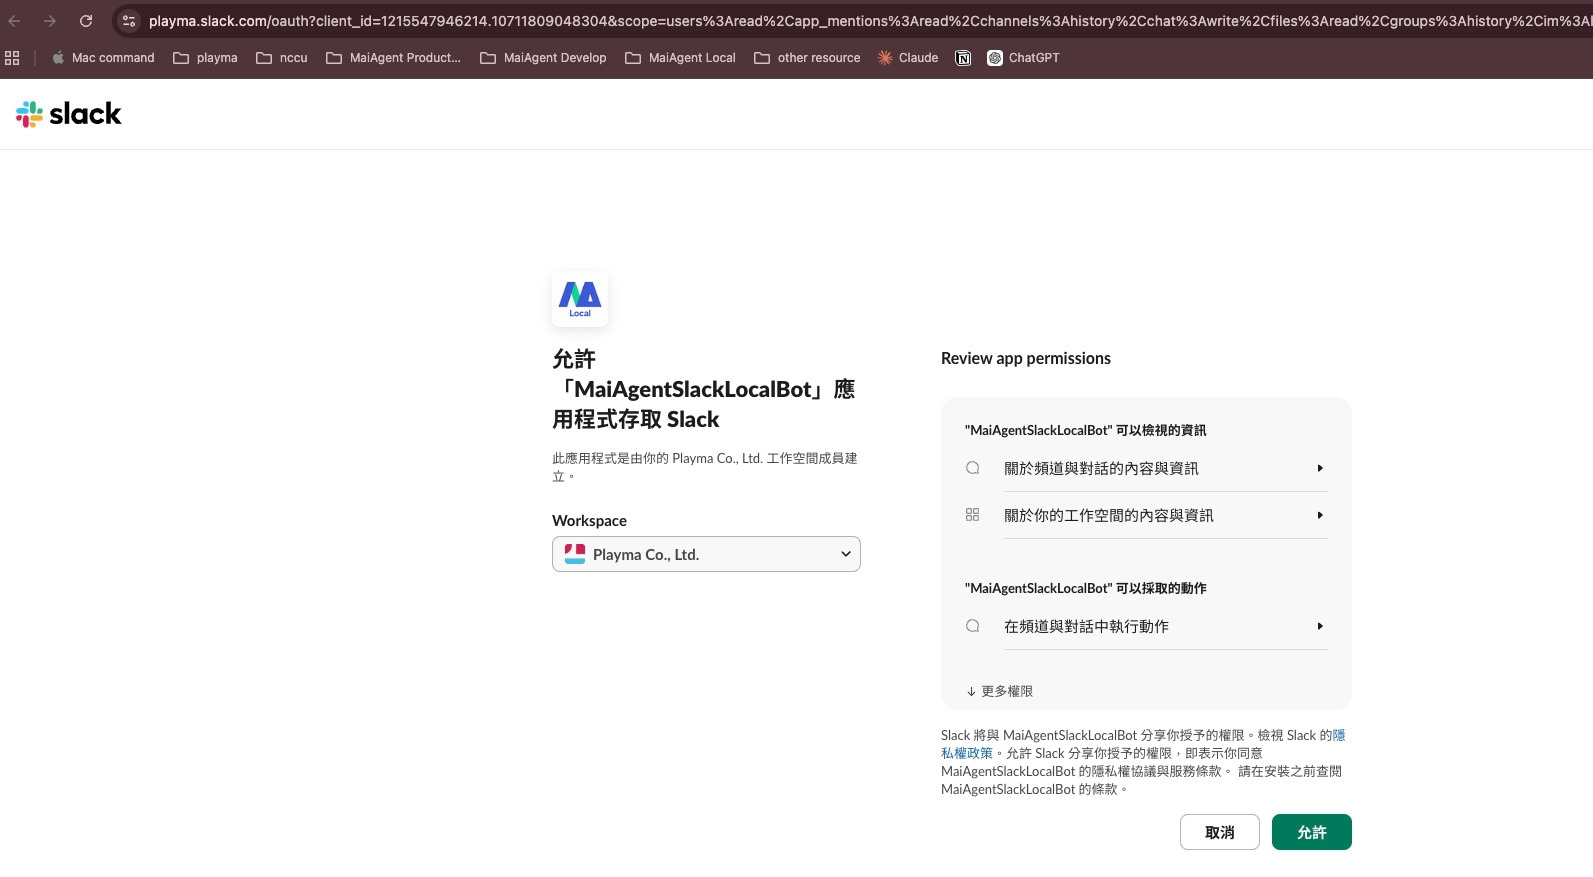
Slack の認可ページに移動します。権限を確認し、<mark style="color:blue;">許可する</mark> をクリックします。

<figure><img src="https://2584873290-files.gitbook.io/~/files/v0/b/gitbook-x-prod.appspot.com/o/spaces%2FTvHx8hgwYGDTLD3A7xoW%2Fuploads%2Fgit-blob-daf77d582ca9b5f01416b59e0c1c2733cf9b8d4d%2Fslack-authorize.png?alt=media" alt=""><figcaption><p>ワークスペースへの App のアクセスを許可</p></figcaption></figure>

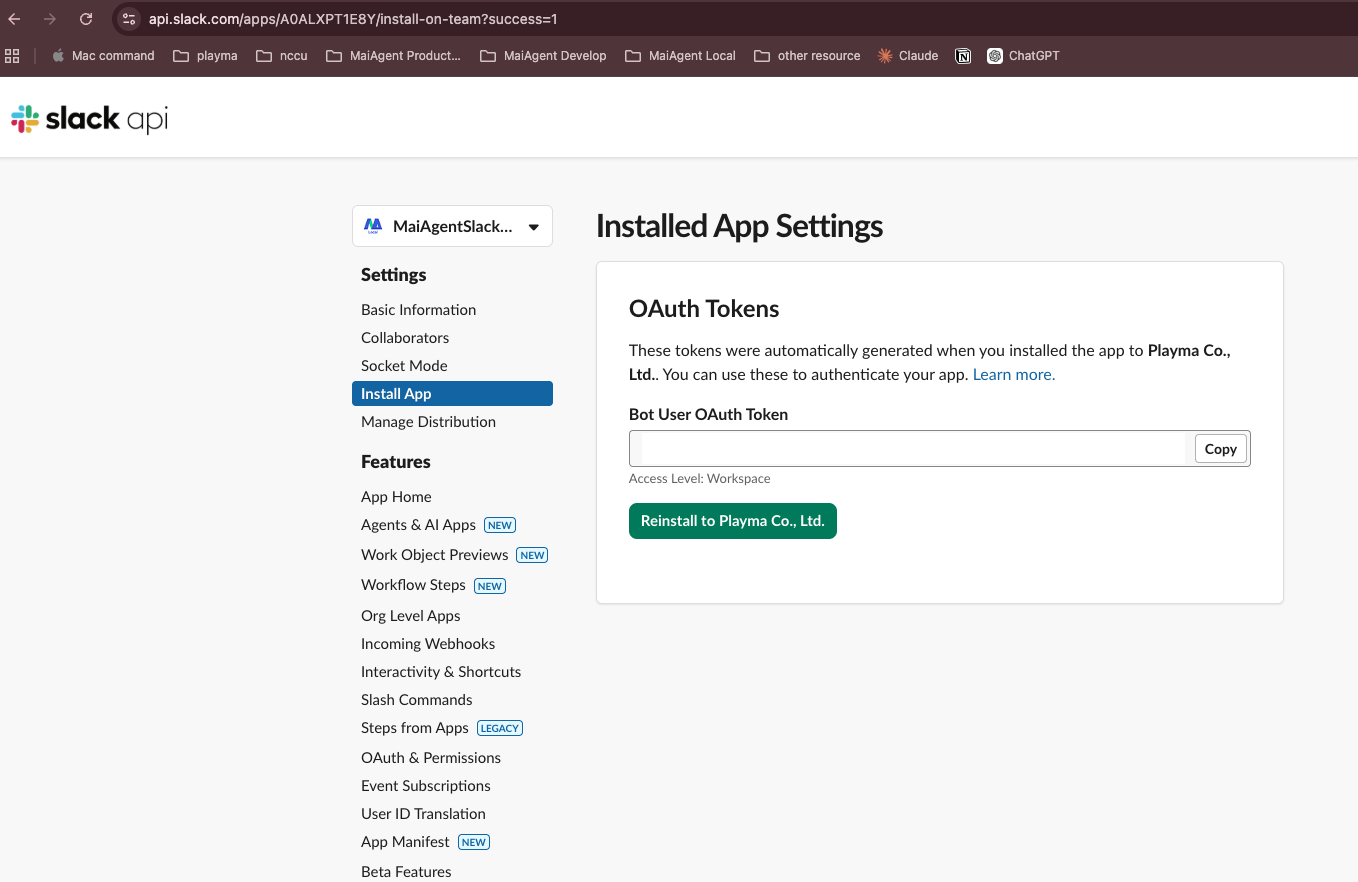
### 4. Bot User OAuth Token をコピー <a href="#step-copy-bot-user-oauth-token" id="step-copy-bot-user-oauth-token"></a>

インストール完了後、<mark style="color:blue;">OAuth & Permissions</mark> ページに戻り、<mark style="color:blue;">Bot User OAuth Token</mark>（形式：`xoxb-...`）をコピーします。

<figure><img src="https://2584873290-files.gitbook.io/~/files/v0/b/gitbook-x-prod.appspot.com/o/spaces%2FTvHx8hgwYGDTLD3A7xoW%2Fuploads%2Fgit-blob-0497bc9b32949a666883cab21c8da7cdbc013795%2Fslack-bot-token.png?alt=media" alt=""><figcaption><p>Bot User OAuth Token をコピー</p></figcaption></figure>

***

## 手順三：App Home の設定（ダイレクトメッセージの有効化） <a href="#step-configure-app-home" id="step-configure-app-home"></a>

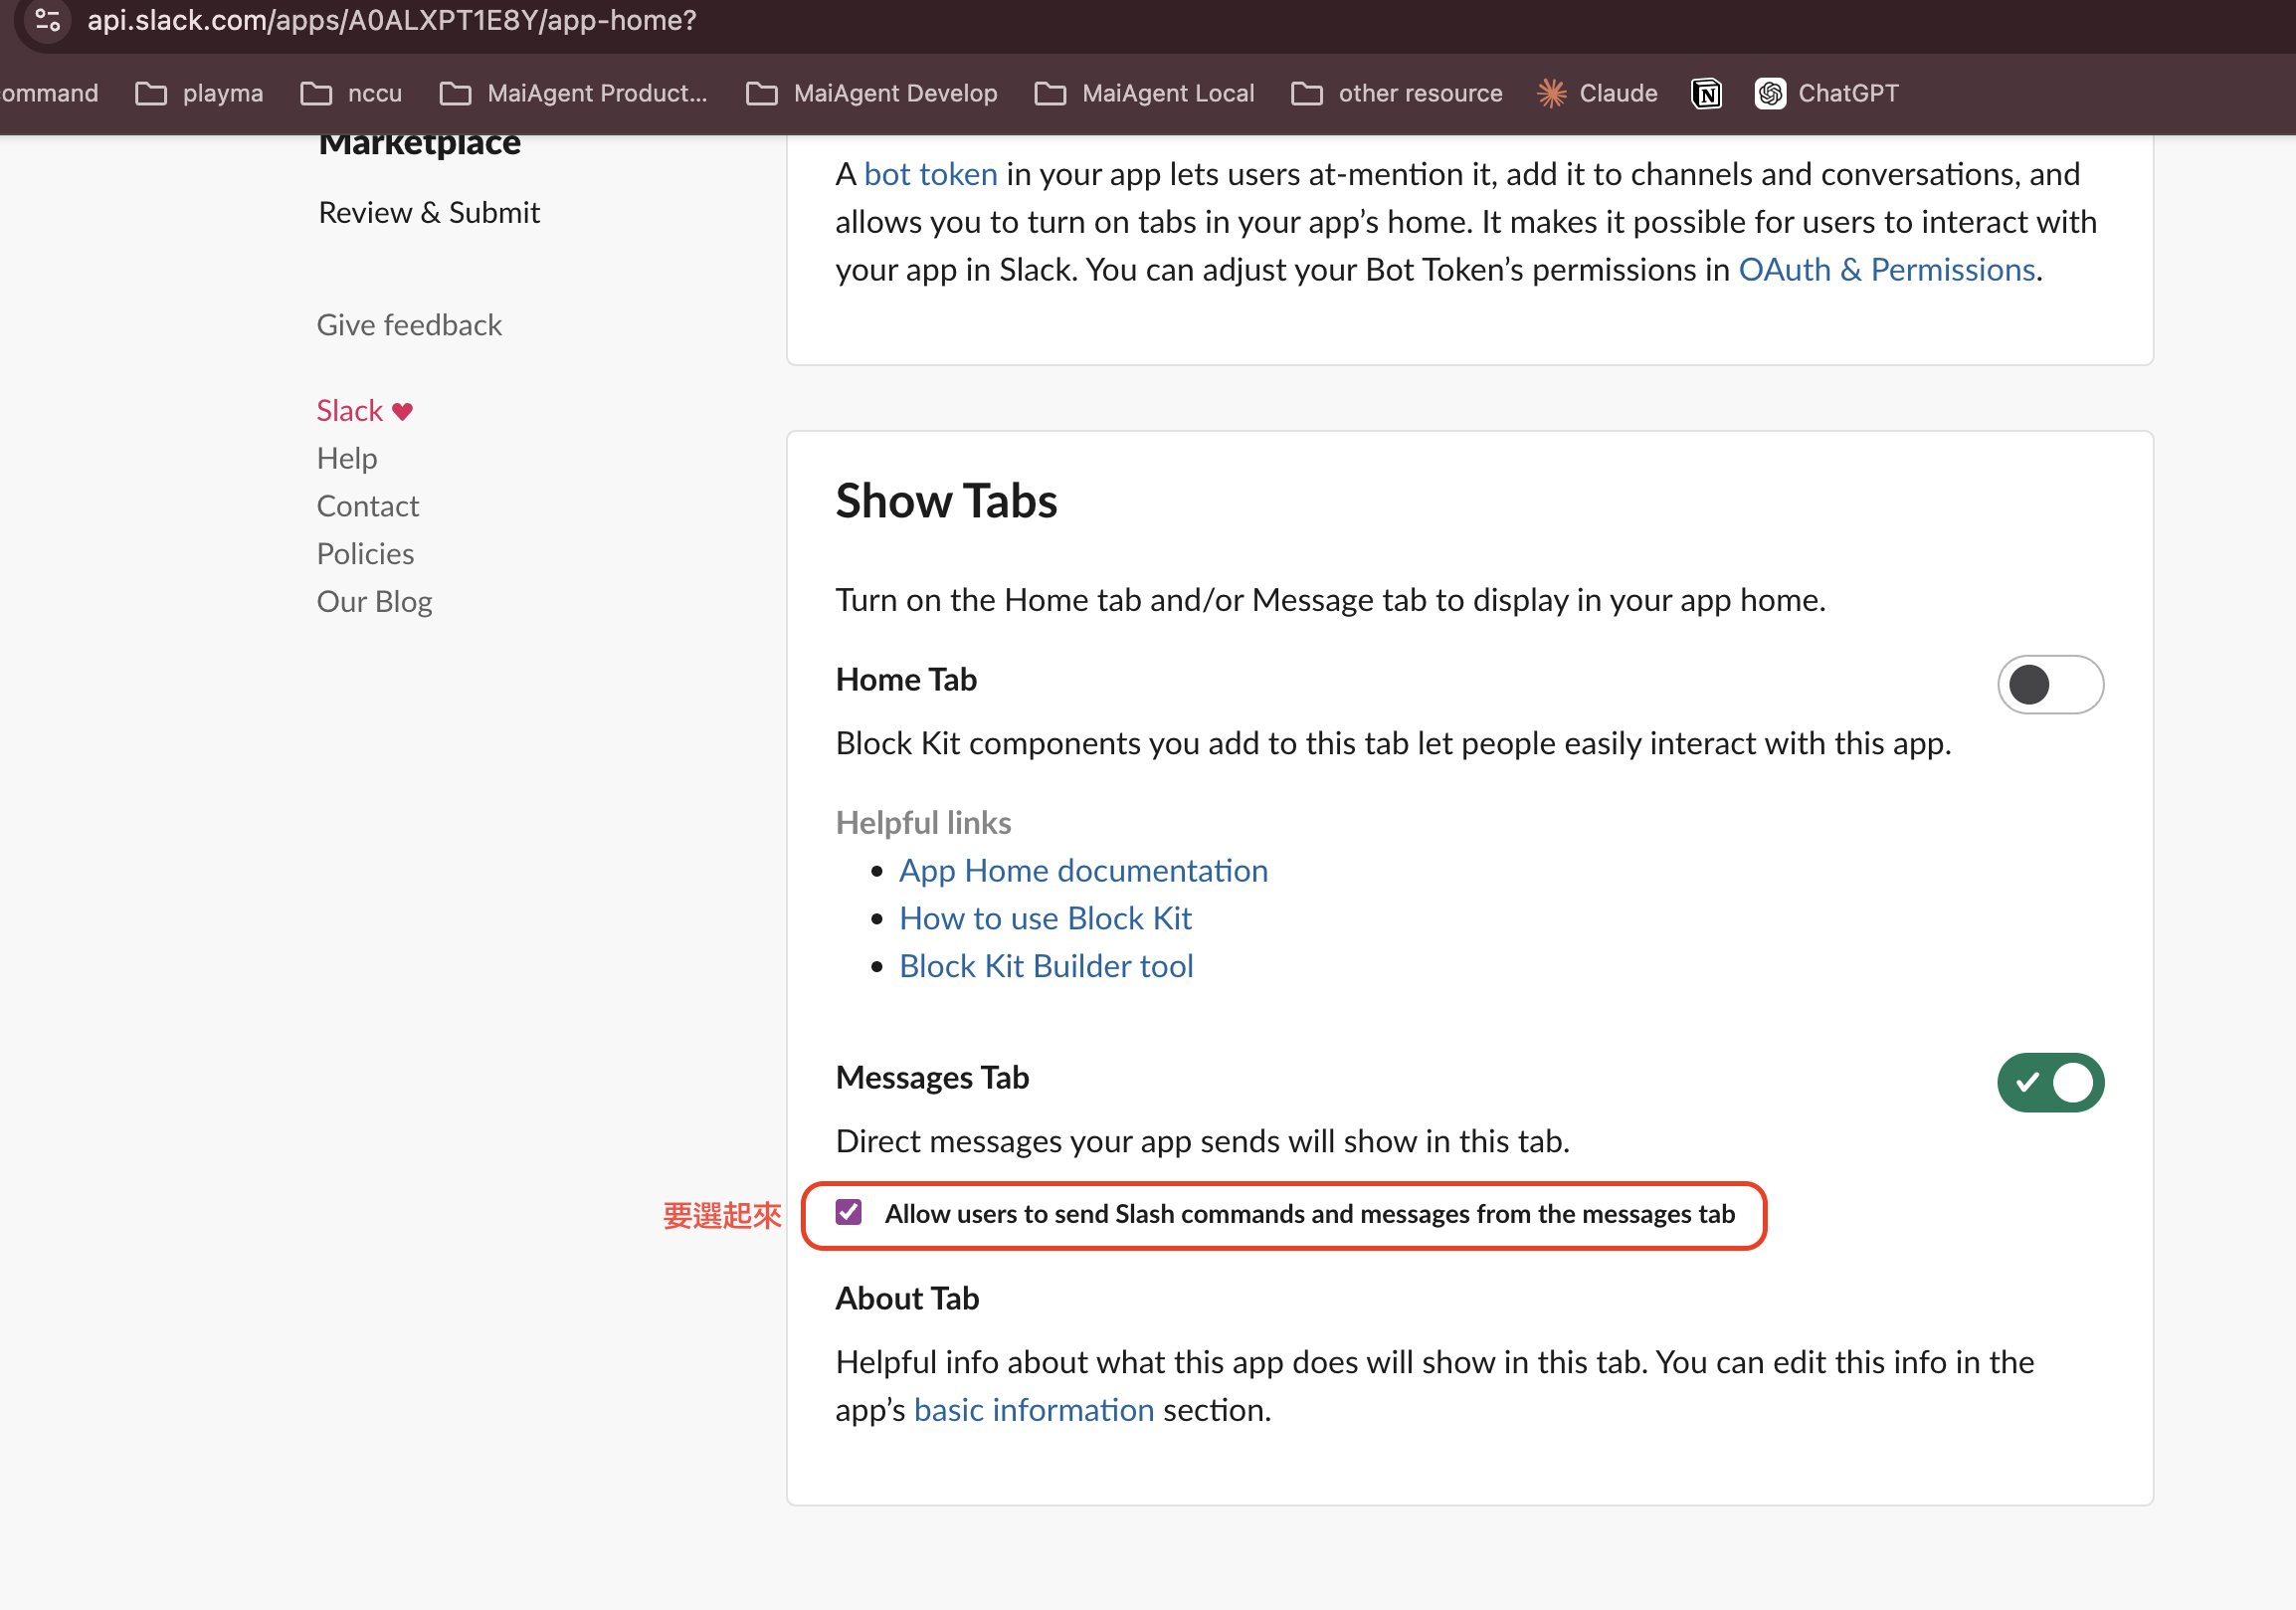
左側のメニューから <mark style="color:blue;">App Home</mark> ページを開き、**Show Tabs** セクションで以下を設定します。

1. <mark style="color:blue;">Messages Tab</mark> を有効にします
2. <mark style="color:blue;">Allow users to send Slash commands and messages from the messages tab</mark> にチェックを入れます

<figure><img src="https://2584873290-files.gitbook.io/~/files/v0/b/gitbook-x-prod.appspot.com/o/spaces%2FTvHx8hgwYGDTLD3A7xoW%2Fuploads%2Fgit-blob-2d94bf960a8fc3380a7d7558b963b1047874fd5e%2Fslack-app-home-messages.png?alt=media" alt=""><figcaption><p>Messages Tab を有効にして、ユーザーが Bot にダイレクトメッセージを送信できるようにします</p></figcaption></figure>

{% hint style="warning" %}
この手順は必須です。完了しないと、ユーザーはダイレクトメッセージで Bot とやり取りできません。
{% endhint %}

***

## 手順四：MaiAgent で Slack チャネルを作成 <a href="#step-create-slack-channel-in-maiagent" id="step-create-slack-channel-in-maiagent"></a>

### 1. チャネル連携を開く <a href="#step-go-to-channel-integration" id="step-go-to-channel-integration"></a>

MaiAgent の左側のメニューで <mark style="color:blue;">チャネル</mark> をクリックし、右上の <mark style="color:blue;">チャネルを連携</mark> をクリックして、<mark style="color:blue;">Slack</mark> を選択します。

### 2. 基本設定を入力 <a href="#step-fill-basic-settings" id="step-fill-basic-settings"></a>

| 項目                       | 説明                                  |
| ------------------------ | ----------------------------------- |
| **名前**                   | この連携の名前を入力します（必須）                   |
| **AI アシスタント**            | 連携する Agent を選択します                   |
| **Bot User OAuth Token** | 手順二で取得した Bot Token を貼り付けます（必須）      |
| **Signing Secret**       | 手順一で取得した Signing Secret を貼り付けます（必須） |

### 3. 認証情報を検証 <a href="#step-verify-credentials" id="step-verify-credentials"></a>

<mark style="color:blue;">認証情報を検証</mark> ボタンをクリックして、Token と Secret が正しいことを確認します。

### 4. チャットルーム設定 <a href="#step-chat-room-settings" id="step-chat-room-settings"></a>

| 設定                          | 説明                                                                                                                                                   |
| --------------------------- | ---------------------------------------------------------------------------------------------------------------------------------------------------- |
| **グループでは @ メンションされた場合のみ返信** | 有効にすると、Bot はグループチャンネルで @ メンションされた場合のみ返信します                                                                                                           |
| **リセットコマンドを有効にする**          | 有効にすると、コマンドの文字列を 1 つ以上追加できます（例：「最初からやり直す」）。ユーザーが Slack で送信したメッセージがいずれかと完全に一致すると、そのユーザー用に新しい会話を開始します。コマンド自体への返信はなく、ユーザーが次のメッセージを送信すると、AI が新しい会話で回答します |

### 5. 保存して Webhook URL を取得 <a href="#step-save-and-get-webhook-url" id="step-save-and-get-webhook-url"></a>

<mark style="color:blue;">チャネルを連携</mark> をクリックして作成を完了します。システムが **Webhook URL** を生成するので、後で使うためにコピーしておきます。

***

## 手順五：Slack App に戻って Event Subscriptions を設定 <a href="#step-configure-event-subscriptions" id="step-configure-event-subscriptions"></a>

### 1. Events を有効にする <a href="#step-enable-events" id="step-enable-events"></a>

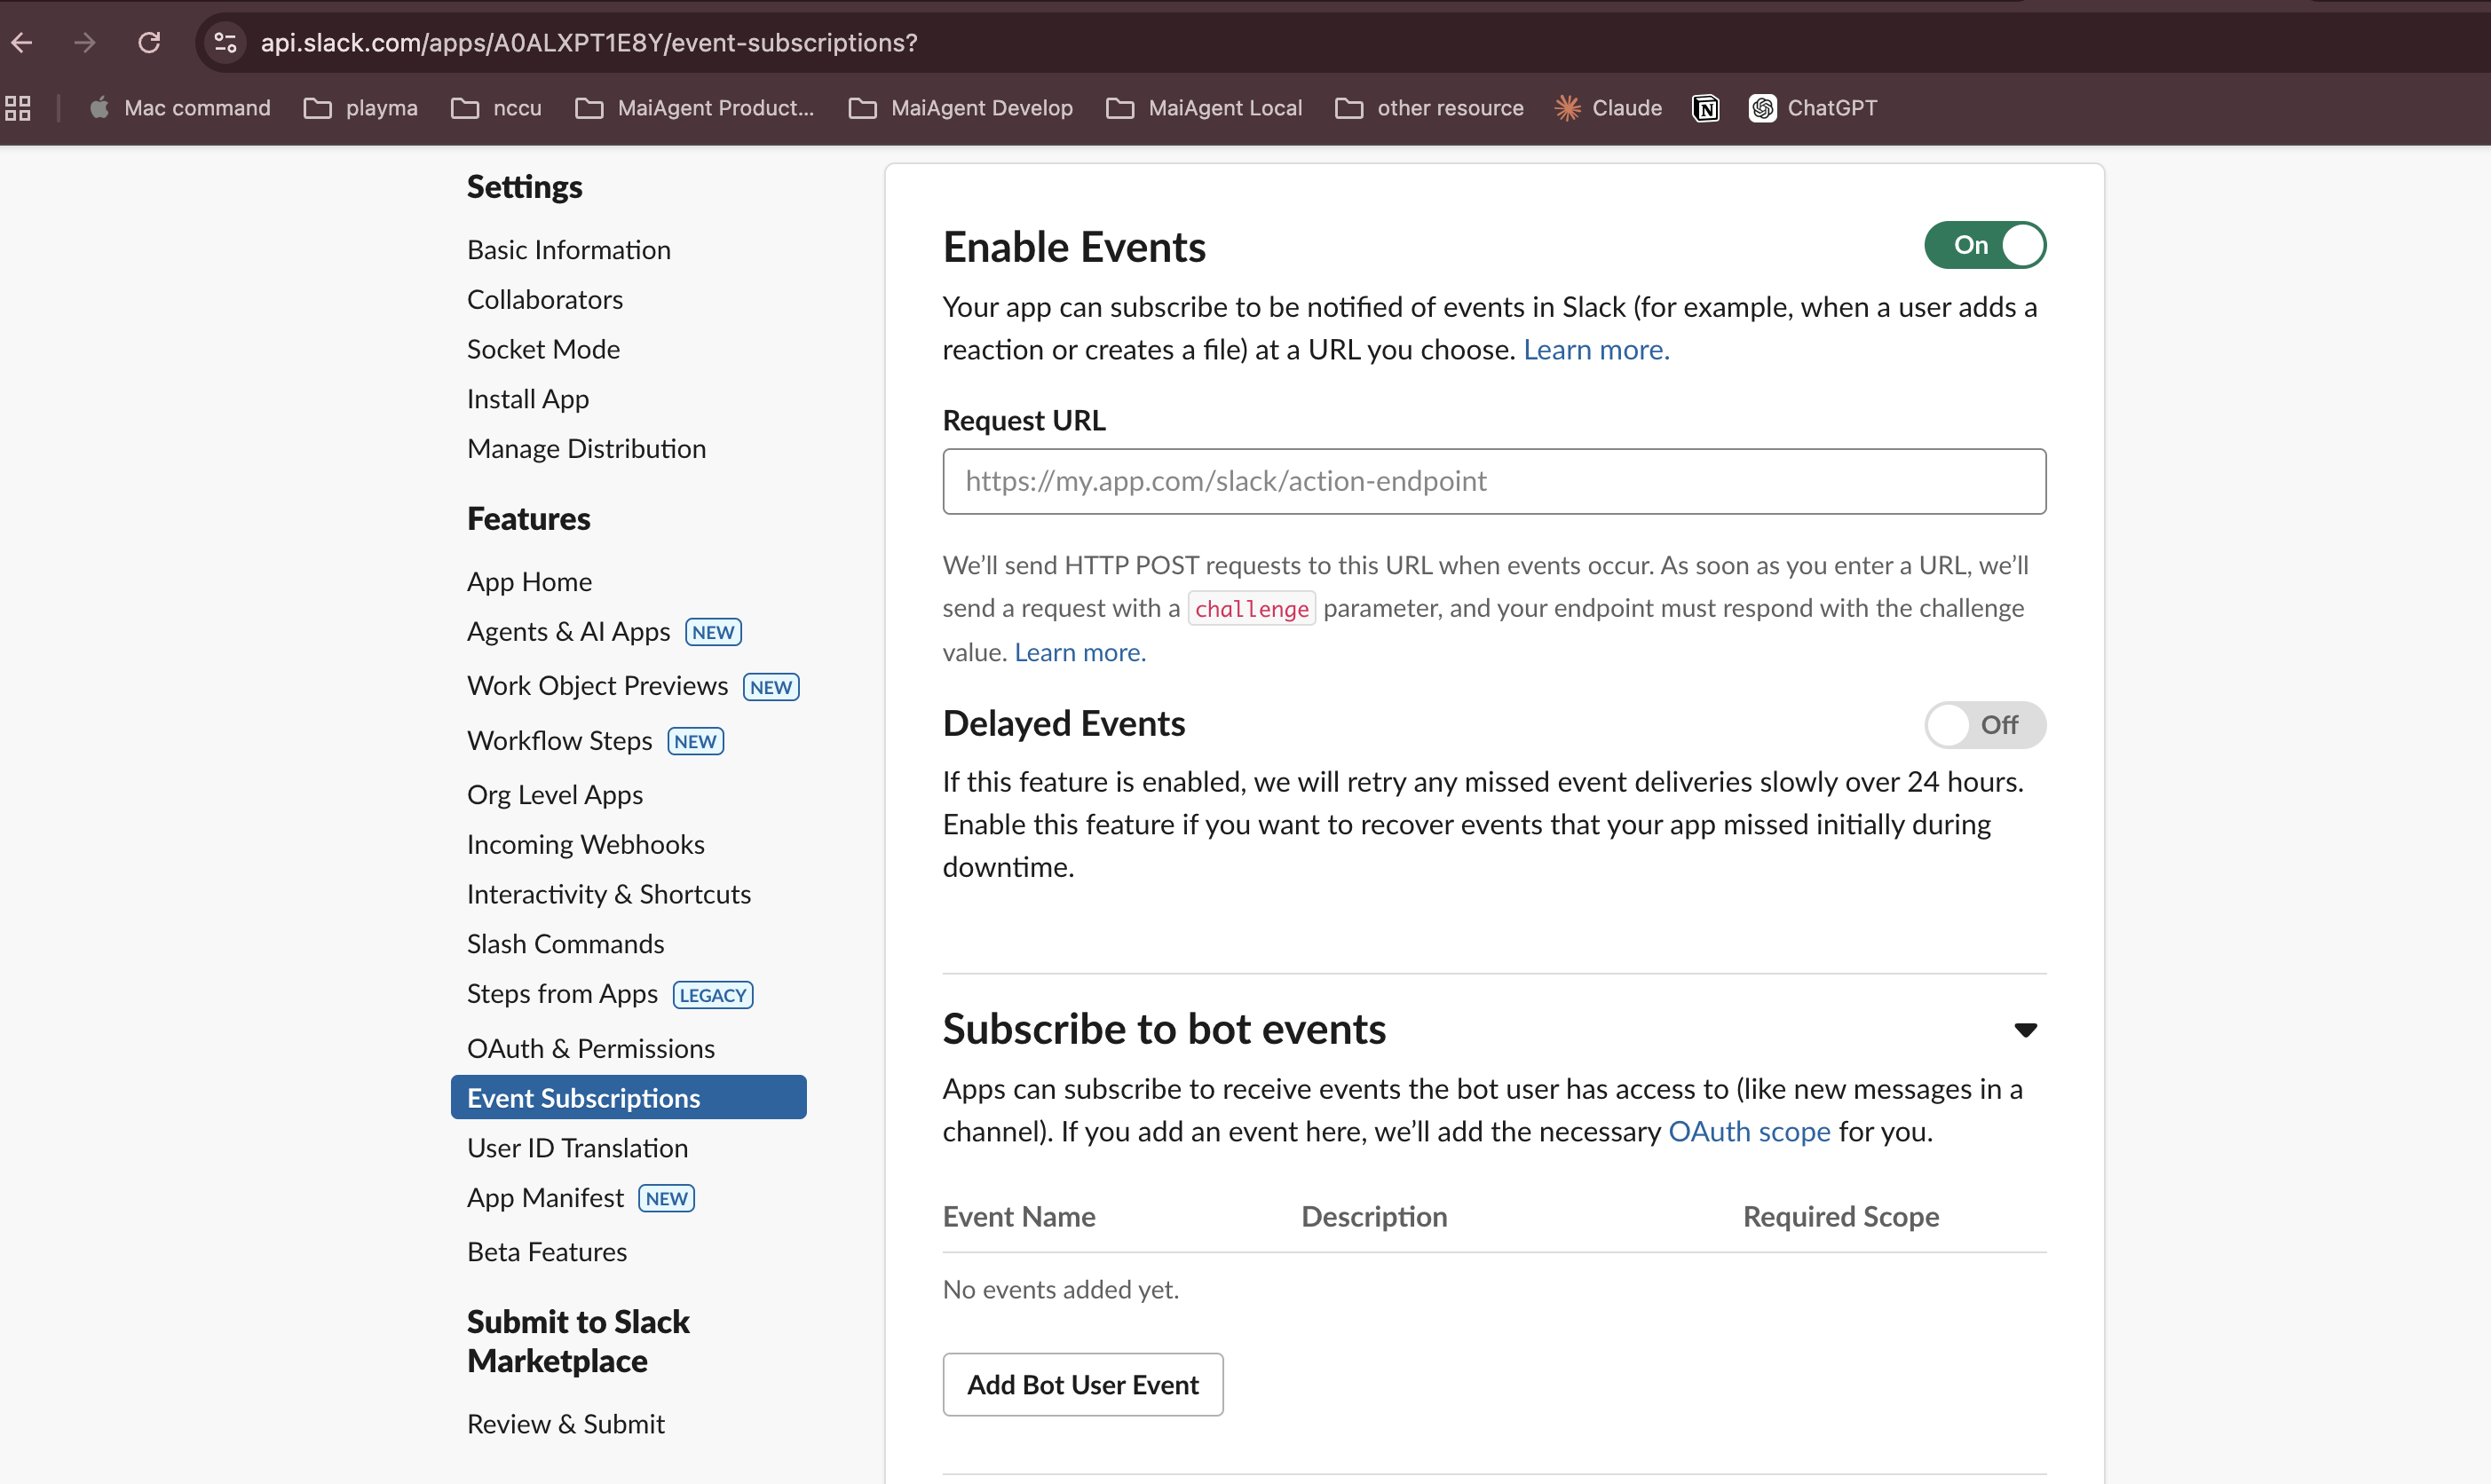
Slack App の左側のメニューで <mark style="color:blue;">Event Subscriptions</mark> をクリックし、<mark style="color:blue;">Enable Events</mark> を有効にします。

<figure><img src="https://2584873290-files.gitbook.io/~/files/v0/b/gitbook-x-prod.appspot.com/o/spaces%2FTvHx8hgwYGDTLD3A7xoW%2Fuploads%2Fgit-blob-589c809a1adab5265cedad08dadedf9699b1cfeb%2Fslack-event-subscriptions.png?alt=media" alt=""><figcaption><p>Event Subscriptions 設定ページ</p></figcaption></figure>

### 2. Request URL を貼り付ける <a href="#step-paste-request-url" id="step-paste-request-url"></a>

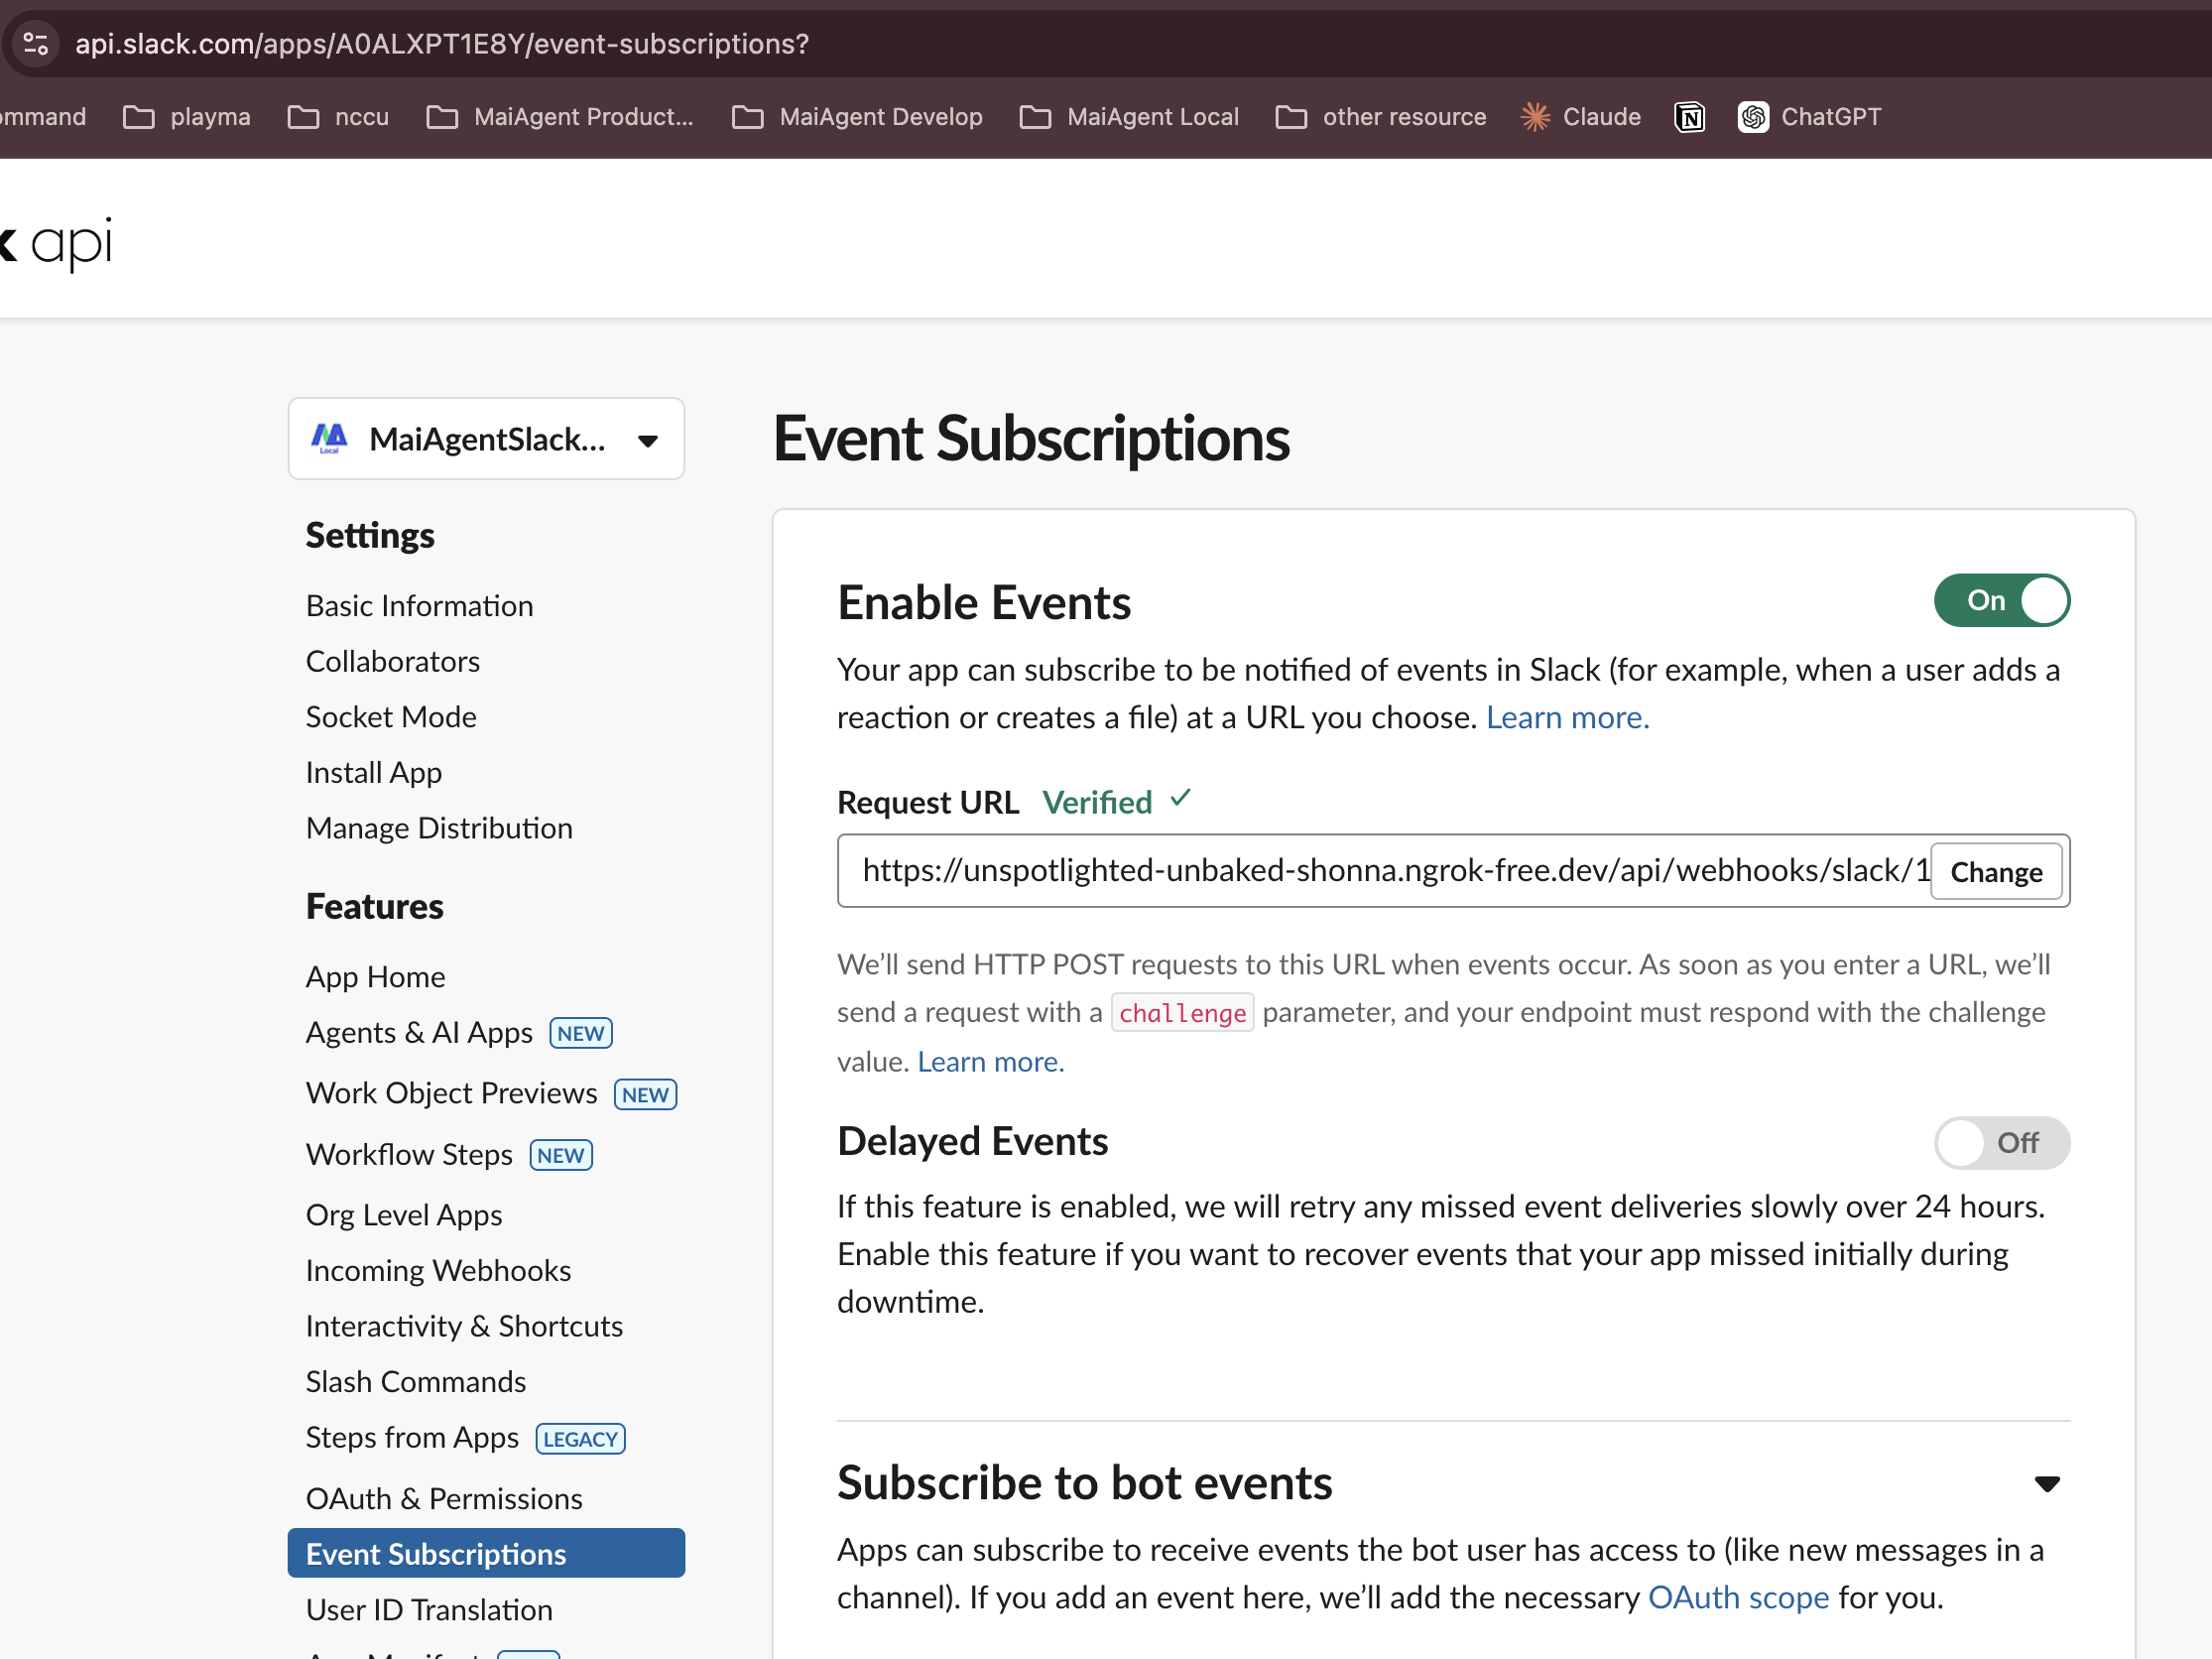
MaiAgent が生成した **Webhook URL** を <mark style="color:blue;">Request URL</mark> 欄に貼り付けます。Slack が自動検証し、<mark style="color:green;">Verified ✓</mark> と表示されれば設定成功です。

<figure><img src="https://2584873290-files.gitbook.io/~/files/v0/b/gitbook-x-prod.appspot.com/o/spaces%2FTvHx8hgwYGDTLD3A7xoW%2Fuploads%2Fgit-blob-0166cb7b78b16d9424fb3d506b972ab76f6ed744%2Fslack-event-verified.png?alt=media" alt=""><figcaption><p>Request URL の検証に成功</p></figcaption></figure>

### 3. Bot Events を購読 <a href="#step-subscribe-bot-events" id="step-subscribe-bot-events"></a>

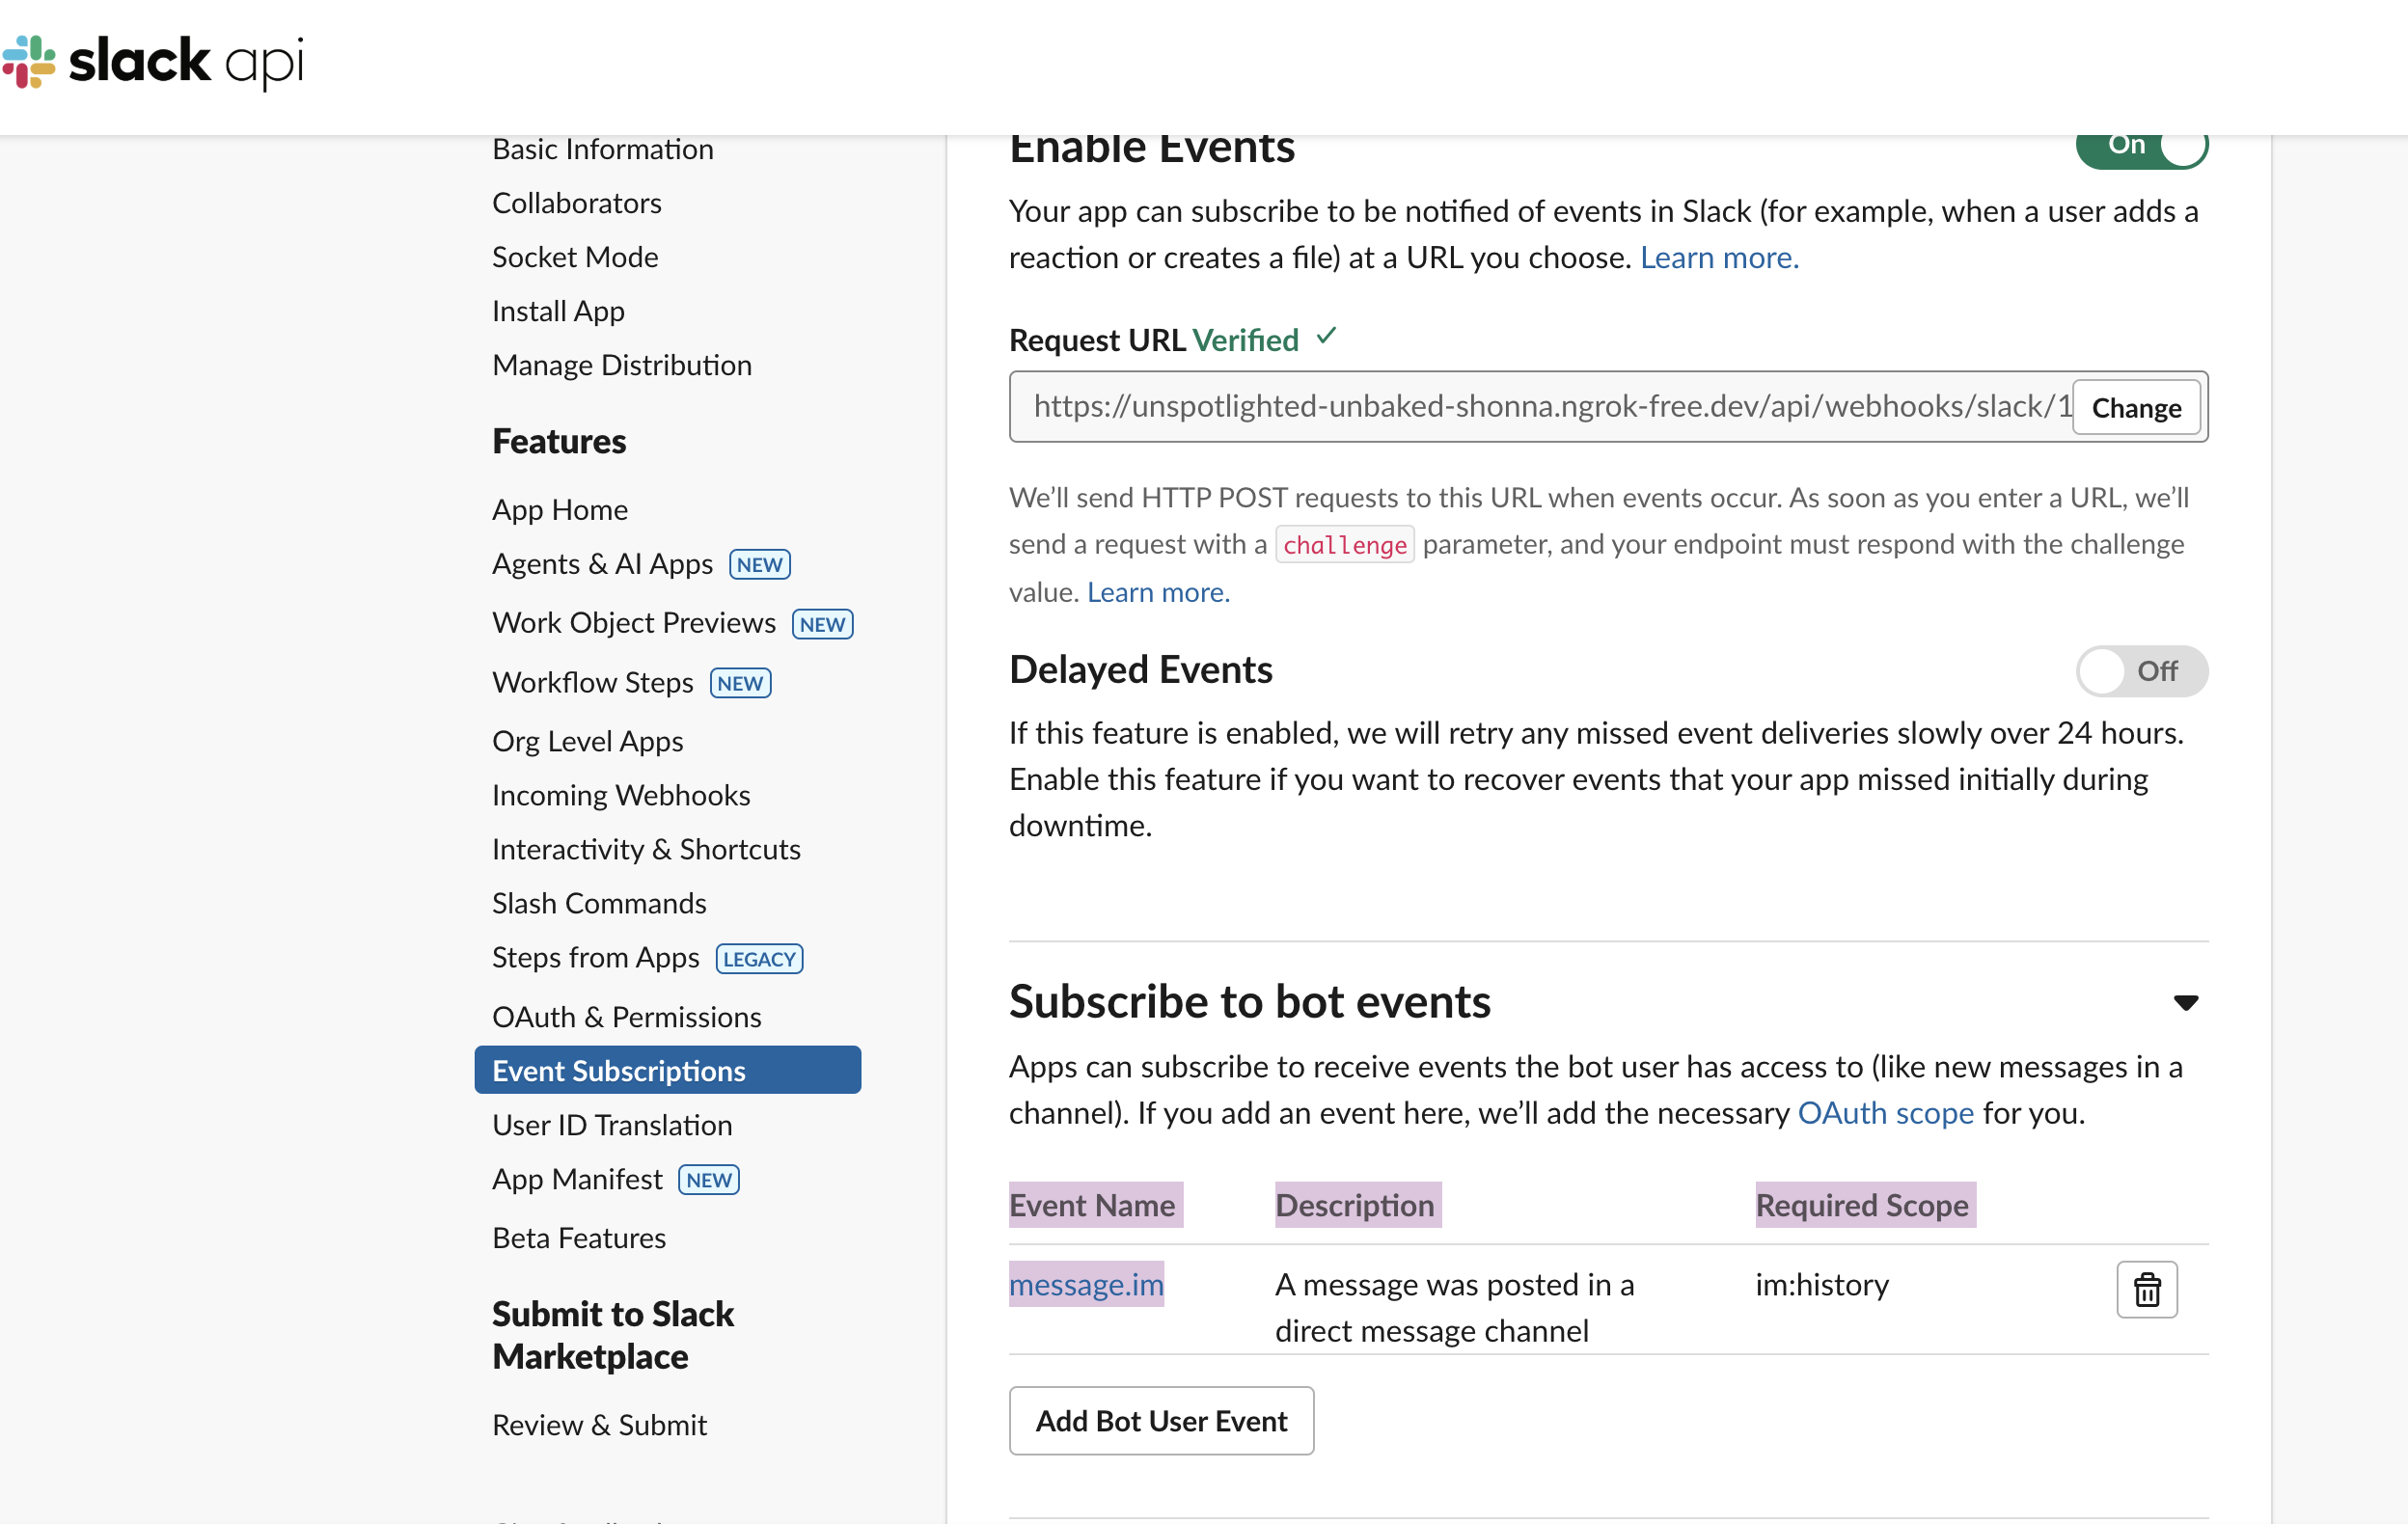
**Subscribe to bot events** セクションを展開し、<mark style="color:blue;">Add Bot User Event</mark> をクリックして、以下のイベントを追加します。

| Event              | 説明                     |
| ------------------ | ---------------------- |
| `message.im`       | ダイレクトメッセージの新着メッセージ     |
| `message.channels` | パブリックチャンネルの新着メッセージ     |
| `message.groups`   | プライベートチャンネルの新着メッセージ    |
| `message.mpim`     | グループダイレクトメッセージの新着メッセージ |
| `app_mention`      | チャンネル内での @ メンション       |

<figure><img src="https://2584873290-files.gitbook.io/~/files/v0/b/gitbook-x-prod.appspot.com/o/spaces%2FTvHx8hgwYGDTLD3A7xoW%2Fuploads%2Fgit-blob-a739fd3cc31beba2fbb8aa335c6a9ca7bb6fd79f%2Fslack-event-bot-events.png?alt=media" alt=""><figcaption><p>Bot Events の購読</p></figcaption></figure>

### 4. 変更を保存 <a href="#step-save-changes" id="step-save-changes"></a>

<mark style="color:blue;">Save Changes</mark> をクリックして設定を完了します。

{% hint style="warning" %}
保存後、Slack から App の再インストールを求められる場合があります。ページ上部の案内をクリックして再インストールし、新しい権限を適用してください。
{% endhint %}

***

## 利用開始 <a href="#getting-started" id="getting-started"></a>

連携完了後、以下の方法で Agent とやり取りできます。

### ダイレクトメッセージでの会話 <a href="#direct-message-conversation" id="direct-message-conversation"></a>

Slack で Bot に直接ダイレクトメッセージを送ると、Agent が自動で返信します。テキスト、画像、ファイルを送信できます。

### ファイルのアップロードと分析 <a href="#file-upload-and-analysis" id="file-upload-and-analysis"></a>

ユーザーは会話中に Excel や PDF などのファイルをアップロードできます。Agent はファイルの内容を読み取り、関連する質問に回答できます。

### チャンネルでの @ メンション <a href="#channel-mention" id="channel-mention"></a>

チャンネルで `@Bot名 質問内容` と入力すると、Agent がそのチャンネルで返信します。

{% hint style="info" %}
Bot を特定のチャンネルに追加するには、そのチャンネルで `/invite @Bot名` と入力するか、チャンネル設定 → インテグレーション → アプリを追加から追加します。
{% endhint %}


---

# Agent Instructions
This documentation is published with GitBook. GitBook is the documentation platform designed so that both humans and AI agents can read, navigate, and reason over technical content effectively. Learn more at gitbook.com.

## Querying This Documentation
If you need additional information that is not directly available in this page, you can query the documentation by asking a question.

Perform an HTTP GET request on the following URL with the `ask` and `goal` query parameters:

```
GET https://docs.maiagent.ai/maiagent-user-guide/ja/build/choose-channel/slack.md?ask=<question>&goal=<user_goal>
```

`ask` is the immediate question: it should be specific, self-contained, and written in natural language.
`goal` is what the user is ultimately trying to achieve, the reason they need the answer. Sharing it helps GitBook give you a better, more relevant answer. A goal is most helpful when it describes the outcome the user wants rather than restating the question. For example, with `ask=how do I create an API token`, a goal like `automate deployments from our CI pipeline` lets GitBook tailor the answer to that use case.

The response will contain a direct answer to the question and relevant excerpts and sources from the documentation.

Use this mechanism when the answer is not explicitly present in the current page, you need clarification or additional context, or you want to retrieve related documentation sections.