> For the complete documentation index, see [llms.txt](https://docs.maiagent.ai/llms.txt). Markdown versions of documentation pages are available by appending `.md` to page URLs; this page is available as [Markdown](https://docs.maiagent.ai/maiagent-user-guide/ja/build/choose-channel/connect-telegram.md).

# 会話プラットフォーム連携：Telegram

Telegram チャネルの連携手順。Telegram Bot を作成して Bot Token を取得し、MaiAgent でチャネルを追加して Agent に紐付けます。

## <mark style="color:blue;">連携前の確認</mark> <a href="#pre-integration-checklist" id="pre-integration-checklist"></a>

* [MaiAgent プラットフォーム](https://admin.maiagent.ai/)で「AI アシスタント」を作成済みであること
* Telegram アカウントを登録済みであること

## <mark style="color:blue;">連携を開始する</mark> <a href="#start-integration" id="start-integration"></a>

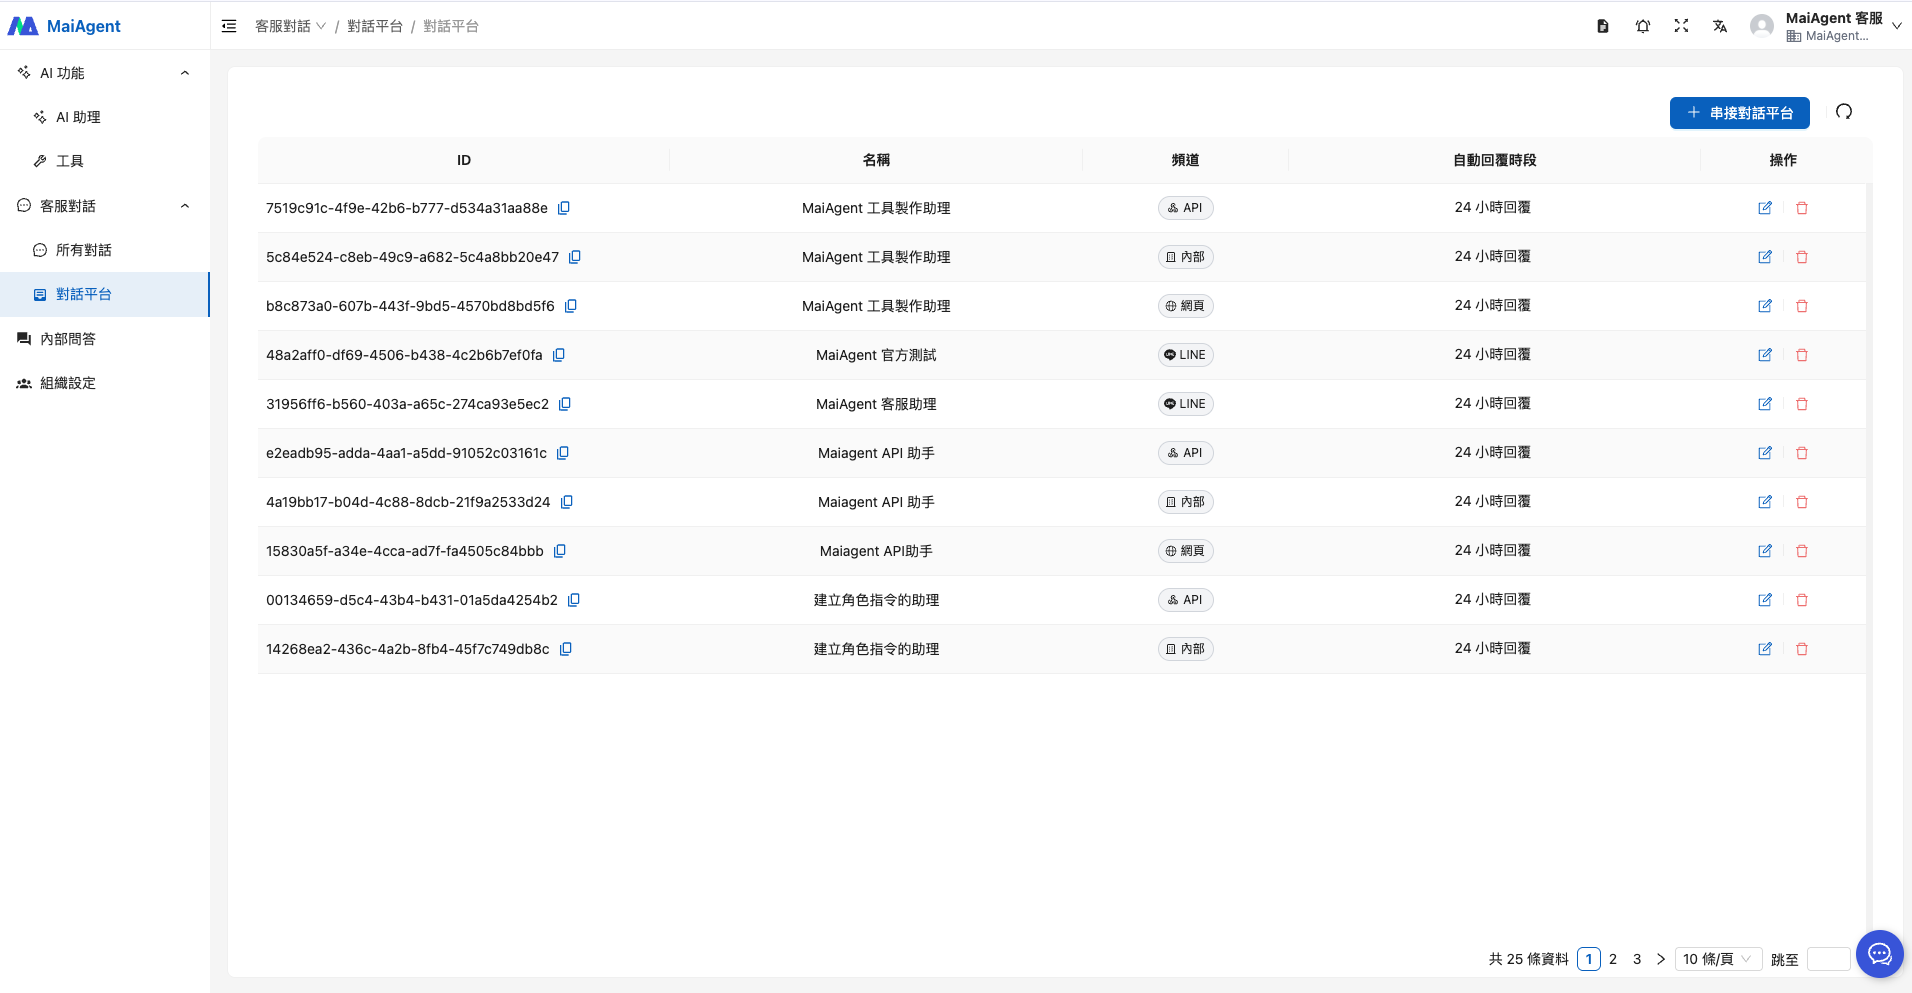
### 1. 左側のメニューで「チャネル」を開き、右上の <mark style="color:blue;">「＋チャネルを連携」</mark> ボタンをクリックします <a href="#step-go-to-channel-menu" id="step-go-to-channel-menu"></a>

<figure><img src="https://2584873290-files.gitbook.io/~/files/v0/b/gitbook-x-prod.appspot.com/o/spaces%2FTvHx8hgwYGDTLD3A7xoW%2Fuploads%2Fgit-blob-cfa83521237f42113d84ee922d67815b61bcbcc4%2F%E6%88%AA%E5%9C%96%202025-05-06%20%E4%B8%8B%E5%8D%882.29.25.png?alt=media" alt=""><figcaption></figcaption></figure>

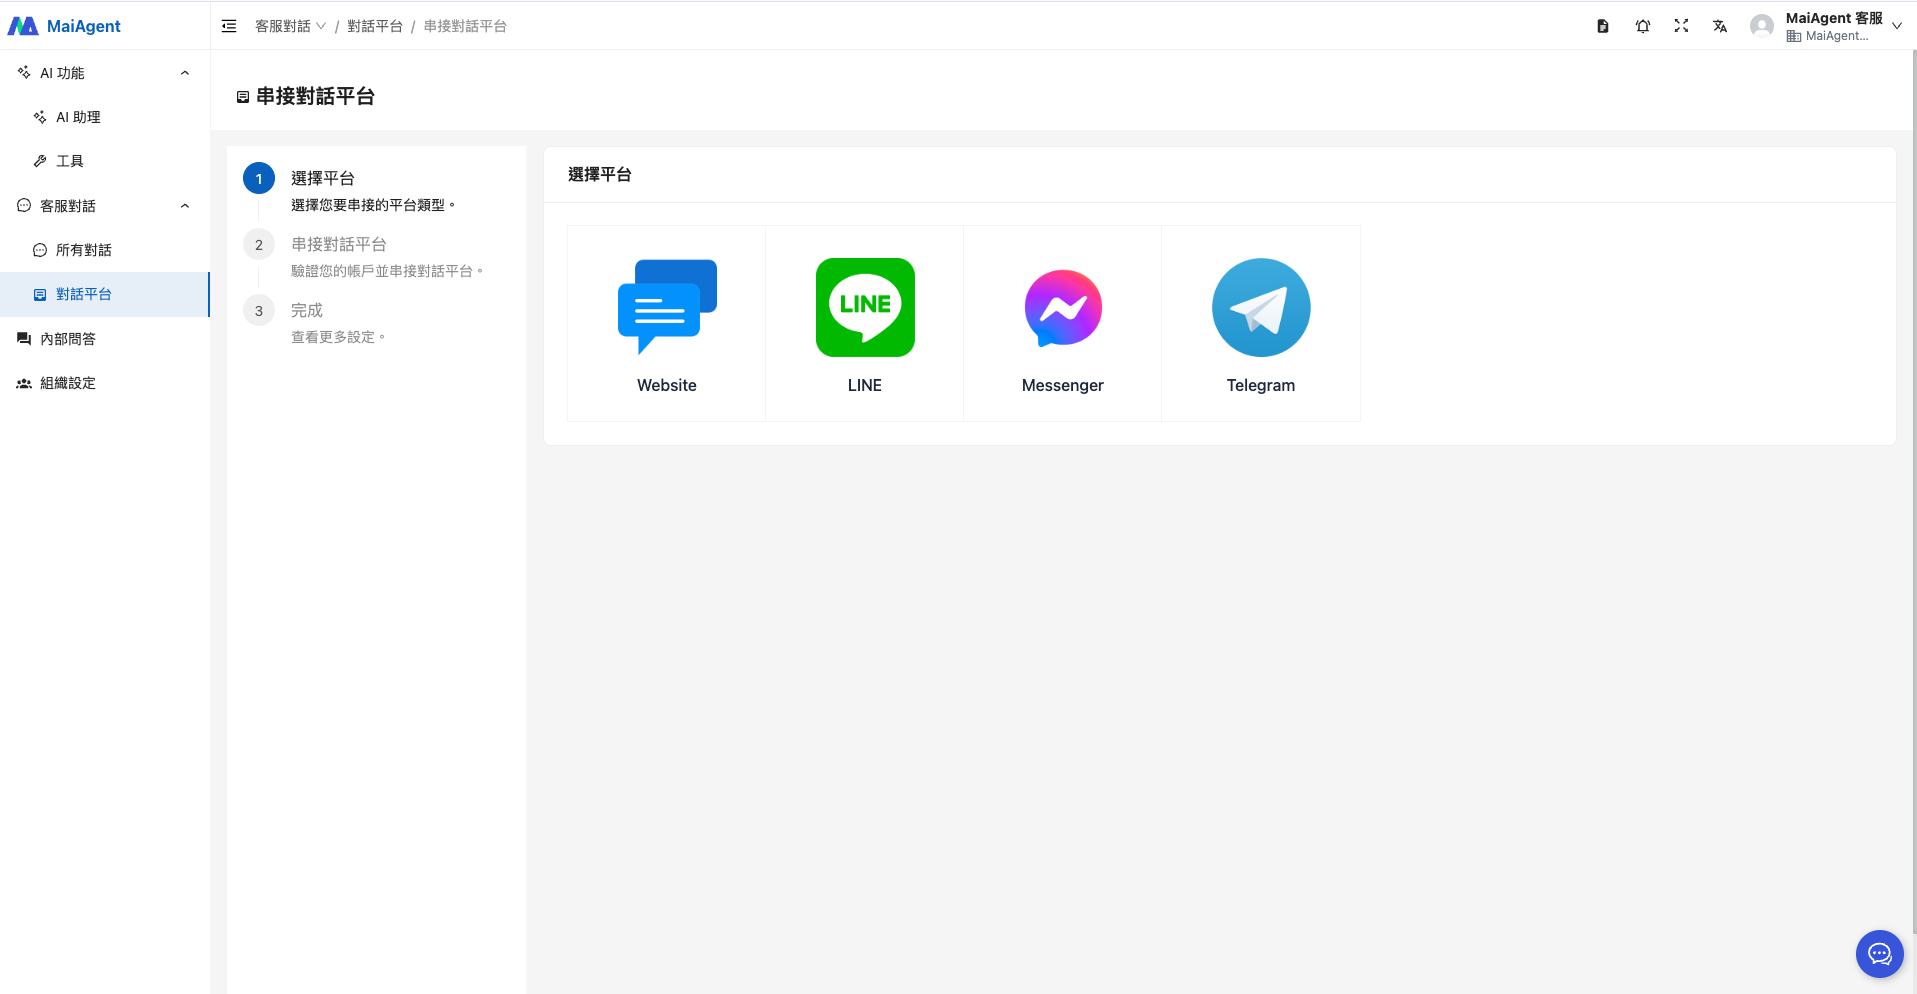
### 2. メッセージングプラットフォームとして Telegram を選択します <a href="#step-select-telegram" id="step-select-telegram"></a>

<figure><img src="https://2584873290-files.gitbook.io/~/files/v0/b/gitbook-x-prod.appspot.com/o/spaces%2FTvHx8hgwYGDTLD3A7xoW%2Fuploads%2Fgit-blob-bdcede59dc7b50838e69ec050c1a23e4c542f895%2F%E6%88%AA%E5%9C%96%202025-05-06%20%E4%B8%8B%E5%8D%882.32.08.png?alt=media" alt=""><figcaption></figcaption></figure>

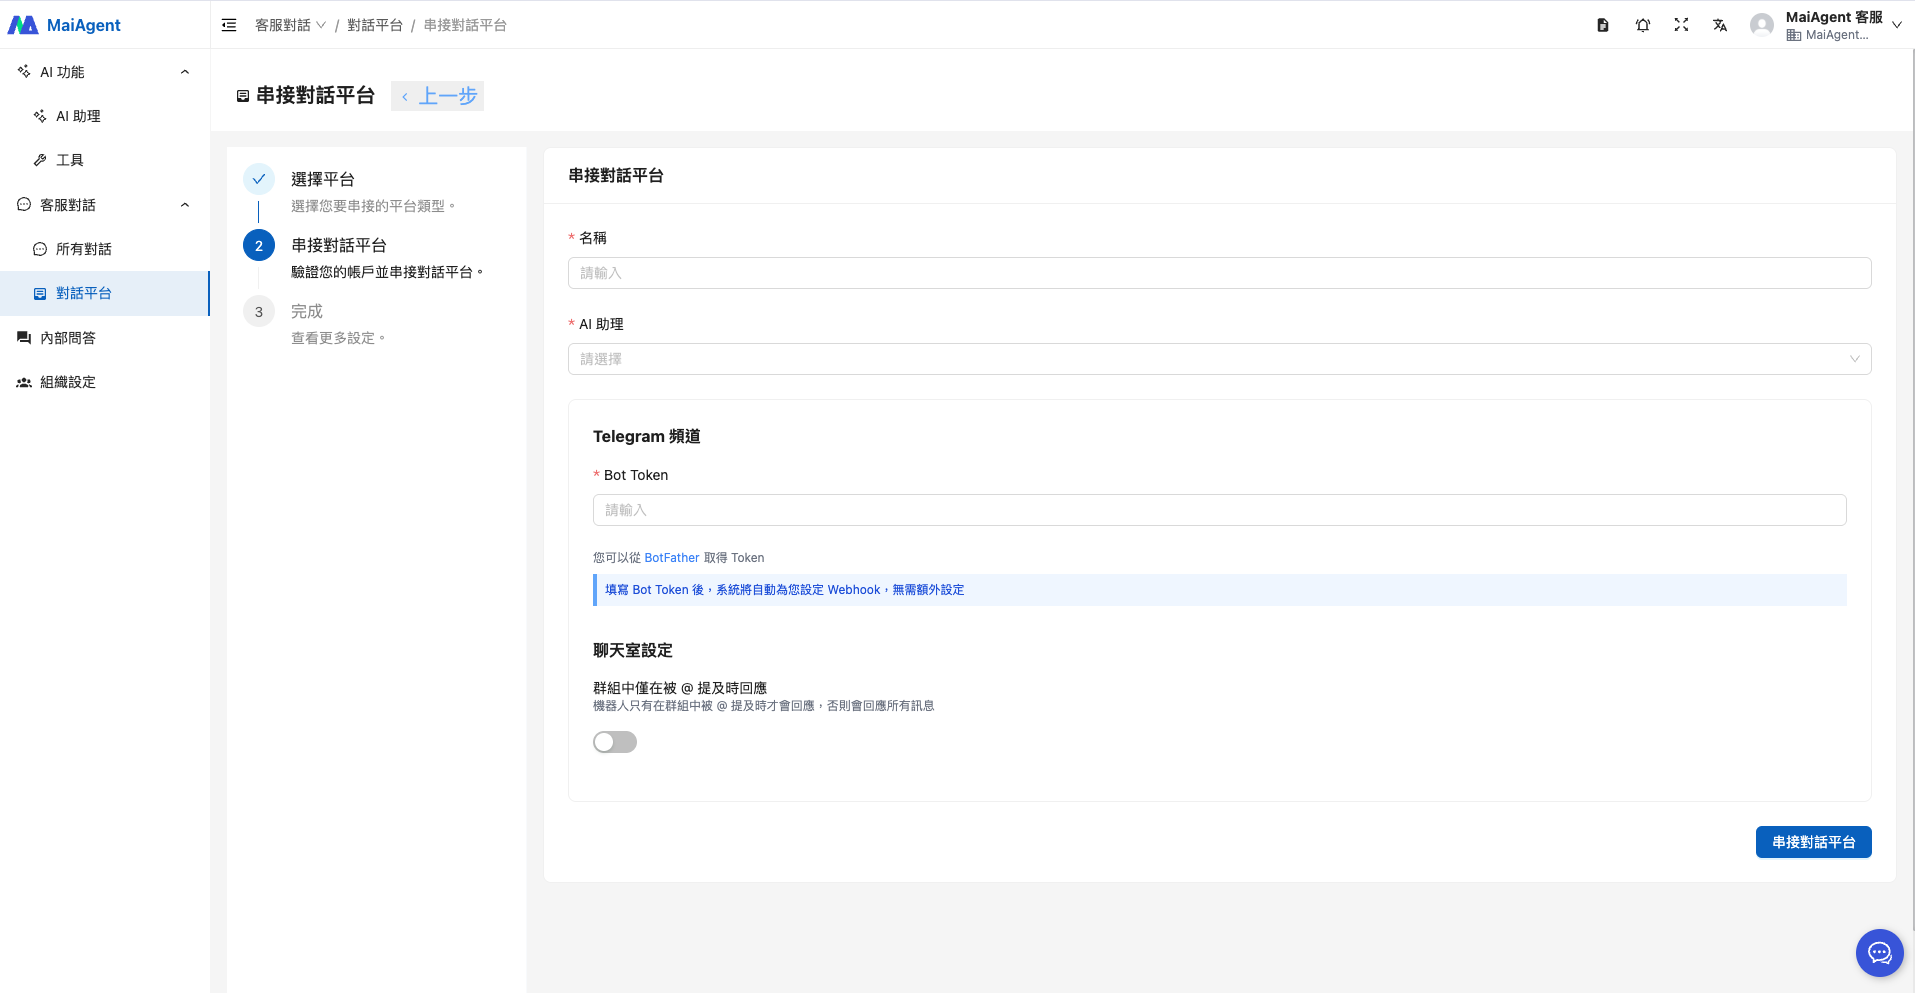
### 3. チャネル名を入力し、Agent を選択します <a href="#step-fill-channel-name-and-ai-agent" id="step-fill-channel-name-and-ai-agent"></a>

<figure><img src="https://2584873290-files.gitbook.io/~/files/v0/b/gitbook-x-prod.appspot.com/o/spaces%2FTvHx8hgwYGDTLD3A7xoW%2Fuploads%2Fgit-blob-91d5396a37d928491b1e057dfdd698873ff60173%2F%E6%88%AA%E5%9C%96%202025-05-06%20%E4%B8%8B%E5%8D%882.35.01.png?alt=media" alt=""><figcaption></figcaption></figure>

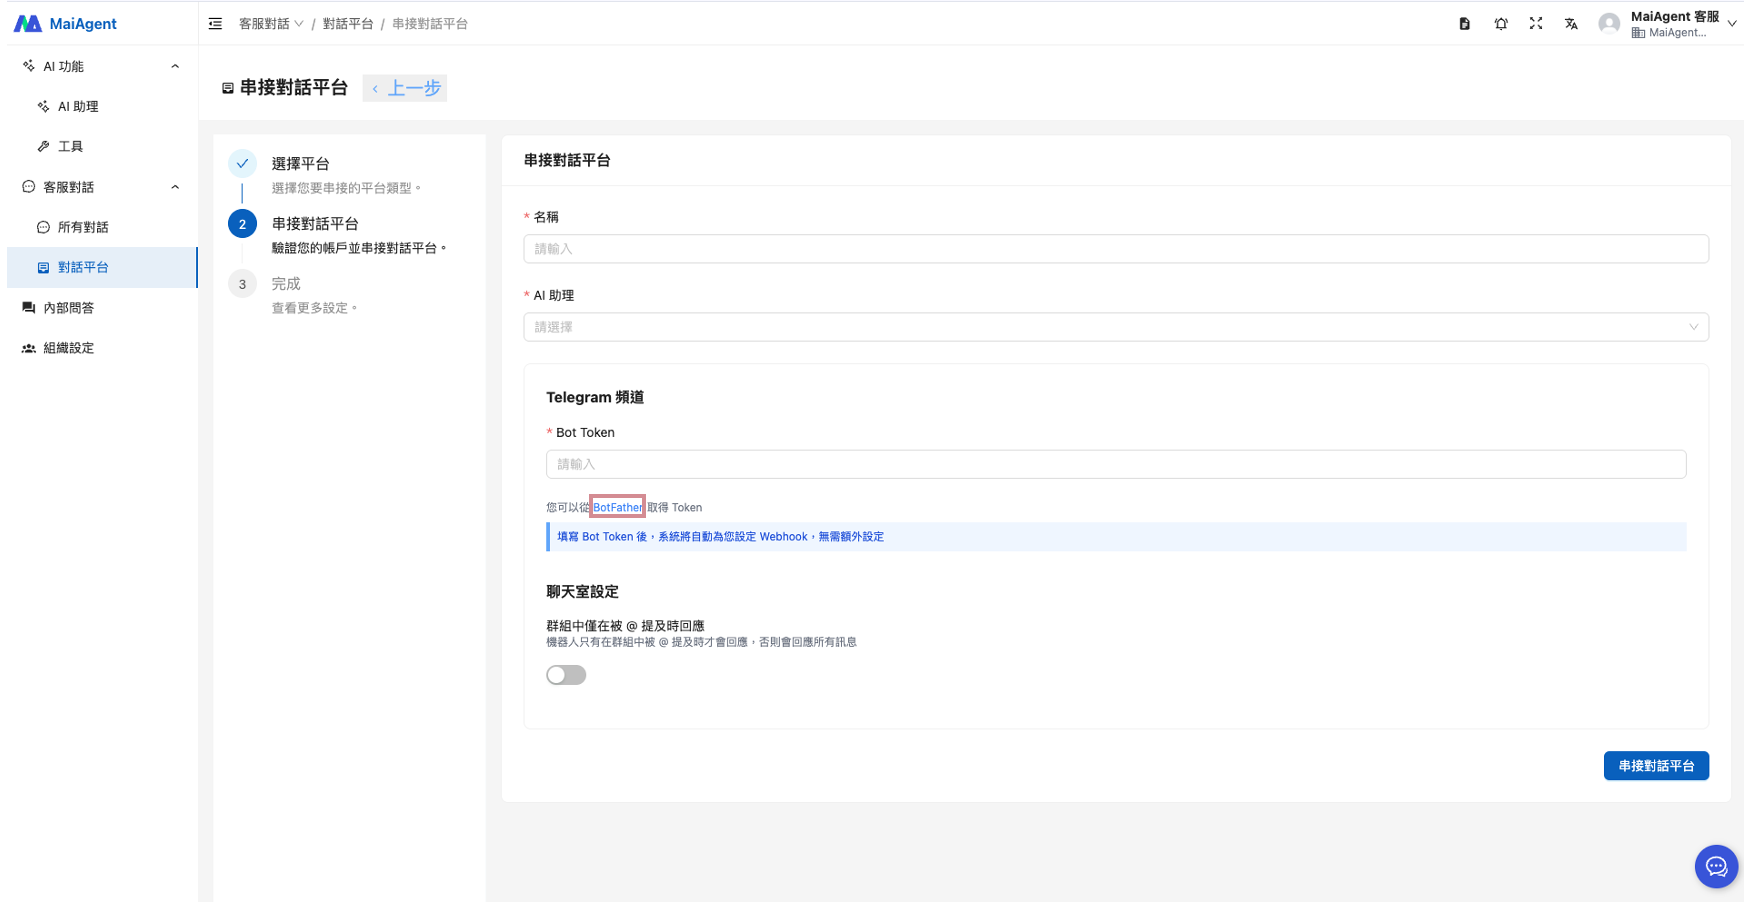
### 4. BotFather <https://t.me/BotFather> から Bot Token を取得します <a href="#step-get-bot-token-from-botfather" id="step-get-bot-token-from-botfather"></a>

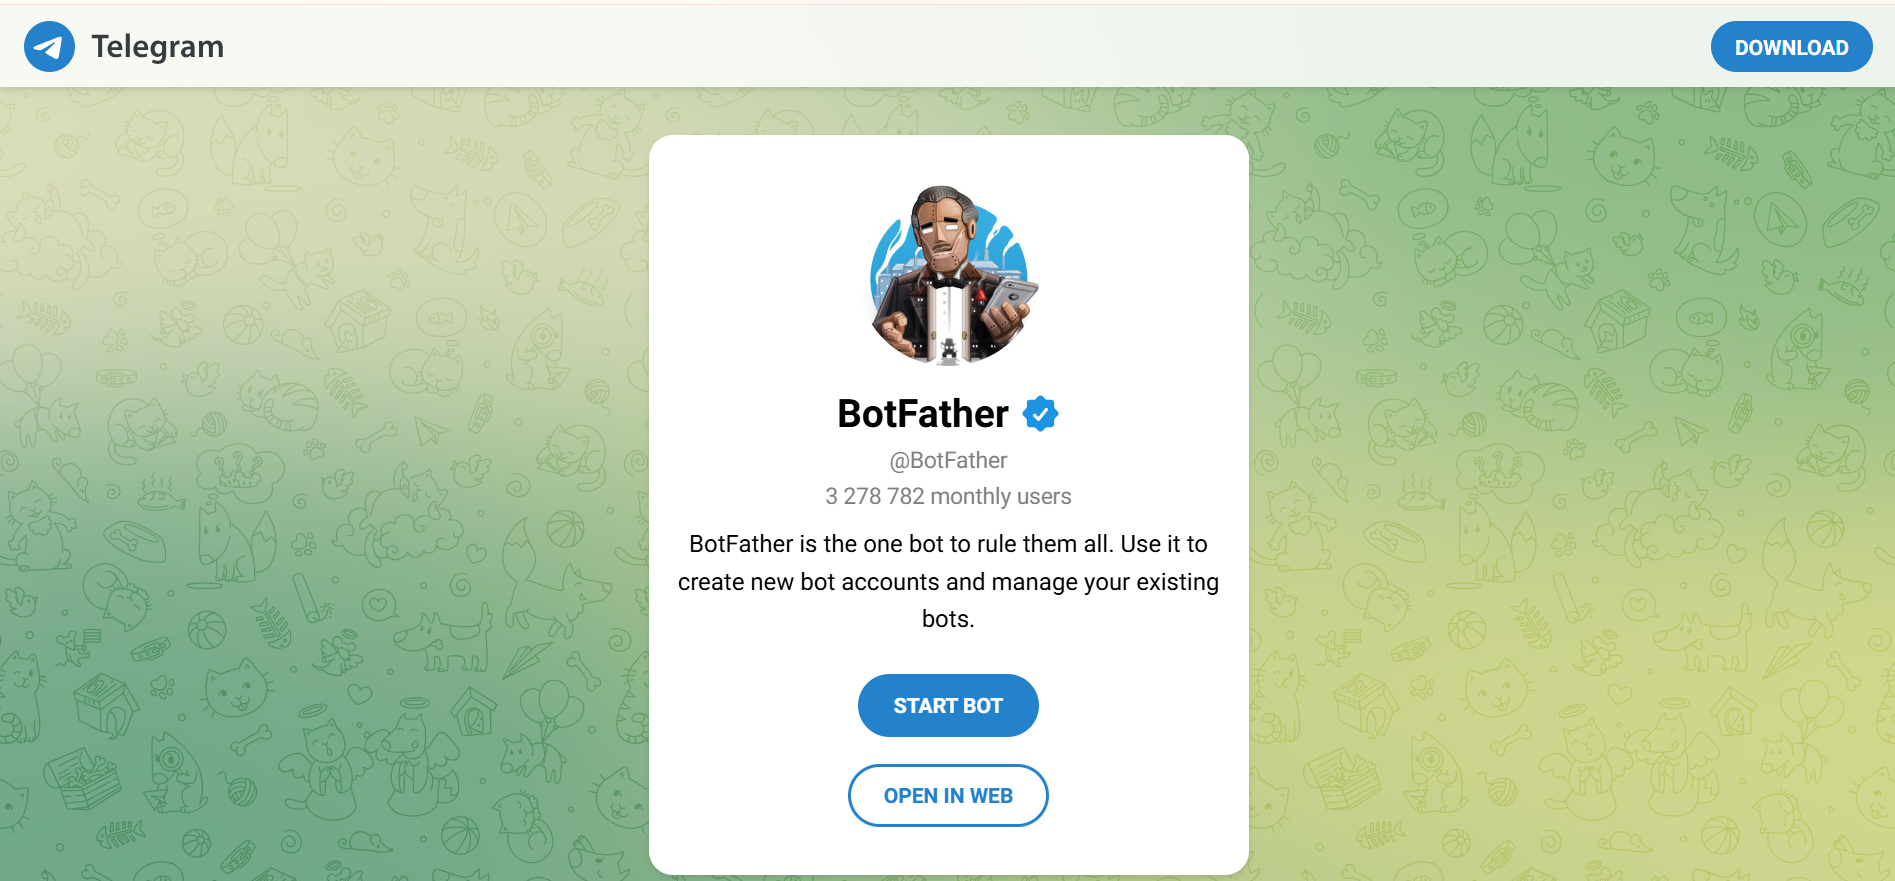
#### a. 「BotFather」のリンクをクリックします：<https://t.me/BotFather> <a href="#sub-step-open-botfather-link" id="sub-step-open-botfather-link"></a>

<figure><img src="https://2584873290-files.gitbook.io/~/files/v0/b/gitbook-x-prod.appspot.com/o/spaces%2FTvHx8hgwYGDTLD3A7xoW%2Fuploads%2Fgit-blob-744702f30502faa32b469df8900384fffaf9690d%2Fimage%20(1)%20(1)%20(1)%20(1)%20(1)%20(1)%20(1).png?alt=media" alt=""><figcaption></figcaption></figure>

#### b. Telegram の BotFather チャネルを開きます <a href="#sub-step-enter-botfather-channel" id="sub-step-enter-botfather-channel"></a>

<figure><img src="https://2584873290-files.gitbook.io/~/files/v0/b/gitbook-x-prod.appspot.com/o/spaces%2FTvHx8hgwYGDTLD3A7xoW%2Fuploads%2Fgit-blob-7f3c18769c6fcf3002319c8c975c114fbd9adda9%2F%E8%9E%A2%E5%B9%95%E6%93%B7%E5%8F%96%E7%95%AB%E9%9D%A2%202025-08-21%20123314.png?alt=media" alt=""><figcaption></figcaption></figure>

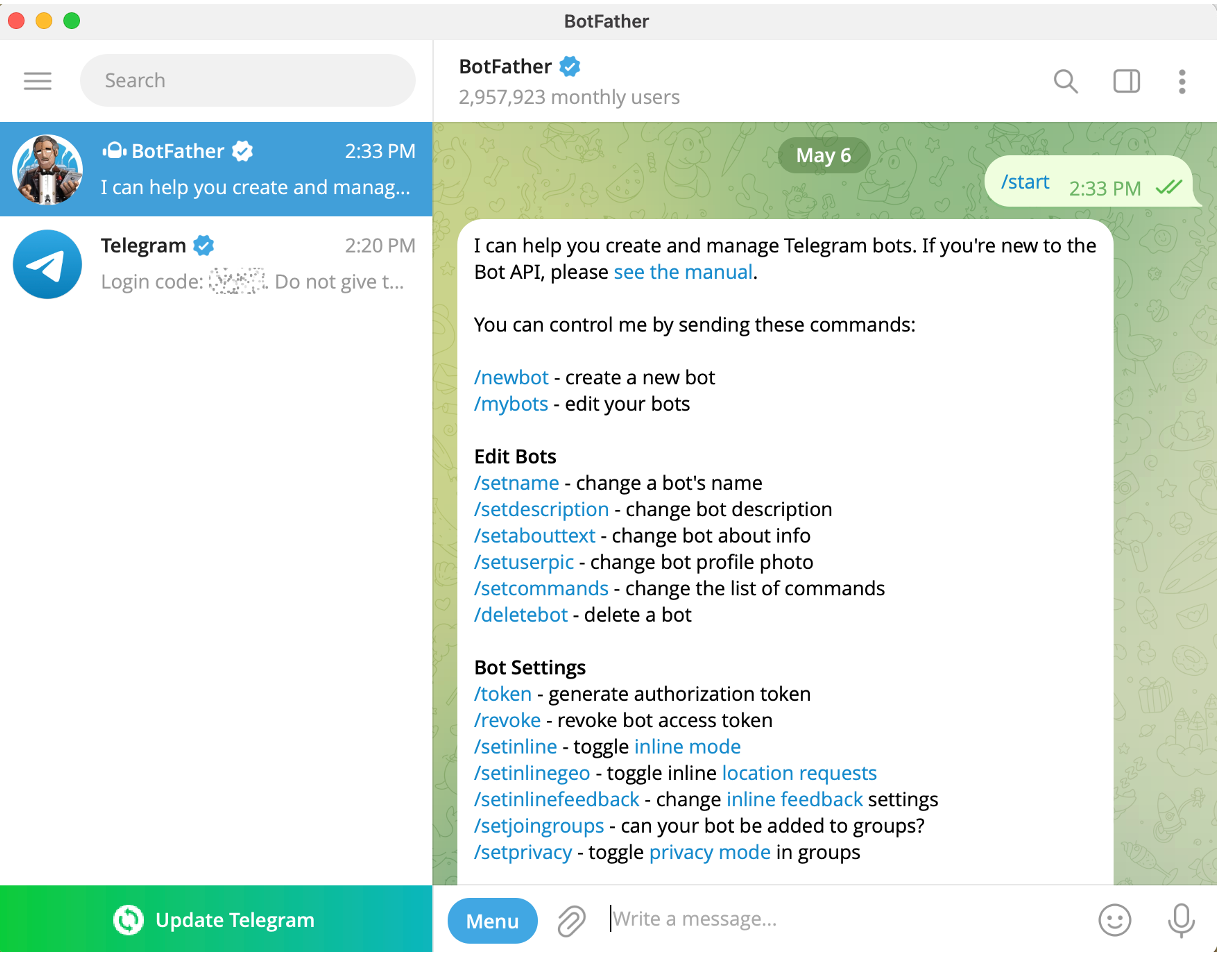
#### c. 「OPEN IN WEB」をクリックします（Web 版の場合） <a href="#sub-step-open-in-web" id="sub-step-open-in-web"></a>

#### クリックすると、BotFather から start をクリックして会話を開始するよう求められます： <a href="#sub-step-start-botfather-conversation" id="sub-step-start-botfather-conversation"></a>

<figure><img src="https://2584873290-files.gitbook.io/~/files/v0/b/gitbook-x-prod.appspot.com/o/spaces%2FTvHx8hgwYGDTLD3A7xoW%2Fuploads%2Fgit-blob-a92d51a2771b3c7073c6430760a86894dff8dc6e%2F%E6%88%AA%E5%9C%96%202025-05-06%20%E4%B8%8B%E5%8D%882.40.13.png?alt=media" alt=""><figcaption></figcaption></figure>

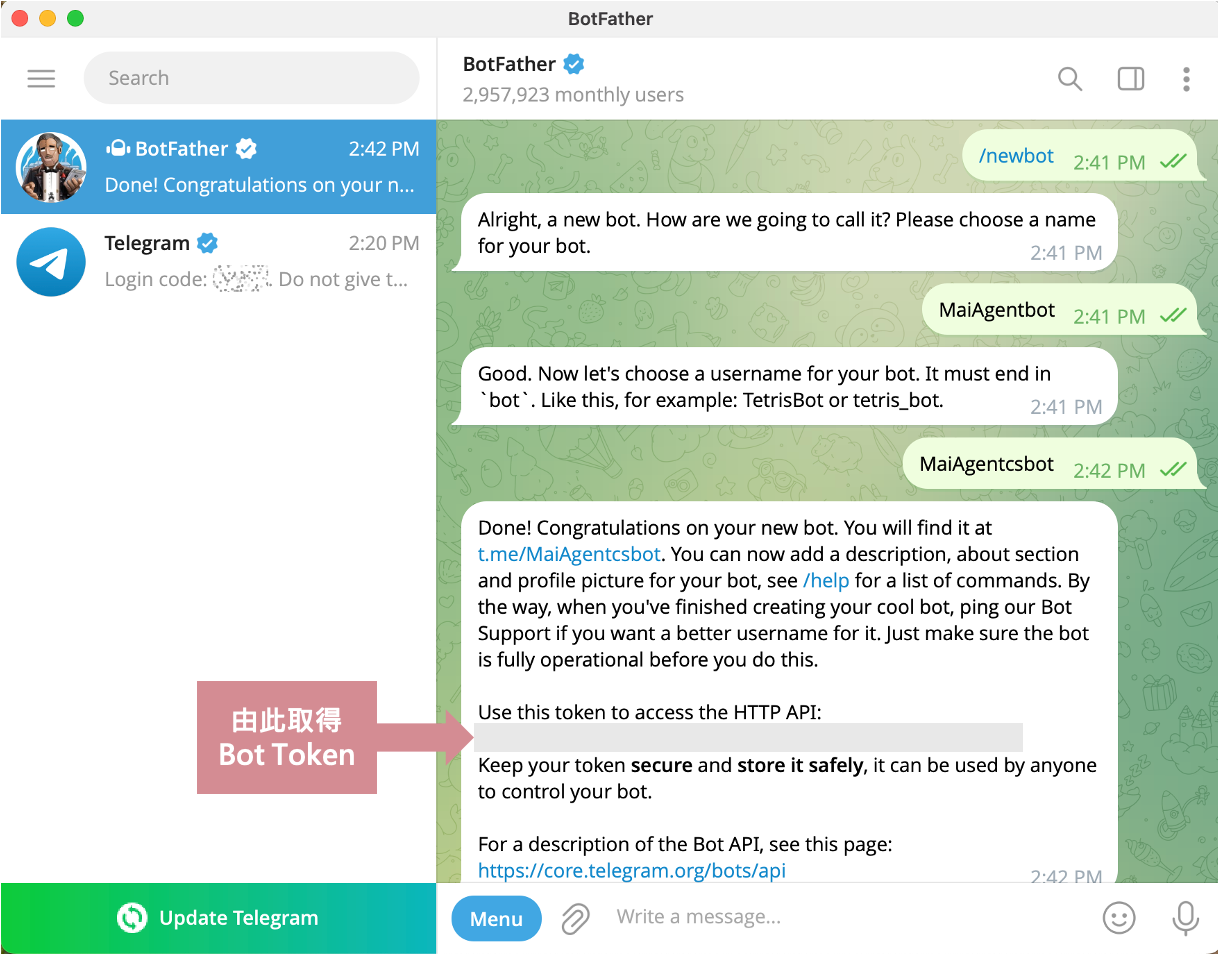
#### d. 「<mark style="color:blue;">/newbot</mark>」をクリックし、指示に従って Bot 名とユーザー名を入力すると、Bot Token を取得できます <a href="#sub-step-create-new-bot" id="sub-step-create-new-bot"></a>

<figure><img src="https://2584873290-files.gitbook.io/~/files/v0/b/gitbook-x-prod.appspot.com/o/spaces%2FTvHx8hgwYGDTLD3A7xoW%2Fuploads%2Fgit-blob-15b6f0fe4aa3d0a415c12f9e9125b51417253d6f%2F%E6%88%AA%E5%9C%96%202025-05-06%20%E4%B8%8B%E5%8D%883.22.23.png?alt=media" alt=""><figcaption></figcaption></figure>

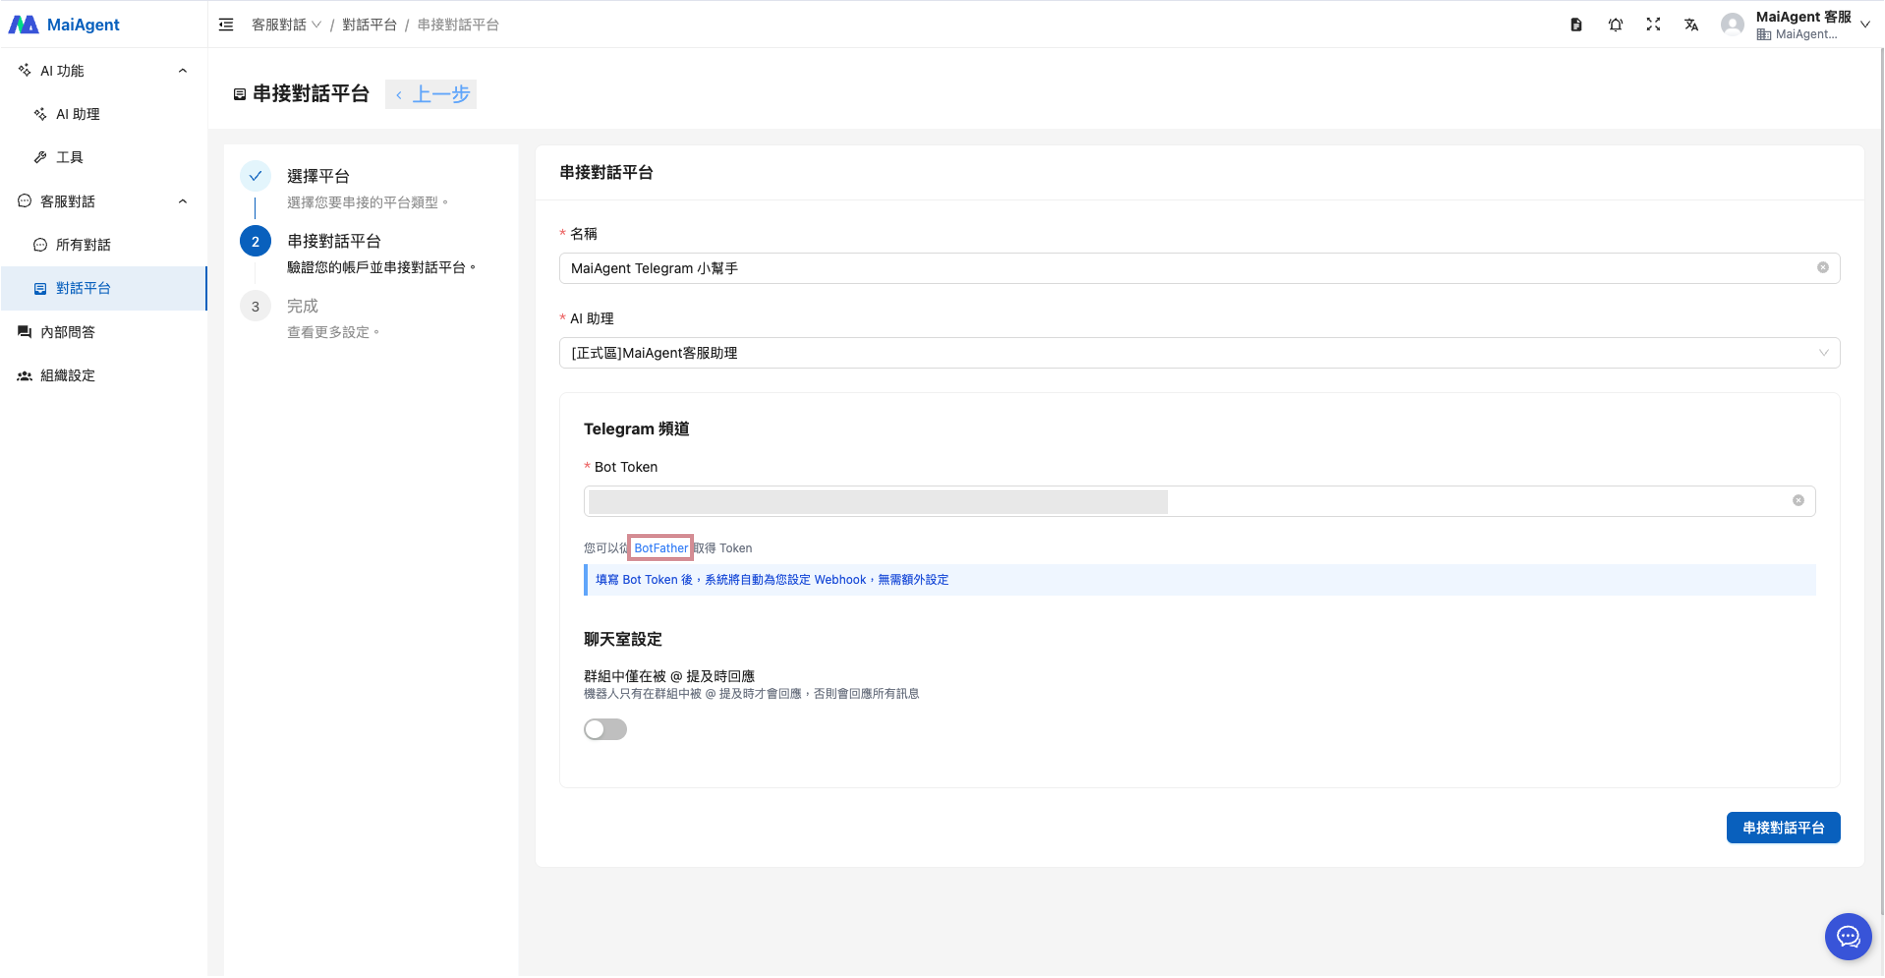
### 5. MaiAgent のチャネル連携編集画面に戻り、取得した Bot Token を貼り付けます <a href="#step-paste-bot-token-in-maiagent" id="step-paste-bot-token-in-maiagent"></a>

作成フォームには、<mark style="color:blue;">基本設定</mark>、<mark style="color:blue;">機能設定</mark>、<mark style="color:blue;">権限設定</mark>の 3 つのタブがあります。<mark style="color:blue;">基本設定</mark>では、次の項目を入力します：

| 項目                                                                                        | 説明                                                                                                                                                      |
| ----------------------------------------------------------------------------------------- | ------------------------------------------------------------------------------------------------------------------------------------------------------- |
| <mark style="color:blue;">名前</mark>、<mark style="color:blue;">AI アシスタント</mark>            | チャネル名と連携する Agent を指定します（手順 3）                                                                                                                           |
| <mark style="color:blue;">Telegram チャネル</mark> › Bot Token                                | BotFather で取得した Token を貼り付けます。項目の下には「Bot Token を入力すると、システムが Webhook を自動設定するため、追加の設定は不要です」と表示されます。LINE のようにプラットフォームの管理画面に戻って Webhook URL を貼り付ける必要はありません  |
| <mark style="color:blue;">チャットルーム設定</mark> › グループでは @メンションされた場合のみ応答                       | 有効にすると、Agent は Telegram グループで @メンションされたメッセージにのみ応答します。無効にすると、グループ内のすべてのメッセージに応答します                                                                       |
| <mark style="color:blue;">入力中表示を有効にする</mark>                                              | Agent が返信を処理している間、Telegram に「入力中」と表示します                                                                                                                 |
| <mark style="color:blue;">リセットコマンドを有効にする</mark>、<mark style="color:blue;">リセットコマンド</mark> | 有効にすると、1 つ以上のコマンド文字列（例：「最初からやり直す」）を追加できます。ユーザーが Telegram で送信したメッセージがいずれかと完全に一致すると、そのユーザーの新しい会話が開始されます。コマンド自体には返信せず、ユーザーが次のメッセージを送信したときに、AI が新しい会話で回答します |

<mark style="color:blue;">機能設定</mark>（OCR の有効化、システム時刻を使用した回答とタイムゾーン、送信者名を使用した回答）と<mark style="color:blue;">権限設定</mark>のタブは、他のメッセージングプラットフォームと共通です。[機能設定](https://docs.maiagent.ai/maiagent-user-guide/ja/build/conversation-settings/platform-settings/function-settings.md#messaging-platform-switches)と[チャネル設定の概要](https://docs.maiagent.ai/maiagent-user-guide/ja/build/conversation-settings/platform-settings.md#tab-map)をご覧ください。

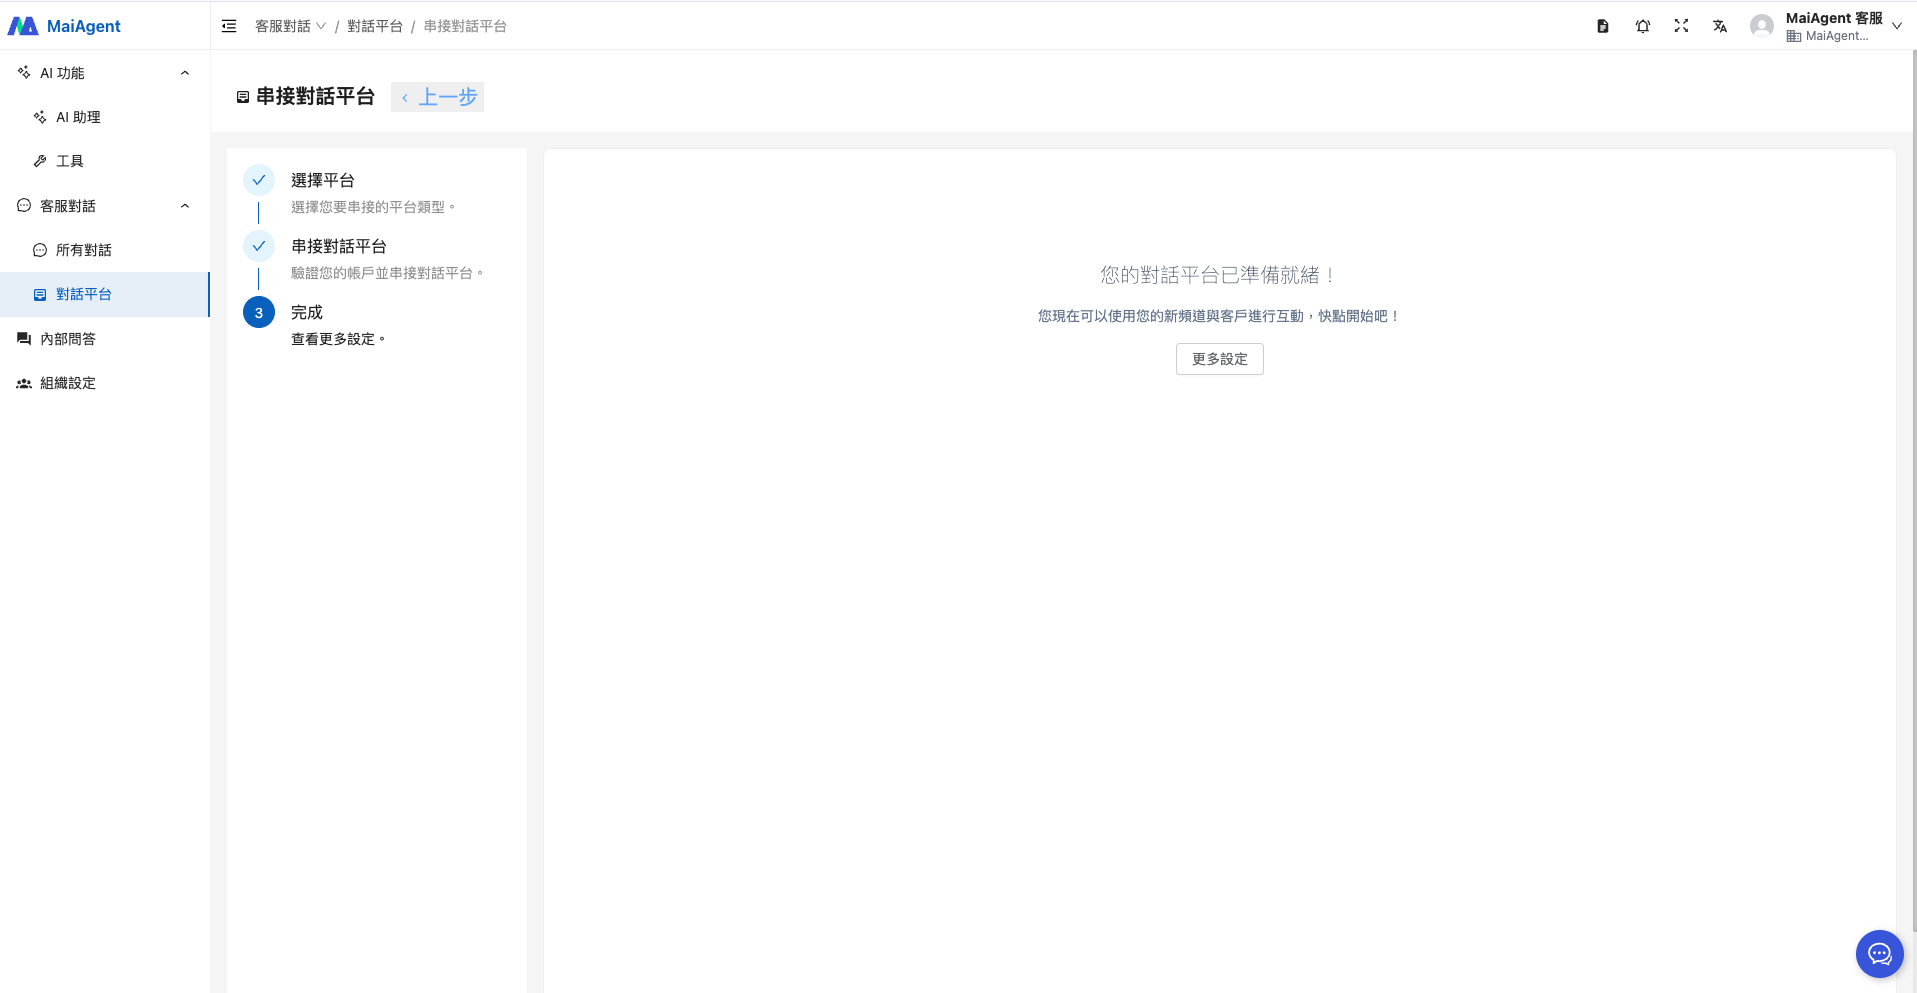
Bot Token を貼り付けたら、右下の「<mark style="color:blue;">チャネルを連携</mark>」ボタンをクリックすると、連携設定が完了します

<figure><img src="https://2584873290-files.gitbook.io/~/files/v0/b/gitbook-x-prod.appspot.com/o/spaces%2FTvHx8hgwYGDTLD3A7xoW%2Fuploads%2Fgit-blob-dc10a03da58822d2e9ed5b061ec10c3c3de6475a%2F%E6%88%AA%E5%9C%96%202025-05-06%20%E4%B8%8B%E5%8D%883.41.08.png?alt=media" alt=""><figcaption></figcaption></figure>

<figure><img src="https://2584873290-files.gitbook.io/~/files/v0/b/gitbook-x-prod.appspot.com/o/spaces%2FTvHx8hgwYGDTLD3A7xoW%2Fuploads%2Fgit-blob-c54f0b7fc1d670659e126e5b0fa4000f99f62ca1%2F%E6%88%AA%E5%9C%96%202025-05-06%20%E4%B8%8B%E5%8D%882.49.41.png?alt=media" alt=""><figcaption></figcaption></figure>

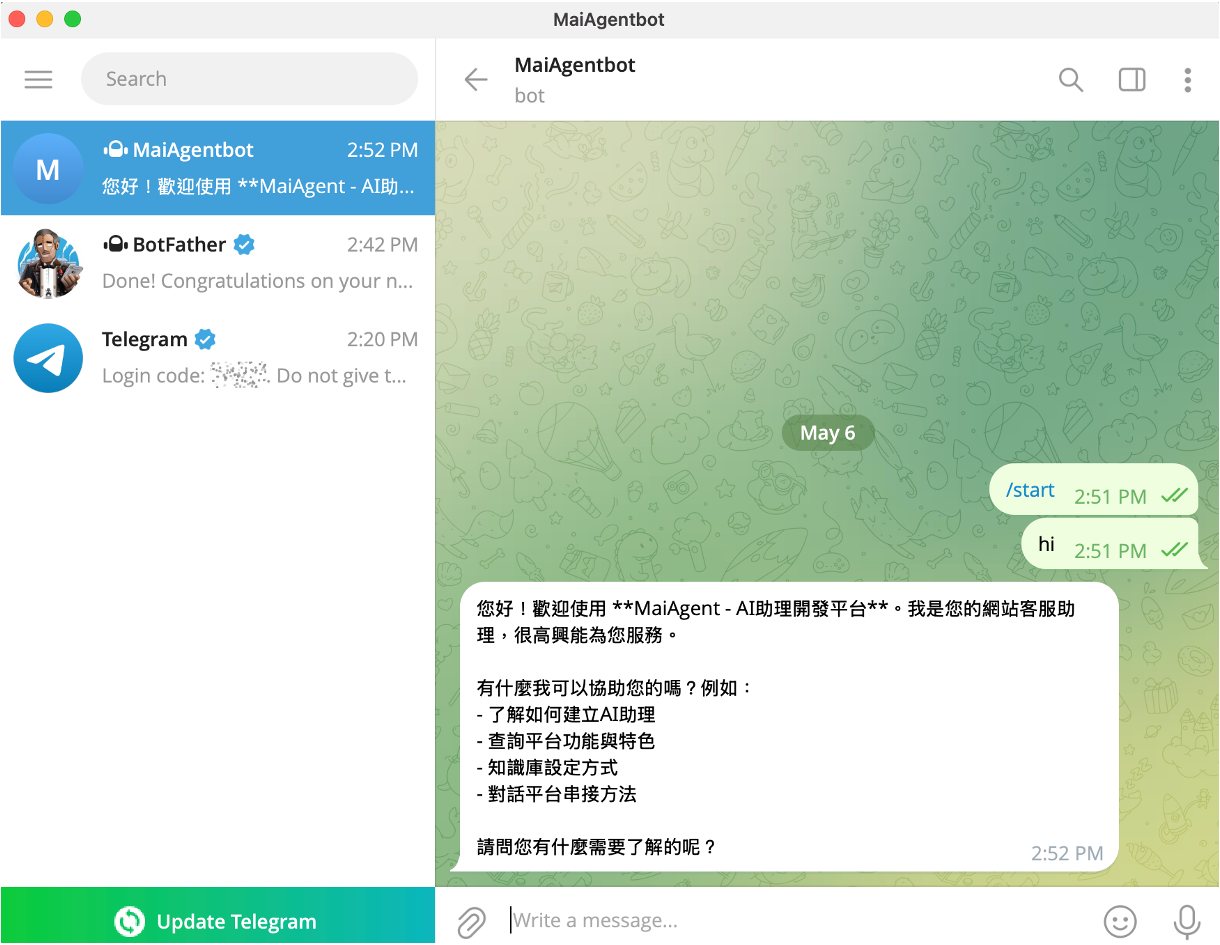
### 6. **連携が成功したか確認します** <a href="#step-verify-integration" id="step-verify-integration"></a>

設定した Telegram Bot と会話してみてください

<figure><img src="https://2584873290-files.gitbook.io/~/files/v0/b/gitbook-x-prod.appspot.com/o/spaces%2FTvHx8hgwYGDTLD3A7xoW%2Fuploads%2Fgit-blob-b7bb328d53c255ce72012401dd26ca1edc29d942%2F%E6%88%AA%E5%9C%96%202025-05-06%20%E4%B8%8B%E5%8D%882.55.48.png?alt=media" alt=""><figcaption></figcaption></figure>

その会話が MaiAgent の「すべての会話」に表示されれば、連携は成功です！

通常、Agent の回答は Telegram のリッチテキストメッセージとして送信され、見出し、太字、箇条書き、表、リンクがレイアウトされて表示されます。ロール指示で Agent に Markdown を使わないよう求める必要はありません。回答が 32,768 文字を超える場合や Telegram に拒否された場合は、プレーンテキストで送信されます。詳しくは[メッセージ内容のレンダリング最適化：Telegram](https://docs.maiagent.ai/maiagent-user-guide/ja/build/choose-channel/web-chat/markdown-rendering.md#telegram-rich-messages)をご覧ください。


---

# Agent Instructions
This documentation is published with GitBook. GitBook is the documentation platform designed so that both humans and AI agents can read, navigate, and reason over technical content effectively. Learn more at gitbook.com.

## Querying This Documentation
If you need additional information that is not directly available in this page, you can query the documentation by asking a question.

Perform an HTTP GET request on the following URL with the `ask` and `goal` query parameters:

```
GET https://docs.maiagent.ai/maiagent-user-guide/ja/build/choose-channel/connect-telegram.md?ask=<question>&goal=<user_goal>
```

`ask` is the immediate question: it should be specific, self-contained, and written in natural language.
`goal` is what the user is ultimately trying to achieve, the reason they need the answer. Sharing it helps GitBook give you a better, more relevant answer. A goal is most helpful when it describes the outcome the user wants rather than restating the question. For example, with `ask=how do I create an API token`, a goal like `automate deployments from our CI pipeline` lets GitBook tailor the answer to that use case.

The response will contain a direct answer to the question and relevant excerpts and sources from the documentation.

Use this mechanism when the answer is not explicitly present in the current page, you need clarification or additional context, or you want to retrieve related documentation sections.