> For the complete documentation index, see [llms.txt](https://docs.maiagent.ai/llms.txt). Markdown versions of documentation pages are available by appending `.md` to page URLs; this page is available as [Markdown](https://docs.maiagent.ai/maiagent-user-guide/en/tools/setup_api_tool.md).

# Create an API Tool

This guide walks you through creating a new API tool on the platform.

{% hint style="info" %}
You can use MaiAgent's [Tool Builder AI Assistant](https://chat.maiagent.ai/web-chats/27934296-105a-4f3f-80f0-7e9dcdb638d3) to help you create API tools
{% endhint %}

API tools are used to integrate external services and automate operational workflows.

## **What Is an API?**

**API (Application Programming Interface)** is a bridge for communication between different software systems. Simply put, it's like a **"waiter" in the software world**, helping different programs exchange information and execute functions.

Imagine you're dining at a restaurant:

* **You**: The customer who needs food (the application)
* **Kitchen**: The place that prepares food (the service provider system)
* **Waiter**: The person who relays messages between you and the kitchen (**API**)

You don't need to go into the kitchen yourself — just tell the waiter what you want. The waiter conveys your request to the kitchen, then brings the finished meal to you.

<figure><img src="https://1360999650-files.gitbook.io/~/files/v0/b/gitbook-x-prod.appspot.com/o/spaces%2F6v6TNkkOQVfRYfcNirHL%2Fuploads%2Fgit-blob-affedbd5ccc8692a11a20ce5fc69a39886d0e2d3%2Fplayma%20(10)%20(1).png?alt=media" alt=""><figcaption><p>API workflow diagram</p></figcaption></figure>

API tools can help you automate standardized workflows, set specific response formats, and retrieve information from your systems such as:

**E-Commerce Customer Service Automation**

```
Customer asks about order ➡️ API queries order status ➡️ Automatically replies with delivery progress
```

**Marketing Campaign Management**

```
New product listed ➡️ Automatically updates website ➡️ Sends EDM ➡️ Promotes on social media
```

**Online Course Platform:**

```
Student asks about course progress ➡️ API queries learning records ➡️ Automatically replies with completion percentage and next class time
```

Through API tools, the AI assistant evolves from a simple chatbot into an intelligent assistant capable of executing actual business workflows, significantly improving work efficiency and automation.

## Quick API Tool Setup

### 1. Access the Tool Management Interface

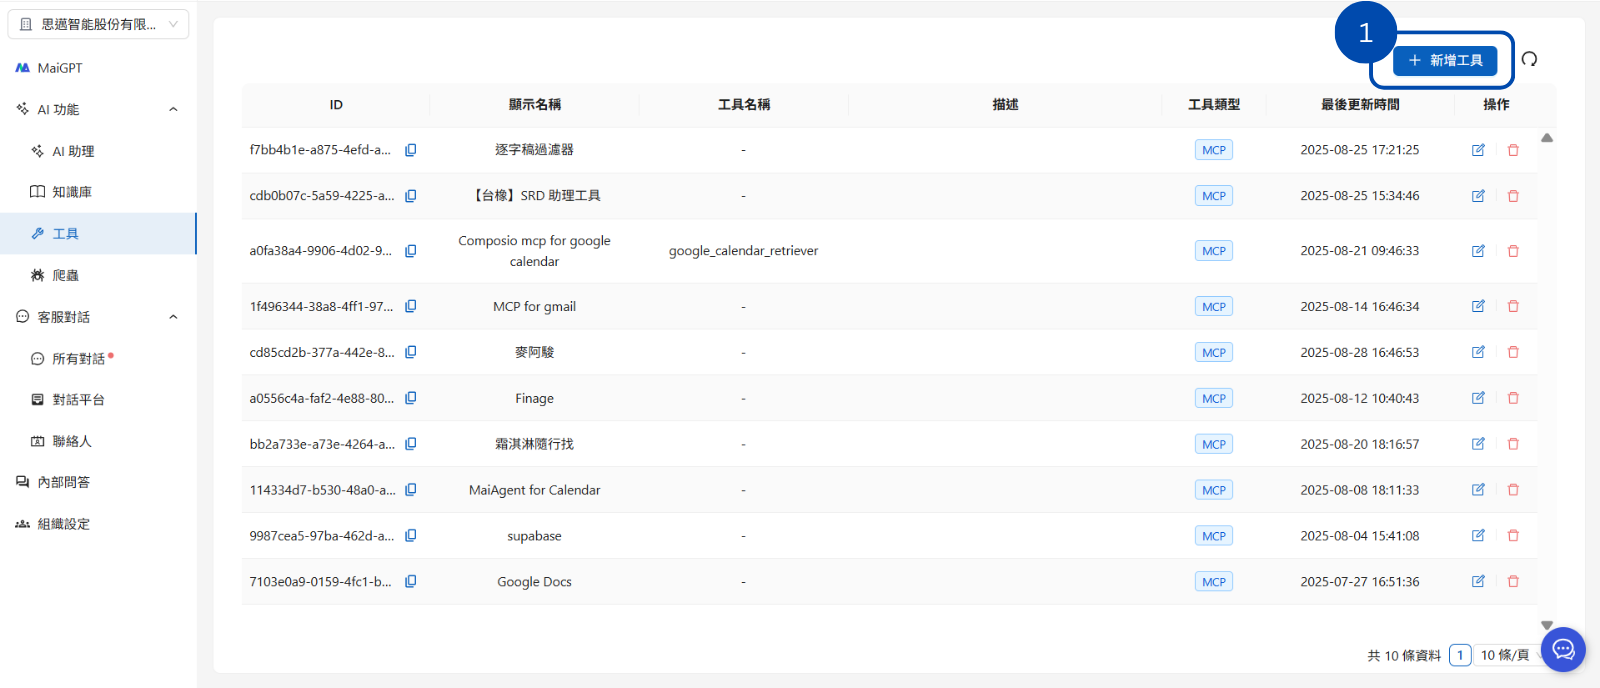
From the left navigation panel, go to the "<mark style="color:blue;">AI Features</mark>" section, then click "<mark style="color:blue;">🔧 Tools</mark>." On the tool list page, click the "<mark style="color:blue;">➕ Add Tool</mark>" button in the upper right corner.

<figure><img src="https://1360999650-files.gitbook.io/~/files/v0/b/gitbook-x-prod.appspot.com/o/spaces%2F6v6TNkkOQVfRYfcNirHL%2Fuploads%2Fgit-blob-1849091665b669bc0c5964295e91459b75acbe42%2FMCP%E5%B7%A5%E5%85%B7.png?alt=media" alt="Tool list page and add button"><figcaption><p>Click "➕ Add Tool" to get started</p></figcaption></figure>

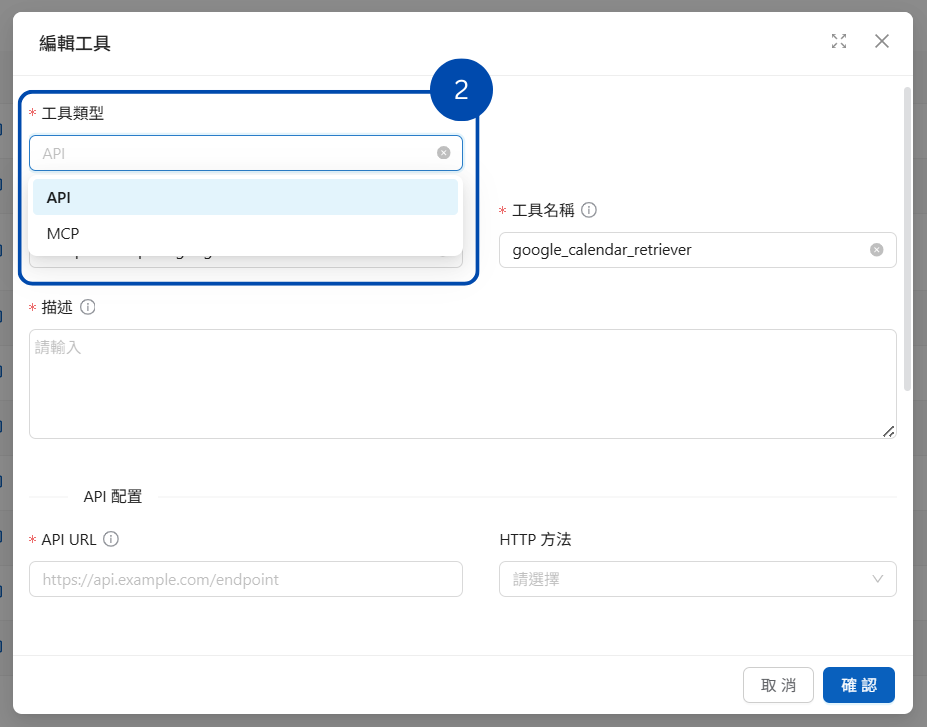
### 2. Select the Tool Type

Select API as the tool type.

<figure><img src="https://1360999650-files.gitbook.io/~/files/v0/b/gitbook-x-prod.appspot.com/o/spaces%2F6v6TNkkOQVfRYfcNirHL%2Fuploads%2Fgit-blob-36d929d6f379aadbfe05520796e63d6f8fefaf4f%2FAPI%E5%B7%A5%E5%85%B7.png?alt=media" alt=""><figcaption></figcaption></figure>

### 3. Set the Display Name

Set a clear display name for the tool. In this example, set it to <mark style="color:blue;">google calendar</mark>.

<figure><img src="https://1360999650-files.gitbook.io/~/files/v0/b/gitbook-x-prod.appspot.com/o/spaces%2F6v6TNkkOQVfRYfcNirHL%2Fuploads%2Fgit-blob-1b6a8ebbc7b3900a46b0a20494b1c11c118fbe47%2FAPI%E5%B7%A5%E5%85%B7%20(2).png?alt=media" alt=""><figcaption></figcaption></figure>

* **Purpose**: This name is displayed on the platform interface for all users to see.
* **Recommendation**: Choose a name that clearly describes the tool's main function for easy user understanding. There are no strict formatting requirements for this name.

### 4. Set the Tool Name

Next is the "<mark style="color:blue;">Tool Name</mark>" field.

* **Purpose**: This name is the unique identifier used by the AI assistant internally to call and identify this tool.
* **Naming Rules (Important)**:
  * Must be in English.
  * Can only contain:
    * Lowercase letters (a-z)
    * Uppercase letters (A-Z)
    * Numbers (0-9)
    * Underscores (`_`)
    * Hyphens (`-`)
  * **Examples**: `get_weather_forecast`, `database-query-tool`

The example below is set to <mark style="color:blue;">google\_calendar\_retriever</mark>

<figure><img src="https://1360999650-files.gitbook.io/~/files/v0/b/gitbook-x-prod.appspot.com/o/spaces%2F6v6TNkkOQVfRYfcNirHL%2Fuploads%2Fgit-blob-e60b90c068677f55f73f007d3f191a41bc3a9e5f%2FAPI%E5%B7%A5%E5%85%B7%20(4).png?alt=media" alt=""><figcaption><p>API tool name definition</p></figcaption></figure>

### 5. Write the Tool Description

In the "<mark style="color:blue;">Tool Description</mark>" field, provide a clear and detailed tool description.

* **Importance**: A good description helps the AI assistant more accurately understand:
  * The tool's function and purpose.
  * When to use this tool.
  * How to interpret the tool's output results.
* **Suggested Content**: Describe what the tool does, what it takes as input, what it outputs, and any usage notes.

<figure><img src="https://1360999650-files.gitbook.io/~/files/v0/b/gitbook-x-prod.appspot.com/o/spaces%2F6v6TNkkOQVfRYfcNirHL%2Fuploads%2Fgit-blob-61fe2994e26226077604c4865223522621a0c39c%2FAPI%E5%B7%A5%E5%85%B7%20(5).png?alt=media" alt=""><figcaption><p>Tool description</p></figcaption></figure>

### 6. Detailed API Configuration

#### a. 🔗 API URL

* Enter the full URL of the target API endpoint (including `http://` or `https://`).
* **Example**: `https://api.opencalendar.org/data/2.5`

<figure><img src="https://1360999650-files.gitbook.io/~/files/v0/b/gitbook-x-prod.appspot.com/o/spaces%2F6v6TNkkOQVfRYfcNirHL%2Fuploads%2Fgit-blob-7c8ec1446f411f007db93eecab4a2de07ee8036e%2FAPI%E5%B7%A5%E5%85%B7%20(6).png?alt=media" alt=""><figcaption></figcaption></figure>

#### b. 📮 HTTP Method

* Select the HTTP verb required by the API service from the dropdown:
  * `GET`: Typically used for retrieving resources.
  * `POST`: Typically used for creating new resources or submitting data.
  * `PUT`: Typically used for fully replacing or updating resources.
  * `DELETE`: Typically used for deleting resources.

<figure><img src="https://1360999650-files.gitbook.io/~/files/v0/b/gitbook-x-prod.appspot.com/o/spaces%2F6v6TNkkOQVfRYfcNirHL%2Fuploads%2Fgit-blob-a96418d1f33a03fb89d7c99d75cbff4200fa5851%2FAPI%E5%B7%A5%E5%85%B7%20(8).png?alt=media" alt=""><figcaption></figcaption></figure>

#### c. 📰 Headers

Headers are like the "<mark style="color:blue;">envelope</mark>" of a letter. Before seeing the actual data content, they tell the receiver some important information. **Without correct headers, API requests may fail authentication, or the receiver may not be able to parse the data correctly.**

**Common Uses**:

* Authentication (`Authorization`, `X-API-Key`)
* Specify content type (`Content-Type`)
* Specify accepted response format (`Accept`)

To add headers:

* Click "<mark style="color:blue;">➕ Add Header</mark>" to define HTTP headers sent with the request.
* **Format**: Must be a valid JSON object where keys are header names and values are header content (strings).
* **Example**:

  ```json
  {
    "Content-Type": "application/json; charset=utf-8",
    "Authorization": "Bearer {{SECRET_API_TOKEN}}",
    "Accept": "application/vnd.github.v3+json"
  }
  ```

<figure><img src="https://1360999650-files.gitbook.io/~/files/v0/b/gitbook-x-prod.appspot.com/o/spaces%2F6v6TNkkOQVfRYfcNirHL%2Fuploads%2Fgit-blob-6d67f75950755371440b5dcd1a50016f36259224%2FAPI%E5%B7%A5%E5%85%B7%20(9).png?alt=media" alt="API headers configuration screenshot"><figcaption><p>Configure required HTTP request headers</p></figcaption></figure>

#### d. 🔎 Query Parameters <a href="#query-params" id="query-params"></a>

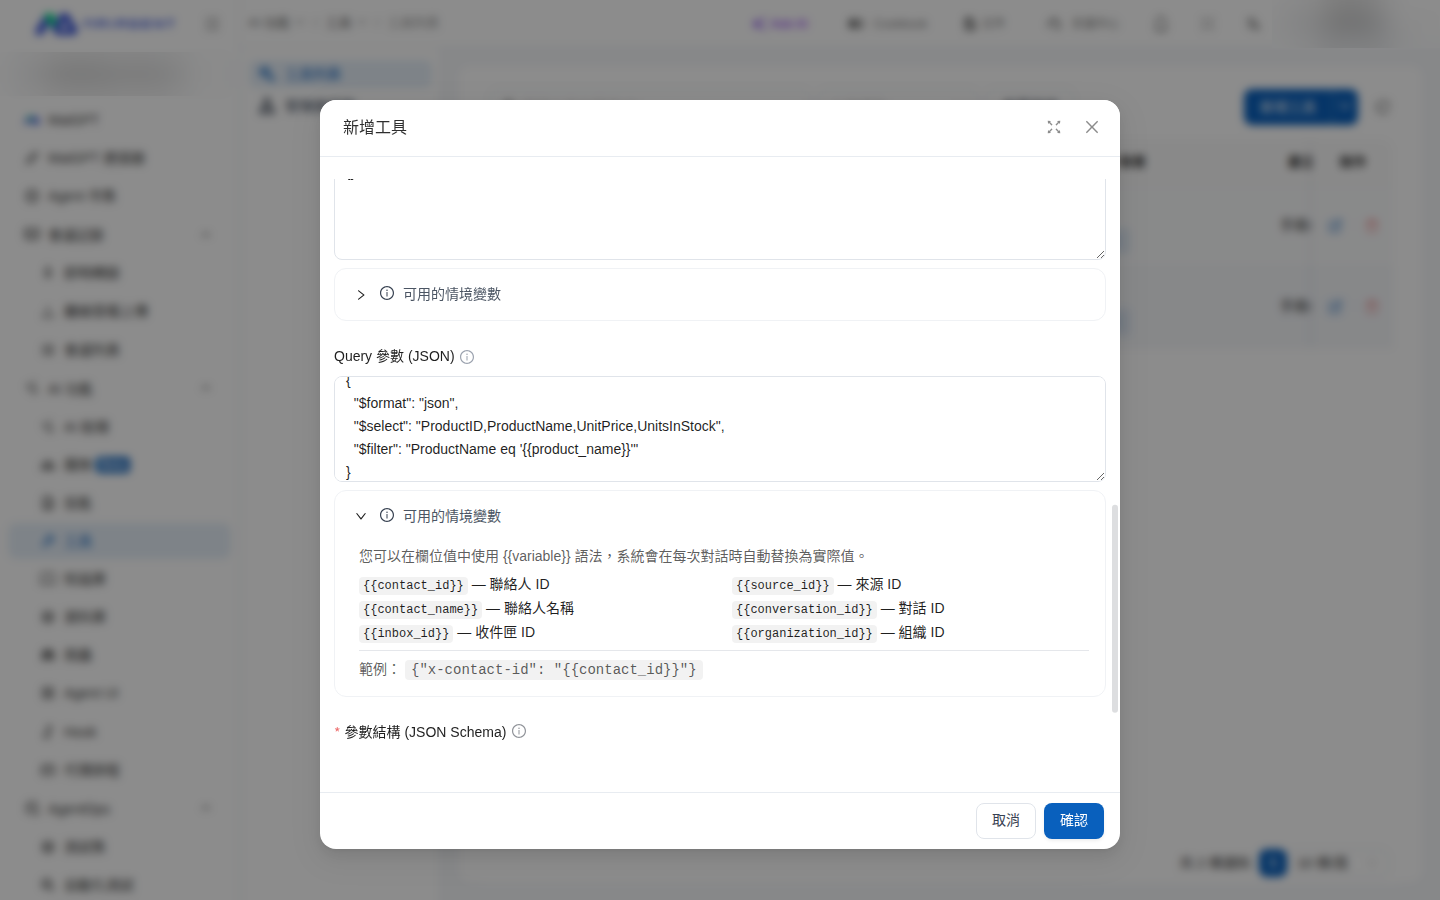
Query parameters are query strings appended after the question mark in a URL (for example, `?format=json&limit=10`) and are sent with every request. They are suitable for fixed query conditions or API keys that can only be passed through the query string.

* Click "<mark style="color:blue;">Available Context Variables</mark>" to expand the list of currently supported variables (contact ID, conversation ID, inbox ID, and others).
* **Format**: A valid JSON object where each key is a parameter name and each value is the parameter content (a string).
* Values can be fixed text, or they can use `{{parameter_name}}` to reference a parameter declared in the Parameters Schema and supplied by the AI assistant when the tool is called. This lets you configure query conditions where the first part is fixed and the remaining value is provided by the user. See [Reference AI assistant parameters in Query Parameters](#query-param-templates) below.
* **Example**:

  ```json
  {
    "$format": "json",
    "$filter": "ProductName eq '{{product_name}}'"
  }
  ```

<figure><img src="https://1360999650-files.gitbook.io/~/files/v0/b/gitbook-x-prod.appspot.com/o/spaces%2F6v6TNkkOQVfRYfcNirHL%2Fuploads%2Fgit-blob-a0552130721b327022bc32313554617846bf0bf7%2Fapi-tool-query-params.png?alt=media" alt="Query Parameters field in the tool settings window, using {{product_name}} to reference a parameter in the value"><figcaption><p>The Query Parameters field and the Available Context Variables list</p></figcaption></figure>

#### e. 🧩 Parameters Schema <a href="#parameters-schema" id="parameters-schema"></a>

**The parameters schema is like an "order form"** — it tells the AI assistant what data it can request from the API and how to make the request.

* **Core Configuration**: Define which parameters the AI assistant can or must provide when calling this tool, as well as the format of those parameters.
* **Format**: Use standard **JSON Schema** format.
* **Key Elements**:
  * `type: "object"`: Indicates the parameters are an object.
  * `properties`: Defines the object for each parameter.
    * **Parameter name** (e.g., `"search"`): The corresponding object contains that parameter's details.
      * `type`: The parameter's data type (`string`, `integer`, `number`, `boolean`, `array`, `object`).
      * `description`: A description for the AI assistant explaining the parameter's meaning.
      * `default` (optional): The parameter's default value.
      * `enum` (optional): If the parameter value can only be one of specific options, list them here.
  * `required`: An array containing the names of all **required** parameters.
* **Example** (video search tool):

  ```json
  {
      "type": "object",
      "properties": {
          "limit": {
              "type": "integer",
              "minimum": 1,
              "description": "Maximum number of results to return"
          },
          "fields": {
              "type": "string",
              "description": "Comma-separated list of fields"
          },
          "search": {
              "type": "string",
              "description": "Search keyword"
          }
      },
      "required": ["search"]
  }
  ```

<figure><img src="https://1360999650-files.gitbook.io/~/files/v0/b/gitbook-x-prod.appspot.com/o/spaces%2F6v6TNkkOQVfRYfcNirHL%2Fuploads%2Fgit-blob-5932120820f0a885644b441bac5c63a4492ae567%2FAPI%E5%B7%A5%E5%85%B7%20(11).png?alt=media" alt="API parameters schema configuration screenshot"><figcaption><p>Use JSON Schema to precisely define API parameters</p></figcaption></figure>

### 7. 💾 Save the Tool

After confirming all settings are correct, scroll to the bottom of the page and click the "<mark style="color:blue;">Confirm</mark>" button. Your new tool is now created!

<figure><img src="https://1360999650-files.gitbook.io/~/files/v0/b/gitbook-x-prod.appspot.com/o/spaces%2F6v6TNkkOQVfRYfcNirHL%2Fuploads%2Fgit-blob-eb2d956da69f2a187bf9f57c4cc86d0a07c2de73%2FAPI%E5%B7%A5%E5%85%B7%20(13).png?alt=media" alt=""><figcaption></figcaption></figure>

## Reference AI assistant parameters in Query Parameters <a href="#query-param-templates" id="query-param-templates"></a>

Many third-party APIs use query conditions made up of a single string containing fixed syntax and a user-provided value. Examples include the OData-style `$filter=ProductName eq 'Chai'` and the `q=` parameter used by search APIs. These APIs do not expect a separate parameter; instead, they require the value to be embedded in a fixed string.

Enter `{{parameter_name}}` in a Query Parameters value. When the AI assistant calls the tool, MaiAgent substitutes the value of the parameter with the same name from the Parameters Schema before sending the request. The person configuring the tool defines the fixed structure, while the AI assistant only supplies the value, so syntax correctness no longer depends on the model.

### Use case <a href="#query-param-templates-use-case" id="query-param-templates-use-case"></a>

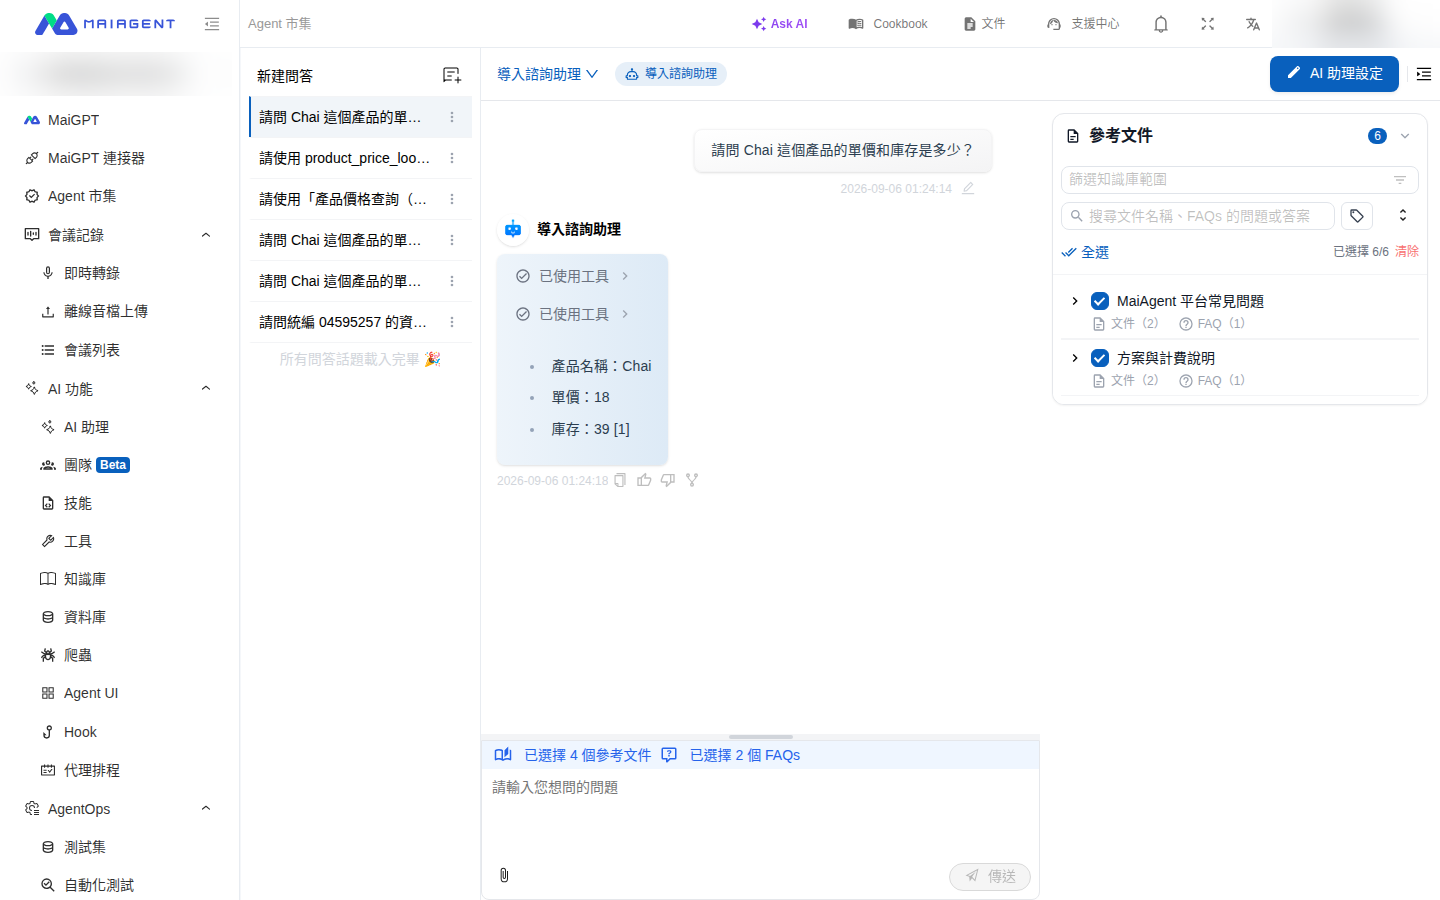
A procurement department wants its internal AI assistant to directly answer questions such as, "What are the current unit price and inventory for a product?" The data comes from an OData query service provided by the company's product catalog system. Previously, each API query required custom code. Now, a procurement specialist can create an API tool, set the query condition to `ProductName eq '{{product_name}}'`, and assign the tool to the AI assistant. When a colleague asks, "What are the unit price and inventory for Chai?", the AI assistant automatically inserts `Chai` into the query condition, calls the API, and replies with the product name, unit price, and inventory.

### Setup steps <a href="#query-param-templates-steps" id="query-param-templates-steps"></a>

The following example uses the public Northwind sample data service (OData), so you can follow the steps directly:

{% stepper %}
{% step %}

### Create the tool and enter the basic information <a href="#query-param-step-basic" id="query-param-step-basic"></a>

Follow the steps in "Quick API Tool Setup" above to add an API tool. Enter a display name (for example, <mark style="color:blue;">Product Price Lookup</mark>), the tool name `product_price_lookup`, a description, and a prompt. Set the <mark style="color:blue;">API URL</mark> to:

```
https://services.odata.org/V4/Northwind/Northwind.svc/Products
```

Keep the <mark style="color:blue;">HTTP Method</mark> set to `GET`.
{% endstep %}

{% step %}

### Declare the parameter that the AI assistant will provide in the Parameters Schema <a href="#query-param-step-schema" id="query-param-step-schema"></a>

Declare `product_name` in the <mark style="color:blue;">Parameters Schema (JSON Schema)</mark>, and use `description` to tell the AI assistant what to provide:

```json
{
  "type": "object",
  "properties": {
    "product_name": {
      "type": "string",
      "description": "The complete English product name, such as Chai"
    }
  },
  "required": ["product_name"]
}
```

{% endstep %}

{% step %}

### Reference the parameter in a Query Parameters value <a href="#query-param-step-template" id="query-param-step-template"></a>

Enter the fixed query structure in <mark style="color:blue;">Query Parameters (JSON)</mark>, and reference the parameter you just declared by using `{{product_name}}` in the value:

```json
{
  "$format": "json",
  "$select": "ProductID,ProductName,UnitPrice,UnitsInStock",
  "$filter": "ProductName eq '{{product_name}}'"
}
```

Click "<mark style="color:blue;">Confirm</mark>" to save the tool.
{% endstep %}

{% step %}

### Assign the tool to an AI assistant and test it <a href="#query-param-step-test" id="query-param-step-test"></a>

Follow [Assign Tools to an AI Assistant](/maiagent-user-guide/en/tools/configure_tools.md) to add this tool to an AI assistant in Agent mode and save it. Then, use the left navigation bar to open "<mark style="color:blue;">Agent Marketplace</mark>", switch to "<mark style="color:blue;">Organization-created</mark>", and select the AI assistant to start a conversation. Enter "What are the unit price and inventory for Chai?" The AI assistant displays "Tool used" and replies with Chai's unit price and inventory.

<figure><img src="https://1360999650-files.gitbook.io/~/files/v0/b/gitbook-x-prod.appspot.com/o/spaces%2F6v6TNkkOQVfRYfcNirHL%2Fuploads%2Fgit-blob-d301cae503ac598952cb9c0c4ef494c0b8bae727%2Fapi-tool-query-params-chat.png?alt=media" alt="The AI assistant uses a tool in the conversation and replies with the product name, unit price, and inventory"><figcaption><p>The AI assistant inserts the user-provided product name into the query condition before calling the API</p></figcaption></figure>
{% endstep %}
{% endstepper %}

### Substitution rules <a href="#query-param-templates-rules" id="query-param-templates-rules"></a>

| Rule                                                | Description                                                                                                                                                                                                 |
| --------------------------------------------------- | ----------------------------------------------------------------------------------------------------------------------------------------------------------------------------------------------------------- |
| **Variable names must match the Parameters Schema** | `{{product_name}}` corresponds to the parameter name under `properties` in the Parameters Schema. The name is case-sensitive.                                                                               |
| **Only values are substituted**                     | Templates apply only to Query Parameters values. Keys remain unchanged and are not substituted.                                                                                                             |
| **Values are inserted verbatim**                    | Parameter values are always inserted as literal text with no numeric conversion. For example, the leading zero in the business registration number `04595257` is preserved.                                 |
| **Missing values stop the request**                 | If the AI assistant does not provide the parameter for a call, or the value is empty, the tool stops with an error that identifies the missing parameter. It does not send `{{product_name}}` as-is.        |
| **Context variables take priority**                 | If a parameter has the same name as a context variable, such as `contact_id` or `conversation_id`, the context variable's value is always used. A value provided by the AI assistant cannot override it.    |
| **Referenced parameters are still sent separately** | A parameter referenced by a template is still sent as an independent query parameter according to the existing behavior (for example, `product_name=Chai` is also sent). Most APIs ignore extra parameters. |
| **Parameter names are preserved**                   | Query parameter keys containing underscores or uppercase letters, such as `Business_Accounting_NO`, are preserved and are not rewritten by the system.                                                      |

{% hint style="info" %}
Values in "<mark style="color:blue;">Headers (JSON)</mark>" also support `{{parameter_name}}` references to parameters in the Parameters Schema. The same rules as Query Parameters apply.
{% endhint %}

{% hint style="warning" %}
Existing tool settings that do not contain `{{ }}` are completely unaffected. If the system previously rewrote a Query Parameter name in an existing tool (for example, changing `Business_Accounting_NO` to `business__accounting_no`), reopen the tool, restore the correct name, and save it. When you reopen the editing window, Query Parameters values are masked as `****`; saving directly does not remove the original values.
{% endhint %}

## ⚠️ Important Reminders <a href="#important-notes" id="important-notes"></a>

**Connection Testing**

* After creating the tool, test the API to ensure it works properly
* Use testing tools to verify functionality, such as:
  * POSTMAN
  * Your company's own API testing platform

**Permission Management**

* Regularly check tool usage status and permission access settings


---

# Agent Instructions
This documentation is published with GitBook. GitBook is the documentation platform designed so that both humans and AI agents can read, navigate, and reason over technical content effectively. Learn more at gitbook.com.

## Querying This Documentation
If you need additional information that is not directly available in this page, you can query the documentation dynamically by asking a question.

Perform an HTTP GET request on the current page URL with the `ask` query parameter, and the optional `goal` query parameter:

```
GET https://docs.maiagent.ai/maiagent-user-guide/en/tools/setup_api_tool.md?ask=<question>&goal=<endgoal>
```

`ask` is the immediate question: it should be specific, self-contained, and written in natural language.
`goal` is optional and describes the broader end goal you are ultimately trying to accomplish on behalf of the user. GitBook uses it to tailor the answer towards what is most useful for that goal.

The response will contain a direct answer to the question and relevant excerpts and sources from the documentation.

Use this mechanism when the answer is not explicitly present in the current page, you need clarification or additional context, or you want to retrieve related documentation sections.