> For the complete documentation index, see [llms.txt](https://docs.maiagent.ai/llms.txt). Markdown versions of documentation pages are available by appending `.md` to page URLs; this page is available as [Markdown](https://docs.maiagent.ai/maiagent-user-guide/en/skills/skills-management.md).

# Skills Management

Learn how to create, edit, and manage skills, including manual creation, uploading skill packages, attaching tools, and export functionality

{% hint style="info" %}
If you're not yet familiar with what skills are, please read: [Skill Overview](/maiagent-user-guide/en/skills/skill-overview.md)
{% endhint %}

## Creating Skills <a href="#create-skill" id="create-skill"></a>

Click <mark style="color:blue;">Skills</mark> in the left sidebar to enter the skills management page, then click the <mark style="color:blue;">Add Skill</mark> button in the upper right corner.

The system provides two creation methods:

### Method 1: Manual Creation <a href="#method-manual-create" id="method-manual-create"></a>

Suitable for writing skill instructions from scratch.

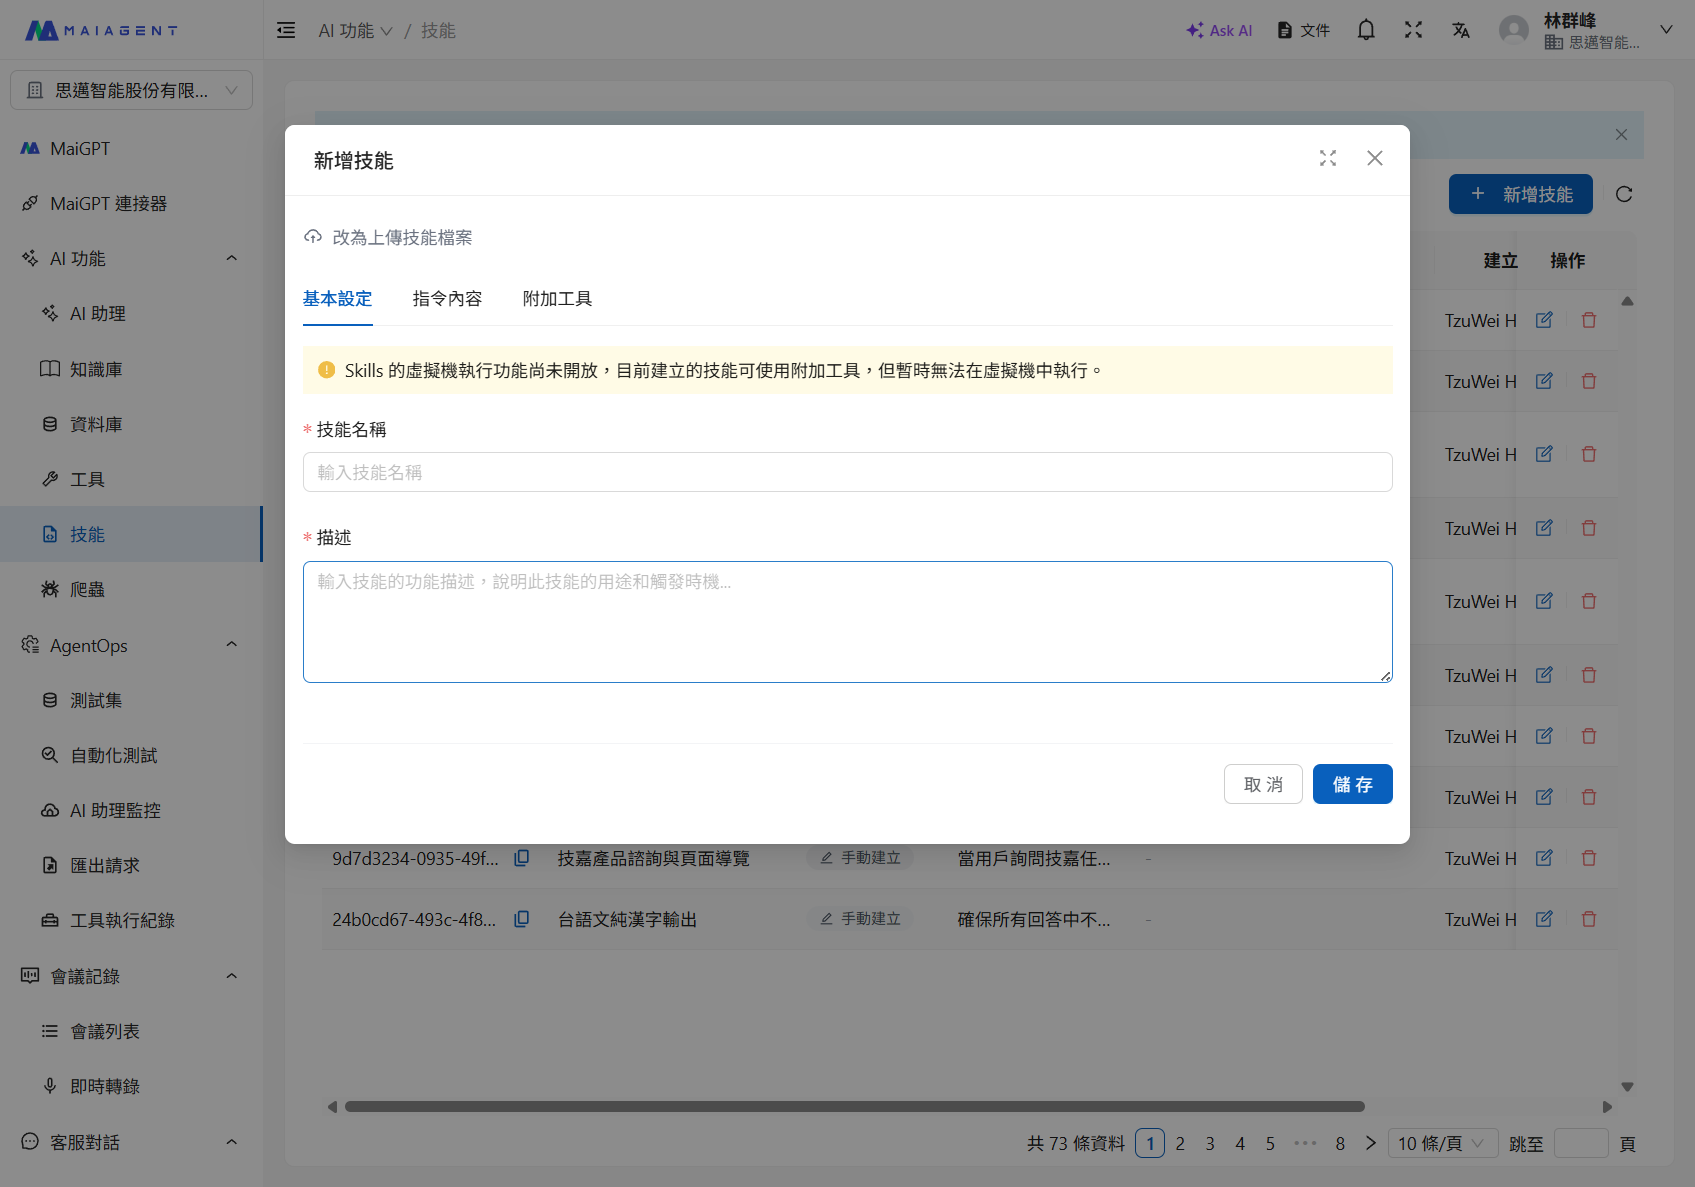
1. In the add skill dialog, click the <mark style="color:blue;">Switch to manual creation</mark> link at the bottom to switch to manual mode
2. Fill in the <mark style="color:blue;">Basic Settings</mark> tab:
   * **Skill Name** (required): Give the skill an easily identifiable name
   * **Description** (required): Briefly describe the skill's purpose

<figure><img src="https://1360999650-files.gitbook.io/~/files/v0/b/gitbook-x-prod.appspot.com/o/spaces%2F6v6TNkkOQVfRYfcNirHL%2Fuploads%2Fgit-blob-9ff82808eea81566942660166fb773f62bd50eac%2Fskills-new-manual.png?alt=media" alt=""><figcaption><p>Manual skill creation — Basic Settings tab</p></figcaption></figure>

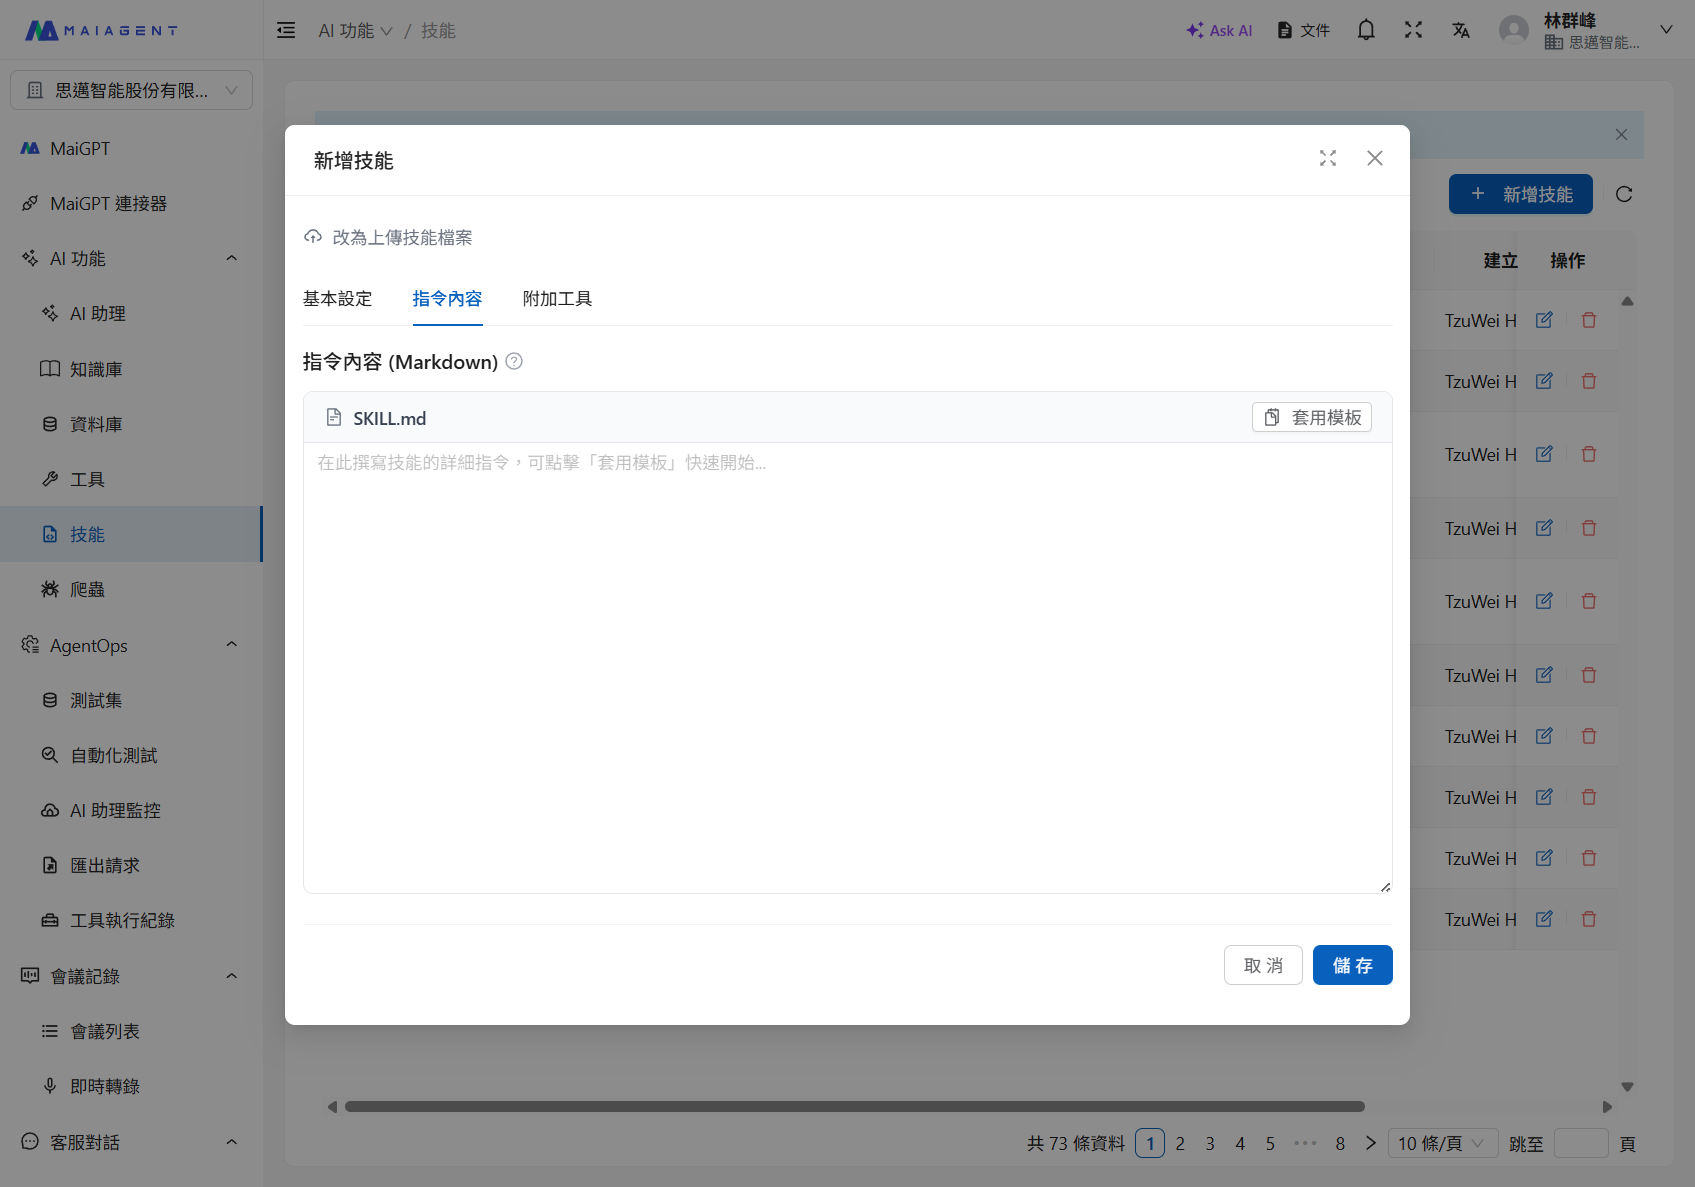
3. Switch to the <mark style="color:blue;">Instructions</mark> tab and write instructions in Markdown format. You can also click the <mark style="color:blue;">Apply Template</mark> button to use a system-provided default template as a starting point

<figure><img src="https://1360999650-files.gitbook.io/~/files/v0/b/gitbook-x-prod.appspot.com/o/spaces%2F6v6TNkkOQVfRYfcNirHL%2Fuploads%2Fgit-blob-208ccb129564da27338d716f0cabf4497a34af3f%2Fskills-new-instructions.png?alt=media" alt=""><figcaption><p>Instructions tab — Supports Markdown format and template application</p></figcaption></figure>

4. (Optional) Switch to the <mark style="color:blue;">Attached Tools</mark> tab to select the tools required by the skill
5. Click <mark style="color:blue;">Save</mark> to complete creation

### Method 2: Upload Skill Package <a href="#method-upload-skill-package" id="method-upload-skill-package"></a>

Suitable for importing pre-packaged `.skill` or `.zip` files.

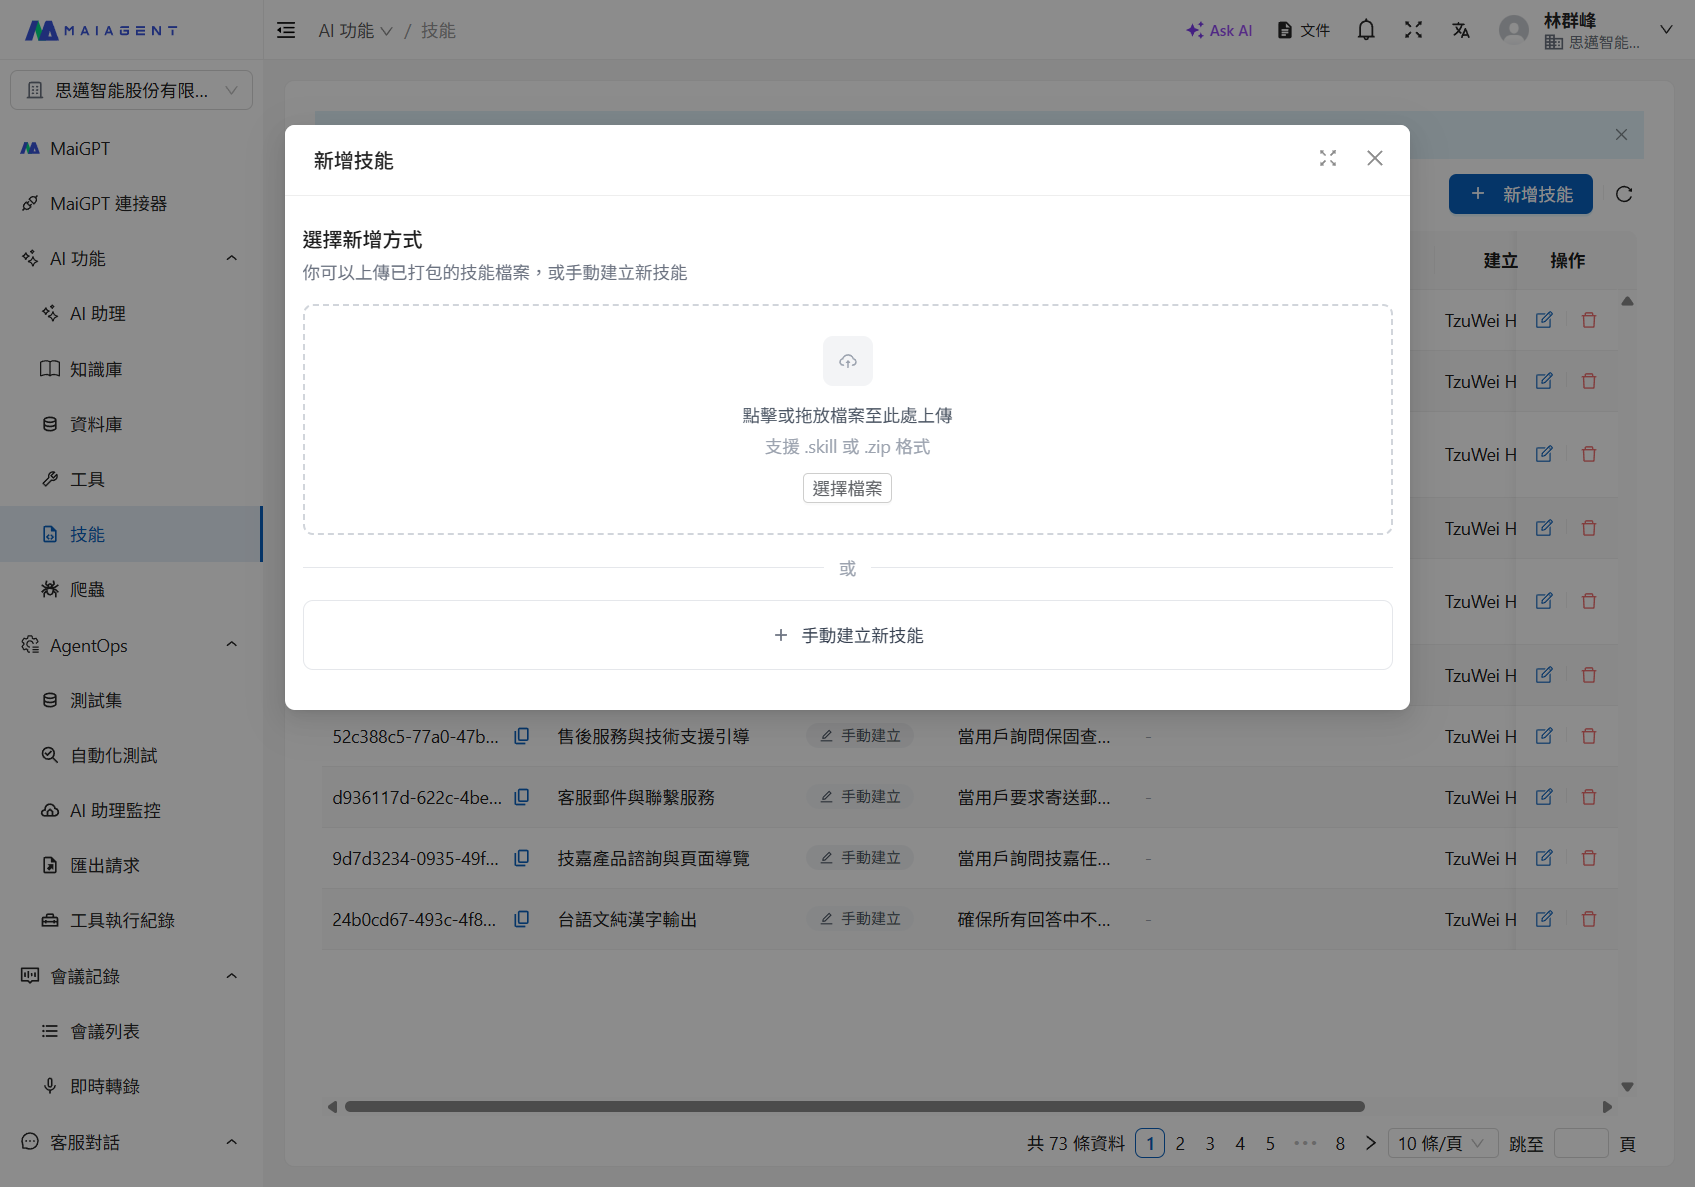
1. In the add skill dialog (upload mode by default), drag and drop the `.skill` or `.zip` file into the upload area, or click the area to select a file

<figure><img src="https://1360999650-files.gitbook.io/~/files/v0/b/gitbook-x-prod.appspot.com/o/spaces%2F6v6TNkkOQVfRYfcNirHL%2Fuploads%2Fgit-blob-8b0eb5b5dc222b68ce354bbcc6c48e59e1a4128a%2Fskills-new-upload.png?alt=media" alt=""><figcaption><p>Upload skill package — Supports .skill or .zip format</p></figcaption></figure>

2. After the upload is complete, the system automatically parses the `SKILL.md` file to extract the skill name, description, and instructions
3. After successful creation, you are automatically redirected to the edit page where you can further adjust the settings

{% hint style="info" %}
The skill package must contain a `SKILL.md` file in the following format:

```markdown
---
name: Skill Name
description: Skill Description
---

This is where the AI assistant's execution instructions go...
```

{% endhint %}

***

## Editing and Configuring Skills <a href="#edit-and-configure-skill" id="edit-and-configure-skill"></a>

In the skill list, click the <mark style="color:blue;">Edit</mark> icon for the skill to enter the skill settings page.

### Basic Settings <a href="#basic-settings" id="basic-settings"></a>

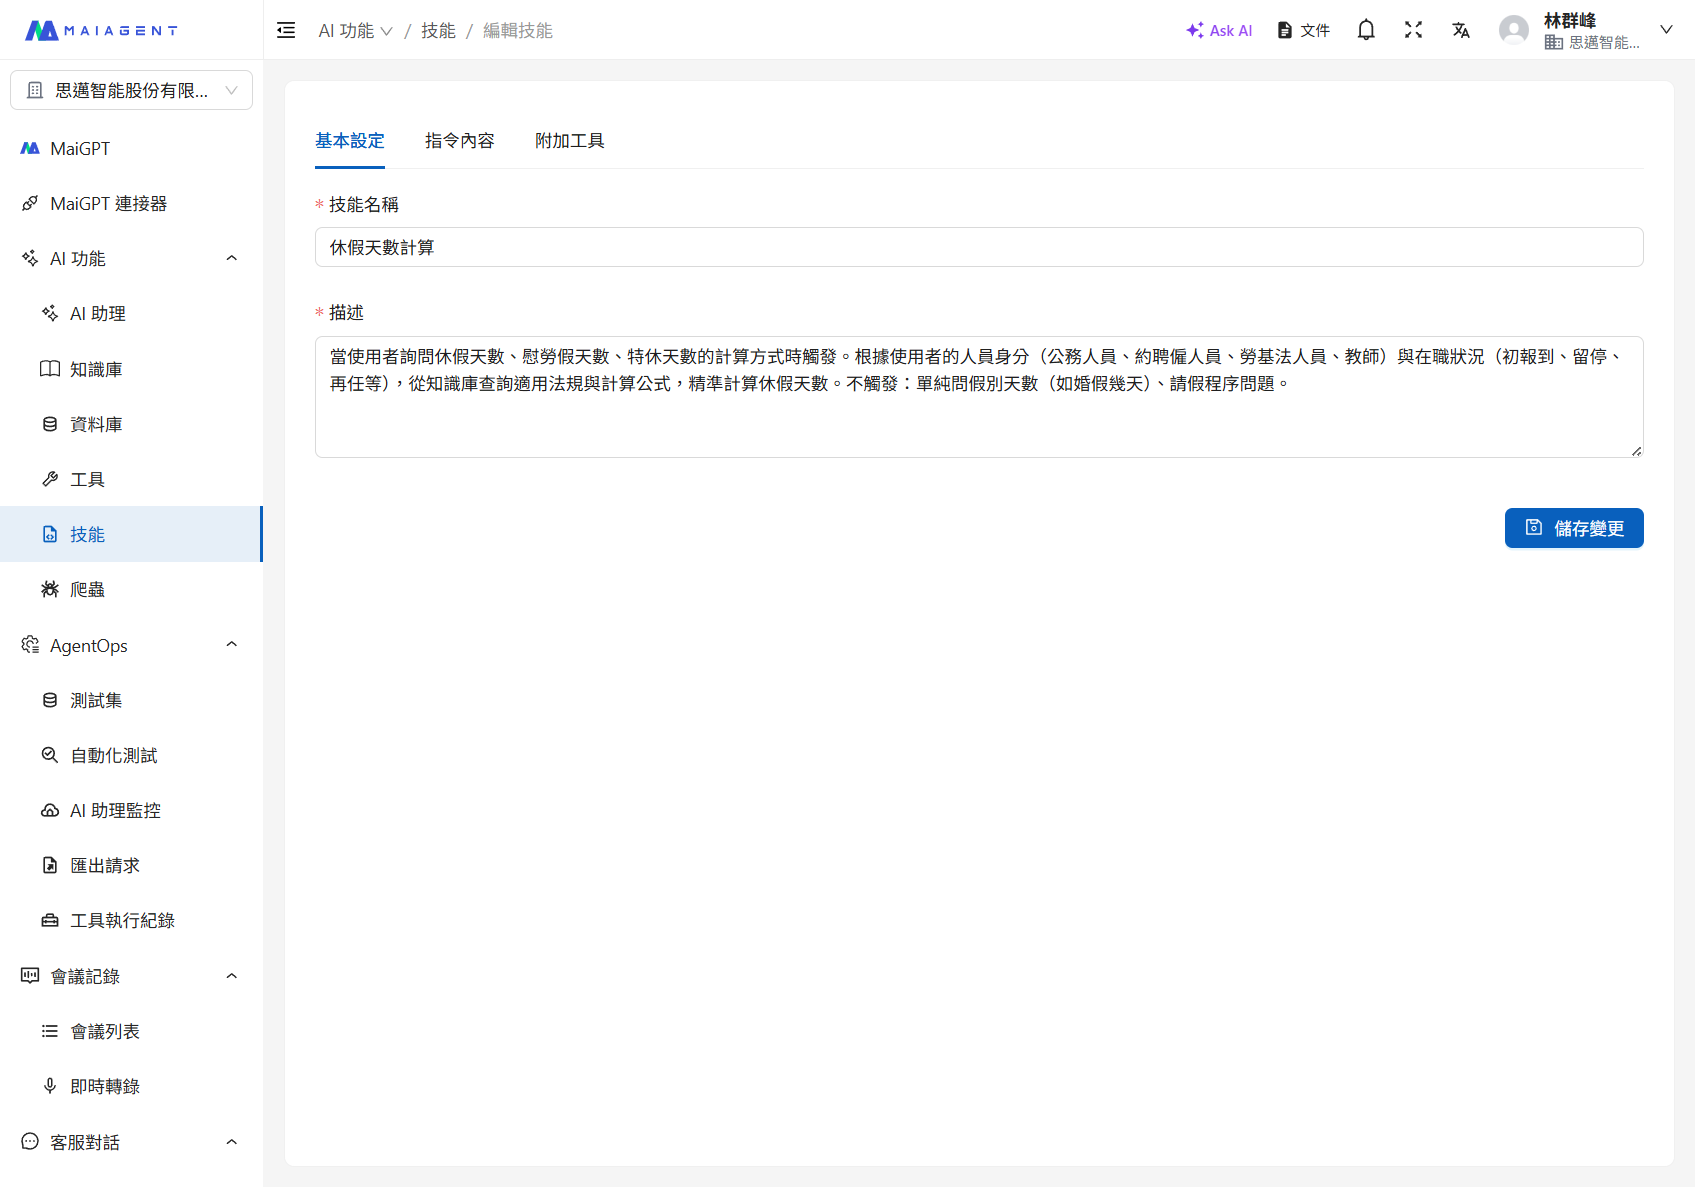
Edit the skill's name and description.

<figure><img src="https://1360999650-files.gitbook.io/~/files/v0/b/gitbook-x-prod.appspot.com/o/spaces%2F6v6TNkkOQVfRYfcNirHL%2Fuploads%2Fgit-blob-fd93e13a22c9e6902e8739d1c5f2ee3ec68e9cf9%2Fskills-edit-basic.png?alt=media" alt=""><figcaption><p>Edit skill — Basic Settings</p></figcaption></figure>

### Instructions <a href="#instruction-content" id="instruction-content"></a>

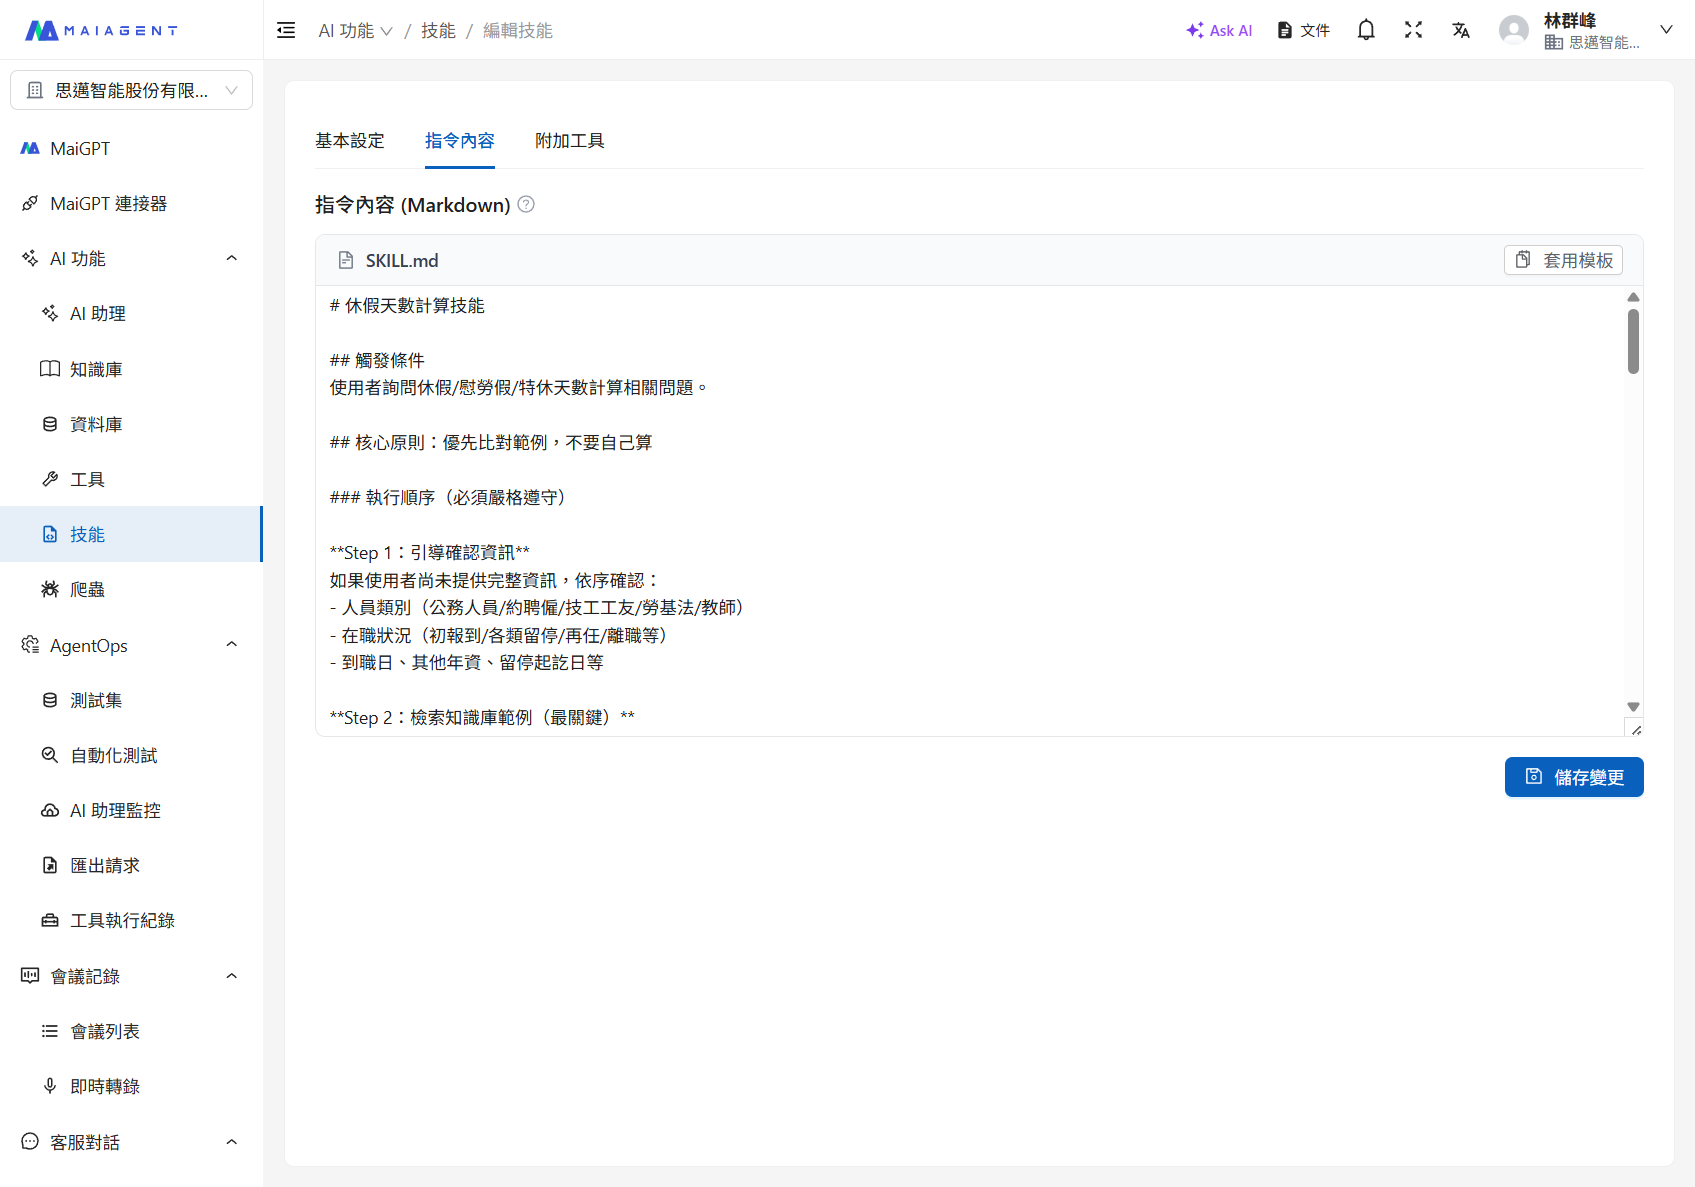
Edit the skill instructions in Markdown format. These instructions serve as the execution guide when the AI assistant activates the skill.

Click <mark style="color:blue;">Apply Template</mark> to load a default instruction template.

{% hint style="warning" %}
Applying a template will overwrite the current instructions. Please confirm before proceeding.
{% endhint %}

### Skill Package (Upload-created skills only) <a href="#skill-package" id="skill-package"></a>

If the skill was created by uploading a `.skill` / `.zip` file, this tab displays:

* **Skill package info**: File name, size, upload time
* <mark style="color:blue;">Preview</mark>: Expand to view the file structure within the skill package
* <mark style="color:blue;">Download</mark>: Export the skill package file
* <mark style="color:blue;">Re-upload skill package</mark>: Upload a new version to replace the existing skill package

<figure><img src="https://1360999650-files.gitbook.io/~/files/v0/b/gitbook-x-prod.appspot.com/o/spaces%2F6v6TNkkOQVfRYfcNirHL%2Fuploads%2Fgit-blob-20d9126b4fd95e0e54cef8732fb7ae1e096cef78%2Fskills-edit-instructions.png?alt=media" alt=""><figcaption><p>Edit skill — Instructions (with practical examples)</p></figcaption></figure>

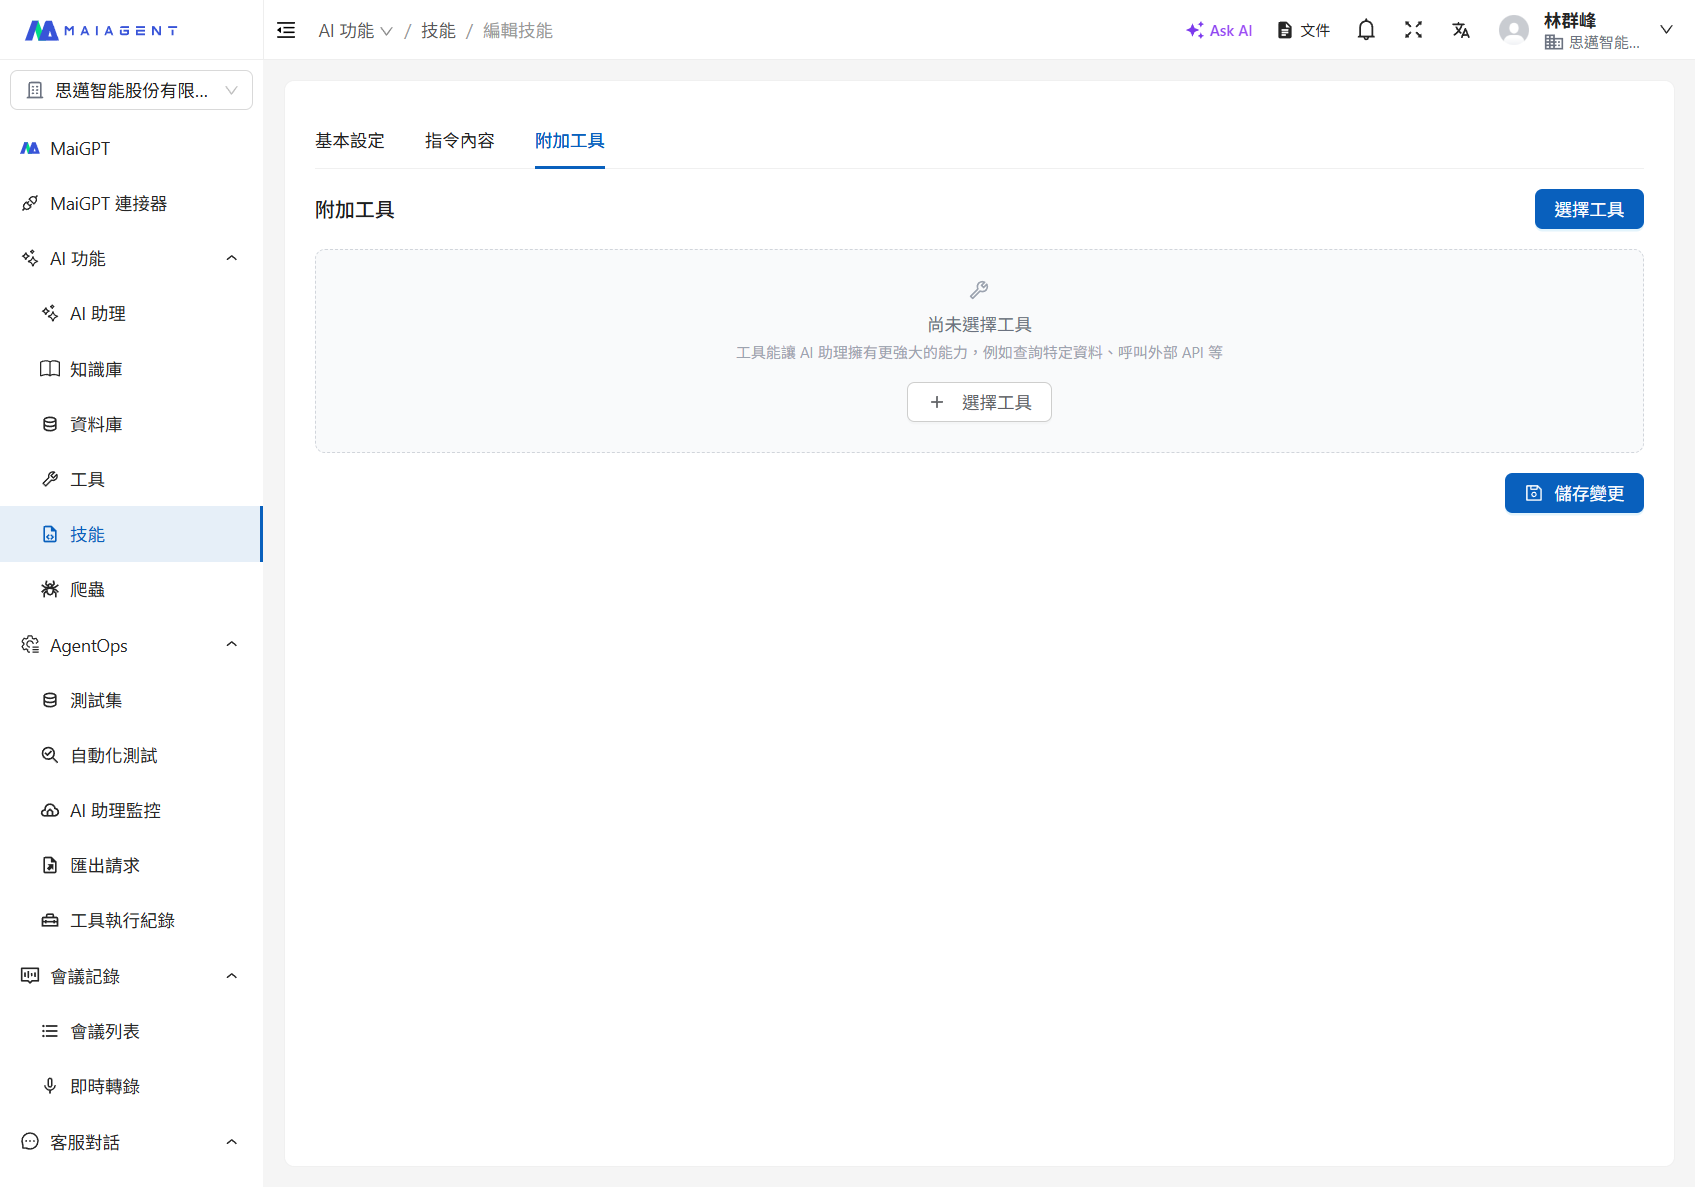
### Attached Tools <a href="#additional-tools" id="additional-tools"></a>

Bind the required tools to the skill so the AI assistant can call them when executing the skill.

1. Click the <mark style="color:blue;">Select Tools</mark> button to open the tool selection dialog
2. Check the tools to attach (multiple selection supported), then click Confirm
3. Selected tools appear in the list, showing the tool name, type (API / MCP), and description
4. To remove a tool, click the delete icon on the tool card

<figure><img src="https://1360999650-files.gitbook.io/~/files/v0/b/gitbook-x-prod.appspot.com/o/spaces%2F6v6TNkkOQVfRYfcNirHL%2Fuploads%2Fgit-blob-34a440536c9d86df0a1633c9d813091f3b997a2e%2Fskills-edit-tools.png?alt=media" alt=""><figcaption><p>Attached Tools tab</p></figcaption></figure>

After completing the configuration, click the <mark style="color:blue;">Save</mark> button in the lower right corner of the page.

***

## Exporting Skills <a href="#export-skill" id="export-skill"></a>

In the skill edit page's <mark style="color:blue;">Skill Package</mark> tab, click the <mark style="color:blue;">Download</mark> button to export the skill as a `.skill` file.

{% hint style="info" %}
Manually created skills can also be exported. The system automatically packages the instructions and resources into a `.skill` file. Exported skill packages can be shared with other organizations for import.
{% endhint %}

***

## Binding Skills to an AI Assistant <a href="#bind-skill-to-ai-agent" id="bind-skill-to-ai-agent"></a>

Skills must be bound to an AI assistant to take effect:

1. Go to the <mark style="color:blue;">AI Assistant</mark> page, select the target AI assistant, and enter its settings
2. Find the <mark style="color:blue;">Skills</mark> setting in the model configuration area
3. Select the skills to bind and click Confirm
4. Save the AI assistant settings

Once bound, the AI assistant automatically determines whether to activate a skill based on the user's question during conversations and executes the corresponding task according to the skill instructions.

***

## Controlling Skill Visibility and Permissions by Role <a href="#skill-role-visibility" id="skill-role-visibility"></a>

If you want members with specific roles to see only the skills relevant to their work, you can use role permission management to assign skills to each role individually.

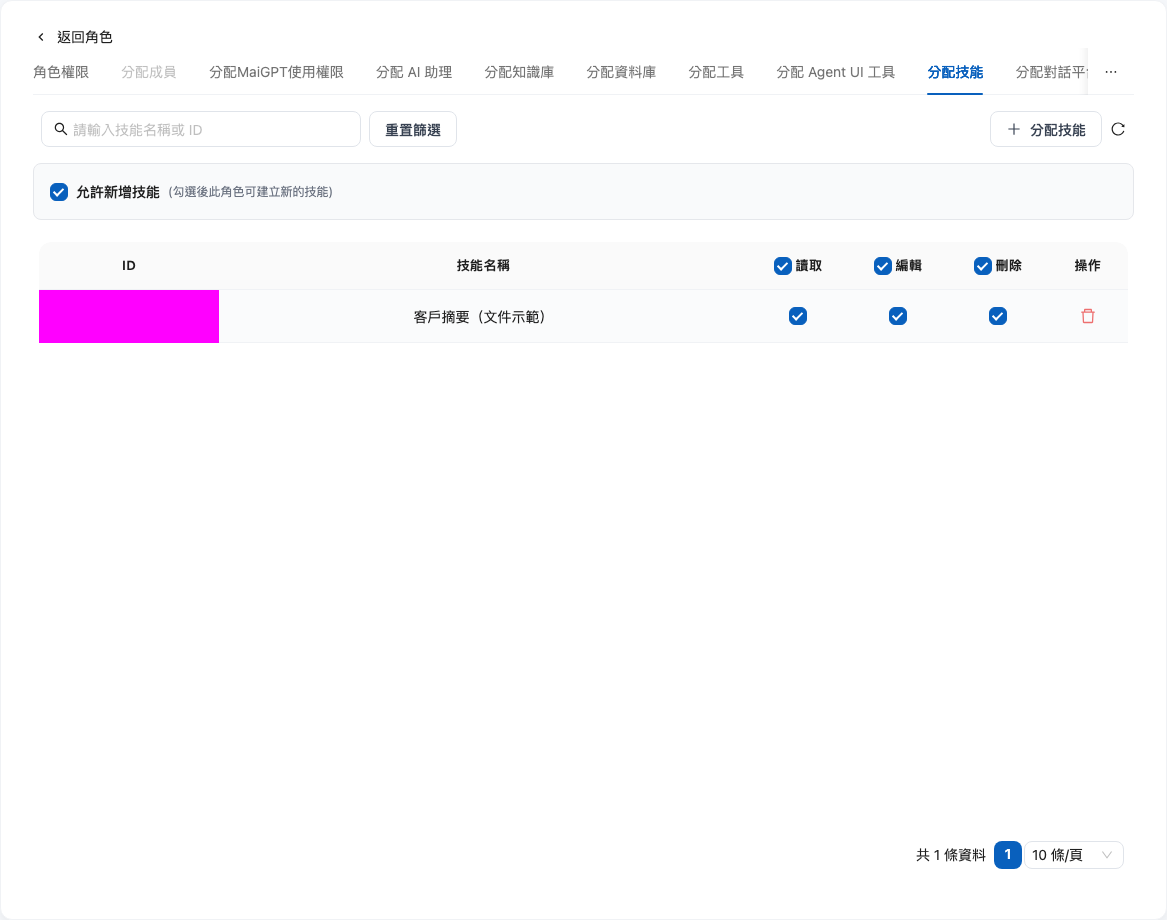
For example, suppose a company's system administrator wants sales representatives to be able to read the “Customer Summary” skill but not modify or delete it. The administrator can edit the sales role, assign this skill, and grant read permission only. Once configured, sales representatives can see “Customer Summary” in the skill list without receiving permission to modify or delete it.

### How It Works <a href="#skill-role-visibility-rules" id="skill-role-visibility-rules"></a>

* **Unassigned means hidden**: Skills created by the organization must be assigned to a role before members with that role can see them in the skill list. Unassigned skills are completely hidden from that role
* **Granular permissions**: Each “role × skill” assignment can have its <mark style="color:blue;">Read</mark>, <mark style="color:blue;">Edit</mark>, and <mark style="color:blue;">Delete</mark> permissions configured independently, allowing read-only scenarios such as “can read but cannot modify”
* **Create permission**: Each role has its own “Allow skill creation” toggle, which controls whether members with that role can create skills
* **Owners are unrestricted**: Organization owners automatically have full access to all skills and do not require assignments
* **Global skill exception**: Built-in global skills are visible to all members and cannot be restricted through role assignments

### Configuration Steps <a href="#skill-role-visibility-steps" id="skill-role-visibility-steps"></a>

{% stepper %}
{% step %}

### Open Role Settings <a href="#open-role-settings" id="open-role-settings"></a>

From the left sidebar, select “<mark style="color:blue;">Organization Settings</mark>” → “<mark style="color:blue;">Organization Overview</mark>,” then click “<mark style="color:blue;">Edit Role Permissions</mark>.” Select the role you want to configure, then switch to the “<mark style="color:blue;">Assign Skills</mark>” tab.
{% endstep %}

{% step %}

### Set Skill Creation Permission <a href="#set-create-skill-permission" id="set-create-skill-permission"></a>

Select or clear “<mark style="color:blue;">Allow skill creation</mark>” as needed to determine whether members with this role can create skills. Changes are saved immediately, and a success message appears after the update is complete.
{% endstep %}

{% step %}

### Assign Skills <a href="#assign-skills-to-role" id="assign-skills-to-role"></a>

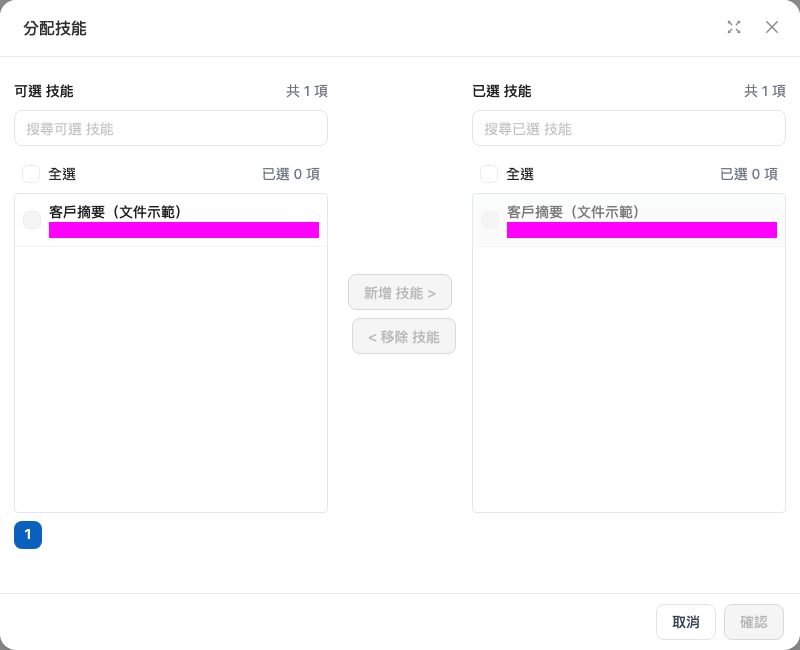
Click the “<mark style="color:blue;">Assign Skills</mark>” button, select the skills you want to make available to this role, and confirm your selection.
{% endstep %}

{% step %}

### Set Skill Permissions <a href="#set-skill-permissions" id="set-skill-permissions"></a>

In the assigned skills list, configure the read, edit, and delete permissions for each skill individually, or remove the assignment. Permission changes are saved immediately when selected or cleared. A success message appears after the update, and there is no separate “Save” button on the page.
{% endstep %}
{% endstepper %}

<figure><img src="https://1360999650-files.gitbook.io/~/files/v0/b/gitbook-x-prod.appspot.com/o/spaces%2F6v6TNkkOQVfRYfcNirHL%2Fuploads%2Fgit-blob-3339a4d762b54ab17bd2f31d015b1aae2f3e74b2%2Frole-permission-assign-skills.png?alt=media" alt="Assign Skills tab in role permission management, where skill creation and skill permissions can be configured"><figcaption><p>Manage skill creation permission and individual skill permissions on the “Assign Skills” tab</p></figcaption></figure>

<figure><img src="https://1360999650-files.gitbook.io/~/files/v0/b/gitbook-x-prod.appspot.com/o/spaces%2F6v6TNkkOQVfRYfcNirHL%2Fuploads%2Fgit-blob-9923a16cdc23ef49119db9d307c83b11ef4977e8%2Frole-permission-assign-skills-modal.png?alt=media" alt="Assign Skills dialog, with available skills on the left and selected skills on the right"><figcaption><p>Select the skills to assign to the role from the available skills</p></figcaption></figure>

{% hint style="info" %}
For information about creating roles and assigning members, see [Role Permission Management](/maiagent-user-guide/en/org/roles/role-permission.md).
{% endhint %}

***

## Deleting Skills <a href="#delete-skill" id="delete-skill"></a>

In the skill list, click the <mark style="color:blue;">Delete</mark> icon for the skill, then confirm to delete it.

{% hint style="warning" %}
After deleting a skill, AI assistants that had this skill bound will no longer be able to use it. This action cannot be undone.
{% endhint %}


---

# Agent Instructions
This documentation is published with GitBook. GitBook is the documentation platform designed so that both humans and AI agents can read, navigate, and reason over technical content effectively. Learn more at gitbook.com.

## Querying This Documentation
If you need additional information that is not directly available in this page, you can query the documentation dynamically by asking a question.

Perform an HTTP GET request on the current page URL with the `ask` query parameter, and the optional `goal` query parameter:

```
GET https://docs.maiagent.ai/maiagent-user-guide/en/skills/skills-management.md?ask=<question>&goal=<endgoal>
```

`ask` is the immediate question: it should be specific, self-contained, and written in natural language.
`goal` is optional and describes the broader end goal you are ultimately trying to accomplish on behalf of the user. GitBook uses it to tailor the answer towards what is most useful for that goal.

The response will contain a direct answer to the question and relevant excerpts and sources from the documentation.

Use this mechanism when the answer is not explicitly present in the current page, you need clarification or additional context, or you want to retrieve related documentation sections.