> For the complete documentation index, see [llms.txt](https://docs.maiagent.ai/llms.txt). Markdown versions of documentation pages are available by appending `.md` to page URLs; this page is available as [Markdown](https://docs.maiagent.ai/maiagent-user-guide/en/org/overview/member.md).

# Member Management

Member management, including the relationship between members and roles, email invitations (existing accounts join directly), organization invitation links, member list actions, changing member names,

## What Is a Member? <a href="#what-is-member" id="what-is-member"></a>

A **member** is a user in an organization who receives permissions and resources through assigned roles.

{% hint style="info" %}
**A simple analogy:**

Members are like employees in a company. Each employee can join different departments (roles) and receive the corresponding work permissions.
{% endhint %}

***

## Member Types <a href="#member-types" id="member-types"></a>

<table><thead><tr><th>Member Type</th><th width="215">Description</th><th>Permissions</th></tr></thead><tbody><tr><td>Owner</td><td>The organization creator by default</td><td>Full access to all resources<br>Can manage organization settings and role permissions</td></tr><tr><td>Regular member</td><td>A member assigned to roles</td><td>Permissions and resources granted by their roles, such as Q&#x26;A and conversation access</td></tr></tbody></table>

{% hint style="info" %}
**A simple analogy:**

* **Owner** = the company's general manager or system administrator, who can manage everything
* **Regular member** = an employee with permissions based on their department (role)
  {% endhint %}

{% hint style="info" %}
For detailed role permission settings, see [Role Permission Management](https://docs.maiagent.ai/maiagent-user-guide/en/org/roles/role-permission.md).
{% endhint %}

***

## Basic Operations <a href="#basic-operations" id="basic-operations"></a>

### Open Member Management <a href="#enter-member-management" id="enter-member-management"></a>

1. Log in to the MaiAgent platform
2. Click “<mark style="color:blue;">Organization Settings</mark>” in the left menu
3. Click “<mark style="color:blue;">Organization Overview</mark>”
4. Click “<mark style="color:blue;">Edit Members</mark>” to open the member management page

### Which Method Should You Use to Add Members? <a href="#how-to-choose-add-method" id="how-to-choose-add-method"></a>

Start by clicking “<mark style="color:blue;">Invite New Members</mark>” at the top right of the member management page. The dialog has two tabs; choose the one that fits your situation:

{% hint style="info" %}
**Quick guide**

* You have a list of email addresses (whether or not recipients have MaiAgent accounts) → Use “**Invite via Email**”: existing account holders join the organization directly, while those without accounts receive an invitation email
* You want people to register themselves → Use “**Generate Invitation Link**” and share the link
  {% endhint %}

{% hint style="success" %}
**Example: Onboard 30 employees at once**

**Scenario A: You have an employee list** → Use the bulk import feature in “Invite via Email” to paste 30 email addresses at once. After submission, the system shows separate counts for members added directly, invitations sent, and existing members skipped. You do not need to check who already has an account

**Scenario B: You want employees to register themselves** → Use “Generate Invitation Link” and share the link through an announcement or group chat

**Scenario C: You have more people or also need to assign roles** → Use the Excel import under “Batch Functions” at the top right. See [Advanced Operations: Batch Member and Permission Management](#batch-member-permission-management)
{% endhint %}

***

### Existing MaiAgent Accounts: Join Directly via Email Invitation <a href="#add-member-existing-account" id="add-member-existing-account"></a>

When the person you want to add **already has a MaiAgent account**, use “<mark style="color:blue;">Invite via Email</mark>” as well:

1. Click “<mark style="color:blue;">Invite New Members</mark>” at the top right of the member management page
2. On the “<mark style="color:blue;">Invite via Email</mark>” tab, select roles, enter the person's email address, and click “<mark style="color:blue;">Add</mark>”
3. Click “<mark style="color:blue;">Send Invitations</mark>”

The system recognizes the existing account by email and **adds the person directly to the organization with the selected roles**, without requiring any action from them. The completion message shows “Added directly: N people,” and they appear in the member list immediately. Email addresses that already belong to organization members are skipped, with the message “Skipped (already members): N people.”

{% hint style="info" %}
Invitation links assign roles only **during registration**. People with existing accounts cannot join through an invitation link. To add roles for existing members, use <mark style="color:blue;">Edit Member Roles</mark> in the member list or [Batch Add Role Members](#batch-add-role-members).
{% endhint %}

***

### Email Invitations (No Account, Email List Available) <a href="#email-invite" id="email-invite"></a>

If the people you want to invite **do not yet have MaiAgent accounts** and you have their email addresses, use email invitations to send them an invitation email.

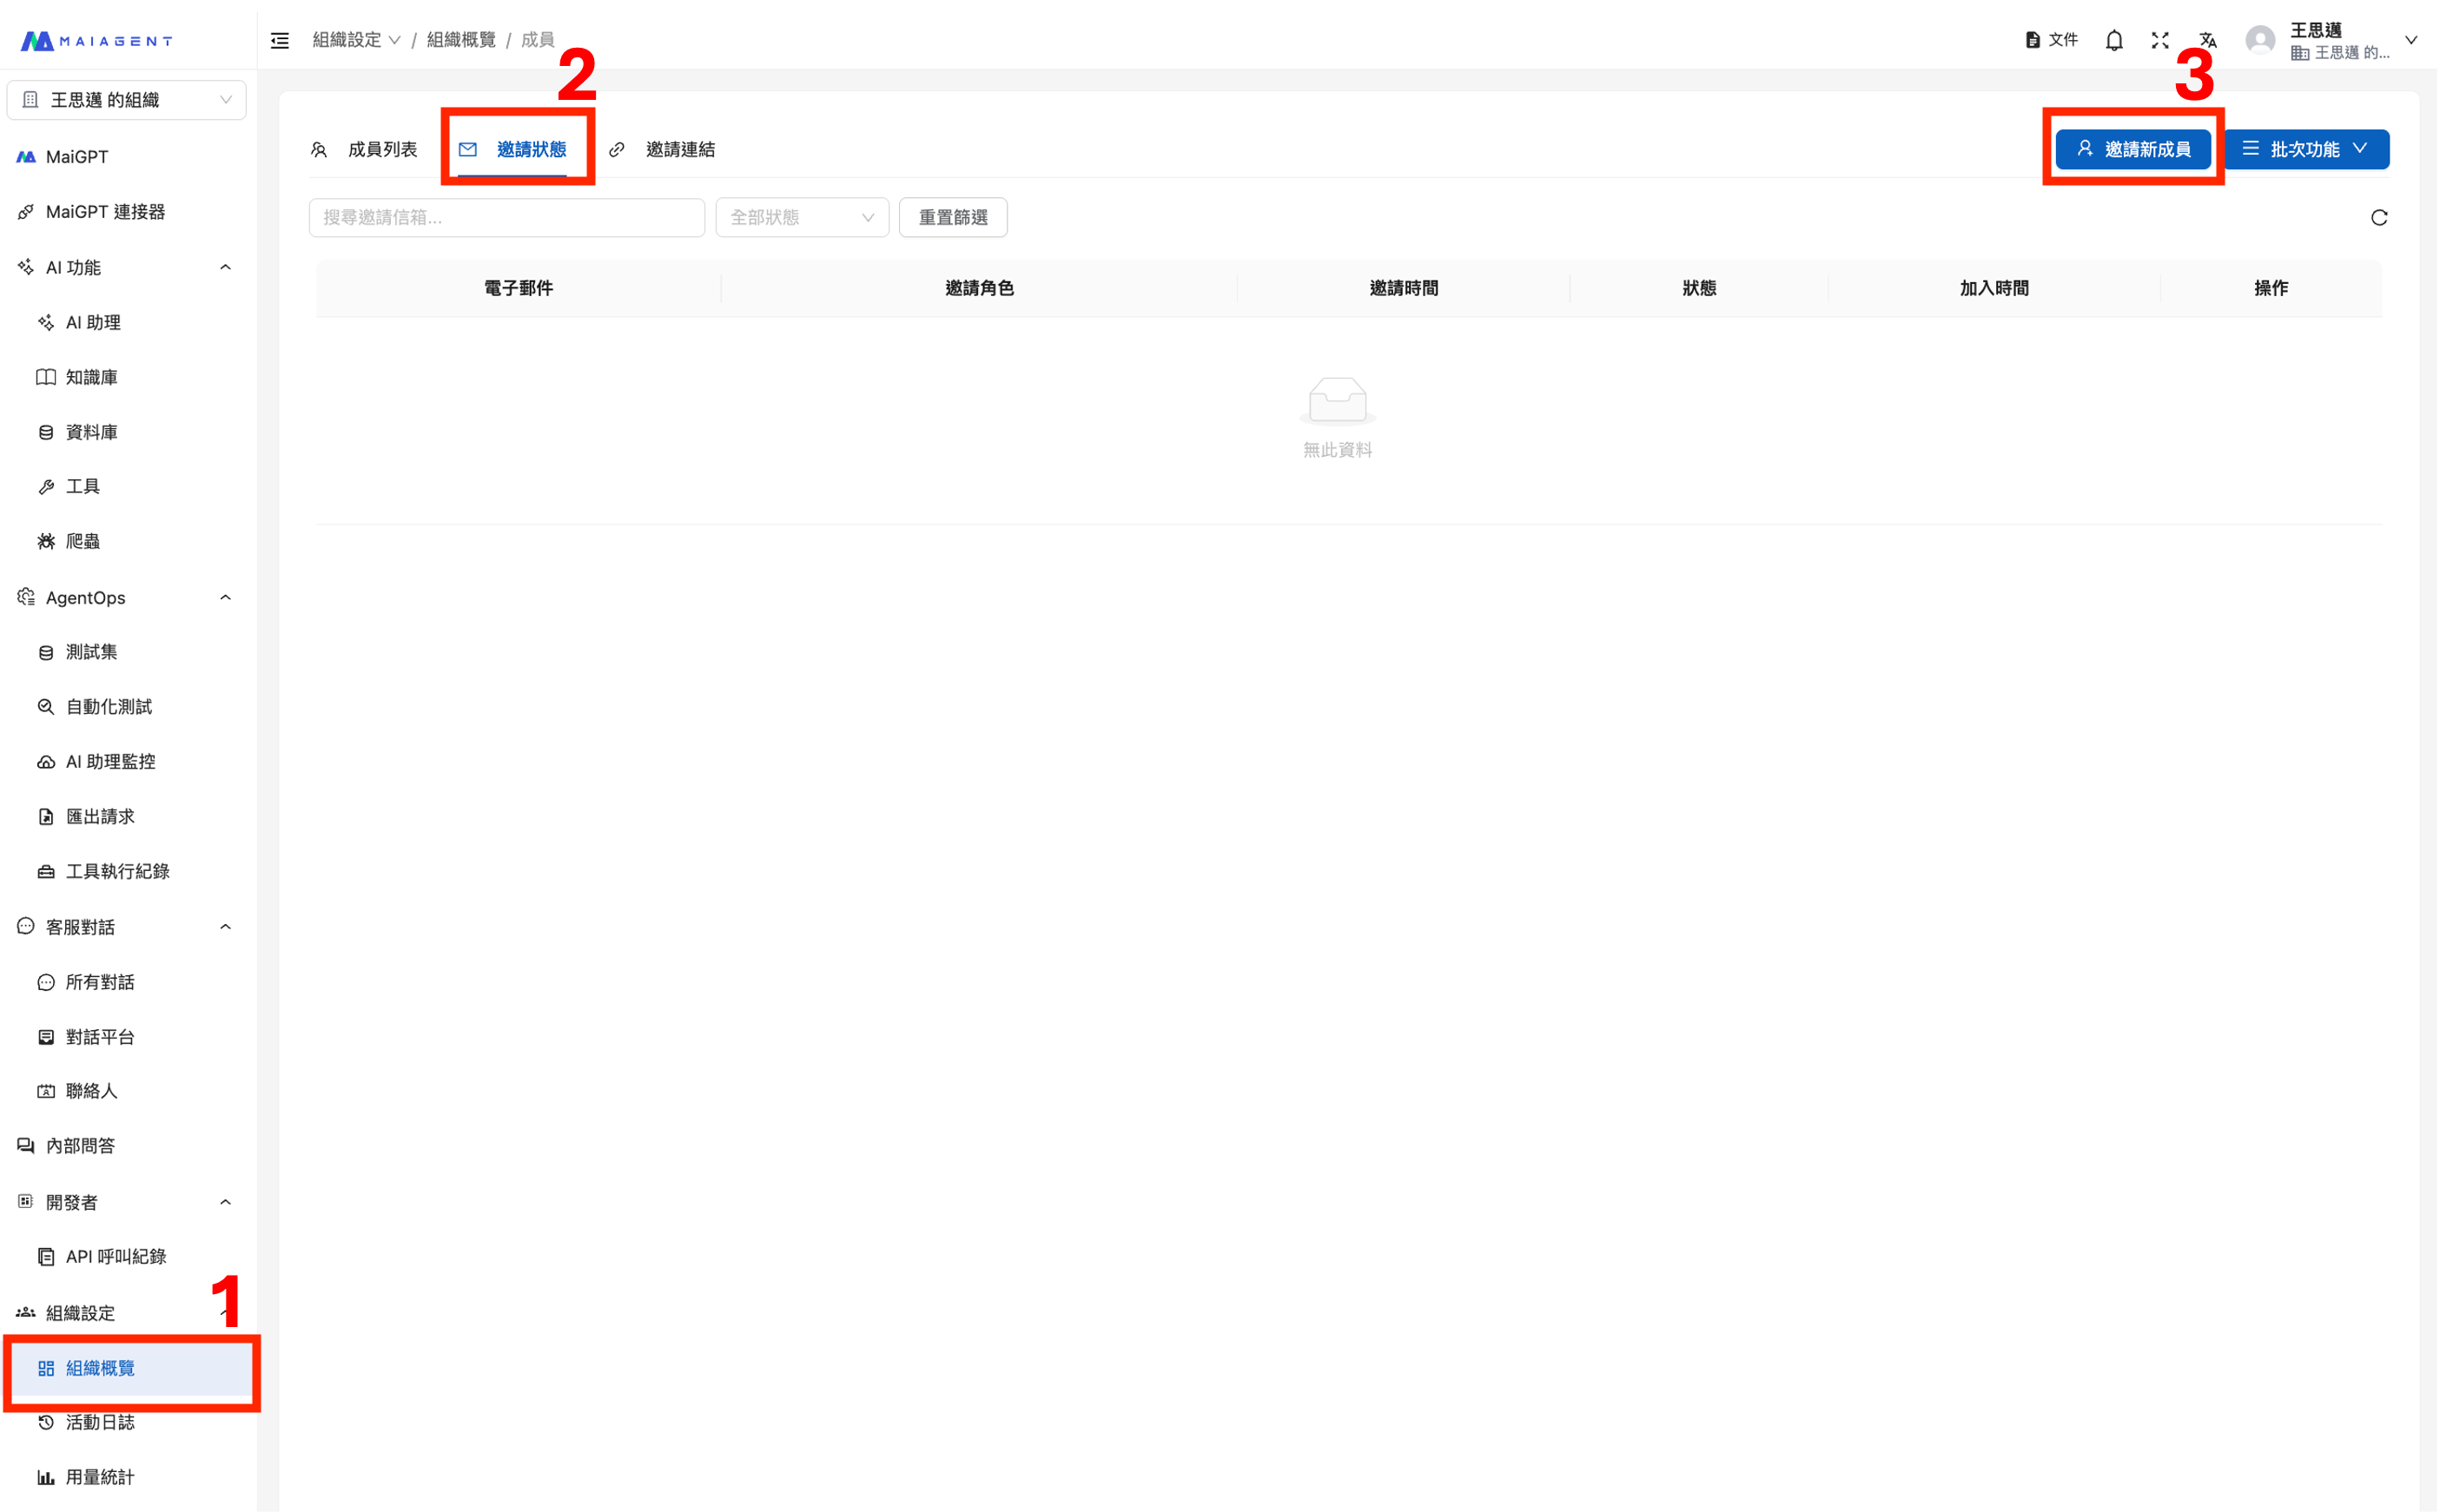
**Step 1: Open the invitation feature**

1. In the left menu, click “<mark style="color:blue;">Organization Settings</mark>” > “<mark style="color:blue;">Organization Overview</mark>”
2. In the <mark style="color:blue;">Management Actions</mark> section, click “<mark style="color:blue;">Edit Members</mark>” to open member management
3. Click “<mark style="color:blue;">Invite New Members</mark>” at the top right (this button is available on all three tabs: Member List, Invitation Status, and Invitation Links)

<figure><img src="https://1360999650-files.gitbook.io/~/files/v0/b/gitbook-x-prod.appspot.com/o/spaces%2F6v6TNkkOQVfRYfcNirHL%2Fuploads%2Fgit-blob-1b2afc2271ee2b61312a979bfe06abf6292fec9e%2Finvitation-email-step1.png?alt=media" alt=""><figcaption></figcaption></figure>

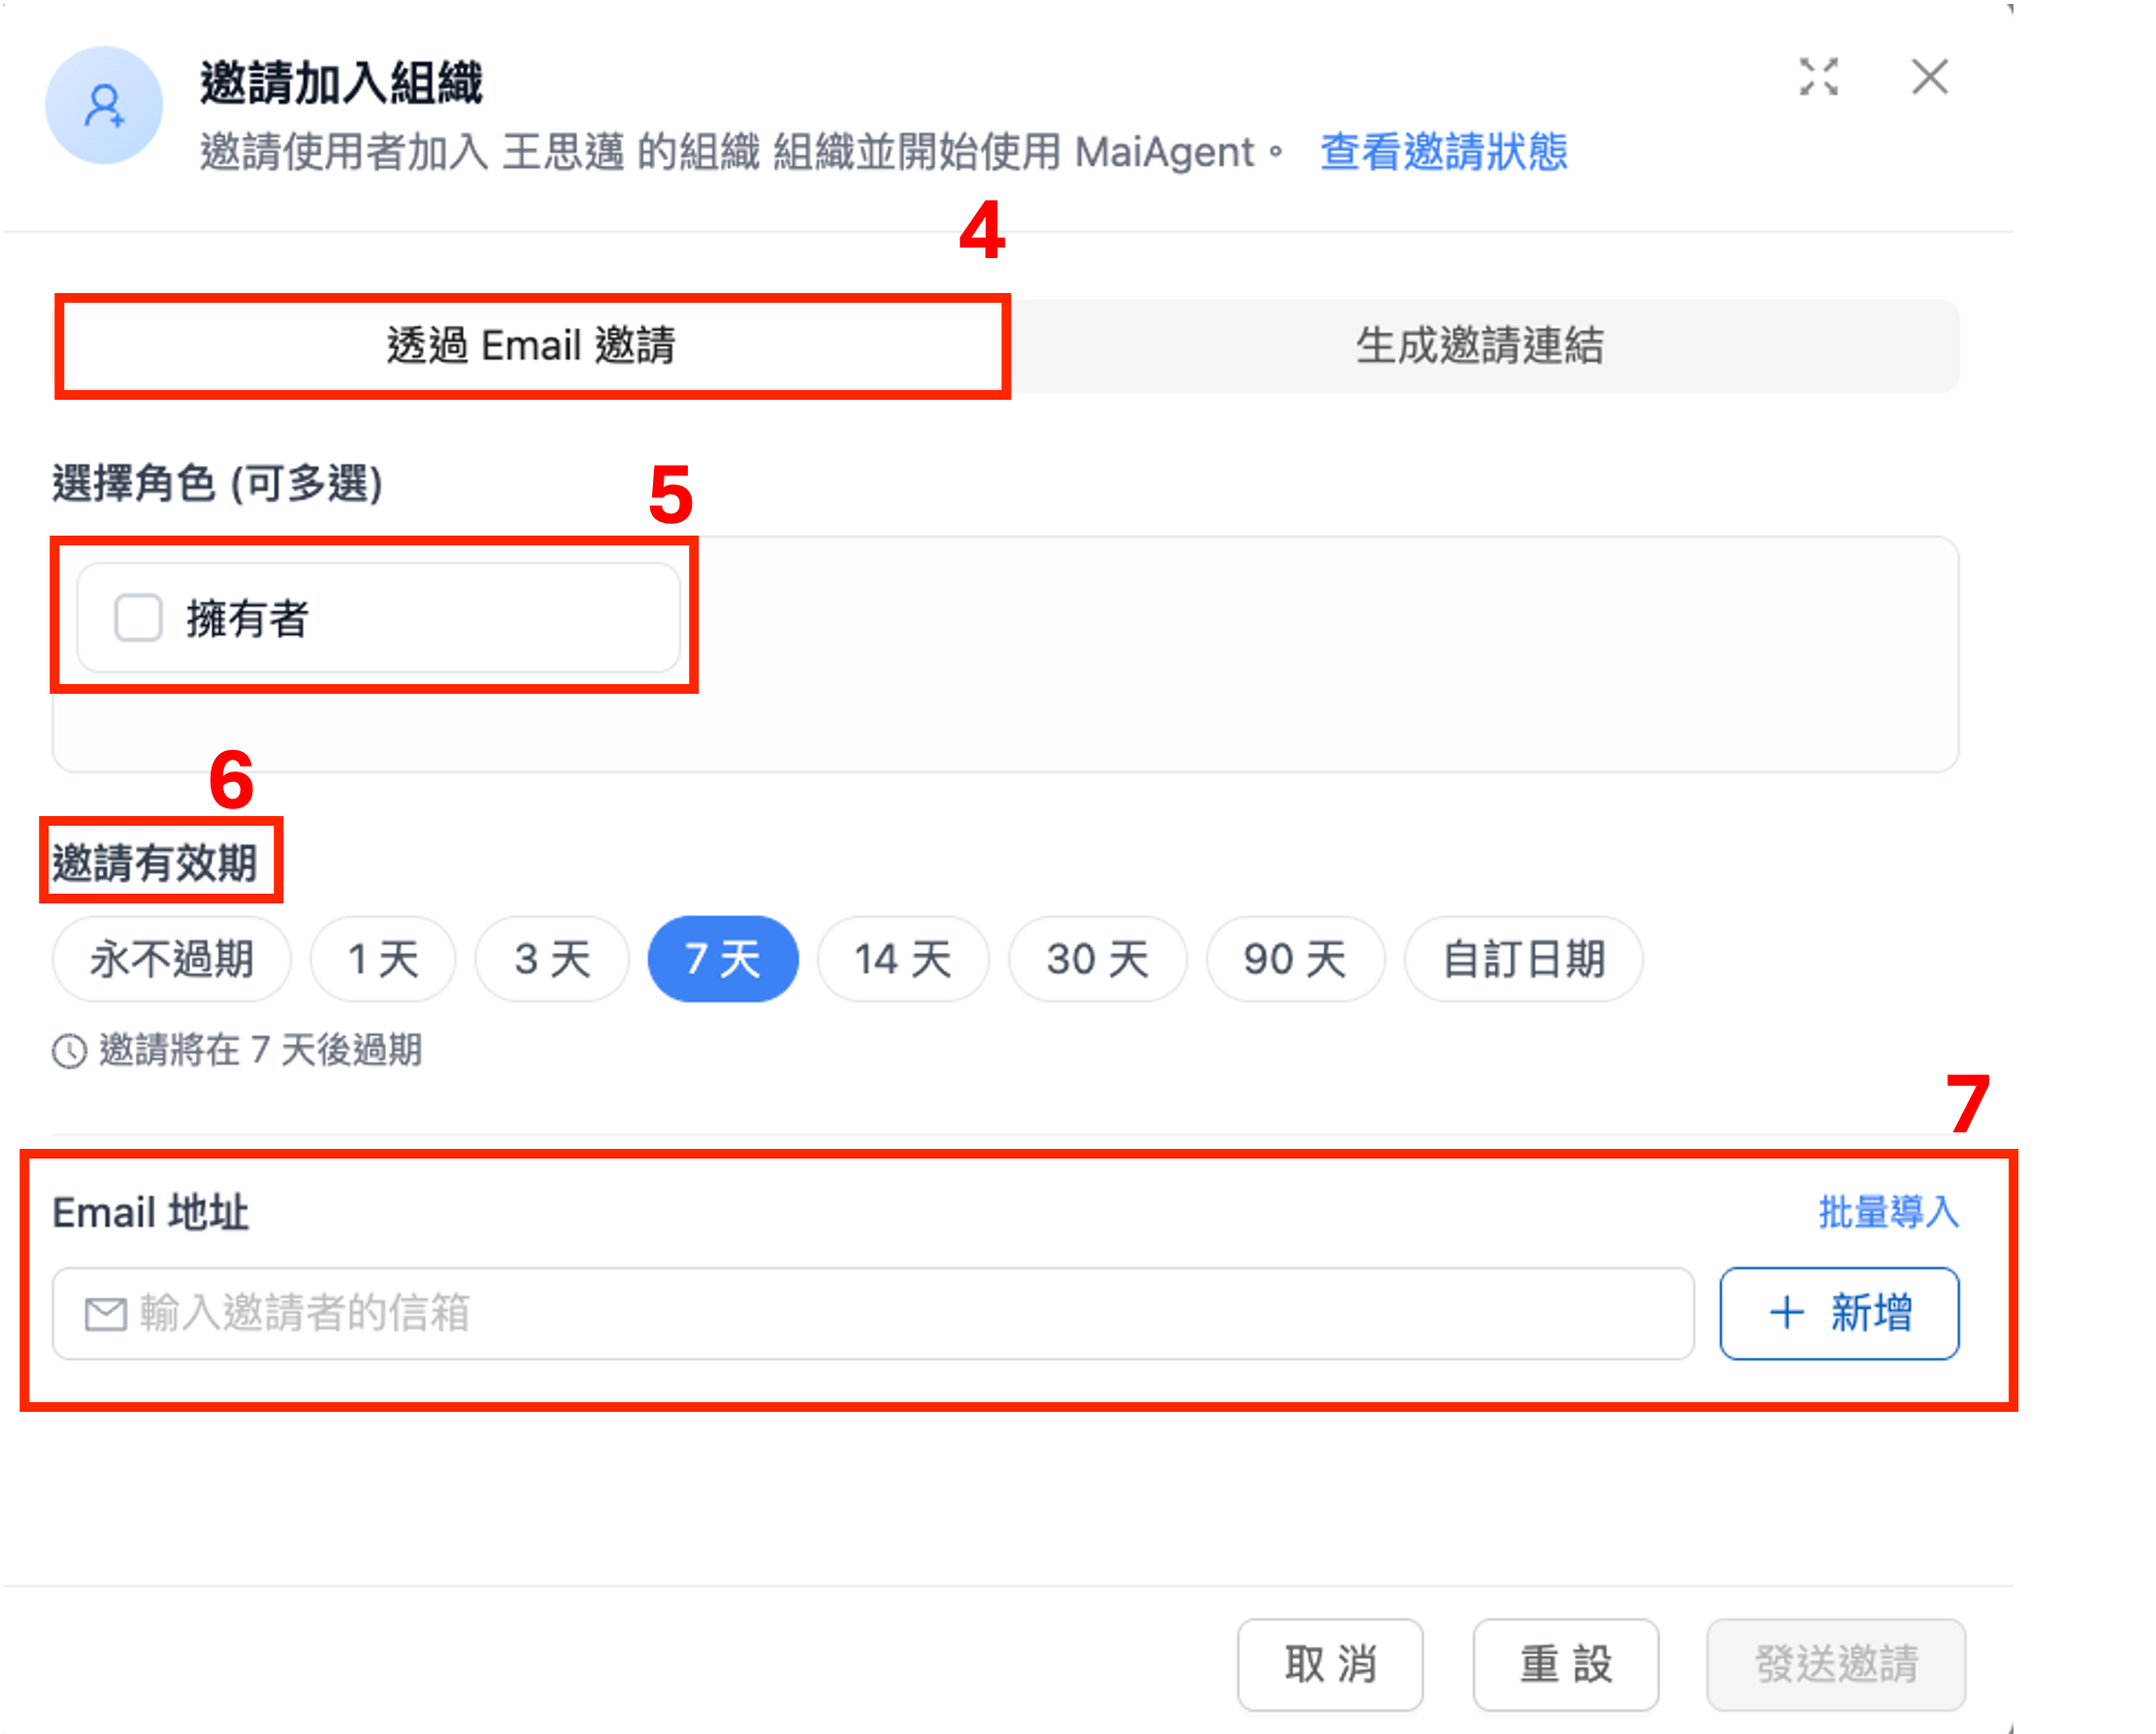
**Step 2: Configure the invitation**

1. Select the “<mark style="color:blue;">Invite via Email</mark>” tab
2. Select roles (multiple selections allowed) to set the invitees' default roles when they join the organization
3. The “<mark style="color:blue;">Credits Quota</mark>” section (shown when the organization uses Credits billing and you have Credit management permission) displays the organization's default quota that will apply when invitees join. To give this batch a different quota, enable “<mark style="color:blue;">Set a Separate Quota for This Batch of Invitations</mark>”. See [Member Credits Quota Management: Override Quotas for Invitations](https://docs.maiagent.ai/maiagent-user-guide/en/others/credits/member-credit-quota.md#invitation-quota-override)
4. “<mark style="color:blue;">Invitation Validity Period</mark>” applies only to invitation links. Email invitations have no expiration date and remain valid until the invitee joins or you revoke the invitation

<figure><img src="https://1360999650-files.gitbook.io/~/files/v0/b/gitbook-x-prod.appspot.com/o/spaces%2F6v6TNkkOQVfRYfcNirHL%2Fuploads%2Fgit-blob-6fb0392320dbcfc35d474e7af316c1dde8a0da39%2Finvitation-email-step2.png?alt=media" alt=""><figcaption></figcaption></figure>

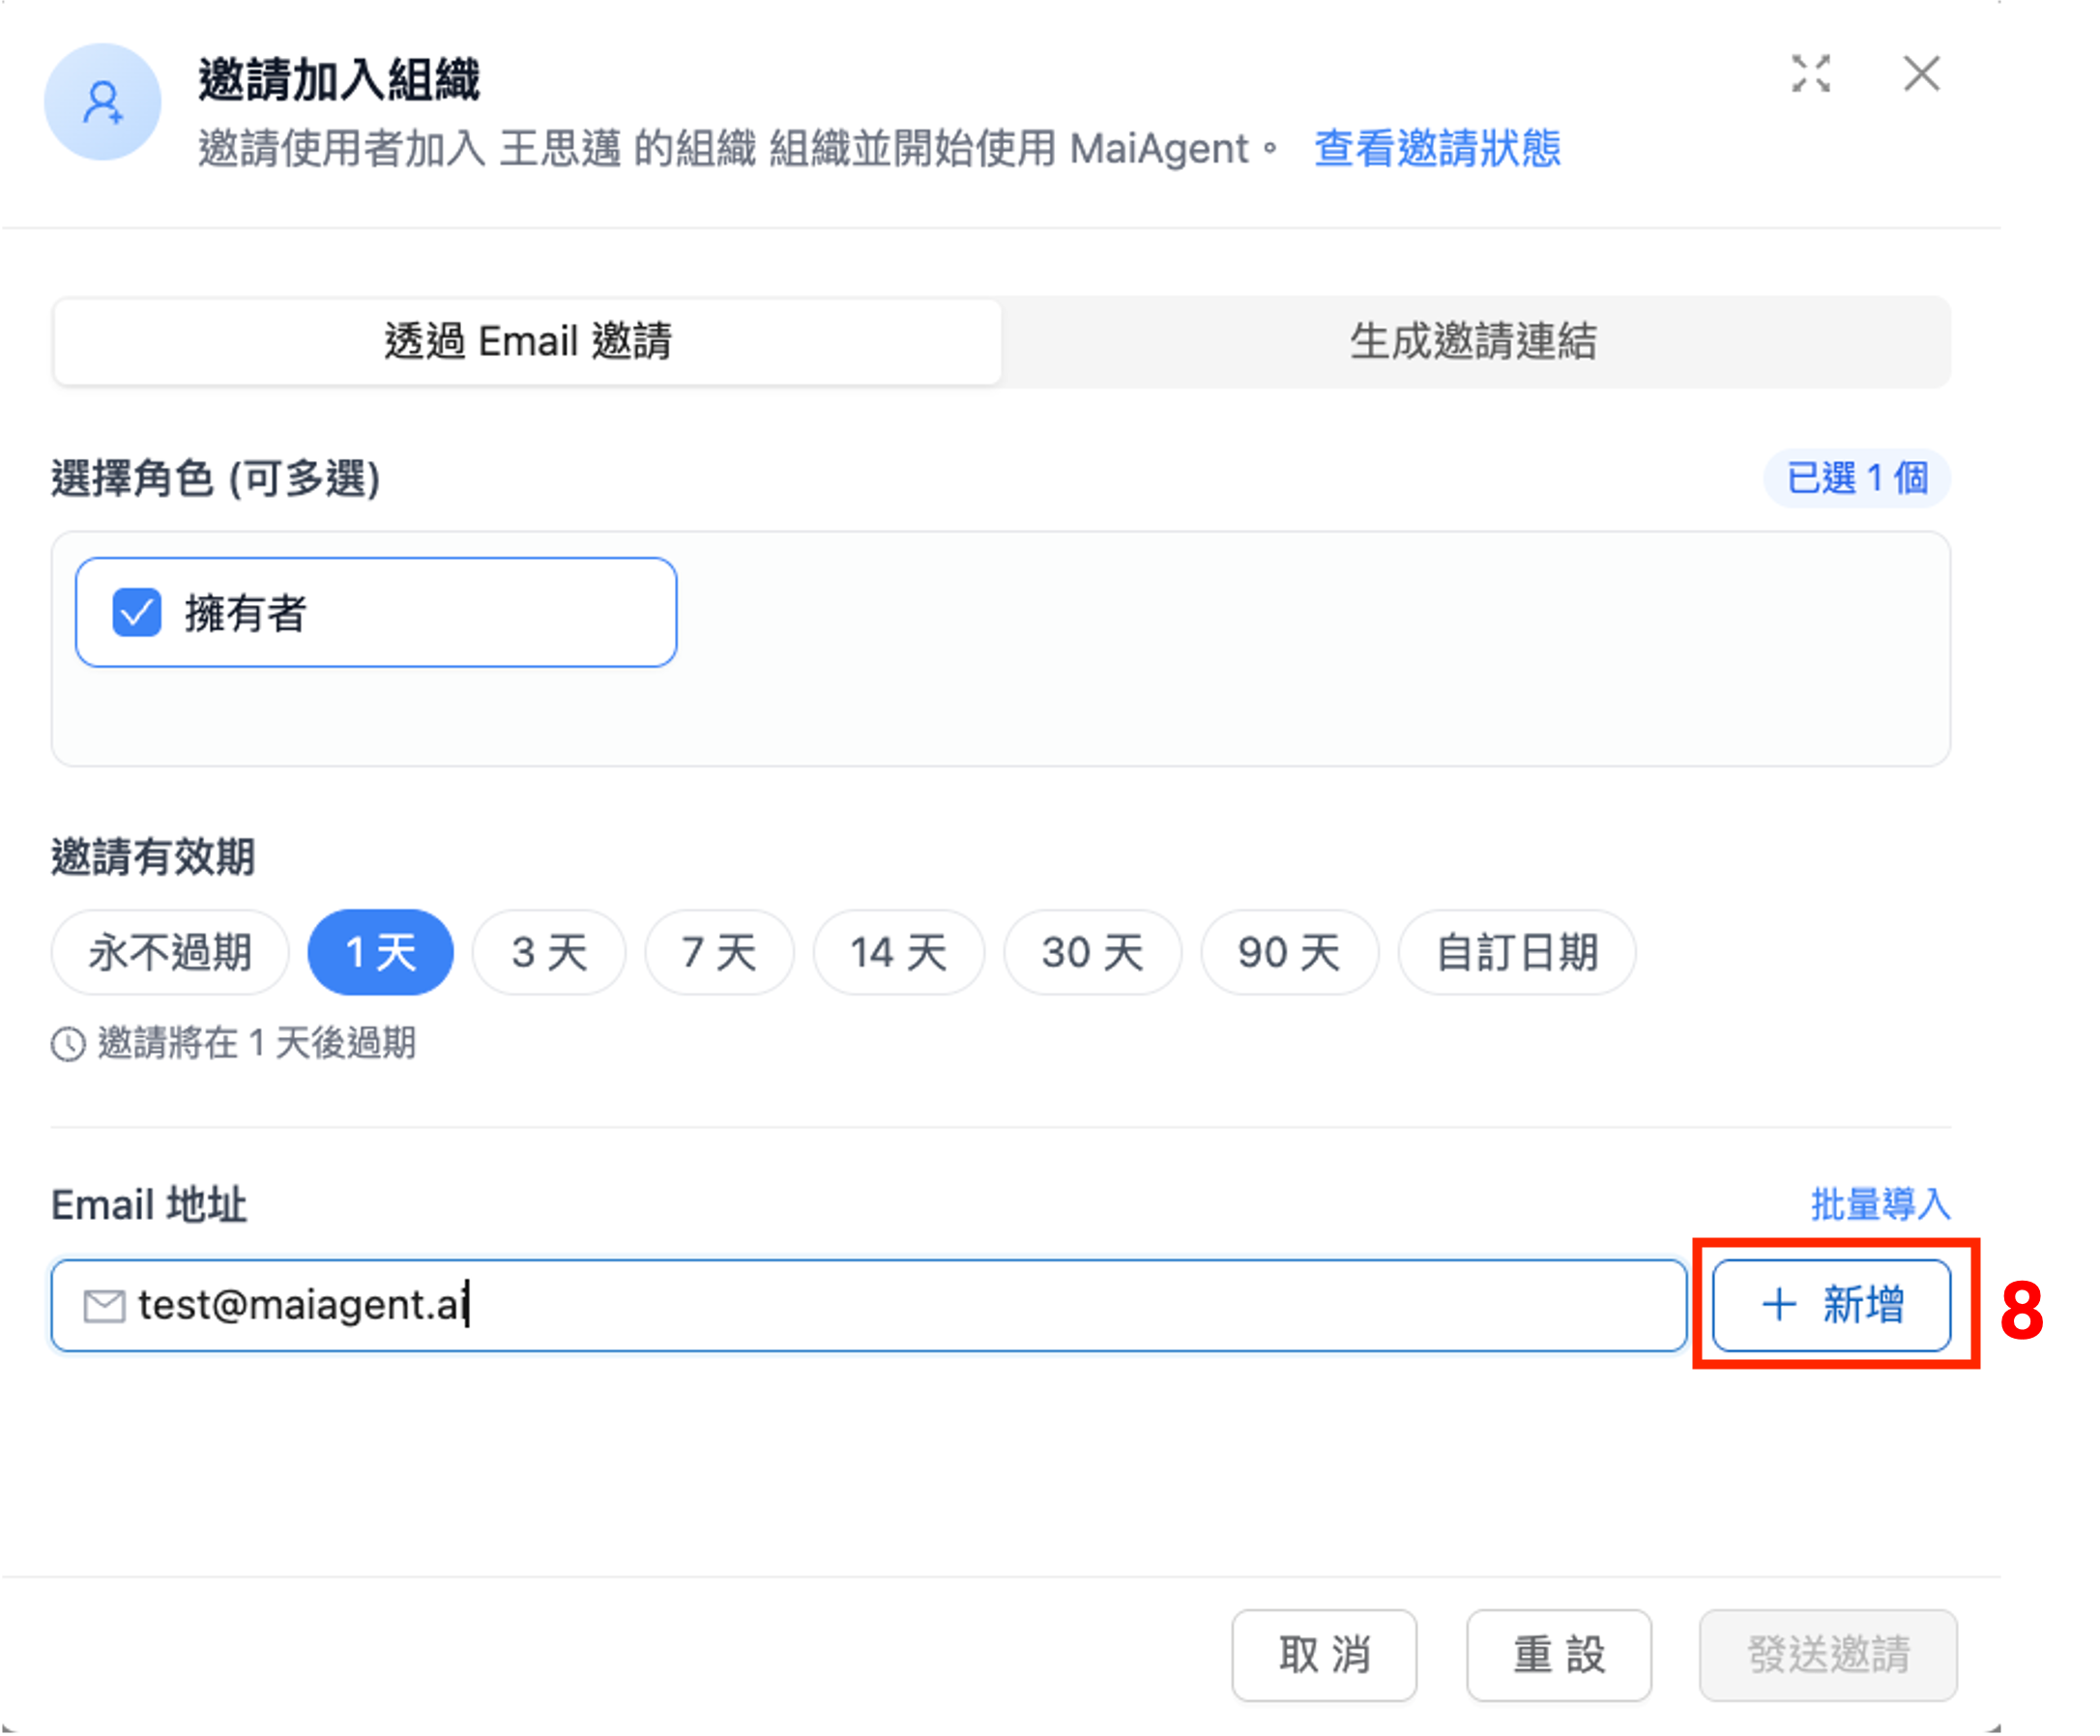
**Step 3: Enter invitee email addresses**

Enter the invitee's email address in the email field, then click “<mark style="color:blue;">Add</mark>” to add it to the invitation list.

<figure><img src="https://1360999650-files.gitbook.io/~/files/v0/b/gitbook-x-prod.appspot.com/o/spaces%2F6v6TNkkOQVfRYfcNirHL%2Fuploads%2Fgit-blob-b591785ccda985c6cd125e1836c030d09216c44e%2Finvitation-email-step3.png?alt=media" alt=""><figcaption></figcaption></figure>

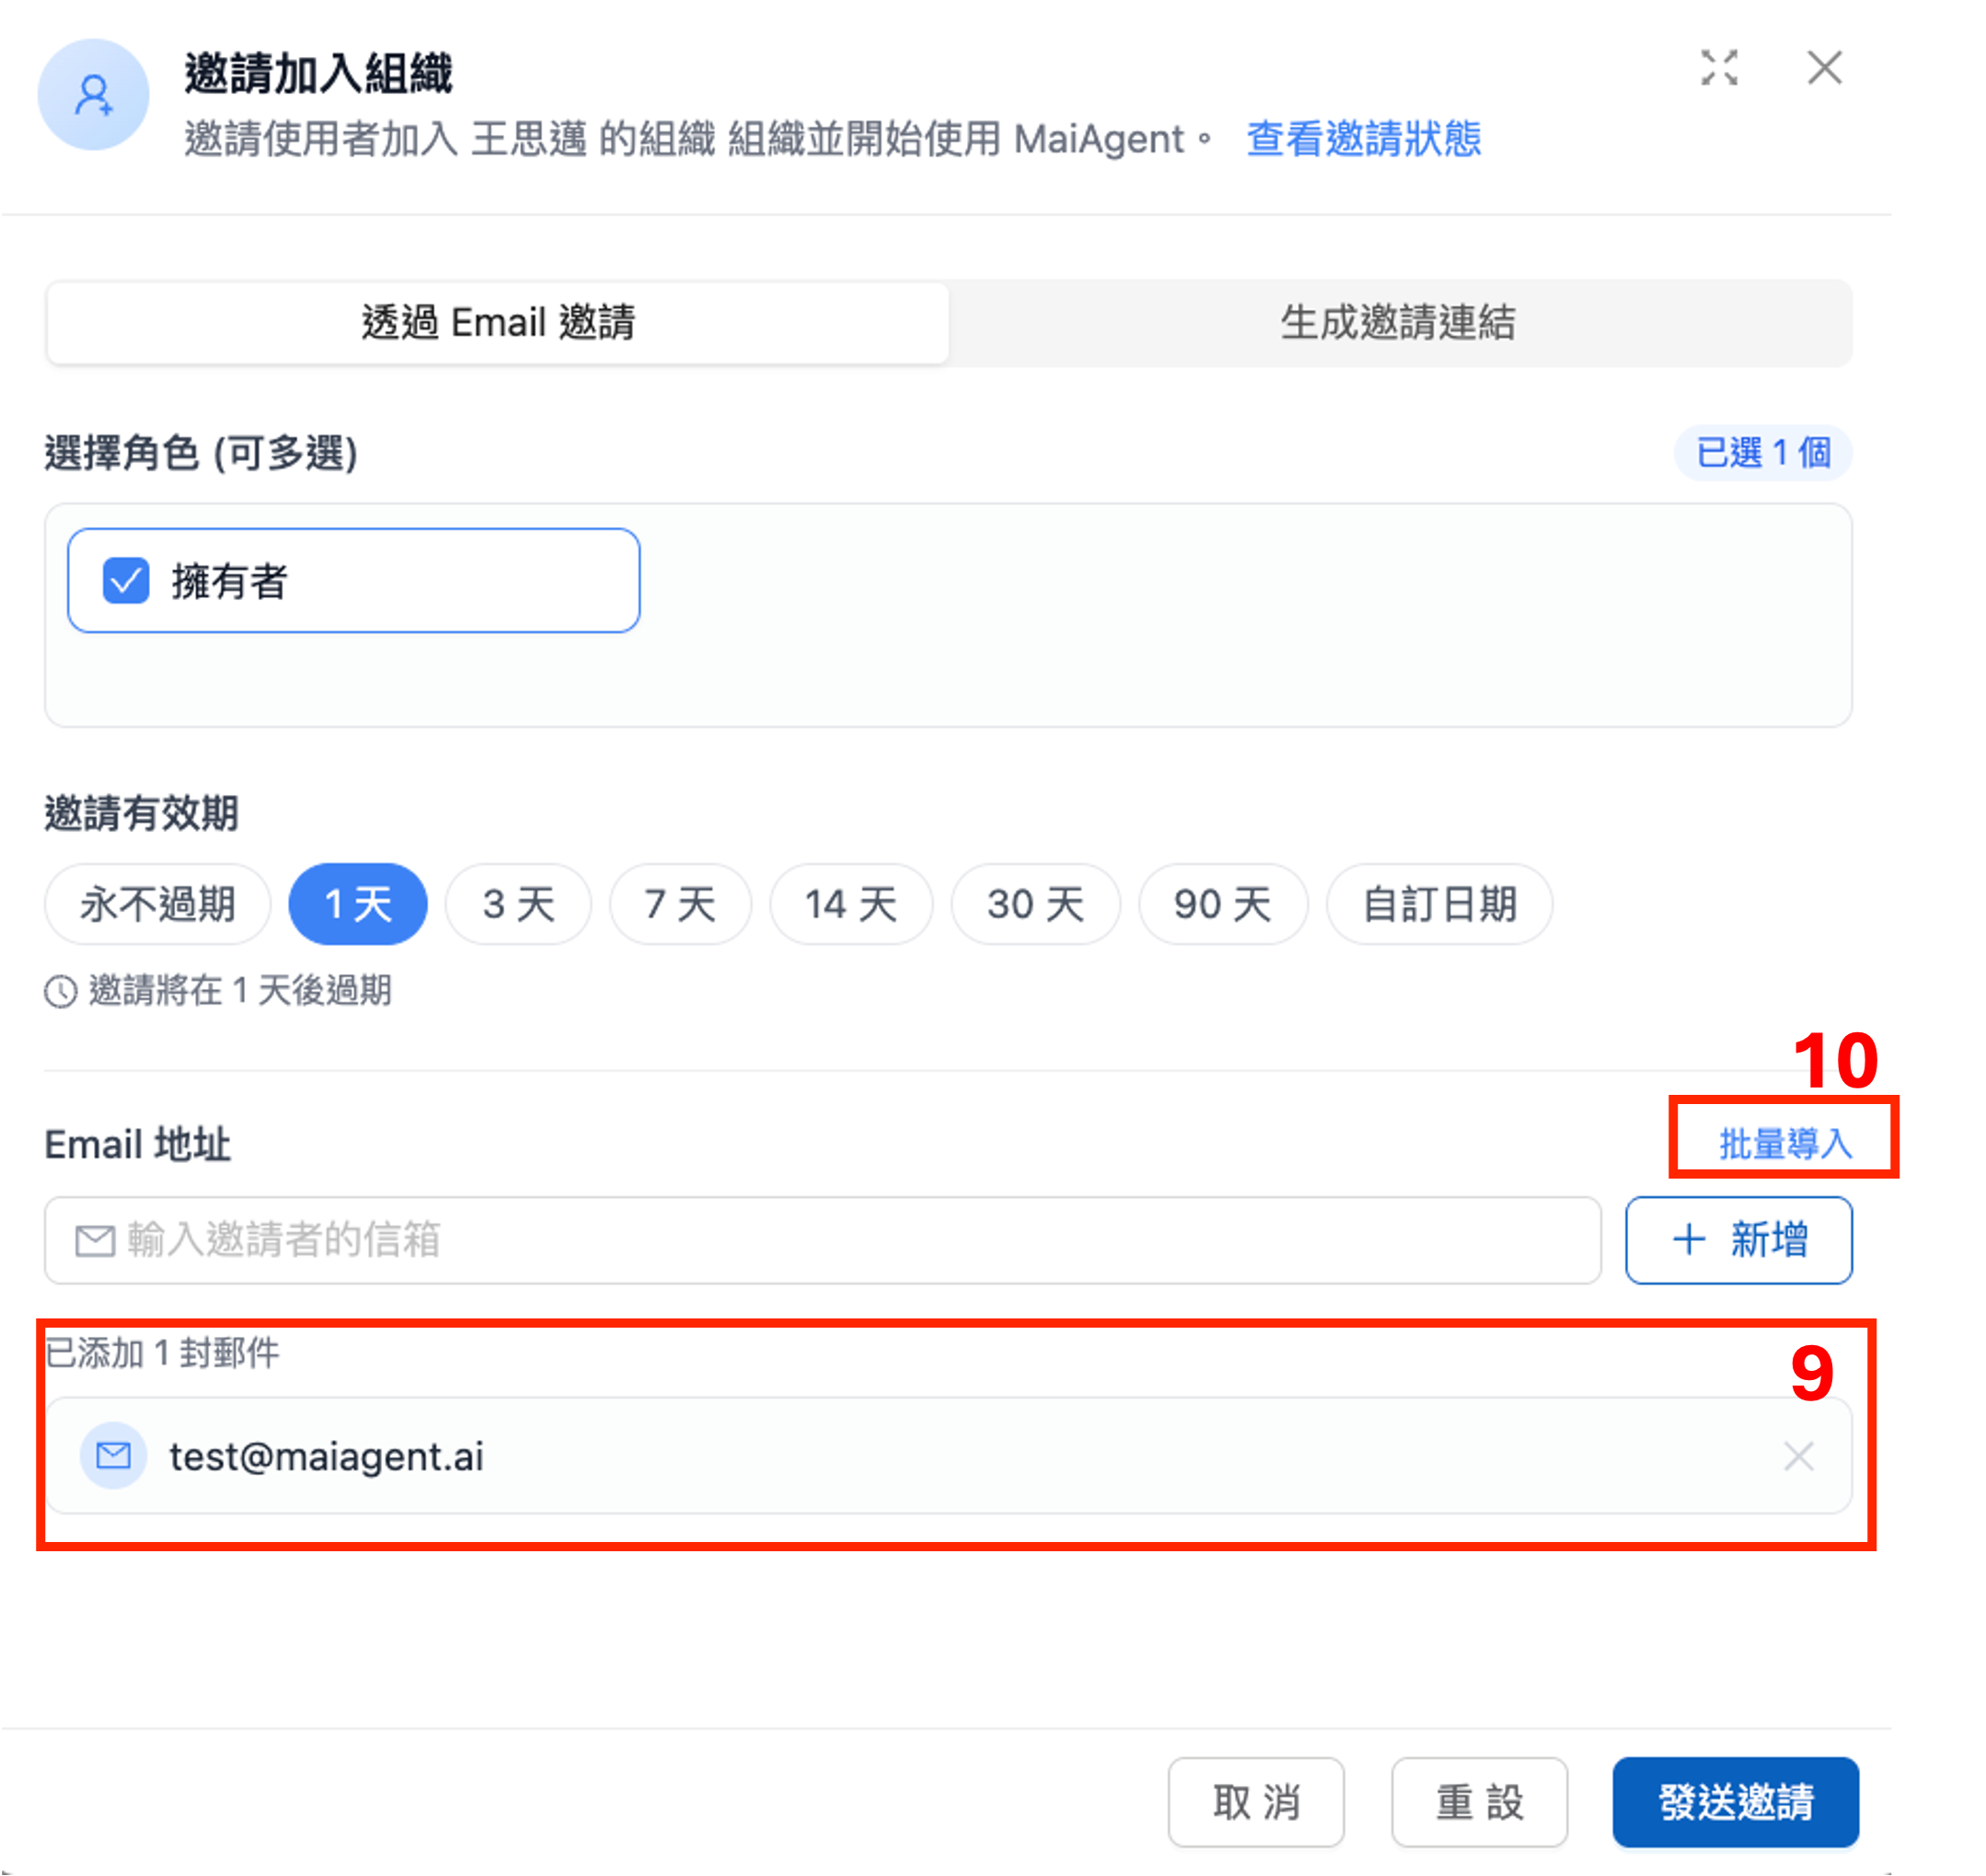
The email address then appears in the “Added” list.

<figure><img src="https://1360999650-files.gitbook.io/~/files/v0/b/gitbook-x-prod.appspot.com/o/spaces%2F6v6TNkkOQVfRYfcNirHL%2Fuploads%2Fgit-blob-f35ffe90f895073f0ad1e23e4c88cb7aa153d40f%2Finvitation-email-step4.png?alt=media" alt=""><figcaption></figcaption></figure>

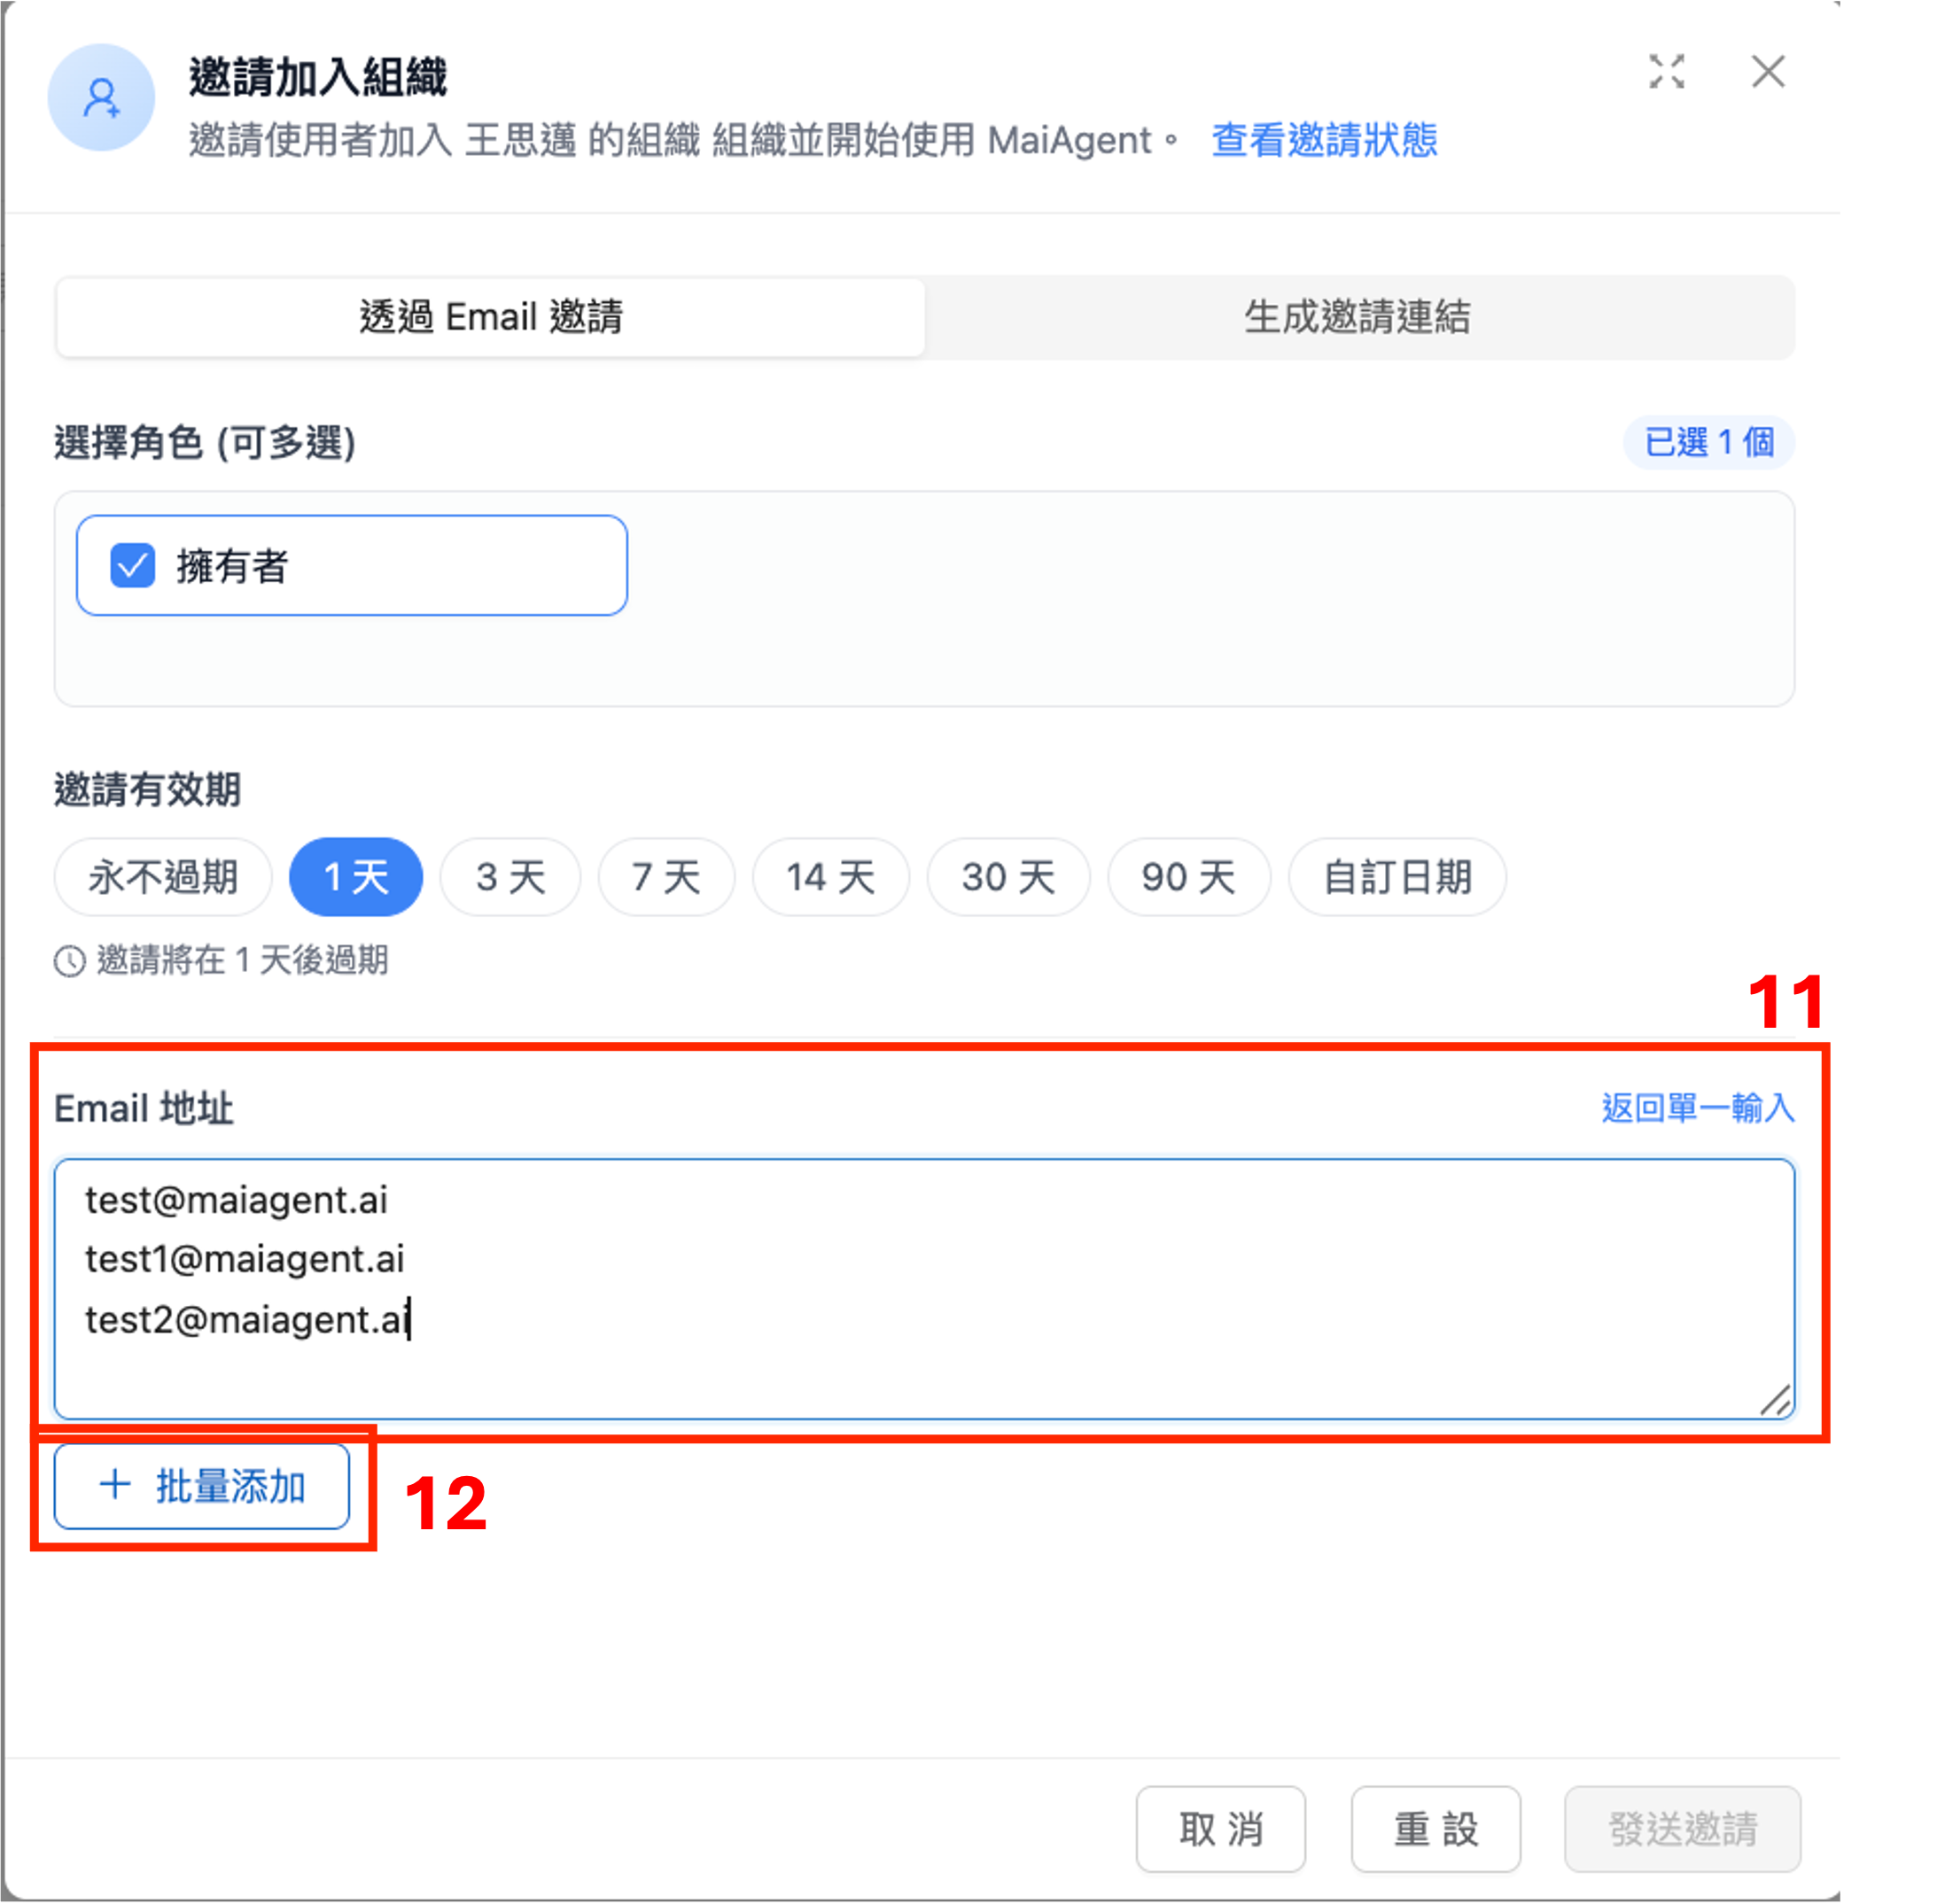
**Step 4: Enter multiple email addresses in bulk (optional)**

To invite several members at once, click “<mark style="color:blue;">Bulk Import</mark>” to switch to bulk input mode. Paste multiple email addresses separated by commas, semicolons, or line breaks.

<figure><img src="https://1360999650-files.gitbook.io/~/files/v0/b/gitbook-x-prod.appspot.com/o/spaces%2F6v6TNkkOQVfRYfcNirHL%2Fuploads%2Fgit-blob-3ef32100f74f9b47a4dc20ffa5263edb18096df6%2Finvitation-email-step5.png?alt=media" alt=""><figcaption></figcaption></figure>

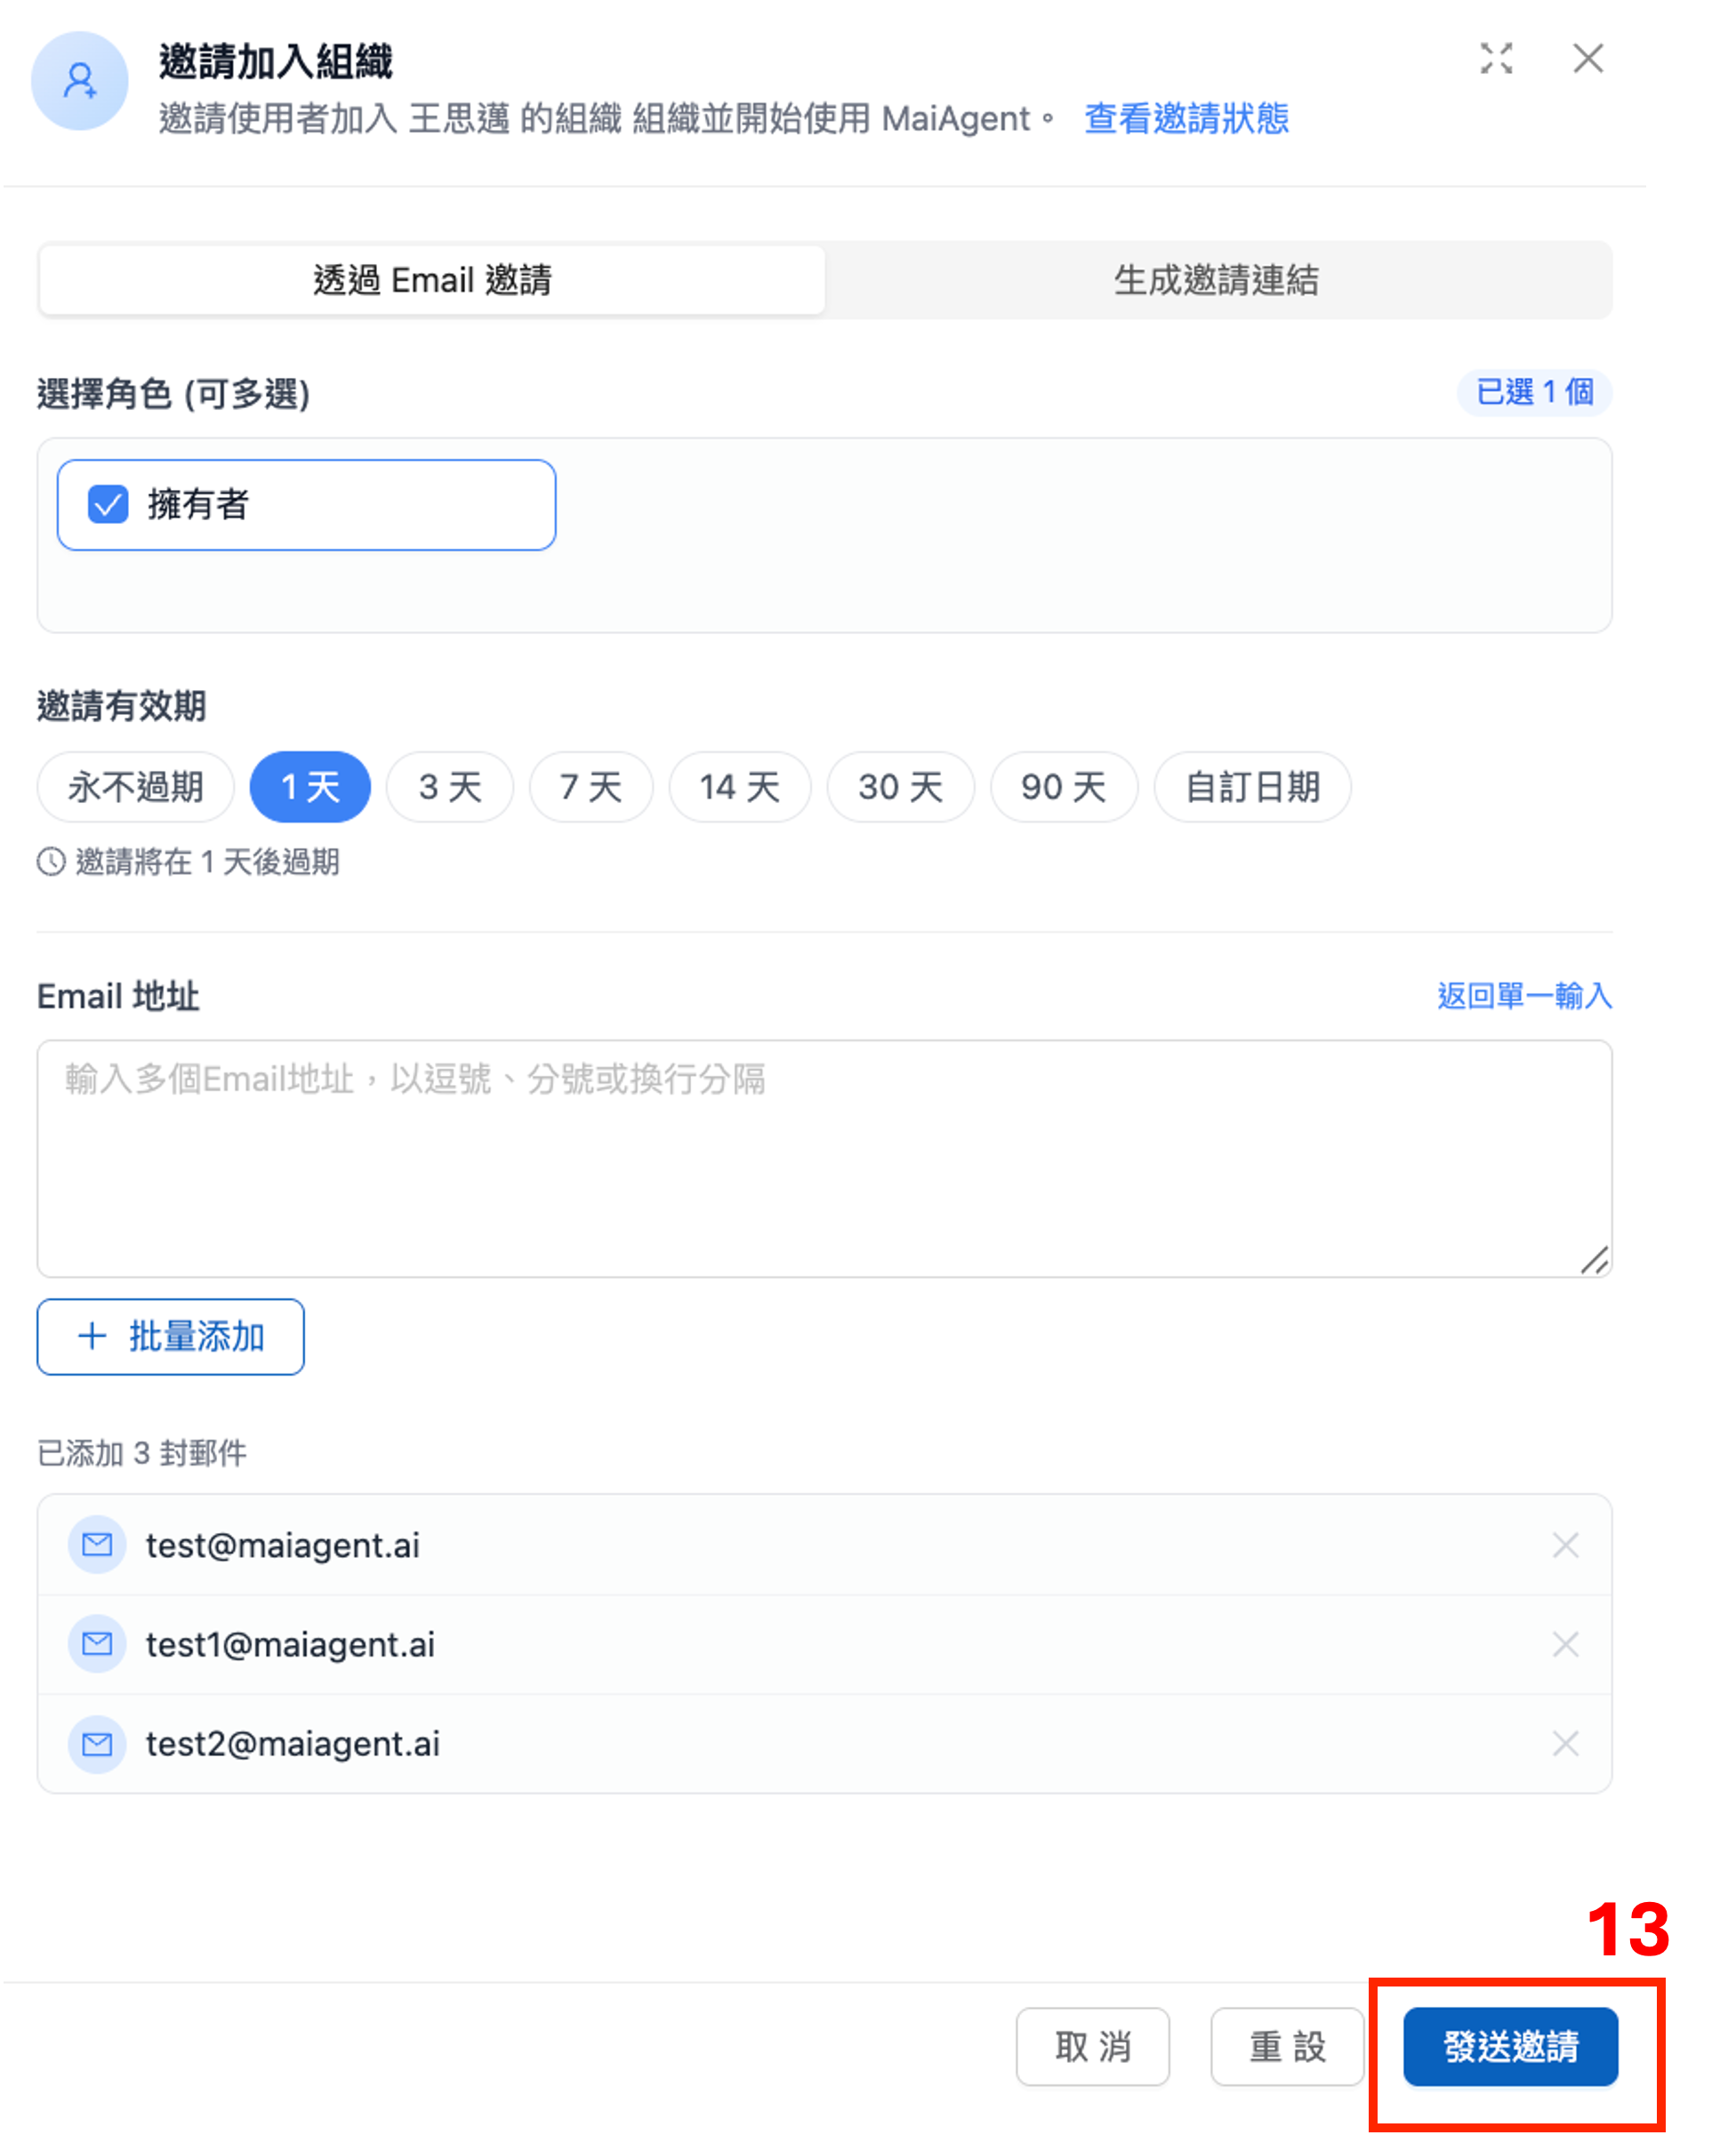
**Step 5: Send invitations**

After checking the invitation list, click “<mark style="color:blue;">Send Invitations</mark>”. The system handles each email address according to its status and displays counts for three possible results:

| Result Message                      | Meaning                                                                                                                            |
| ----------------------------------- | ---------------------------------------------------------------------------------------------------------------------------------- |
| Added directly: N people            | Already have MaiAgent accounts; added directly to the organization with the selected roles and now appear in the member list       |
| Invitations sent: N people          | Do not have accounts; invitation emails have been sent. Track them on the “<mark style="color:blue;">Invitation Status</mark>” tab |
| Skipped (already members): N people | Already belong to the organization; no duplicate action is taken                                                                   |

<figure><img src="https://1360999650-files.gitbook.io/~/files/v0/b/gitbook-x-prod.appspot.com/o/spaces%2F6v6TNkkOQVfRYfcNirHL%2Fuploads%2Fgit-blob-04c4ce9fc34718da4c6db26df836d4dcdb438c1c%2Finvitation-email-step6.png?alt=media" alt=""><figcaption></figcaption></figure>

{% hint style="info" %}
**Invitee workflow**

After invitees follow the email link and register, the system automatically adds them to the organization and assigns the specified roles based on **the email address that received the invitation**. Email invitations do not expire and remain valid until the recipient joins or you revoke them. If an email was not received, click “<mark style="color:blue;">Resend</mark>” on the “<mark style="color:blue;">Invitation Status</mark>” tab (each invitation can be sent up to 3 times, including the first send, with at least 5 minutes between sends).
{% endhint %}

#### Registration Guide for Invitees <a href="#invitee-registration-guide" id="invitee-registration-guide"></a>

For the full steps invitees follow—registration, login, invitation validity, signing in when their company uses SSO, and switching organizations—see [Received an Invitation: Join an Organization](https://docs.maiagent.ai/maiagent-user-guide/en/start/invitation.md). You can share that page directly with invitees.

***

### Organization Invitation Links (No Account, Self-Registration) <a href="#organization-invite-link" id="organization-invite-link"></a>

If the people you want to invite **do not yet have MaiAgent accounts** and you want them to register themselves, generate an invitation link to share with them.

**Step 1: Generate an invitation link**

1. Click “<mark style="color:blue;">Invite New Members</mark>”
2. Select the “<mark style="color:blue;">Generate Invitation Link</mark>” tab
3. Select roles (multiple selections allowed) to set default roles for people registering through this link
4. (Organizations using Credits billing) Check the quota that applies to people joining through this link in the “<mark style="color:blue;">Credits Quota</mark>” section. To set a different quota, enable “<mark style="color:blue;">Set a Separate Quota for This Batch of Invitations</mark>”. Each person receives their own quota. See [Member Credits Quota Management: Override Quotas for Invitations](https://docs.maiagent.ai/maiagent-user-guide/en/others/credits/member-credit-quota.md#invitation-quota-override)
5. In “<mark style="color:blue;">Invitation Validity</mark>”, choose how long the link stays valid: <mark style="color:blue;">1 day</mark>, <mark style="color:blue;">3 days</mark>, <mark style="color:blue;">7 days</mark> (default), <mark style="color:blue;">14 days</mark>, <mark style="color:blue;">30 days</mark>, <mark style="color:blue;">90 days</mark>, or <mark style="color:blue;">Custom Date</mark>. The text below shows “The invitation will expire in N days” (for a custom date, “The invitation will expire on YYYY/MM/DD”)
6. (Optional) Enter a link description to make it easier to identify and manage later
7. Click “<mark style="color:blue;">Generate Invitation Link</mark>”

<figure><img src="https://1360999650-files.gitbook.io/~/files/v0/b/gitbook-x-prod.appspot.com/o/spaces%2F6v6TNkkOQVfRYfcNirHL%2Fuploads%2Fgit-blob-f42e446a2f4a0d0a9790b4899f3fece7e3b88819%2Finvitation-link-expiry-options.png?alt=media" alt="Invitation validity options on the Generate Invitation Link tab, with 7 days selected by default and a note below saying the invitation will expire in 7 days"><figcaption><p>Invitation validity defaults to 7 days</p></figcaption></figure>

Invitation links always have an expiration date; there is no “never expires” option. For a link you need for a long time, choose <mark style="color:blue;">90 days</mark>, or use <mark style="color:blue;">Custom Date</mark> to set a later date, then generate a new link after it expires. For example, if HR wants all new hires in a month to register through the same link, choose <mark style="color:blue;">Custom Date</mark> and pick the last day of that month. The link works until the end of that day.

After you choose <mark style="color:blue;">Custom Date</mark>, pick a date (today or later) under “<mark style="color:blue;">Select a specific expiration time</mark>”. The link expires at the end of that day. Until you pick a date, the “<mark style="color:blue;">Generate Invitation Link</mark>” button is disabled. If you change the validity period or date after a link has been generated, the link in the dialog is cleared and you need to click “<mark style="color:blue;">Generate Invitation Link</mark>” again to create a new one. Links generated earlier are not invalidated; they remain usable until their original expiration. If you no longer need one, disable it with the “<mark style="color:blue;">Status</mark>” switch on the [“Invitation Links” tab](#invite-link-tab).

<figure><img src="https://1360999650-files.gitbook.io/~/files/v0/b/gitbook-x-prod.appspot.com/o/spaces%2F6v6TNkkOQVfRYfcNirHL%2Fuploads%2Fgit-blob-3385bdcee0ee7c13e14c208899840273a6e36eb7%2Finvitation-link-custom-date-required.png?alt=media" alt="After Custom Date is selected but no date is picked, the date field shows Select a specific expiration time and the Generate Invitation Link button is disabled"><figcaption><p>After selecting Custom Date without picking a date, the Generate Invitation Link button is disabled</p></figcaption></figure>

**Step 2: Copy and share the link**

Once the link is generated, click “<mark style="color:blue;">Copy Link</mark>” to copy it to your clipboard. Share it with invitees via email, messaging apps, or internal announcements. The summary card lists the roles, validity period, and “Quota on Joining.” If you entered a link description, it is listed as well.

<figure><img src="https://1360999650-files.gitbook.io/~/files/v0/b/gitbook-x-prod.appspot.com/o/spaces%2F6v6TNkkOQVfRYfcNirHL%2Fuploads%2Fgit-blob-6f35814c75577d27e458375b0df5225d7570abfe%2Finvitation-link-generated.png?alt=media" alt="The dialog after an invitation link is generated: 7 days is selected for invitation validity, the invitation link section shows the link URL (invitation code masked) and the Copy Link button, and the summary below lists the link description, roles, expiration date, and quota on joining"><figcaption><p>After generation, the dialog shows the URL, the Copy Link button, and a summary</p></figcaption></figure>

**Step 3: Invitees complete registration**

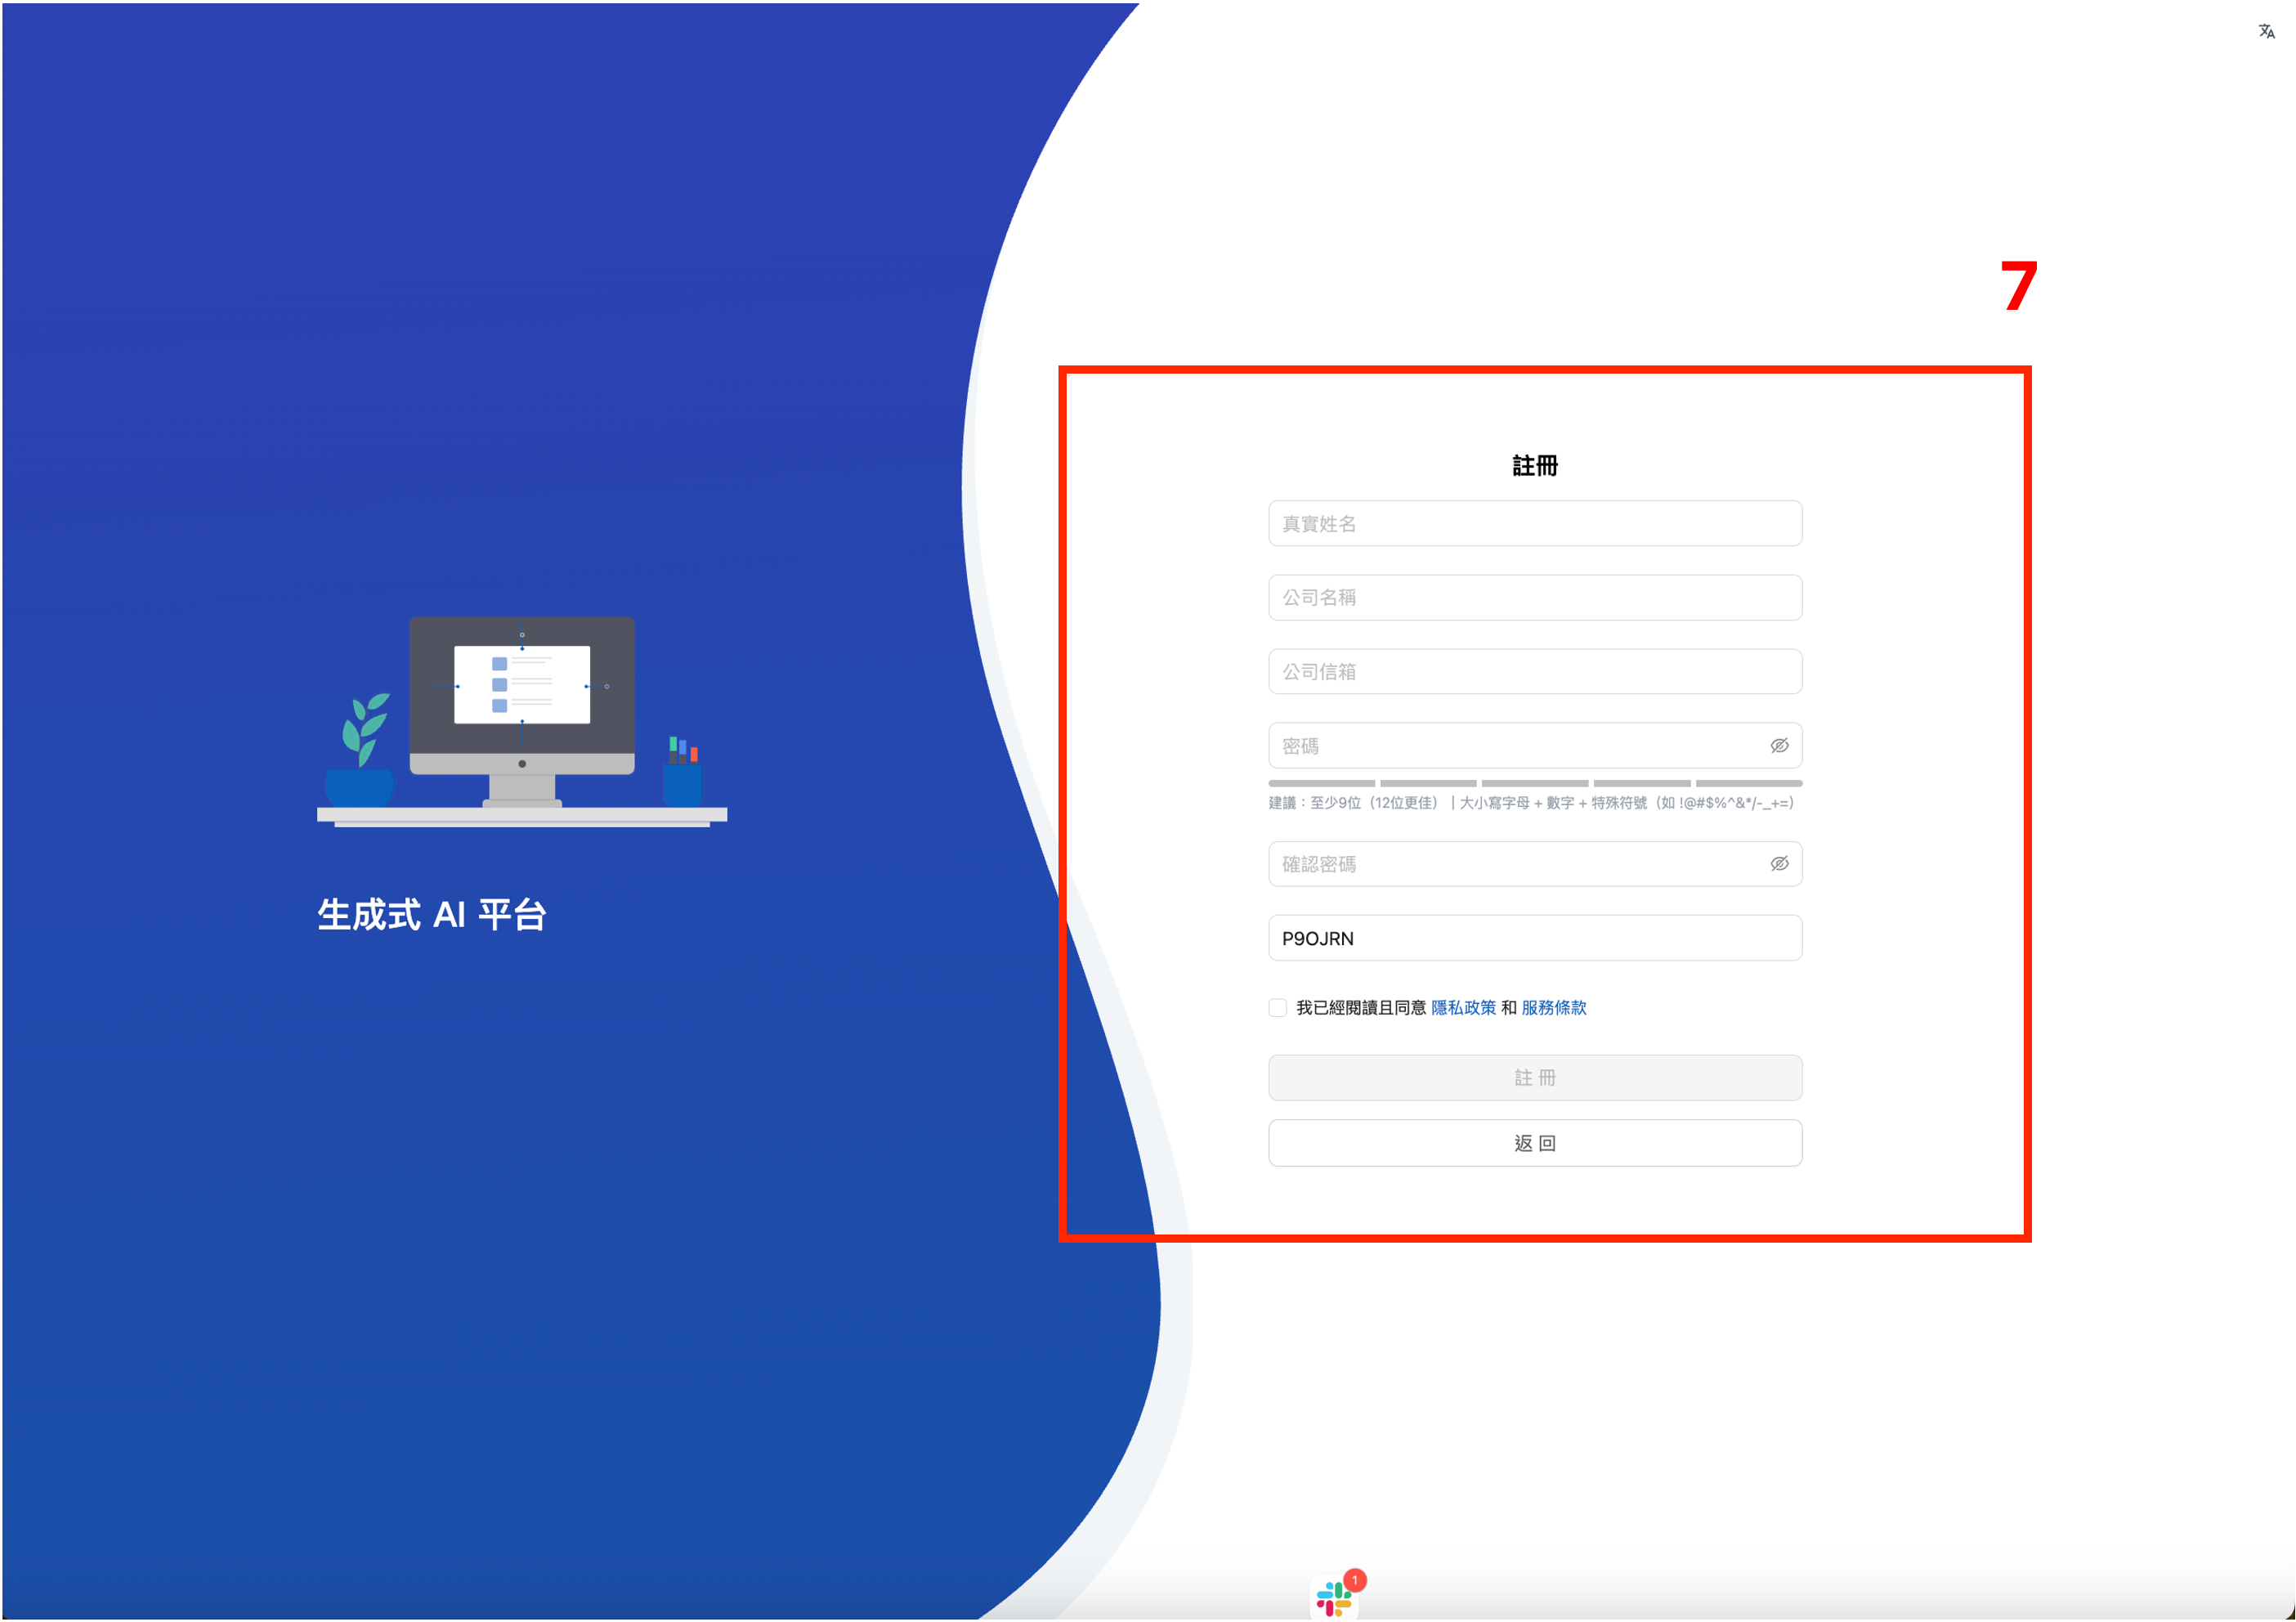
Clicking the link takes invitees to the MaiAgent registration page. Once they fill in their basic information and register, they automatically join your organization.

<figure><img src="https://1360999650-files.gitbook.io/~/files/v0/b/gitbook-x-prod.appspot.com/o/spaces%2F6v6TNkkOQVfRYfcNirHL%2Fuploads%2Fgit-blob-134ca4280b7bf2616f4dd7c48a49b11702bab8de%2Finvitation-link-step3.png?alt=media" alt=""><figcaption></figcaption></figure>

{% hint style="warning" %}
**Notes**

* Invitation links always have an expiration date (7 days by default) and cannot be used after they expire. They cannot be extended after creation; generate a new link when needed
* Multiple people can register through the same link
* Existing account holders cannot join through invitation links; use email invitations instead
  {% endhint %}

#### Manage Existing Invitation Links <a href="#invite-link-tab" id="invite-link-tab"></a>

The “<mark style="color:blue;">Invitation Links</mark>” tab on the member management page lists all links created by the organization. Search by description keywords or filter by status (<mark style="color:blue;">Active</mark>, <mark style="color:blue;">Expired</mark>, or <mark style="color:blue;">Disabled</mark>).

| Field                                                                                      | Description                                                                                                                                                                                                                                  |
| ------------------------------------------------------------------------------------------ | -------------------------------------------------------------------------------------------------------------------------------------------------------------------------------------------------------------------------------------------- |
| <mark style="color:blue;">Description</mark>                                               | The description entered when creating the link; “-” is displayed if none was provided                                                                                                                                                        |
| <mark style="color:blue;">Invited Roles</mark>                                             | Roles assigned to people who register through this link. More than two roles collapse into “+N”; hover to expand                                                                                                                             |
| <mark style="color:blue;">Invitation Time</mark>, <mark style="color:blue;">Inviter</mark> | When the link was created and who created it                                                                                                                                                                                                 |
| <mark style="color:blue;">Expiration Time</mark>                                           | When the link expires                                                                                                                                                                                                                        |
| <mark style="color:blue;">Joined Count</mark>                                              | Number of people who registered and joined through this link. If greater than 0, click to open the “<mark style="color:blue;">Joined Users</mark>” dialog, which lists each user and their join time and supports searching by name or email |
| <mark style="color:blue;">Status</mark>                                                    | Use the switch on the left to disable or re-enable the link at any time. Expired links cannot be re-enabled; generate a new one                                                                                                              |
| <mark style="color:blue;">Actions</mark>                                                   | <mark style="color:blue;">Copy Link</mark>                                                                                                                                                                                                   |

***

### Member List Actions <a href="#member-list-actions" id="member-list-actions"></a>

On the “<mark style="color:blue;">Member List</mark>” tab, search by name, ID, or email, or filter members by role using the role dropdown (see [Filter Role Members](https://docs.maiagent.ai/maiagent-user-guide/en/org/roles/group-member-filtering.md)). Each member's Actions column has the following icons:

| Icon                                                                      | Function                                                                                                                                                                                                                                                                                                                                                                                                         |
| ------------------------------------------------------------------------- | ---------------------------------------------------------------------------------------------------------------------------------------------------------------------------------------------------------------------------------------------------------------------------------------------------------------------------------------------------------------------------------------------------------------- |
| <mark style="color:blue;">Edit Member Roles</mark>                        | Adjust the member's assigned roles. See [Assign Roles to a Member](#assign-role-to-member)                                                                                                                                                                                                                                                                                                                       |
| <mark style="color:blue;">Edit Member Information</mark>                  | Change the member's name in this organization (organization owners only), and set personal preferences and custom attributes such as department, job title, and extension. See [Change a Member's Name](#edit-member-name) below and [Personal Profile: Custom Attributes—Set by an Administrator](https://docs.maiagent.ai/maiagent-user-guide/en/org/overview/custom-attributes.md#admin-edit-member-metadata) |
| <mark style="color:blue;">View Effective Permissions</mark> (shield icon) | See the actual permissions a member has after all their roles are combined, and which role grants each one. See [View a Member's Effective Permissions](#effective-permissions) below                                                                                                                                                                                                                            |
| <mark style="color:blue;">Delete</mark>                                   | Remove the member from the organization. See [Remove a Member](#delete-member) below                                                                                                                                                                                                                                                                                                                             |

### Change a Member's Name <a href="#edit-member-name" id="edit-member-name"></a>

Organization owners can change the name displayed for a member in **this organization**, for example to correct a name or replace a company-created account's name with the employee's real name. This changes the member's name within this organization; their account name stays the same.

1. Find the member in the “<mark style="color:blue;">Member List</mark>” and click the “<mark style="color:blue;">Edit Member Information</mark>” icon in the Actions column
2. The “<mark style="color:blue;">Name</mark>” field at the top of the dialog contains the member's current display name in this organization. Enter the new name
3. Click “<mark style="color:blue;">Confirm</mark>”: the dialog closes and a success message appears. The “<mark style="color:blue;">Member</mark>” column in the list immediately shows the new name

The name, personal preferences, and custom attributes in this dialog are saved together with the same “<mark style="color:blue;">Confirm</mark>” button. If saving fails, the dialog stays open and displays the reason.

<figure><img src="https://1360999650-files.gitbook.io/~/files/v0/b/gitbook-x-prod.appspot.com/o/spaces%2F6v6TNkkOQVfRYfcNirHL%2Fuploads%2Fgit-blob-88599ae0bd0e003ca36fefe056186d23d781bf44%2Forg-member-edit-name.png?alt=media" alt="An organization owner opens the Edit Member Information dialog. The Name field at the top is editable, with a note below stating that it is displayed only in this organization and does not change the member&#x27;s account name (name obscured)"><figcaption><p>Edit Member Information as seen by an organization owner: the Name field at the top is editable, with a note that it is displayed only in this organization</p></figcaption></figure>

When other roles open the same dialog, the “<mark style="color:blue;">Name</mark>” field is read-only and shows “Only organization owners can change names”:

<figure><img src="https://1360999650-files.gitbook.io/~/files/v0/b/gitbook-x-prod.appspot.com/o/spaces%2F6v6TNkkOQVfRYfcNirHL%2Fuploads%2Fgit-blob-3a2cc5139c8bc68b3cf15b0db2ad07e3f4c2b580%2Forg-member-edit-name-readonly.png?alt=media" alt="A user who is not an organization owner opens the Edit Member Information dialog. The Name field is read-only, with a note that only organization owners can change names"><figcaption><p>Edit Member Information as seen by a user who is not an organization owner: the Name field is gray and read-only, with a note below that only organization owners can change names</p></figcaption></figure>

| Rule                                  | Description                                                                                                                                                                                                                                                                                                                                                                                                                            |
| ------------------------------------- | -------------------------------------------------------------------------------------------------------------------------------------------------------------------------------------------------------------------------------------------------------------------------------------------------------------------------------------------------------------------------------------------------------------------------------------- |
| Who can change names                  | Only **organization owners** can change any member's name, including their own and other owners' names. Other roles (including those with member management permissions) can see the name field in “<mark style="color:blue;">Edit Member Information</mark>”, but it is read-only and shows “Only organization owners can change names”. Personal preferences and custom attributes remain editable according to existing permissions |
| Scope                                 | Applies only to this organization. The member list, member search, role member list, and member selector for conversation assignments all display the new name. Searches match the new name but no longer match the old name; searching by email still works                                                                                                                                                                           |
| Unaffected areas                      | The member's account name (the name they see under “<mark style="color:blue;">Account</mark> → <mark style="color:blue;">Personal Profile</mark>”) stays the same. Their name in other organizations also stays the same                                                                                                                                                                                                               |
| Restore the account name display      | Clear the name (or enter only spaces) and click “<mark style="color:blue;">Confirm</mark>” to display the member's account name again in this organization. When the field is cleared, a note below it shows the account name that will be displayed                                                                                                                                                                                   |
| Name format                           | Leading and trailing spaces are removed automatically. Names can contain up to 255 characters; exceeding this limit displays an error below the field and prevents saving. Names do not need to be unique. Entering the currently displayed name counts as no change                                                                                                                                                                   |
| Member changes their own account name | A name set by an owner remains in effect. Organizations without a separately configured name display the member's new account name                                                                                                                                                                                                                                                                                                     |
| Change history                        | Each name change is recorded in the [Activity Log](https://docs.maiagent.ai/maiagent-user-guide/en/org/activity-log.md), including the actor, time, member, old name, and new name                                                                                                                                                                                                                                                     |

{% hint style="warning" %}
**Names of members managed through SCIM synchronization cannot be changed manually**

For members provisioned by an identity provider through [SCIM Identity Synchronization](https://docs.maiagent.ai/maiagent-user-guide/en/org/identity-sync.md#scim-member-behavior), the name field is read-only and shows “This member's name is managed by identity provider (SCIM) synchronization”. API updates are also rejected. These names are managed by the identity provider; change them in your company's identity provider, such as Azure AD.
{% endhint %}

{% hint style="info" %}
To change many member names at once, use Excel batch import. See [Batch Update Existing Member Names](#batch-update-member-names). You can also update names through the API; see [Change a Member's Name](https://docs.maiagent.ai/api/api-reference/zu-zhi-he-cheng-yuan#organizations-members-display-name-partial-update) in the API documentation.
{% endhint %}

### View a Member's Effective Permissions <a href="#effective-permissions" id="effective-permissions"></a>

When a member belongs to several roles, what they actually have is the union of all those roles (see [Permission Union Principle](https://docs.maiagent.ai/maiagent-user-guide/en/org/roles/role-permission.md#permission-union-principle)). <mark style="color:blue;">View Effective Permissions</mark> lists that union directly and shows which roles grant each item, so you don't have to open each role and compare.

{% hint style="info" %}
Only administrators with the Organization Overview permission, meaning those who can open the member management page, can view this. The permission requirement is the same as for [Batch Set Role Permissions](https://docs.maiagent.ai/maiagent-user-guide/en/org/roles/role-batch-permissions.md).
{% endhint %}

#### Use Case <a href="#effective-permissions-scenario" id="effective-permissions-scenario"></a>

A sales colleague reports that they can see an Agent called “Financial Report Analysis” in the Agent list, which they should not be able to see. The organization administrator finds them in the member list and clicks the shield icon in the Actions column. On the AI Assistant card under <mark style="color:blue;">Assigned Resources</mark>, the source label for this Agent is “Cross-Department Project Team.” After confirming that the colleague is no longer on the project team, the administrator removes them from that role and the problem is solved on the spot, without opening each role's settings one by one.

#### How to Read It <a href="#read-effective-permissions" id="read-effective-permissions"></a>

<figure><img src="https://1360999650-files.gitbook.io/~/files/v0/b/gitbook-x-prod.appspot.com/o/spaces%2F6v6TNkkOQVfRYfcNirHL%2Fuploads%2Fgit-blob-0ca46d7574272e0c01a19e3b9d69855e9e9d1439%2Fmember-effective-permissions-entry.png?alt=media" alt="The shield icon in the member list Actions column, with the tooltip View Effective Permissions shown on hover"><figcaption><p>The shield icon in the member list Actions column</p></figcaption></figure>

In the member list, click the shield icon in the member's Actions column (hovering shows <mark style="color:blue;">View Effective Permissions</mark>) to open the “Effective Permissions - Name (Email)” dialog:

| Section                                                          | Contents                                                                                                                                                                                                                                                                              |
| ---------------------------------------------------------------- | ------------------------------------------------------------------------------------------------------------------------------------------------------------------------------------------------------------------------------------------------------------------------------------- |
| Summary                                                          | “Combined from N roles, N settings in total; N of them are granted by multiple roles.” All of the member's roles are listed below                                                                                                                                                     |
| <mark style="color:blue;">Role Permissions</mark>                | The feature permissions the member can use, listed in the same main permission / sub-permission hierarchy as the role edit page                                                                                                                                                       |
| <mark style="color:blue;">Assign MaiGPT Usage Permissions</mark> | MaiGPT's <mark style="color:blue;">Available Scope</mark> (the union across roles) and <mark style="color:blue;">Features</mark>                                                                                                                                                      |
| <mark style="color:blue;">Assigned Resources</mark>              | One card per resource type (AI Assistants, Teams, Knowledge Bases, Databases, Tools, Agent UI Tools, Skills, Chat Platforms), listing the actions allowed on each resource (read / edit / delete) and whether creating new ones is allowed. Chat Platforms also show the channel type |

<figure><img src="https://1360999650-files.gitbook.io/~/files/v0/b/gitbook-x-prod.appspot.com/o/spaces%2F6v6TNkkOQVfRYfcNirHL%2Fuploads%2Fgit-blob-be3caa6c04c761b989fe6184e4888f269b80f611%2Fmember-effective-permissions.png?alt=media" alt="The Effective Permissions dialog: summary, role list, and the source role of each permission"><figcaption><p>The Effective Permissions dialog lists the member's roles; the role that grants each permission appears on its right</p></figcaption></figure>

* The label on the right of each item is the role that grants it. Items granted by multiple roles are highlighted in yellow, making it easy to find duplicate settings that can be simplified.
* By default, only granted items are listed (when a sub-permission is granted, its ungranted parent permission is still listed and marked <mark style="color:blue;">Not Granted</mark>). Turn on <mark style="color:blue;">Show Ungranted Permissions</mark> to list ungranted items as well, each marked <mark style="color:blue;">Not Granted</mark>.
* Only features currently available to the organization are listed. Features that the organization has not enabled or that are not included in its plan do not appear.
* For owners, only the role list and the note “The owner role automatically has all feature permissions…” are shown, because owners are not restricted by role settings.
* Disabled members cannot be viewed. The shield icon is disabled with the message “Member is disabled; effective permissions cannot be viewed.”

In the <mark style="color:blue;">Roles</mark> column of the member list, roles assigned through identity synchronization (LDAP / SCIM, etc.) are shown in orange with a lock icon to distinguish them from manually assigned roles. For identity synchronization, see [Identity Synchronization (LDAP / SCIM)](https://docs.maiagent.ai/maiagent-user-guide/en/org/identity-sync.md).

To adjust the permissions of multiple roles at once, see [Batch Set Role Permissions](https://docs.maiagent.ai/maiagent-user-guide/en/org/roles/role-batch-permissions.md).

### Remove a Member <a href="#delete-member" id="delete-member"></a>

Click “<mark style="color:blue;">Delete</mark>” to remove a member from the organization.

### Assign Roles to Members <a href="#assign-role-to-member" id="assign-role-to-member"></a>

After members join the organization, you can assign each member different roles and grant the corresponding permissions based on those roles. For detailed settings, see [Role Permission Management](https://docs.maiagent.ai/maiagent-user-guide/en/org/roles/role-permission.md).

***

## Advanced Operations: Batch Member and Permission Management <a href="#batch-member-permission-management" id="batch-member-permission-management"></a>

{% hint style="info" %}
**When do you need batch operations?**

Batch functions save a great deal of time when you need to add many members at once (for example, 50 new employees) or assign roles to multiple employees.
{% endhint %}

MaiAgent provides powerful batch management functions for scenarios where you need to add or manage many members. By importing an Excel file, you can add multiple members and assign roles in one step, greatly improving management efficiency.

### Access Batch Functions <a href="#batch-feature-entry" id="batch-feature-entry"></a>

On the member management page, click the “<mark style="color:blue;">Batch Functions</mark>” button at the top right. The dropdown menu has three options:

| Option                                                             | Purpose                                                                                                                                                              |
| ------------------------------------------------------------------ | -------------------------------------------------------------------------------------------------------------------------------------------------------------------- |
| <mark style="color:blue;">Batch Add Members to Organization</mark> | Add multiple people to the organization at once using a list of Emails. See [Batch Add Members to Organization](#batch-add-members)                                  |
| <mark style="color:blue;">Batch Add Role Members</mark>            | Assign roles to multiple members at once. See [Batch Add Role Members](#batch-add-role-members)                                                                      |
| <mark style="color:blue;">Batch Import Member Metadata</mark>      | Update custom attributes (department, job title, employee ID, etc.) for multiple members at once. See [Batch Import Member Metadata](#batch-import-members-metadata) |

***

### Batch Add Members to Organization <a href="#batch-add-members" id="batch-add-members"></a>

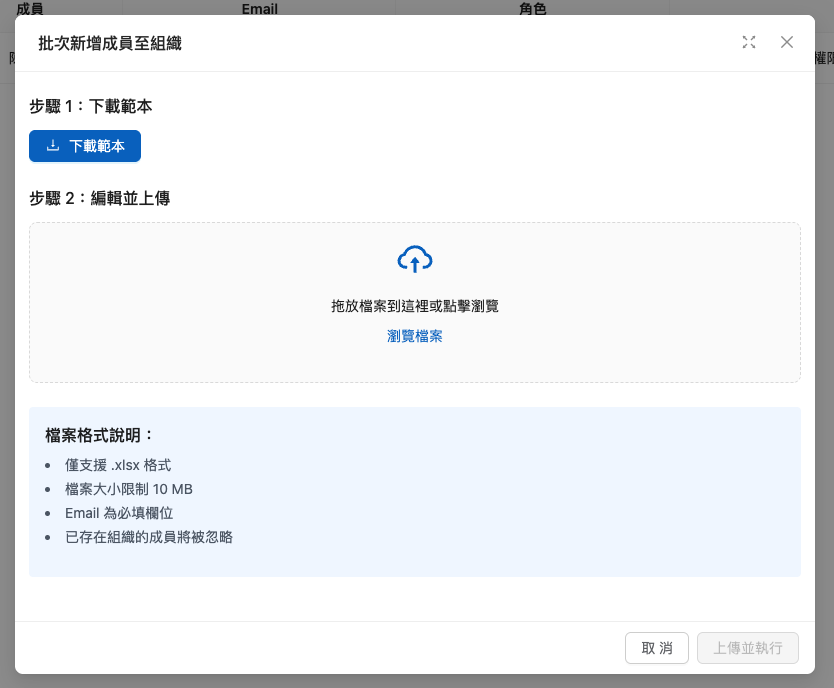
This function lets you add multiple members to the organization at once through an Excel file. Organization owners can also use the same template to batch update the names of existing members in this organization (see [Batch Update Existing Member Names](#batch-update-member-names)).

<figure><img src="https://1360999650-files.gitbook.io/~/files/v0/b/gitbook-x-prod.appspot.com/o/spaces%2F6v6TNkkOQVfRYfcNirHL%2Fuploads%2Fgit-blob-d8c0aefc5e89ab4cf1d0e34e6eb02053e12edb2e%2F%E6%88%AA%E5%9C%96%202025-12-10%20%E4%B8%8B%E5%8D%883.24.55.png?alt=media" alt=""><figcaption></figcaption></figure>

**Steps:**

1. **Download the template**: Click “Download Template” to get the Excel template file
2. **Edit the template**: Enter each member's Email in the template (required field)
3. **Upload the file**: Drag and drop the completed file, or click to upload it
4. **Run the import**: Click “Upload and Run” to complete the batch addition. On success, a notification appears listing the number of records processed (see [Import Completion Notification](#batch-import-result))

#### Excel File Format <a href="#excel-file-format" id="excel-file-format"></a>

| Column              | Required   | Description                                                                                                                                                                                                                                                                                                                                                                                                |
| ------------------- | ---------- | ---------------------------------------------------------------------------------------------------------------------------------------------------------------------------------------------------------------------------------------------------------------------------------------------------------------------------------------------------------------------------------------------------------- |
| **Name**            | Optional   | Member name, up to 255 characters. For people joining the organization for the first time, Name becomes their name in this organization; if their account is also newly created, Name becomes the account name as well. If left blank, the Email prefix is used automatically. For people who are already members, organization owners can use it to update their name in this organization when importing |
| **Email(required)** | ✅ Required | The member's email address                                                                                                                                                                                                                                                                                                                                                                                 |

#### Example File Content <a href="#excel-file-example" id="excel-file-example"></a>

| Name          | Email(required)           |
| ------------- | ------------------------- |
| Xiaoming Wang | <ming.wang@company.com>   |
| Xiaohua Li    | <hua.li@company.com>      |
| Dawei Zhang   | <david.zhang@company.com> |
|               | <john@company.com>        |

{% hint style="info" %}
**Example**

A company needs to add 50 new employees to its MaiAgent organization:

1. The IT administrator exports the employee list (names and Emails) from the HR system
2. The data is arranged into an Excel file in the format above
3. After the file is uploaded and run, the system will:
   * For employees who already have a MaiAgent account: add them directly to the organization
   * For employees without an account: automatically create an account and add them to the organization
4. All new members automatically receive the permissions of the “Default Role”
   {% endhint %}

{% hint style="warning" %}
**File Format Notes**

* Only the .xlsx format is supported
* File size limit is 10 MB; a single import can contain up to 25,000 rows (excluding the header row). If exceeded, the entire file is not imported and the message “A single import can contain up to 25,000 rows. Please split the file and import in batches” appears. Split the data into multiple files and import them separately
* Email is a required field; Name can be up to 255 characters
* If any row has an error (for example, a blank or invalid Email, or a Name longer than 255 characters, including rows for new members), the entire file is not imported, and the error message lists the problematic rows
* If the same Email appears multiple times, only the first entry is processed
* Emails that already belong to organization members are not added again: when an organization owner imports, names are updated based on Name; when other roles import, they are skipped. See the explanation below
  {% endhint %}

#### Batch Update Existing Member Names <a href="#batch-update-member-names" id="batch-update-member-names"></a>

When an **organization owner** imports the file, rows whose Email already belongs to a member of this organization are handled by updating that member's name in this organization based on Name. The template columns remain unchanged:

| Situation                                                                                         | Result                                                                                                                                    |
| ------------------------------------------------------------------------------------------------- | ----------------------------------------------------------------------------------------------------------------------------------------- |
| Name differs from the currently displayed name                                                    | Updated to Name; counted under “names updated”                                                                                            |
| Name is blank, or the same as the currently displayed name                                        | No change; counted under “unchanged”                                                                                                      |
| Name differs from the currently displayed name, but the member is managed by SCIM synchronization | Not updated; counted under “managed by SCIM synchronization, not updated” (for the reason, see [Edit a Member's Name](#edit-member-name)) |

* Only the member's name in this organization is updated. The account name of the existing member is not changed, and other organizations the member belongs to are not affected
* A blank Name does not clear an existing name. To revert to displaying the account name, clear the name in “<mark style="color:blue;">Edit Member Information</mark>”
* Every actual name change is recorded in the [Activity Log](https://docs.maiagent.ai/maiagent-user-guide/en/org/activity-log.md)
* When roles other than owner import, existing members are skipped as before and their names are not updated

#### Import Completion Notification <a href="#batch-import-result" id="batch-import-result"></a>

When the import succeeds, a success notification appears for about 3 seconds. The text depends on who ran the import:

| Imported by        | Notification text                                                                                                                                      |
| ------------------ | ------------------------------------------------------------------------------------------------------------------------------------------------------ |
| Organization owner | “X added, Y names updated, Z unchanged”; if some SCIM-managed members were not updated, “, N managed by SCIM synchronization, not updated” is appended |
| Other roles        | The original text, “X members added, Y already exist (skipped)”                                                                                        |

{% hint style="info" %}
When an organization owner imports, people who are already members are no longer shown as “already exist (skipped)”. They are counted under “names updated” or “unchanged” instead.
{% endhint %}

***

### Batch Add Role Members <a href="#batch-add-role-members" id="batch-add-role-members"></a>

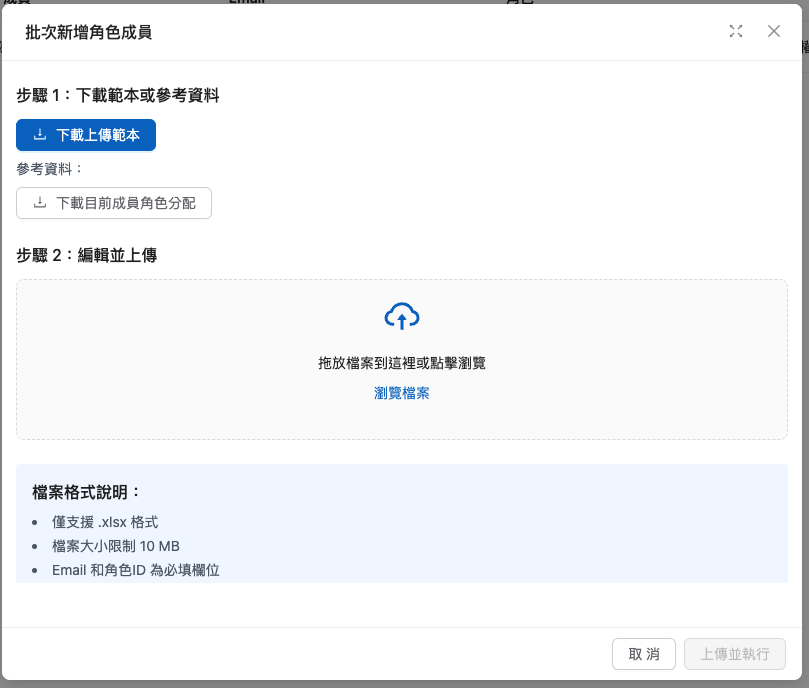
This function assigns roles to multiple members in bulk, enabling automatic permission assignment.

<figure><img src="https://1360999650-files.gitbook.io/~/files/v0/b/gitbook-x-prod.appspot.com/o/spaces%2F6v6TNkkOQVfRYfcNirHL%2Fuploads%2Fgit-blob-3f7fc3207029981126f6c4ca0ab68e442ea4b3ce%2F%E6%88%AA%E5%9C%96%202025-12-10%20%E4%B8%8B%E5%8D%883.25.37.png?alt=media" alt=""><figcaption></figcaption></figure>

**Steps:**

1. **Download the template**: Click “Download Upload Template” to get the Excel template
2. **Download reference data** (optional): Click “Download Current Member Role Assignments” to view the existing configuration
3. **Edit the template**:
   * Enter the member's Email
   * Enter the role ID to assign
4. **Upload the file**: Drag and drop the completed file, or click to upload it
5. **Run the import**: Click “Upload and Run” to complete the batch role assignment

#### Excel File Format <a href="#excel-file-format-role" id="excel-file-format-role"></a>

| Column                  | Required   | Description                                                                |
| ----------------------- | ---------- | -------------------------------------------------------------------------- |
| **Name**                | Optional   | Member display name; if left blank, the Email prefix is used automatically |
| **Email(required)**     | ✅ Required | The member's email address                                                 |
| **Group\_id(required)** | ✅ Required | The role ID to assign (UUID format)                                        |
| **Group\_name**         | Optional   | Role name (for reference only; the system relies on Group\_id)             |

{% hint style="info" %}
**How do I get a role ID?**

Click “Download Current Member Role Assignments” to export a reference file containing all role IDs, or view each role's ID on the [Role Permission Management](https://docs.maiagent.ai/maiagent-user-guide/en/org/roles/role-permission.md) page.
{% endhint %}

#### Example File Content <a href="#excel-file-example-role" id="excel-file-example-role"></a>

| Name          | Email(required)            | Group\_id(required)                  | Group\_name         |
| ------------- | -------------------------- | ------------------------------------ | ------------------- |
| Xiaoming Wang | <ming.wang@company.com>    | 4e368ab4-c543-48a2-bbb8-f6f5a0bf6c61 | Product Department  |
| Xiaoming Wang | <ming.wang@company.com>    | 7a2b3c4d-e5f6-7890-abcd-ef1234567890 | Agent Administrator |
| Xiaohua Li    | <hua.li@company.com>       | 4e368ab4-c543-48a2-bbb8-f6f5a0bf6c61 | Product Department  |
| Dawei Zhang   | <david.zhang@company.com>  | 8b9c0d1e-f2a3-4567-89ab-cdef01234567 | R\&D Department     |
| New Employee  | <new.employee@company.com> | 4e368ab4-c543-48a2-bbb8-f6f5a0bf6c61 | Product Department  |

{% hint style="success" %}
**Example: Batch Department Permission Setup**

After completing Azure AD integration, a company needs to assign different resource access permissions to 100 employees by department (for Azure AD setup, see [Third-Party Login (SSO)](https://docs.maiagent.ai/maiagent-user-guide/en/org/sso.md)):

**Step 1: Prepare roles**

* Create department roles in MaiAgent: “Product Department,” “R\&D Department,” and “Sales Department”
* Set the corresponding feature permissions for each role (see [Role Permission Management](https://docs.maiagent.ai/maiagent-user-guide/en/org/roles/role-permission.md))
* Assign the Agents, knowledge bases, and chat platforms each role can access

**Step 2: Prepare the Excel file**

* Export the employee list (including department information) from the HR system
* Fill in the matching role ID according to each department name
* The same employee can appear in multiple rows (for example, Xiaoming Wang belongs to both the Product Department and Agent Administrator)

**Step 3: Run the import**

* After the Excel file is uploaded, the system will:
  * For members already in the organization: assign roles directly
  * For Emails not yet in the organization: automatically invite them to join and assign roles
  * Members immediately receive the permissions corresponding to their roles

**Result**

* Permission setup for 100 employees is completed in 5 minutes
* Employees in each department can access only the Agents, knowledge bases, and chat platforms relevant to their work
  {% endhint %}

{% hint style="warning" %}
**File Format Notes**

* Only the .xlsx format is supported
* File size limit is 10 MB
* Email and role ID are required fields
* The same Email can appear in multiple rows (one person can have multiple roles)
* Emails not in the organization will automatically have an account created and be invited to the organization
* **The Default role (DEFAULT) cannot be assigned through Excel batch import**
* **The Owner role (OWNER) cannot be assigned through Excel batch import**
  {% endhint %}

***

### Batch Import Member Metadata <a href="#batch-import-members-metadata" id="batch-import-members-metadata"></a>

This function updates the **custom attributes** (metadata) of multiple members at once through Excel, for example writing the department, job title, and employee number from your HR system into member data in bulk. The content written is the same data that members fill in themselves in their [Profile](https://docs.maiagent.ai/maiagent-user-guide/en/org/overview/custom-attributes.md), or that administrators fill in using [Edit Member Information](https://docs.maiagent.ai/maiagent-user-guide/en/org/overview/custom-attributes.md#admin-edit-member-metadata).

**Steps:**

1. **Download the template**: Click “<mark style="color:blue;">Download Template</mark>” to get the Excel template
2. **Edit the template**: Fill in one attribute of one member per row (Email, attribute name, value); if a member has multiple attributes, fill in multiple rows
3. **Upload the file**: Drag and drop the completed file, or click to upload it
4. **Run the import**: Click “<mark style="color:blue;">Upload and Run</mark>”. When finished, “N metadata records updated” is displayed (N is the number of members updated)

#### Excel File Format <a href="#excel-file-format-metadata" id="excel-file-format-metadata"></a>

| Column              | Required   | Description                                                |
| ------------------- | ---------- | ---------------------------------------------------------- |
| **Email(required)** | ✅ Required | The member's email; must already be an organization member |
| **Key**             | ✅ Required | Attribute name, for example `Department`                   |
| **Value**           | ✅ Required | Attribute value, for example `Product Development`         |

#### Example File Content <a href="#excel-file-example-metadata" id="excel-file-example-metadata"></a>

| Email(required)         | Key        | Value               |
| ----------------------- | ---------- | ------------------- |
| <ming.wang@company.com> | Department | Product Development |
| <ming.wang@company.com> | Job Title  | Engineer            |
| <hua.li@company.com>    | Department | Sales               |

{% hint style="warning" %}
**The whole batch succeeds or fails; nothing is partially applied**

* Only the .xlsx format is supported; file size limit is 10 MB
* Email, Key, and Value are all required. If any cell is blank, the same member has a duplicate Key, or an Email is not an organization member, the entire file is not written, and the error message points to the problematic rows
* For members listed in the file, their custom attributes are **replaced entirely with the content of the file**: attributes that existed but are not listed in the file are cleared, including “personal preferences.” To keep existing attributes, include them in the file as well
* Members not listed in the file are not affected
  {% endhint %}

***

## Further Reading <a href="#further-reading" id="further-reading"></a>

* For detailed role and permission settings, see [Role Permission Management](https://docs.maiagent.ai/maiagent-user-guide/en/org/roles/role-permission.md)
* To apply the same permission settings to multiple roles at once, see [Batch Set Role Permissions](https://docs.maiagent.ai/maiagent-user-guide/en/org/roles/role-batch-permissions.md)
* For the automatic role synchronization mechanism for EIP login, see [Third-Party Login (SSO)](https://docs.maiagent.ai/maiagent-user-guide/en/org/sso.md)


---

# Agent Instructions
This documentation is published with GitBook. GitBook is the documentation platform designed so that both humans and AI agents can read, navigate, and reason over technical content effectively. Learn more at gitbook.com.

## Querying This Documentation
If you need additional information that is not directly available in this page, you can query the documentation by asking a question.

Perform an HTTP GET request on the following URL with the `ask` and `goal` query parameters:

```
GET https://docs.maiagent.ai/maiagent-user-guide/en/org/overview/member.md?ask=<question>&goal=<user_goal>
```

`ask` is the immediate question: it should be specific, self-contained, and written in natural language.
`goal` is what the user is ultimately trying to achieve, the reason they need the answer. Sharing it helps GitBook give you a better, more relevant answer. A goal is most helpful when it describes the outcome the user wants rather than restating the question. For example, with `ask=how do I create an API token`, a goal like `automate deployments from our CI pipeline` lets GitBook tailor the answer to that use case.

The response will contain a direct answer to the question and relevant excerpts and sources from the documentation.

Use this mechanism when the answer is not explicitly present in the current page, you need clarification or additional context, or you want to retrieve related documentation sections.