> For the complete documentation index, see [llms.txt](https://docs.maiagent.ai/llms.txt). Markdown versions of documentation pages are available by appending `.md` to page URLs; this page is available as [Markdown](https://docs.maiagent.ai/maiagent-user-guide/en/conversations/web-chat/website.md).
# Integrate with Platform: Website
## I. Open the Settings Page
### 1. Path 1: Add a Web Customer Service Chat
In the left menu, click “Customer Service Chat > Chat Platforms,” click “+ Integrate Chat Platform” in the upper-right corner, and select “Website.”
### 2. Path 2: Access a Chat Platform Associated with an AI Assistant
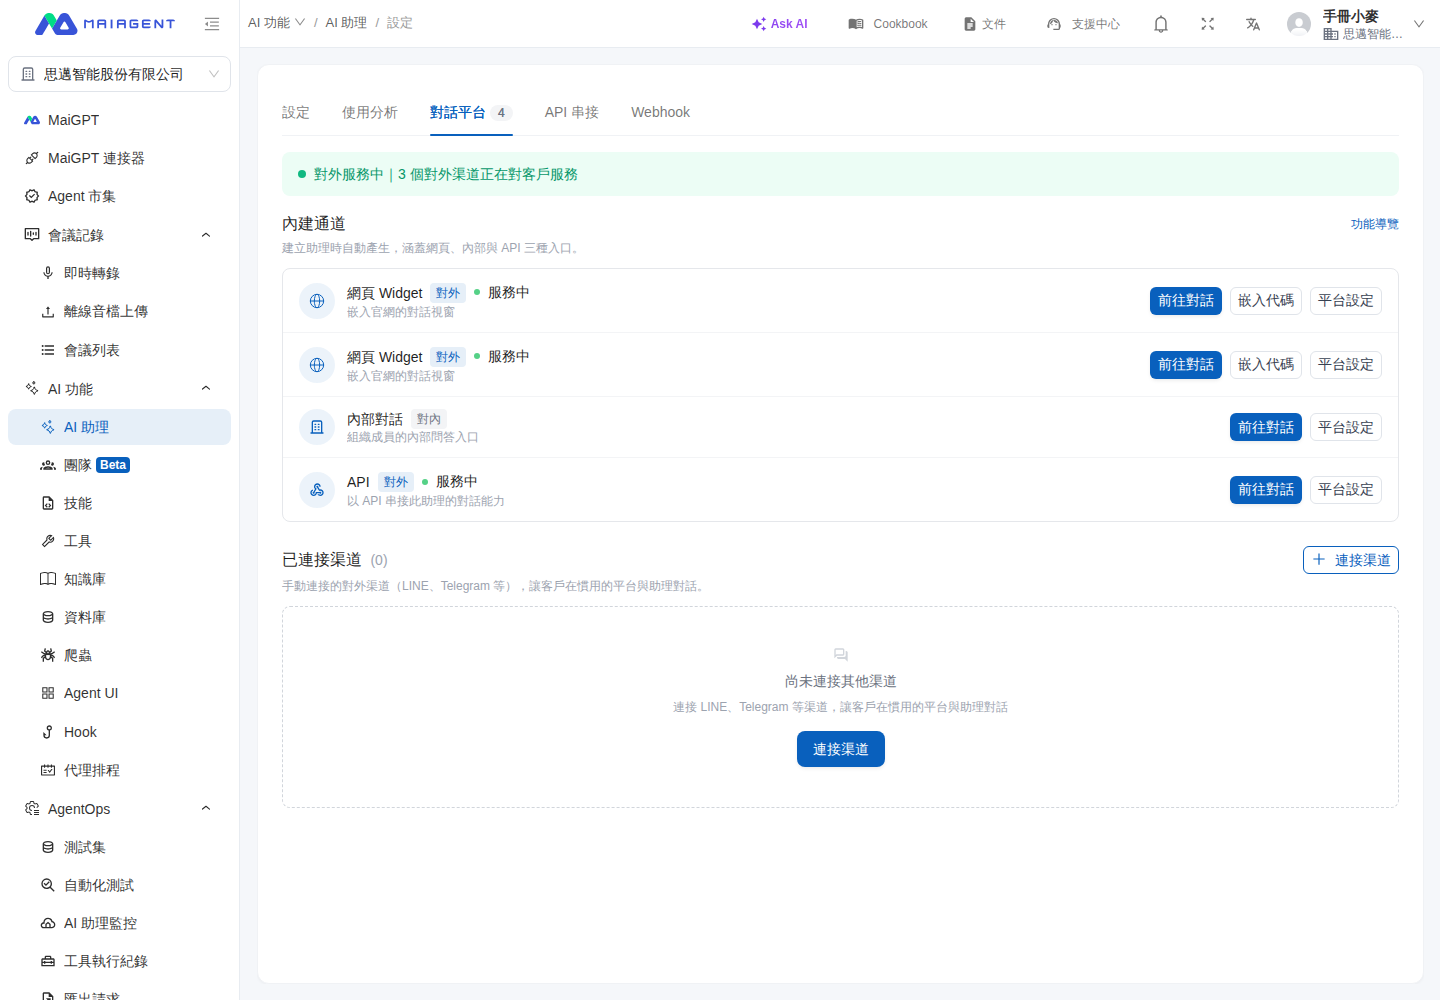
In the left sidebar, go to AI Features → AI Assistants, select the assistant you want to configure, and switch to the Chat Platforms tab. Find the website chat platform you want to adjust, then click Platform Settings.
Click “Platform Settings” on the AI Assistant's Chat Platforms tab.
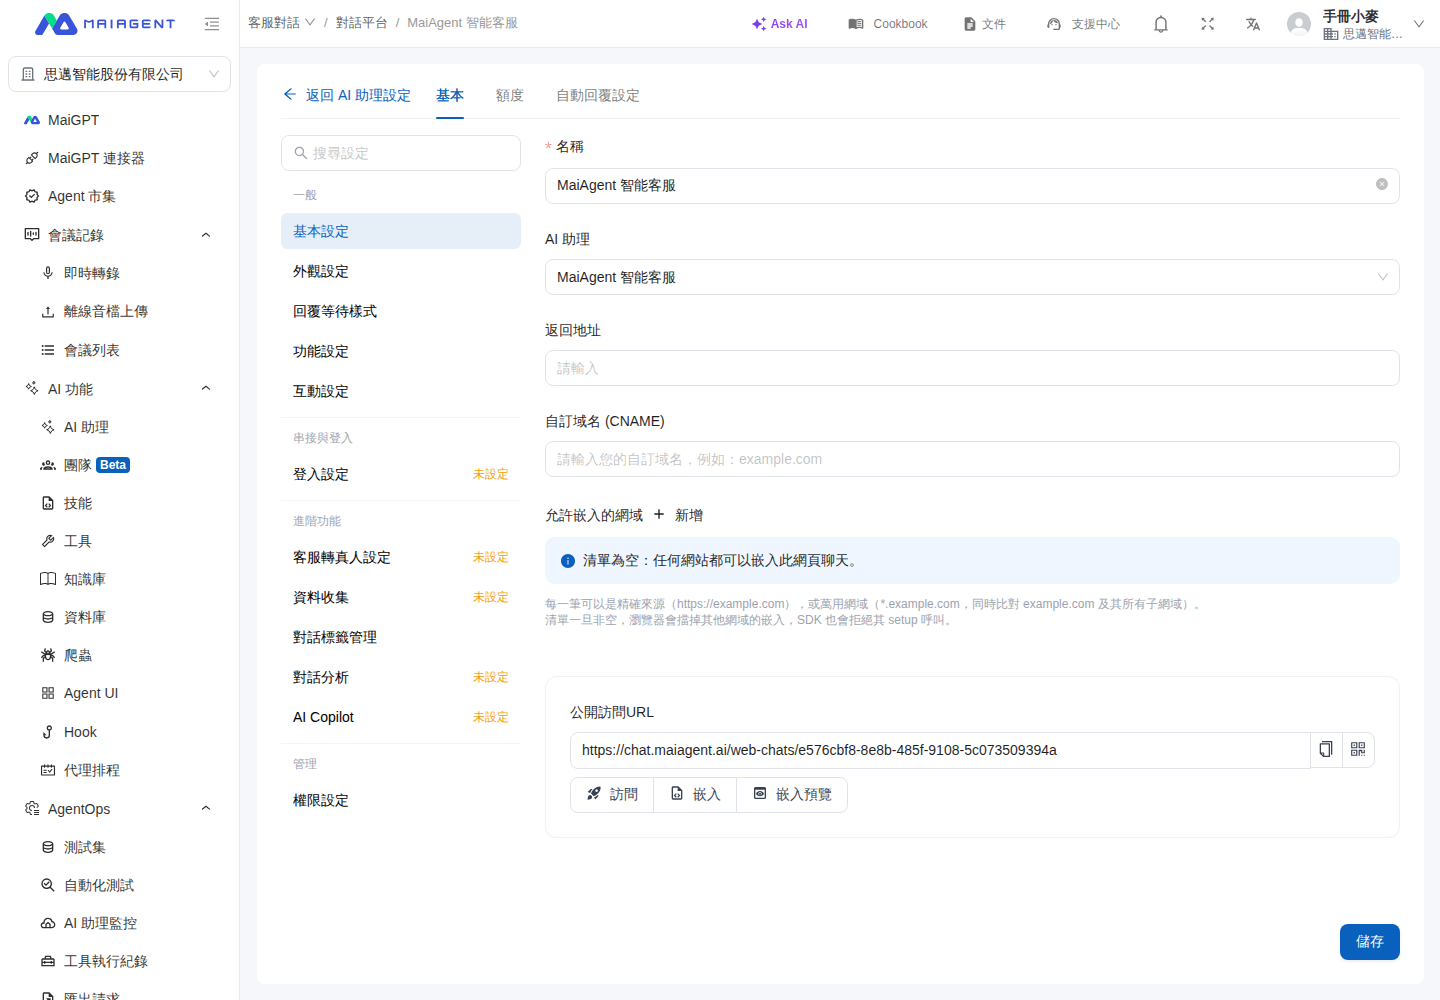
After completing the settings, click Back to AI Assistant Settings at the top of the page to return to the original assistant's Chat Platforms tab. This return option remains available when switching between Basic, Quota, and Auto-Reply Settings.
After completing the settings, return directly to the original AI Assistant settings page.
{% hint style="info" %} Back to AI Assistant Settings is displayed only when you access the page from the AI Assistant's Chat Platforms tab. If you access it directly from Chat Platforms in the left menu, the page retains its original navigation.
{% endhint %}
#### Use Case: Return to the Assistant After Updating Website Customer Service
A customer service manager needs to update the website customer service settings for the “Product Consultation Assistant.” She clicks Platform Settings on this AI Assistant's Chat Platforms tab. After making the changes, she clicks Back to AI Assistant Settings to return to the same assistant's chat platform list and continue checking other customer service channels, without having to find the assistant again in the AI Assistant list.
### 3. Path 3: Chat Platform Operations
In the left sidebar, go to “Customer Service Chat > Chat Platforms,” select the AI Assistant you want to configure, and click the “Operations” icon to open the chat platform configuration.
## II. Basic Settings
The five categories in the “General” group of the “Basic” tab each have a dedicated page with detailed instructions:
### 1. Basic Settings
For the platform name, AI Assistant, return URL, custom domain, allowed embed domains, public access URL, and three embedding methods, see [Basic Settings](/maiagent-user-guide/en/conversations/platform-settings/basic-settings.md).
#### Allowed Embed Domains
For how the embed allowlist works, setup steps, and a pre-enablement checklist, see [Basic Settings: Allowed Embed Domains](/maiagent-user-guide/en/conversations/platform-settings/basic-settings.md#allowed-embed-origins).
### 2. Appearance Settings
For the logo, avatar, display settings, and light/dark theme colors, see [Appearance Settings](/maiagent-user-guide/en/conversations/platform-settings/appearance-settings.md).
### 3. Feature Settings
For enabling the platform, allowing file uploads, cited documents, OCR, tool display mode, question-set option display mode, and AI awareness settings, see [Feature Settings](/maiagent-user-guide/en/conversations/platform-settings/function-settings.md).
### 4. Interaction Settings
For the greeting, conversation starter questions, including greeting options in the Agent context, conversation display settings, satisfaction surveys, and quota-exhausted messages, see [Interaction Settings](/maiagent-user-guide/en/conversations/platform-settings/interaction-settings.md).
#### Include Greeting Options in the Agent Context
For differences before and after enabling it, use cases, and important notes, see [Interaction Settings: Include Greeting Options in the Agent Context](/maiagent-user-guide/en/conversations/platform-settings/interaction-settings.md#include-greeting-in-context).
### 5. Login Settings
**Configure the SSO Login Source**
* MaiAgent currently supports SSO (Single Sign-On) through Keycloak integration
* Switch the source using the “Login Source” dropdown menu
* Select Maiagent or Keycloak as the authentication method
**Passwordless Chat from an Embedded Client**
If you embed Web Chat on your website and users are already logged in there, enable “Allow Passwordless Chat from Embedded Clients Using Source ID” so they can start chatting immediately. For setup and signature integration instructions, see [Passwordless Chat Using a Contact Source ID](/maiagent-user-guide/en/conversations/web-chat/source-id-access.md).
## III. Auto-Reply Settings
You can configure when the bot replies here.
* Click the toggle next to a date to select the days of the week on which replies are sent.
* Set a time period by selecting its start and end times.
* To configure multiple time periods, click “+ Add Time Period,” then set the period.
---
# Agent Instructions
This documentation is published with GitBook. GitBook is the documentation platform designed so that both humans and AI agents can read, navigate, and reason over technical content effectively. Learn more at gitbook.com.
## Querying This Documentation
If you need additional information that is not directly available in this page, you can query the documentation dynamically by asking a question.
Perform an HTTP GET request on the current page URL with the `ask` query parameter, and the optional `goal` query parameter:
```
GET https://docs.maiagent.ai/maiagent-user-guide/en/conversations/web-chat/website.md?ask=&goal=
```
`ask` is the immediate question: it should be specific, self-contained, and written in natural language.
`goal` is optional and describes the broader end goal you are ultimately trying to accomplish on behalf of the user. GitBook uses it to tailor the answer towards what is most useful for that goal.
The response will contain a direct answer to the question and relevant excerpts and sources from the documentation.
Use this mechanism when the answer is not explicitly present in the current page, you need clarification or additional context, or you want to retrieve related documentation sections.