> For the complete documentation index, see [llms.txt](https://docs.maiagent.ai/llms.txt). Markdown versions of documentation pages are available by appending `.md` to page URLs; this page is available as [Markdown](https://docs.maiagent.ai/maiagent-user-guide/en/conversations/web-chat.md).

# Web Chat Overview

This article introduces Web Chat interactive features and interface customization, helping you create a Web Chat service that matches your brand identity

## <mark style="color:blue;">1. What is WebChat?</mark> <a href="#what-is-webchat" id="what-is-webchat"></a>

You can embed AI assistants created on MaiAgent into your website to provide real-time customer service or other conversations. Web Chat features a **responsive design that adapts perfectly to desktop, tablet, and mobile devices.**

MaiAgent currently offers the following three embedding methods:

### 1. Bottom-Right Corner Widget <a href="#embed-widget" id="embed-widget"></a>

* Embed into your website as a built-in smart assistant
* Non-intrusive to normal browsing, available whenever needed
* Ideal for general customer service and consultation

### 2. Full-Screen Embed <a href="#embed-fullscreen" id="embed-fullscreen"></a>

* Provides a complete conversation experience
* Suitable for complex consultation and service workflows
* Customizable design to meet enterprise needs

### 3. MaiGPT Window Mode Embed <a href="#embed-maigpt" id="embed-maigpt"></a>

* A full ChatGPT-style conversation interface (conversation history list on the left + main conversation area on the right) that can be embedded directly into a page as the primary UI
* Can be permanently displayed in a specified container, or opened full-screen by clicking a floating button in the bottom-right corner
* Ideal for AI portal sites, internal knowledge portals, or as the primary conversation interface for a product

{% hint style="info" %}
MaiGPT window mode can be selected in the "<mark style="color:blue;">Embed</mark>" window of the chat platform settings. For complete setup steps, see [MaiGPT Window Mode Embed](/maiagent-user-guide/en/conversations/web-chat/maigpt-embed.md).
{% endhint %}

This design delivers:

* **Immediacy**: Visitors get professional answers instantly without waiting, enhancing user experience
* **Convenience**: The floating bottom-right design doesn't interfere with normal browsing, available whenever needed
* **Cost Efficiency**: AI assistant provides 24/7 service, significantly reducing labor costs
* **Professional Image**: Demonstrates the enterprise's technological capabilities and service quality

## <mark style="color:blue;">2. Build a Brand-Styled Web Chat Service</mark> <a href="#branding" id="branding"></a>

MaiAgent offers customization features including custom logos, avatars, and Q\&A theme colors to help you build a brand-styled Web Chat service

You can:

1. Choose the assistant display name
2. Upload your company logo
3. Choose the AI assistant display avatar
4. Select the Web Chat theme color
5. Select the message background color for AI assistant replies

to create your own Web Chat appearance:

This way, you can create a Web Chat service that matches your brand colors and corporate identity

Web Chat displays the platform branding below the conversation input area. The login, registration, and loading screens also display the brand image at a consistent aspect ratio without compressing, stretching, or distorting it.

<figure><img src="https://1360999650-files.gitbook.io/~/files/v0/b/gitbook-x-prod.appspot.com/o/spaces%2F6v6TNkkOQVfRYfcNirHL%2Fuploads%2Fgit-blob-08a452dcf190d99fb18802f136241351607d360a%2Fwebchat-brand-footer.png?alt=media" alt="Powered by and the MaiAgent brand logo displayed below the Web Chat input area"><figcaption><p>The brand logo at the bottom of Web Chat remains clear and preserves its aspect ratio</p></figcaption></figure>

### Dark Mode Optimization <a href="#dark-mode" id="dark-mode"></a>

MaiAgent's Web Chat dark mode has been fully optimized to provide a more comfortable visual experience:

**Dynamic Color Adjustment**

* Automatically adjusts theme color brightness to ensure visibility on dark backgrounds
* Intelligently adjusts text contrast for optimal readability
* Optimizes icon and button colors for better visibility in dark mode

**Contrast Optimization**

* Message bubble background colors are carefully designed to prevent visual fatigue
* Links and important information use high-contrast colors for clear identification
* Input field and button border colors are optimized to enhance the user experience

**Seamless Switching Experience**

* Users can switch between light and dark modes at any time
* Conversation content and operation states are preserved during switching
* The system remembers the user's theme preference

Dark mode is particularly suitable for:

* Nighttime use or low-light environments
* Extended conversations to reduce eye strain
* Enterprise brand designs with dark color schemes

## <mark style="color:blue;">3. Message Customization</mark> <a href="#messages" id="messages"></a>

When entering the Web Chat service for the first time, you can freely configure your AI assistant's opening message based on the following scenarios.

### **1. Greeting Customization** <a href="#greeting" id="greeting"></a>

#### **Branded Greeting**

Set: "Welcome to our website! I'm your dedicated customer service assistant" to showcase your enterprise's professional image and friendly service attitude

#### **Guided Opening**

Set: "I can help you look up product information, answer usage questions, and assist with order processing" to clearly inform users of the available service scope and build trust in the service capabilities

### 2. Guided Starter Questions <a href="#starter-questions" id="starter-questions"></a>

* Set "<mark style="color:blue;">conversation starter questions</mark>" as quick options
* Users can directly click on common questions without typing
* **Example questions**:
  * "How do I check my ordered items?"
  * "How do I place an order?"
  * "Membership points rules"
  * "Business hours"

Users can tap starter questions to begin a conversation, speeding up the Q\&A process:

## Stop a Response While It Is Being Generated <a href="#stop-generating" id="stop-generating"></a>

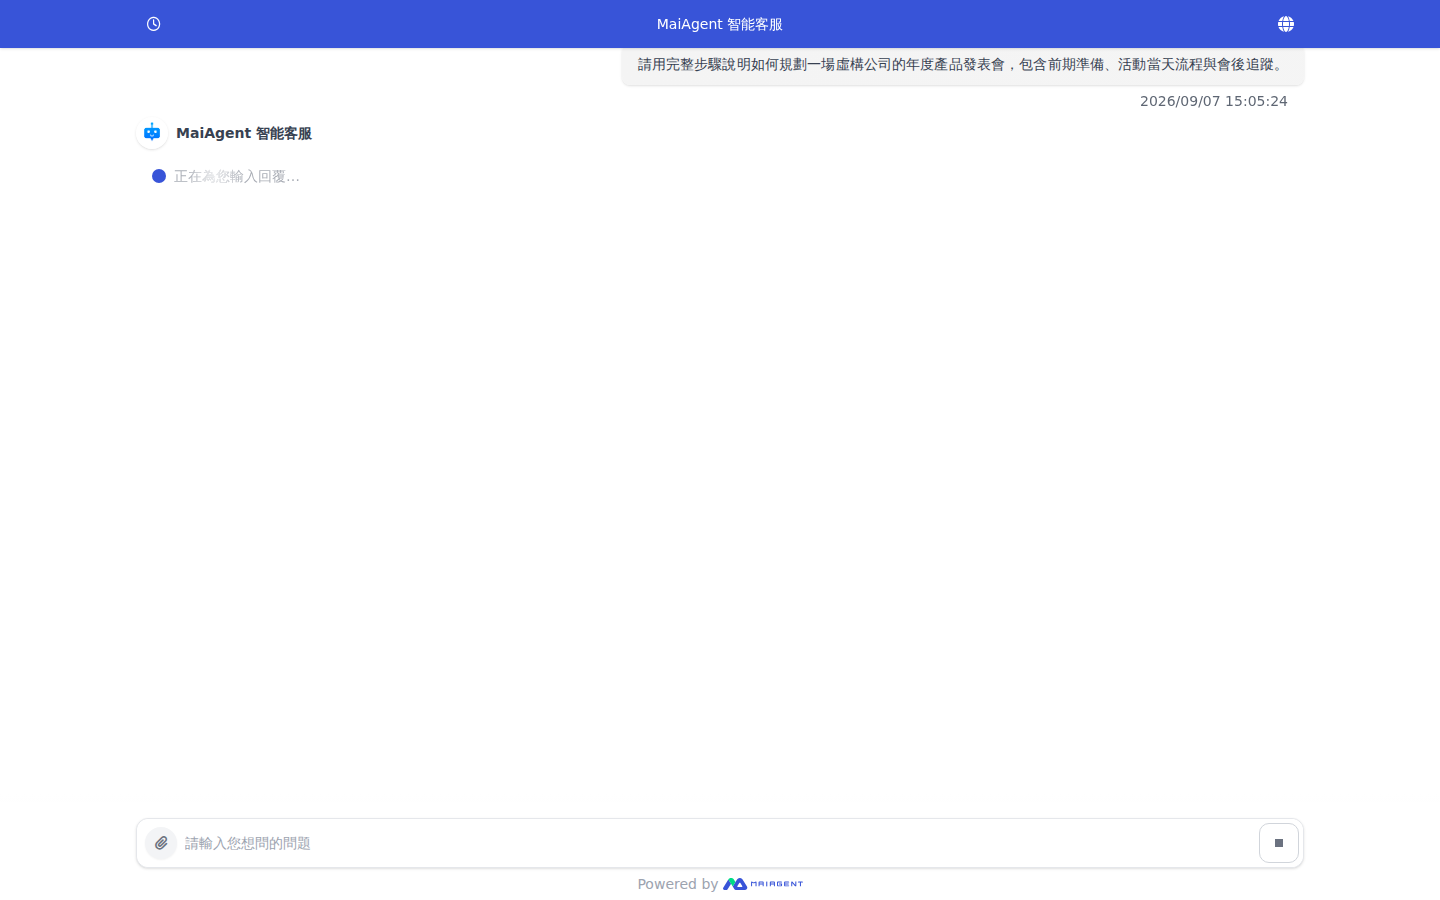
If you notice an error in your question after sending it, you do not need to wait for the AI assistant to finish the entire response. While the response is being generated, the send button to the right of the input field changes to a square <mark style="color:blue;">Stop</mark> button. Click it to stop the current response, then enter and send your corrected question.

For example, suppose a customer service representative asks the AI assistant to plan an annual product launch but realizes after sending the request that they forgot to specify the event budget. They can click <mark style="color:blue;">Stop</mark> while the AI assistant is generating the response, then add the budget and number of attendees and ask again. This avoids waiting for content that does not meet their needs to finish generating.

### Stop the Current Response <a href="#stop-current-response" id="stop-current-response"></a>

{% stepper %}
{% step %}

### 1. Find the Stop Button <a href="#find-stop-button" id="find-stop-button"></a>

After sending a question, wait for the AI assistant to start generating a response. A square <mark style="color:blue;">Stop</mark> button appears to the right of the input field.

<figure><img src="https://1360999650-files.gitbook.io/~/files/v0/b/gitbook-x-prod.appspot.com/o/spaces%2F6v6TNkkOQVfRYfcNirHL%2Fuploads%2Fgit-blob-5b470980c305488984de0c77295cf0ef2ae6f57f%2Fwebchat-stop-response.png?alt=media" alt="A square Stop button appears to the right of the input field while Web Chat is generating a response"><figcaption><p>Click the Stop button to the right of the input field while a response is being generated</p></figcaption></figure>
{% endstep %}

{% step %}

### 2. Stop and Ask Again <a href="#stop-and-ask-again" id="stop-and-ask-again"></a>

Click <mark style="color:blue;">Stop</mark>. Once the "Typing a response for you" message disappears, enter the corrected question in the input field and send it again.
{% endstep %}
{% endstepper %}

{% hint style="info" %}
Stopping only interrupts the response currently being generated. It does not delete the question you sent or any previous conversation history.
{% endhint %}

## <mark style="color:blue;">4. Diverse Q\&A Content</mark> <a href="#multimodal-qa" id="multimodal-qa"></a>

### 1. Multi-Language Support <a href="#multi-language" id="multi-language"></a>

Responds in the user's language, eliminating communication barriers.

* **Auto-detection**: Selects the assistant's reply language based on the user's input language

**Manual switching**:

1. Use the Web Chat interface to select the language. See: [Multi-Language Support](https://docs.maiagent.ai/maiagent-user-guide/en/conversations/pages/BaXHx76Xacpa5IBNtuzL#id-2.-web-chat-liao-tian-she-ding)[: Web Chat Chat Settings](https://docs.maiagent.ai/maiagent-user-guide/en/conversations/pages/BaXHx76Xacpa5IBNtuzL#id-2.-web-chat-liao-tian-she-ding).
2. Use the Web Chat initialization script (JavaScript) to specify the AI assistant's reply language. See: [Technical Manual - Web Chat Initialization](https://docs.maiagent.ai/tech/api-integration/web-chat-chu-shi-hua#e5-9b-9bweb-chat-e5-b5-8c-e5-85-a5-e8-88-87-e8-aa-9e-e8-a8-80-e8-a8-a-d-e5-ae-9a).

{% hint style="info" %}
For the list of supported languages, see: [Multi-Language Support](/maiagent-user-guide/en/build/multi-language-support.md#zhi-yuan-yu-yan-qing-dan)[: Supported Language List](/maiagent-user-guide/en/build/multi-language-support.md#zhi-yuan-yu-yan-qing-dan)
{% endhint %}

### 2. Multimodal Q\&A <a href="#multimodal" id="multimodal"></a>

In addition to text-based Q\&A, the AI assistant also supports uploading different types of files:

* Spreadsheets: .xls, .xlsx, .csv, .ods
* Word processing documents: .doc, .docx, .odt, .pdf, .md, .txt
* Presentation files: .ppt, .pptx, .odp
* Web files: .html, .htm
* Data formats: .json, .jsonl
* Audio files: .wav, .mp3, .m4a, .aac
* Video files: .mp4

{% hint style="info" %}
You can disable file uploads for users, restricting conversations to text only to ensure conversation security.
{% endhint %}

#### Image Content Processing

**Image Recognition and Analysis**

* **Upload image analysis**: Users can upload product images, and the AI automatically identifies and provides relevant information
* **Screenshot processing**: Supports screenshot analysis to help resolve usage issues
* **Image descriptions**: Automatically generates image content descriptions and related suggestions

**Image Response Feature**

* **Product image display**: Replies include actual product images
* **Operation guide images**: Provides step-by-step operation screenshots

Examples:

1. A user asks where to configure the MaiAgent assistant, and the assistant responds with an image of the settings screen
2. A user sends a screenshot to the assistant to confirm whether the path is correct, and the assistant correctly interprets and responds

#### Document Processing Capabilities

**Supported Document Formats**

* **PDF files**: Automatically parses PDF content and answers related questions
* **Word documents**: Processes .doc/.docx format documents
* **Excel spreadsheets**: Analyzes spreadsheet data and provides insights
* **PowerPoint presentations**: Extracts presentation content and answers questions

**Document Interaction Features**

* **Document content queries**: Answers specific questions based on uploaded documents
* **Data analysis**: Automatically analyzes table data and provides statistical information in table format
* **Document summaries**: Generates key content summaries for long documents

***

Example 1: Ask the AI assistant to present data content in table format and provide reference links

Example 2: Ask the assistant to analyze sales content and provide table analysis

Example 3: Upload a docx file and ask the assistant to help analyze CV writing issues

{% hint style="success" %}
The AI assistant replies in Markdown format, organizing response content in a well-structured manner.
{% endhint %}

## <mark style="color:blue;">5. Conversation Memory and Sharing</mark> <a href="#memory-and-sharing" id="memory-and-sharing"></a>

### **1. Conversation History Memory** <a href="#chat-history" id="chat-history"></a>

To provide a continuous service experience, WebChat automatically remembers users' conversation history, allowing each conversation to build upon previous ones.

**Memory Scope**

* **Conversation content**: Complete Q\&A records, including text, images, documents, etc.
* **Service status**: Incomplete queries, pending issues

Users can view past conversation records in the conversation list on the left side of Web Chat, or start a new conversation

The conversation memory feature can be used for:

* **Continuous consultation**: When a user asks "What tent model did you recommend last time?", the AI can immediately recall and answer
* **Progress tracking**: When a user says "Continue the order inquiry from last time", the AI automatically retrieves the relevant information
* **Personalized service**: Provides more accurate recommendations and suggestions based on conversation history

### **2. Conversation Sharing** <a href="#chat-sharing" id="chat-sharing"></a>

When you want to share a conversation with friends or colleagues after consulting the AI assistant, or when internal teams need to collaborate on customer issues, you can use MaiAgent's service to generate a conversation sharing link:

**Shared Content**

* **Complete conversation record**: Includes all text, images, documents, and other content
* **Conversation summary**: Automatically generated conversation highlights summary
* **Related resources**: Product links, documents, etc. mentioned in the conversation

Conversation record sharing can be used for:

* **Customer sharing**: "This camping gear recommendation is great, share it with the hiking club"
* **Internal collaboration**: Customer service staff share complex issues with the technical support team
* **Training purposes**: Share typical conversation cases as employee training materials

### **3. Conversation Timeout Management** <a href="#chat-timeout" id="chat-timeout"></a>

To ensure conversation quality and system performance, Web Chat features an intelligent conversation timeout management mechanism:

**Intelligent Filtering Mechanism**

* **Automatic greeting filtering**: The system identifies and filters opening greetings, excluding them from conversation timeout calculations
* **Correct message count reset**: When a conversation restarts, the message counter resets correctly
* **Optimized timeout determination**: Timeout calculations only apply to substantive conversation content, providing more accurate conversation management

**Conversation Continuity Assurance**

* Ensures users do not unexpectedly time out during normal conversations
* Conversations can continue after extended periods of thinking or pauses
* The system intelligently determines whether a conversation is still in progress

**How It Works**

1. **Start conversation**: The user sends a greeting (e.g., "Hello"), which the system does not count toward the timeout
2. **Enter conversation**: The user begins asking substantive questions, and the timeout timer starts
3. **Conversation pause**: If the user temporarily leaves, the system maintains the conversation state
4. **Resume**: The user returns to continue the conversation, and the message count updates correctly

This optimization makes the conversation experience smoother and more natural, so users don't need to worry about interruptions due to extended thinking time.

## <mark style="color:blue;">6. Choose Whether to Display Tool Usage and Citation Lists</mark> <a href="#display-tools-and-citations" id="display-tools-and-citations"></a>

### **1. Display Tool Usage List** <a href="#show-tools" id="show-tools"></a>

You can choose whether to let users see the list of tools the AI assistant uses during reasoning. If enabled, the following screen appears when the AI assistant generates a response:

You can use this list to verify whether the AI assistant is using the correct tools.

### **2. Display Citation List** <a href="#show-citations" id="show-citations"></a>

Each AI response automatically generates a citation list, clearly indicating information sources to enhance the credibility and traceability of answers.

**Display Settings**

Enterprises can configure whether to let users see the tool usage list and reference document names. If display is enabled, the following list appears at the bottom of the AI assistant's response. Clicking on a "citation node" reveals the referenced document excerpt:

Depending on different usage scenarios, you can choose whether to display citation information:

* **Public customer service**: Display all citation information to build trust
* **Internal support**: Hide sensitive documents to protect confidential information
* **Educational institutions**: Display learning resources for convenient student reference

## <mark style="color:blue;">7. Conversation Access Control - A Secure and Controllable Conversation Environment</mark> <a href="#access-control" id="access-control"></a>

### 1. Login Configuration <a href="#login-config" id="login-config"></a>

**Mandatory Login Mechanism**

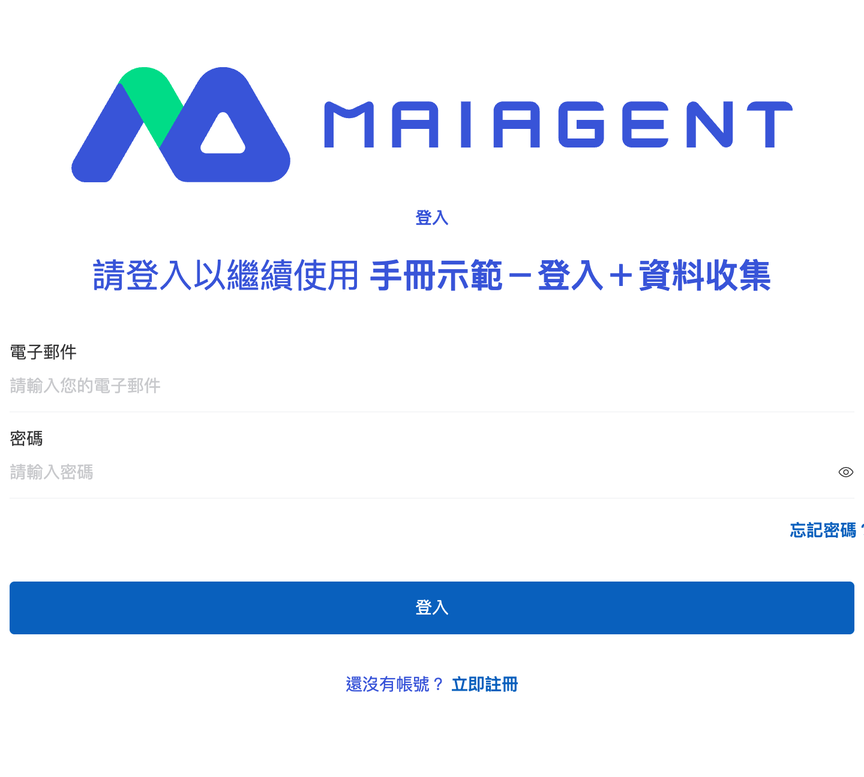
To ensure the security and controllability of conversation content, enterprises can enable the login feature, requiring users to log in before using the AI assistant service. Once configured, visitors clicking on WebChat will first be directed to a login page, and only successfully authenticated users can begin conversations with the AI assistant

**Security Advantages**

* **Identity verification**: Ensures every conversation user has a verified identity
* **Access control**: Provides corresponding service content based on user identity
* **Conversation tracking**: Maintains complete conversation history records for each user
* **Data protection**: Prevents unauthorized users from accessing sensitive information

### 2. Three Login Methods <a href="#login-methods" id="login-methods"></a>

**AD (Active Directory) Login**

* **Use case**: For internal employees, integrated with existing AD systems
* **Features**: Single Sign-On (SSO), no additional account management needed
* **Setup**: Configure AD server connection information and synchronization rules
* **Practical application**: Employees log in directly with company accounts and automatically receive corresponding permissions

**Keycloak Login**

* **Use case**: For enterprises requiring complex identity management, supporting multiple identity providers
* **Features**: Supports standard protocols such as OAuth2, SAML, and OpenID Connect
* **Setup**: Configure Keycloak server, user pools, and identity providers
* **Practical application**: Integrate user identities across multiple systems with unified permission management

**MaiAgent Login**

* **Use case**: For simple user management needs with quick deployment
* **Features**: Built-in user management system, simple and intuitive operation
* **Setup**: Create user accounts and permissions on the MaiAgent platform
* **Practical application**: Create a dedicated login system for specific user groups

Once enabled, the following screen will appear before starting a conversation, requiring login:

## <mark style="color:blue;">8. Data Collection (Pre-chat Form)</mark> <a href="#pre-chat-form" id="pre-chat-form"></a>

After data collection is enabled, visitors see a form before starting a conversation and must complete it to continue. Their responses are saved to the visitor's [contact](/maiagent-user-guide/en/org/contact.md), so customer service agents can view them directly on the conversation page. This is useful when you need to identify visitors in advance. For example, distributor support can collect a company name and business registration number, while event inquiries can collect a name and email address.

### 1. Configure the Data Collection Form <a href="#pre-chat-config" id="pre-chat-config"></a>

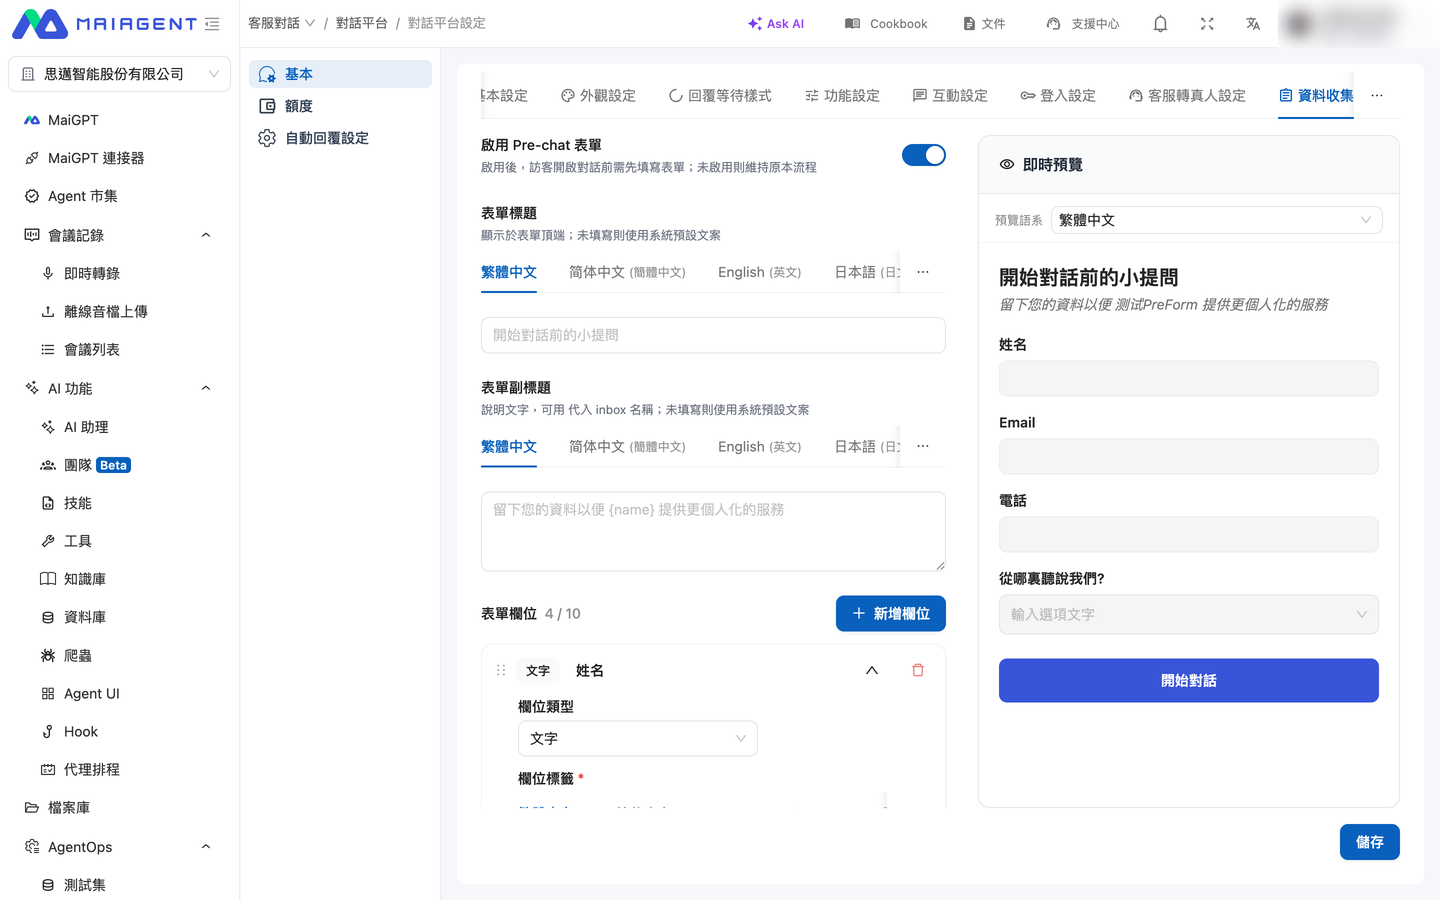
Path: <mark style="color:blue;">Customer Service</mark> → <mark style="color:blue;">Conversation Platforms</mark> → select the Web Chat conversation platform → <mark style="color:blue;">Data Collection</mark> tab.

<figure><img src="https://1360999650-files.gitbook.io/~/files/v0/b/gitbook-x-prod.appspot.com/o/spaces%2F6v6TNkkOQVfRYfcNirHL%2Fuploads%2Fgit-blob-fa62f86ab7ff682fcd9c0907a8a126acf6672991%2Fweb-chat-prechat-settings.png?alt=media" alt="Data Collection tab"><figcaption><p>Data Collection tab: configure the toggle, title, and fields on the left; the Live Preview on the right updates the form's appearance in real time</p></figcaption></figure>

{% stepper %}
{% step %}

### Enable the Form <a href="#pre-chat-enable-form" id="pre-chat-enable-form"></a>

Turn on <mark style="color:blue;">Enable Pre-chat Form</mark>. When it is disabled, visitors enter the conversation directly, following the original flow.
{% endstep %}

{% step %}

### Set the Title and Subtitle (Optional) <a href="#pre-chat-form-title" id="pre-chat-form-title"></a>

* <mark style="color:blue;">Form title</mark>: Appears at the top of the form. If left blank, the system uses the default text "A few questions before we start."
* <mark style="color:blue;">Form subtitle</mark>: Descriptive text for the form. Use `{name}` to insert the conversation platform name. If left blank, the default text is "Leave your information so {name} can provide more personalized service."

Both fields support multiple languages. Switch language tabs to enter each translation separately.
{% endstep %}

{% step %}

### Add Fields <a href="#pre-chat-add-fields" id="pre-chat-add-fields"></a>

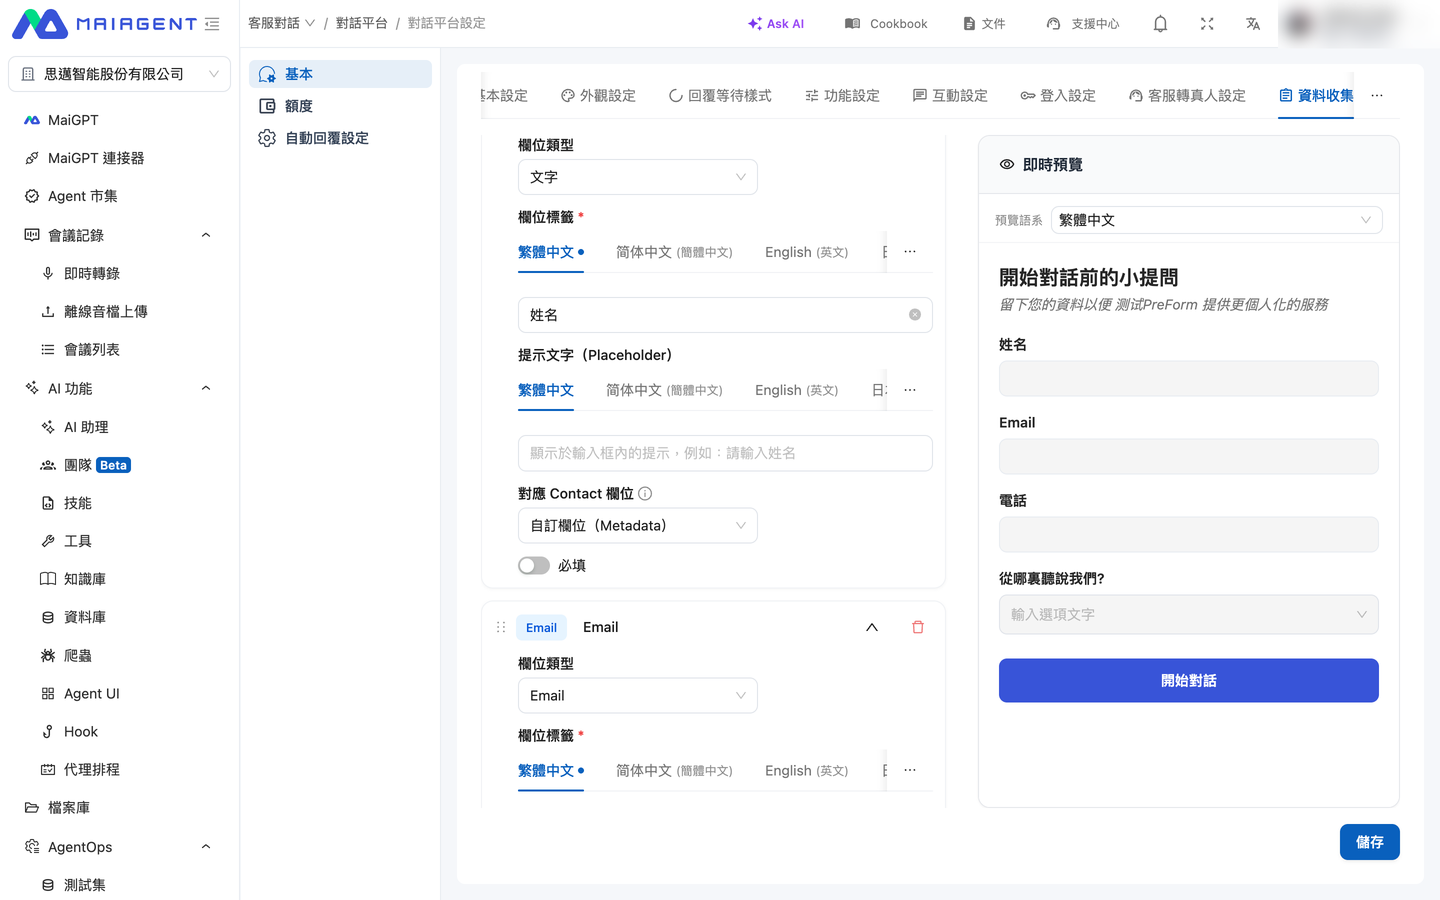
Click <mark style="color:blue;">Add Field</mark>. You can configure the following options for each field:

| Setting                                                | Description                                                                                                                                                                                                                                                                                 |
| ------------------------------------------------------ | ------------------------------------------------------------------------------------------------------------------------------------------------------------------------------------------------------------------------------------------------------------------------------------------- |
| <mark style="color:blue;">Field type</mark>            | Text, Email, Phone, or Dropdown                                                                                                                                                                                                                                                             |
| <mark style="color:blue;">Field label</mark>           | The field name visitors see; enter a separate label for each language                                                                                                                                                                                                                       |
| <mark style="color:blue;">Placeholder</mark>           | Gray hint text displayed inside the field                                                                                                                                                                                                                                                   |
| <mark style="color:blue;">Required</mark>              | When selected, visitors cannot submit the form without completing the field                                                                                                                                                                                                                 |
| <mark style="color:blue;">Contact field mapping</mark> | Determines where the data is stored in the contact: <mark style="color:blue;">Name (Contact.name)</mark>, <mark style="color:blue;">Email (Contact.email)</mark>, <mark style="color:blue;">Phone (Contact.phoneNumber)</mark>, or <mark style="color:blue;">Custom Field (Metadata)</mark> |

Dropdown fields also have an <mark style="color:blue;">Options</mark> list. Select <mark style="color:blue;">Allow custom "Other" input</mark> to let visitors enter their own response after selecting "Other."

<figure><img src="https://1360999650-files.gitbook.io/~/files/v0/b/gitbook-x-prod.appspot.com/o/spaces%2F6v6TNkkOQVfRYfcNirHL%2Fuploads%2Fgit-blob-6003c1d8c3373fe2ad0ab3686474f5c2d61d442e%2Fweb-chat-prechat-field-editor.png?alt=media" alt="Field editor"><figcaption><p>Configure each field's type, localized label, placeholder, Contact field mapping, and required status</p></figcaption></figure>

Drag fields to reorder them. A form can contain up to 10 fields. The preview area on the right updates the form's appearance in real time. Switch the <mark style="color:blue;">Preview Language</mark> to check each language version.
{% endstep %}

{% step %}

### Save <a href="#pre-chat-save-form" id="pre-chat-save-form"></a>

After confirming that the preview is correct, save the form. The changes take effect immediately in Web Chat.
{% endstep %}
{% endstepper %}

{% hint style="info" %}
**Contact field mapping restrictions**

* Name can only map to a Text field, Email can only map to an Email field, and Phone can only map to a Phone field. Incompatible field types are disabled with an explanatory message.
* Name, Email, and Phone can each be mapped by only one form field. For all other fields, such as business registration number or company name, select Custom Field (Metadata).
  {% endhint %}

### 2. Visitor Form Flow <a href="#pre-chat-visitor-flow" id="pre-chat-visitor-flow"></a>

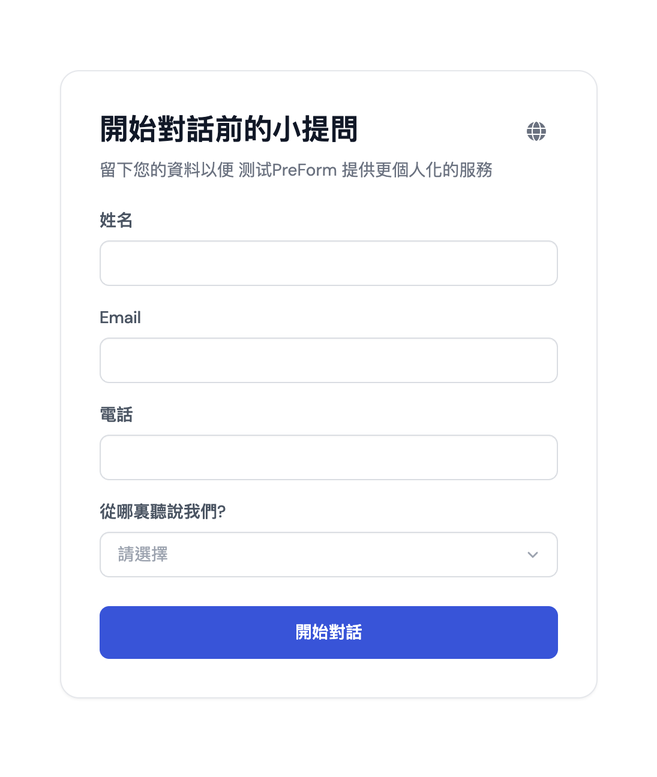
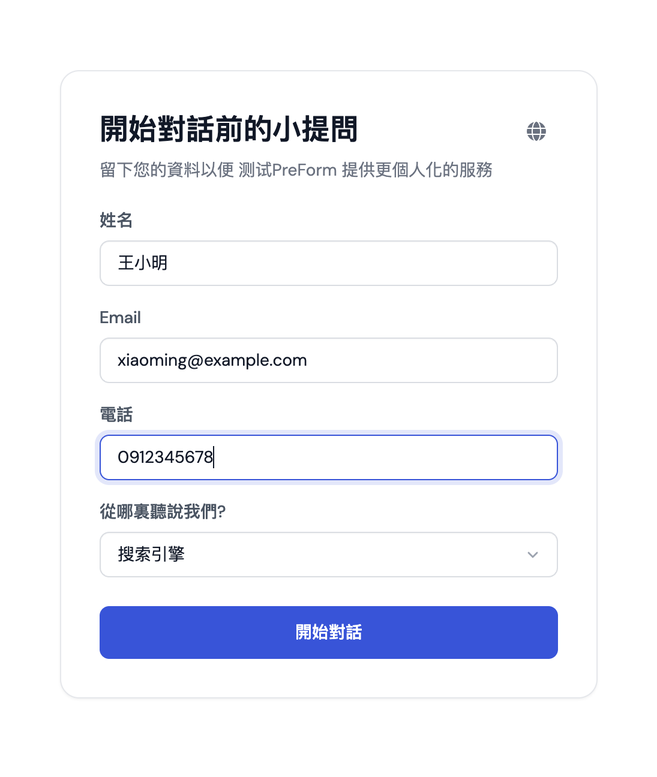
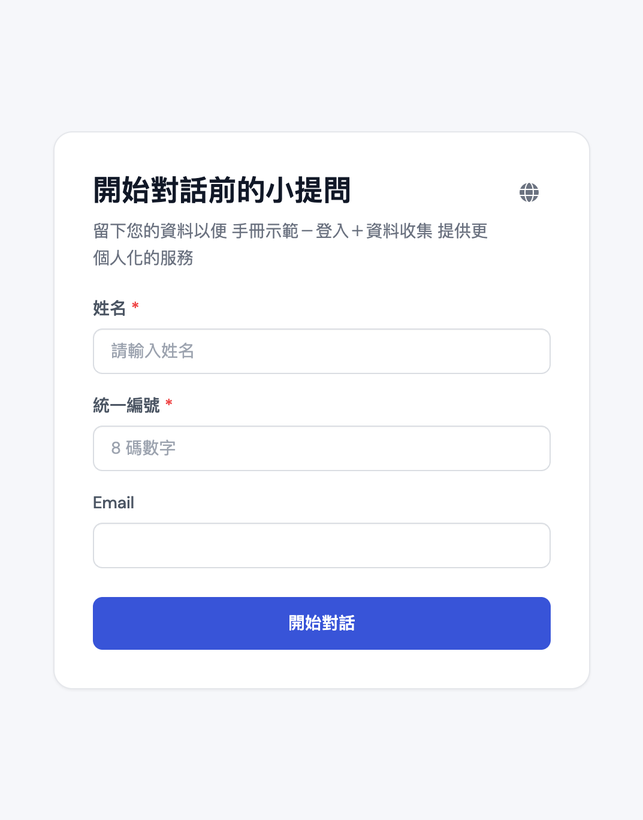
When visitors open Web Chat, they first see the form with its title, subtitle, configured fields, and a language selector in the upper-right corner. After completing the form, they click <mark style="color:blue;">Start Conversation</mark> to enter the conversation.

<div><figure><img src="https://1360999650-files.gitbook.io/~/files/v0/b/gitbook-x-prod.appspot.com/o/spaces%2F6v6TNkkOQVfRYfcNirHL%2Fuploads%2Fgit-blob-72d96183b2932a7f3a53fa26e25b0c44693d9976%2Fweb-chat-prechat-form.png?alt=media" alt="Form displayed to visitors"><figcaption><p>Visitors see the form when they open Web Chat</p></figcaption></figure> <figure><img src="https://1360999650-files.gitbook.io/~/files/v0/b/gitbook-x-prod.appspot.com/o/spaces%2F6v6TNkkOQVfRYfcNirHL%2Fuploads%2Fgit-blob-80e055ba2910bb69258325f5f6f23ee481ba7342%2Fweb-chat-prechat-form-filled.png?alt=media" alt="Completed form"><figcaption><p>Click Start Conversation after completing the form</p></figcaption></figure></div>

* If a required field is empty or an email address or phone number has an invalid format, an error appears below the field and the form cannot be submitted.
* After completing the form once in a browser, the visitor will not be asked to complete it again when opening the same Web Chat.
* To correct their information, visitors can open the <mark style="color:blue;">⋮</mark> menu in the upper-right corner of Web Chat and click <mark style="color:blue;">Refill Information</mark>. The form appears again.

<figure><img src="https://1360999650-files.gitbook.io/~/files/v0/b/gitbook-x-prod.appspot.com/o/spaces%2F6v6TNkkOQVfRYfcNirHL%2Fuploads%2Fgit-blob-cc226e66c15e542470c95f0dd2b494f604ad81ec%2Fweb-chat-prechat-menu-refill.png?alt=media" alt="Refill information"><figcaption><p>Refill Information in the upper-right ⋮ menu</p></figcaption></figure>

### 3. Use with Login: Associate Data with a Login Account <a href="#pre-chat-with-login" id="pre-chat-with-login"></a>

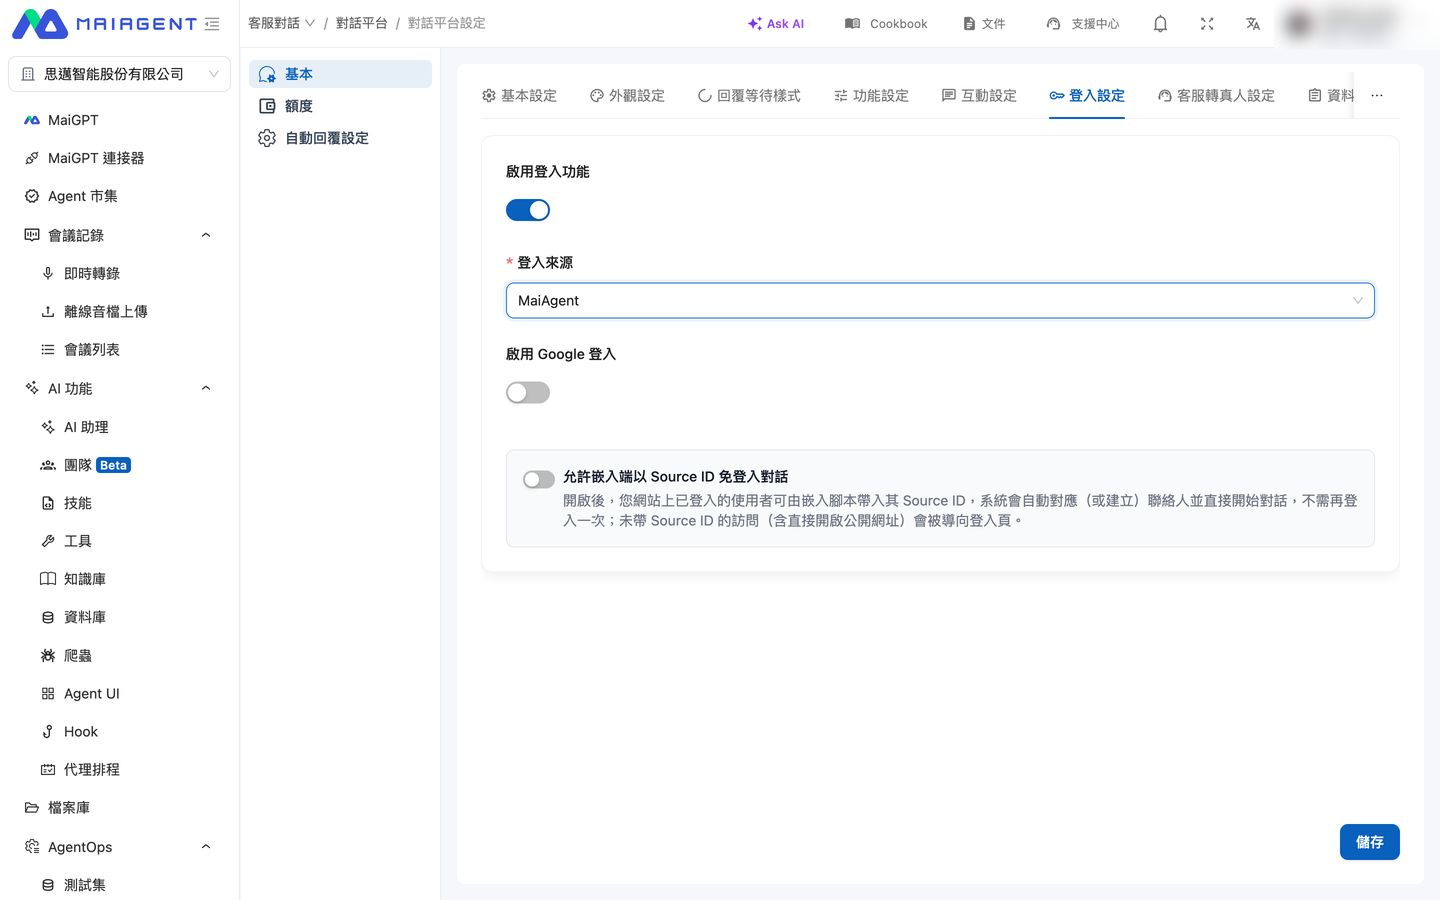
If the same Web Chat has both the [login feature](#login-config) and data collection enabled, the flow is: **Log in → Fill out the form → Start the conversation**. The information entered by the user is associated with their login account rather than the browser.

<figure><img src="https://1360999650-files.gitbook.io/~/files/v0/b/gitbook-x-prod.appspot.com/o/spaces%2F6v6TNkkOQVfRYfcNirHL%2Fuploads%2Fgit-blob-b190160bed2cd104cb0e87160c4a63c047689a70%2Fweb-chat-prechat-login-settings.png?alt=media" alt="Login Settings tab"><figcaption><p>On the "Login Settings" tab, enable "Enable Login" and select a login source; these settings are independent of the "Data Collection" tab</p></figcaption></figure>

<div><figure><img src="https://1360999650-files.gitbook.io/~/files/v0/b/gitbook-x-prod.appspot.com/o/spaces%2F6v6TNkkOQVfRYfcNirHL%2Fuploads%2Fgit-blob-f9c71c232b1bbdd9ee1880cf922a6361d2420e5e%2Fweb-chat-prechat-login-page.png?alt=media" alt="Login screen"><figcaption><p>① When Web Chat opens, the login screen appears first</p></figcaption></figure> <figure><img src="https://1360999650-files.gitbook.io/~/files/v0/b/gitbook-x-prod.appspot.com/o/spaces%2F6v6TNkkOQVfRYfcNirHL%2Fuploads%2Fgit-blob-020c77245a78280ffc81ed879bdb2a9613f3cdeb%2Fweb-chat-prechat-login-form.png?alt=media" alt="Form after login"><figcaption><p>② The data collection form appears only after login</p></figcaption></figure></div>

| Situation                                                                                              | Web Chat behavior                                                                                             |
| ------------------------------------------------------------------------------------------------------ | ------------------------------------------------------------------------------------------------------------- |
| The account is being used for the first time and has not completed the form                            | The form appears after login. Once submitted, a contact associated with the account is created.               |
| The same account logs in on a different device or browser                                              | The form does not appear again. The conversation starts immediately using the account's existing information. |
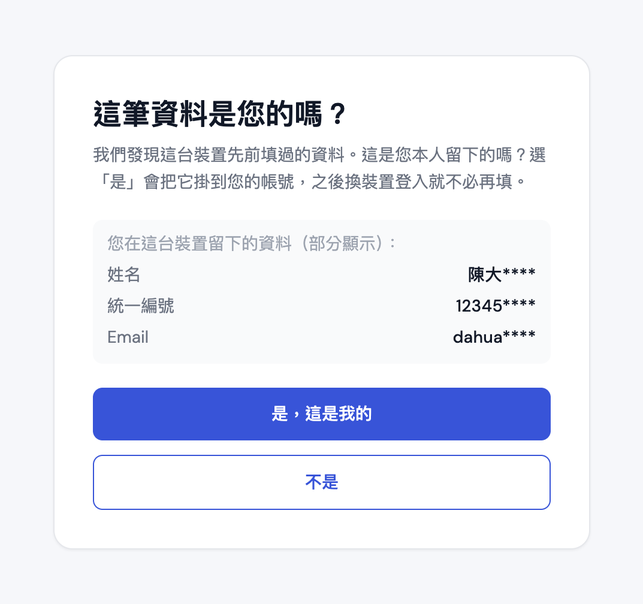
| The form was previously completed on this device while logged out, but the account has no information  | An "Is this information yours?" confirmation screen appears (see below).                                      |
| The account already has information, and this device has separate information entered while logged out | The account information takes precedence. The system does not ask for confirmation or merge the records.      |
| A logged-in user clicks <mark style="color:blue;">Refill Information</mark>                            | The existing contact associated with the account is updated; a new contact is not created.                    |

**Confirmation screen: Is this information yours?**

If someone previously completed the form on this device without logging in and the account currently logging in has no information, the form does not appear immediately after login. Instead, a confirmation screen appears first. It displays the information previously entered on this device, with some details masked, and provides two buttons:

* <mark style="color:blue;">Yes, this is mine</mark>: Associates that information with the current account. The user will not need to complete the form again when logging in to the same account on any device.
* <mark style="color:blue;">No</mark>: Does not merge the records. The original information remains unchanged, and the form then appears for the user to complete.

<figure><img src="https://1360999650-files.gitbook.io/~/files/v0/b/gitbook-x-prod.appspot.com/o/spaces%2F6v6TNkkOQVfRYfcNirHL%2Fuploads%2Fgit-blob-f8d35bfa6b85a7ec60a08eb8e73cc09904338eb6%2Fweb-chat-prechat-claim.png?alt=media" alt="Is this information yours? confirmation screen"><figcaption><p>The confirmation screen masks some details, showing only enough information for users to determine whether they submitted it</p></figcaption></figure>

{% hint style="info" %}

* Web Chats without the login feature enabled are unaffected and continue to use the browser to determine whether the form has already been completed.
* The system does not automatically populate the form with account information. The first time an account is used, the user is still asked to complete the form even if their information already exists in the admin console.
  {% endhint %}

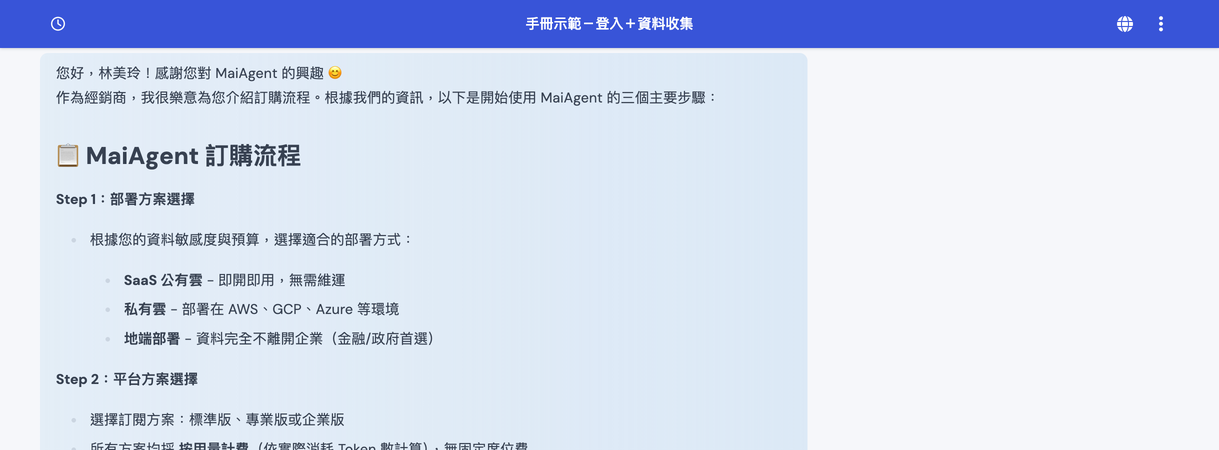
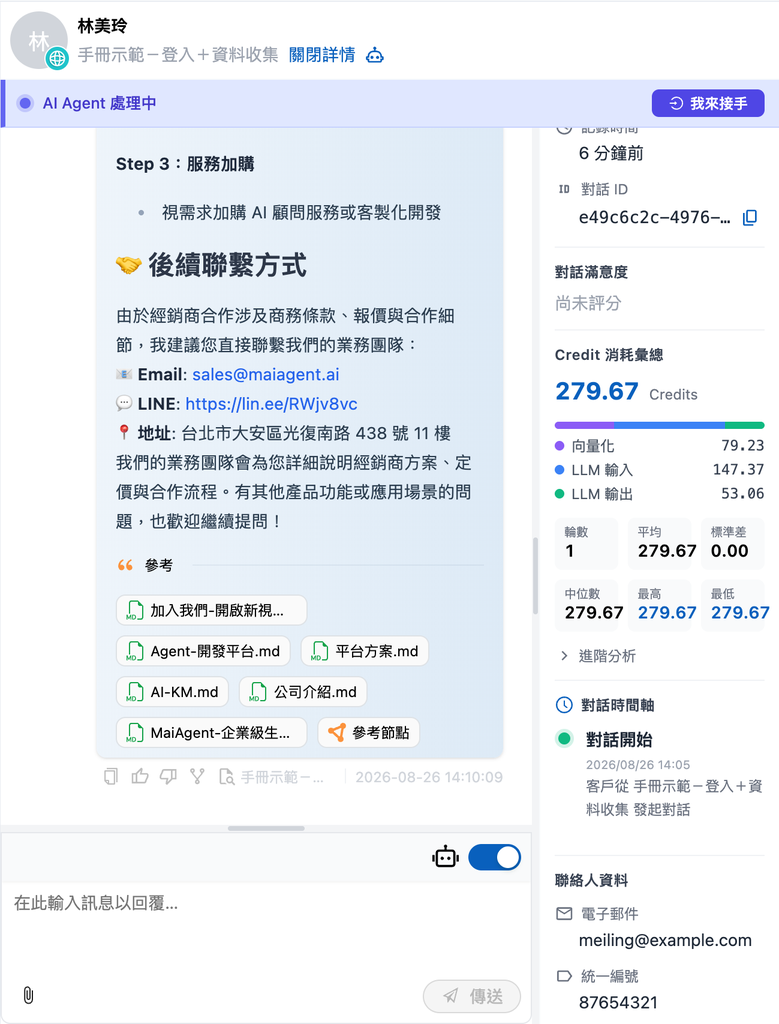
After the conversation starts, both the AI assistant and customer service staff see the contact associated with the account:

<div><figure><img src="https://1360999650-files.gitbook.io/~/files/v0/b/gitbook-x-prod.appspot.com/o/spaces%2F6v6TNkkOQVfRYfcNirHL%2Fuploads%2Fgit-blob-f9a99f4c93d7d3395efb4d6f27175d2469857745%2Fweb-chat-prechat-login-chat.png?alt=media" alt="Conversation after login"><figcaption><p>The AI assistant addresses the user by the name entered in the form</p></figcaption></figure> <figure><img src="https://1360999650-files.gitbook.io/~/files/v0/b/gitbook-x-prod.appspot.com/o/spaces%2F6v6TNkkOQVfRYfcNirHL%2Fuploads%2Fgit-blob-3236973f772f1fb9b44df23cb6812d8c0980bac6%2Fweb-chat-prechat-conversation-login.png?alt=media" alt="Conversation page in the admin console"><figcaption><p>The conversation page in the admin console displays the contact and the business registration number collected through the form</p></figcaption></figure></div>

### 4. View Collected Information in the Admin Console <a href="#pre-chat-view-data" id="pre-chat-view-data"></a>

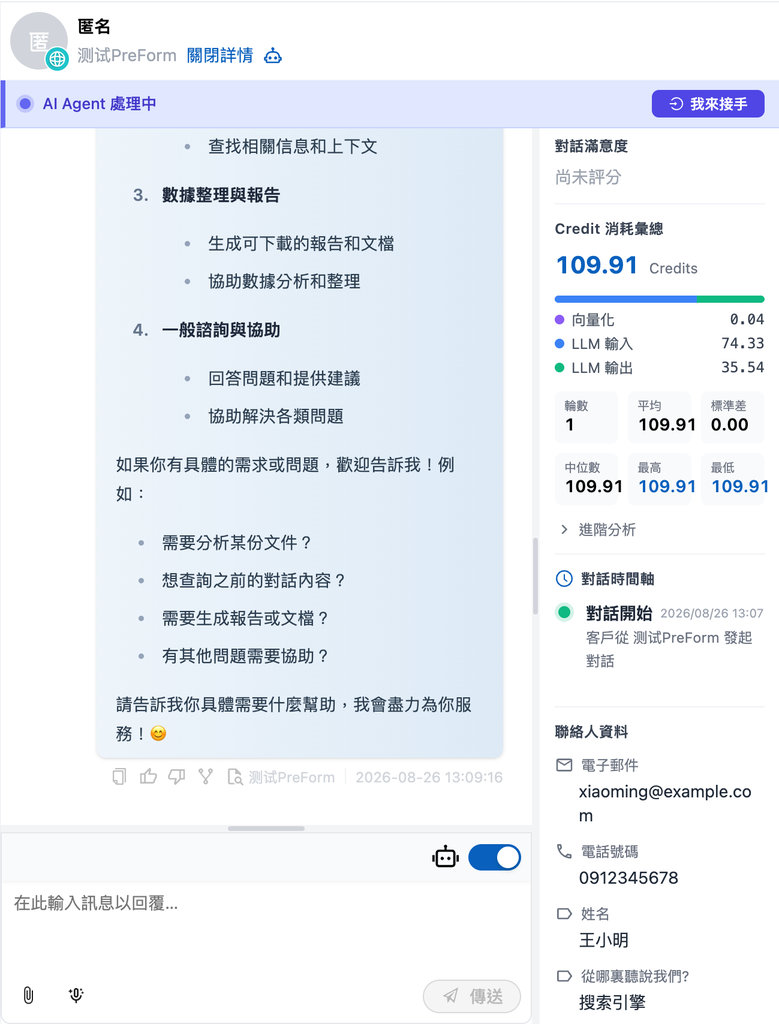
**View in a conversation**: Go to <mark style="color:blue;">Customer Service</mark> → <mark style="color:blue;">All Conversations</mark> → open a conversation. The <mark style="color:blue;">Contact Information</mark> section on the right lists each item collected through the form. Fields mapped to email and phone are displayed as "Email" and "Phone Number," while custom fields use the field labels you configured.

<figure><img src="https://1360999650-files.gitbook.io/~/files/v0/b/gitbook-x-prod.appspot.com/o/spaces%2F6v6TNkkOQVfRYfcNirHL%2Fuploads%2Fgit-blob-efe6eb93e6c245a6c4dd2e98e793cc07bd69668f%2Fweb-chat-prechat-conversation-contact.png?alt=media" alt="Contact Information section on the right side of the conversation page"><figcaption><p>The "Contact Information" section on the right side of the conversation page lists each item collected through the form</p></figcaption></figure>

{% hint style="info" %}
The "Contact" column in the contact list displays the contact's name. If the form's name field is mapped to "Custom Field (Metadata)" rather than "Name (Contact.name)," contacts for visitors who are not logged in are displayed as "Anonymous," and the name appears only in the custom attributes. To display visitor names directly in the list, map the name field to "Name (Contact.name)."
{% endhint %}

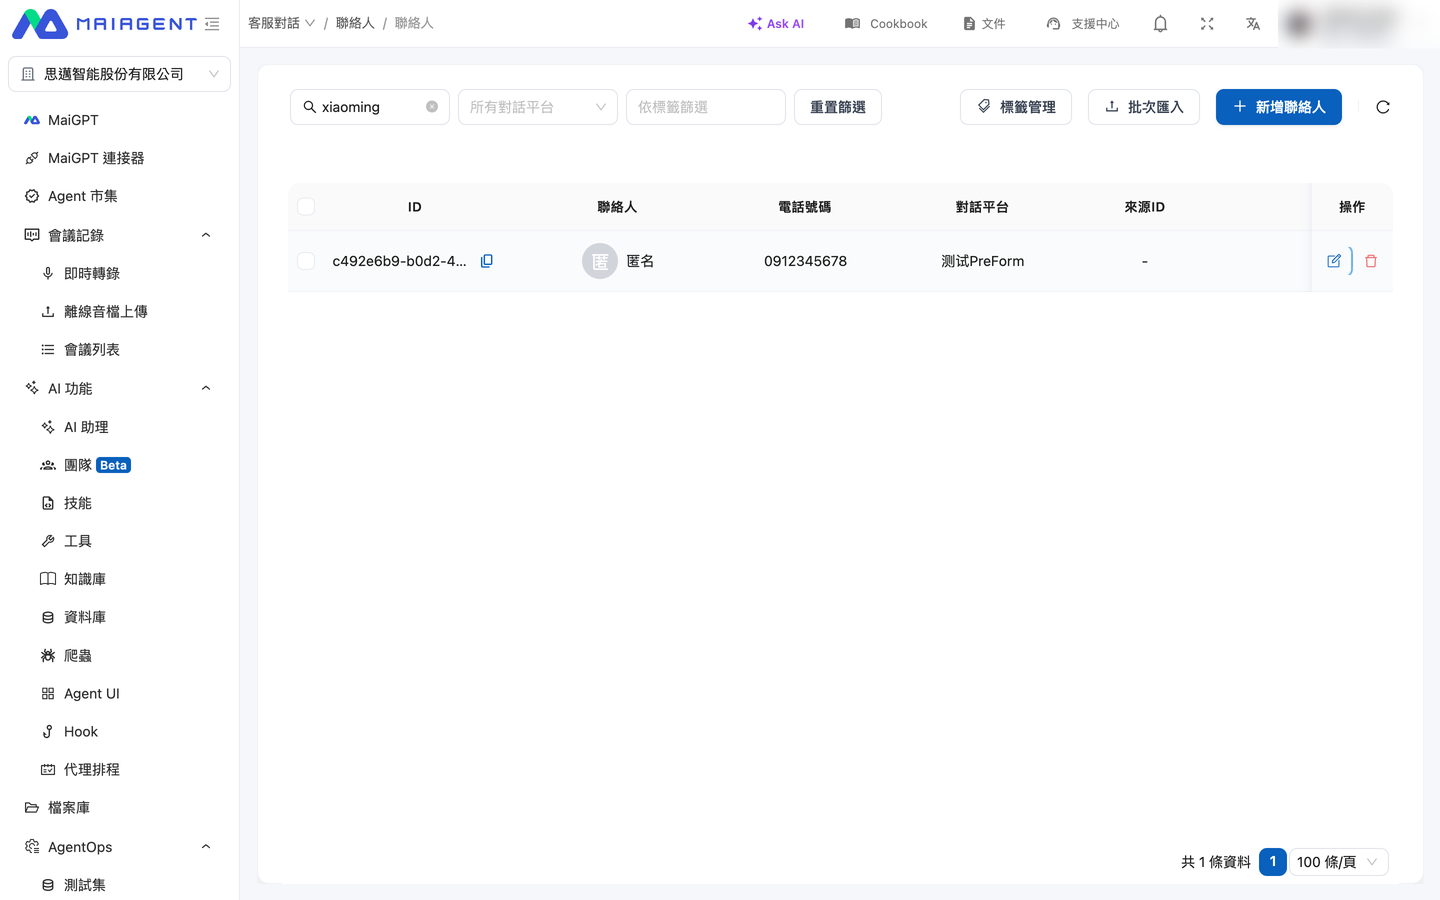
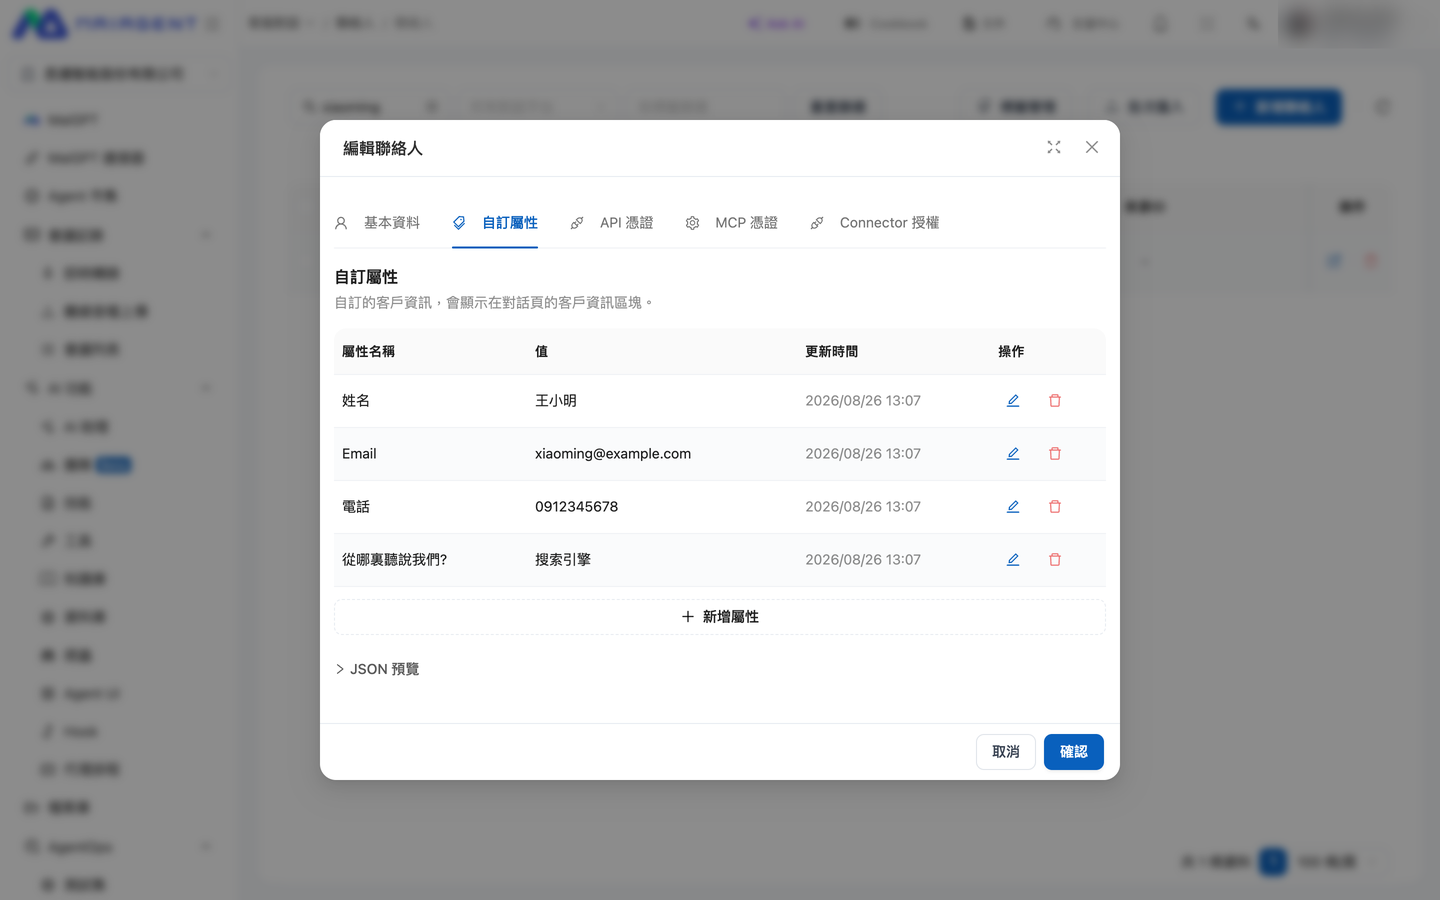
**View on the contact page**: Go to <mark style="color:blue;">Customer Service</mark> → <mark style="color:blue;">Contacts</mark> → open a contact. The <mark style="color:blue;">Basic Information</mark> tab displays the name and phone number, while the <mark style="color:blue;">Custom Attributes</mark> tab displays the other form fields.

<div><figure><img src="https://1360999650-files.gitbook.io/~/files/v0/b/gitbook-x-prod.appspot.com/o/spaces%2F6v6TNkkOQVfRYfcNirHL%2Fuploads%2Fgit-blob-45f6d1ebb32ce47284176306f8353e503c88539c%2Fweb-chat-prechat-contacts-list.png?alt=media" alt="Contact list"><figcaption><p>Search the contact list by name, email, or phone number</p></figcaption></figure> <figure><img src="https://1360999650-files.gitbook.io/~/files/v0/b/gitbook-x-prod.appspot.com/o/spaces%2F6v6TNkkOQVfRYfcNirHL%2Fuploads%2Fgit-blob-9bc3a0bf13c97c7eed1f5223b76a9bca113962f5%2Fweb-chat-prechat-contact-attributes.png?alt=media" alt="Custom Attributes tab"><figcaption><p>The "Custom Attributes" tab lists the value of each form field</p></figcaption></figure></div>

Information entered by a logged-in user is associated with their account, so the contact is no longer an unclaimed anonymous contact. The contact name depends on the form configuration: if the name field is mapped to "Name (Contact.name)," the name entered in the form is displayed; if the form does not have a name field, the login account's name is displayed.

## What Should I Do If the Connection Fails? <a href="#connection-failure" id="connection-failure"></a>

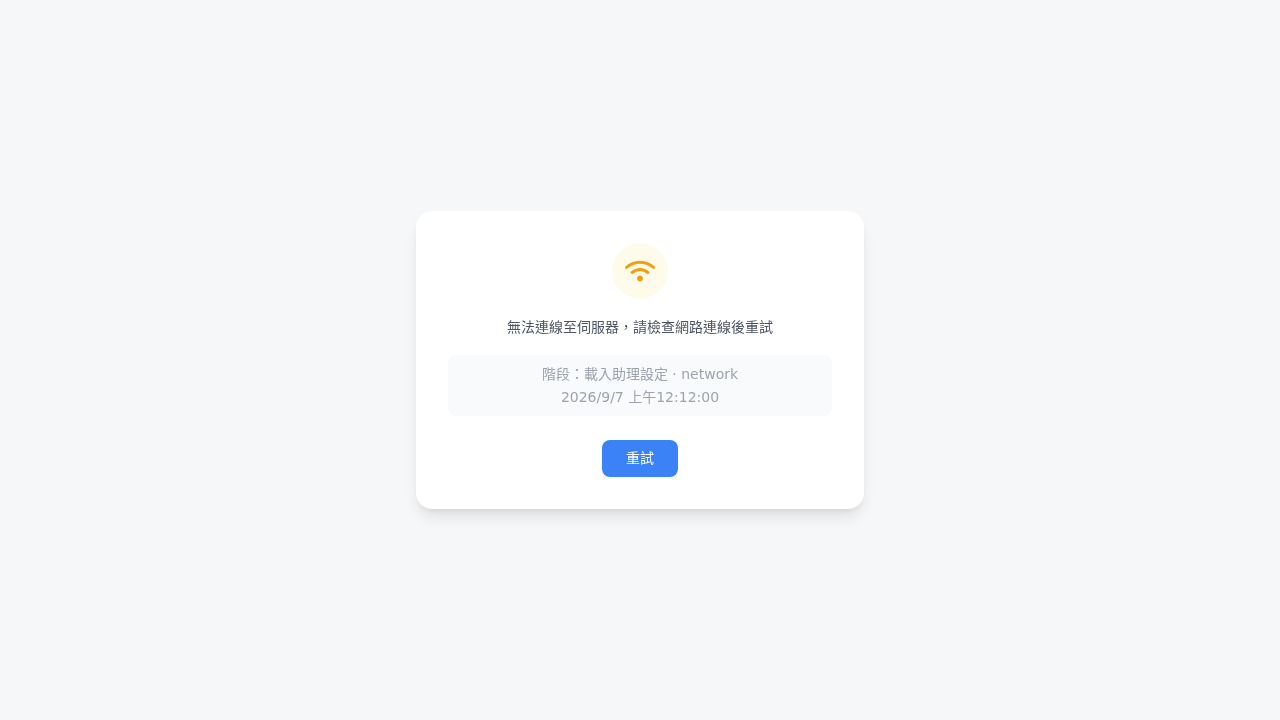
For example, a website administrator may receive a report from a visitor that Web Chat displays a connection error when opened. The visitor should first wait for the system to retry automatically. If the error screen remains, they should capture the entire screen, including the failed stage, error category, and time of occurrence, and send it to the administrator so the issue can be diagnosed more quickly.

If the network connection is interrupted while Web Chat is loading the AI assistant settings, it automatically retries first. The loading screen remains visible during this time. If it still cannot connect after retrying, the error screen displays:

* The loading stage that failed
* The error category, along with the HTTP status code when available
* The local time when the error occurred

<figure><img src="https://1360999650-files.gitbook.io/~/files/v0/b/gitbook-x-prod.appspot.com/o/spaces%2F6v6TNkkOQVfRYfcNirHL%2Fuploads%2Fgit-blob-e24edbd1a83fd7f69430443a8a74158aeb6a117b%2Fweb-chat-connection-failure-network.png?alt=media" alt="Web Chat diagnostic for a network connection failure while loading AI assistant settings"><figcaption><p>If automatic retries fail, the screen lists the failed stage, error category, and time of occurrence</p></figcaption></figure>

If the system has received an HTTP error status code, the server has already responded. In this case, it does not retry automatically and displays the diagnostic error screen immediately.

{% hint style="info" %}
First, confirm that the device can access the internet, then click <mark style="color:blue;">Retry</mark> on the error screen. If the problem persists, include all diagnostic information in the screenshot and make sure that no conversation content or personal information is visible.
{% endhint %}

## Review Earlier Messages While a Response Is Being Generated <a href="#review-during-generation" id="review-during-generation"></a>

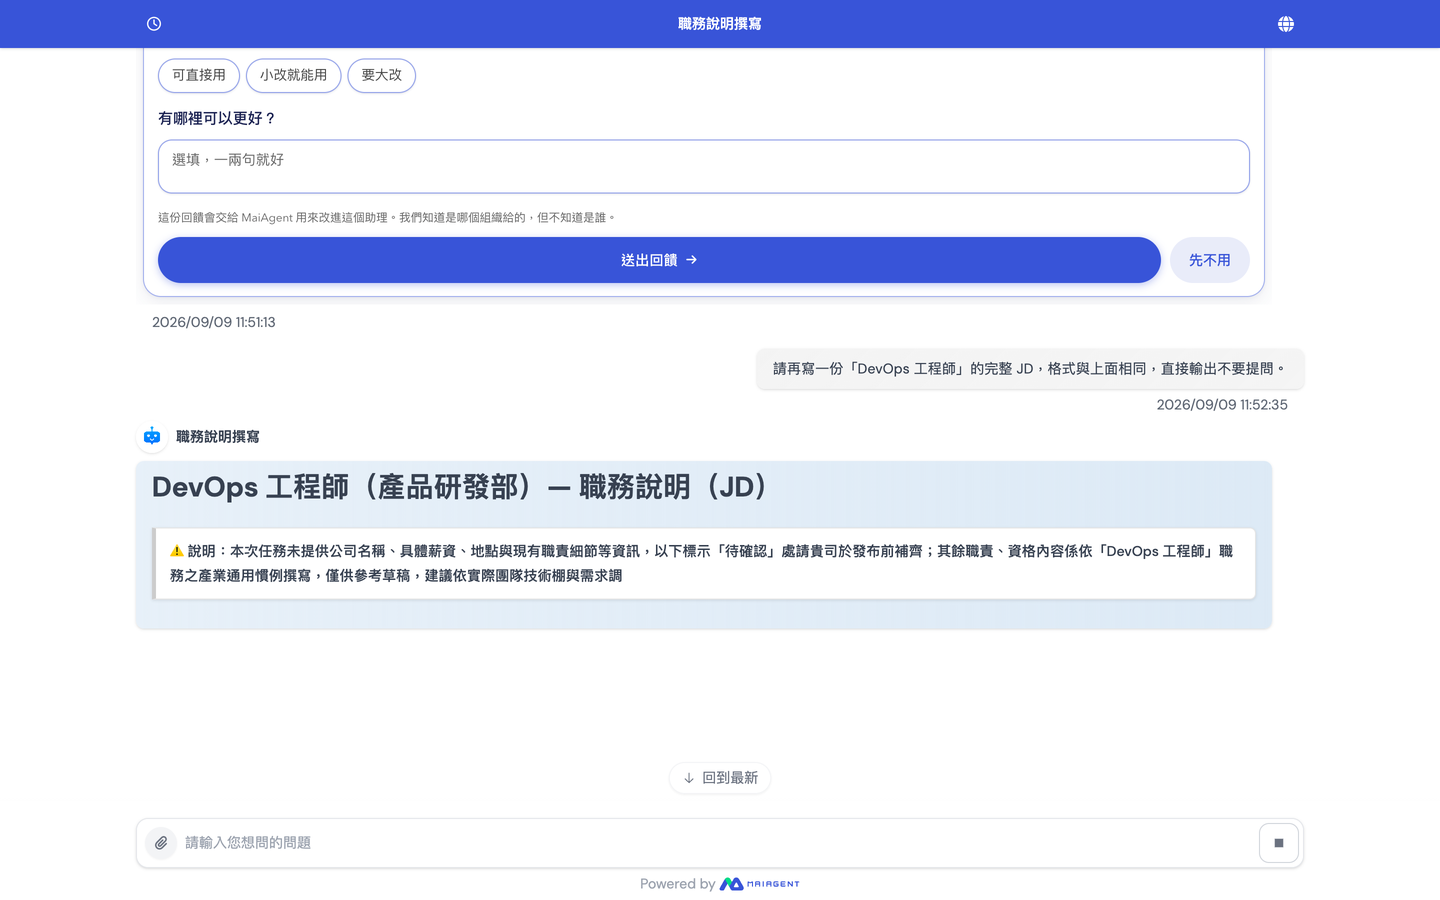
While the AI assistant is still generating a response, visitors can scroll up to review earlier messages. The response continues to be generated below, but the view remains at the visitor's current scroll position instead of being pulled down by newly generated text. As soon as the visitor leaves the latest position, a <mark style="color:blue;">Back to Latest</mark> button appears above the input box.

### Scenario <a href="#generation-scroll-scenario" id="generation-scroll-scenario"></a>

A visitor asks the AI assistant to compare several options at once. Before the response is complete, she wants to check the price of the first option, so she scrolls up. The view stays where it is and does not jump as more text appears below. After checking the price, she clicks <mark style="color:blue;">Back to Latest</mark>. The view returns to the position of her latest question so she can continue reading the rest of the comparison.

### How to Use It <a href="#generation-scroll-steps" id="generation-scroll-steps"></a>

{% stepper %}
{% step %}

### 1. Scroll Up <a href="#scroll-up-during-generation" id="scroll-up-during-generation"></a>

While the AI assistant is generating a response, scroll up using the mouse wheel, a touch gesture, or by dragging the scroll bar.
{% endstep %}

{% step %}

### 2. Read at Your Current Position <a href="#read-in-place" id="read-in-place"></a>

The view remains at the position you scrolled to. Newly generated content does not change your current position.

<figure><img src="https://1360999650-files.gitbook.io/~/files/v0/b/gitbook-x-prod.appspot.com/o/spaces%2F6v6TNkkOQVfRYfcNirHL%2Fuploads%2Fgit-blob-537d8652530560963f91fe83d44727c547068051%2Fwebchat-back-to-latest.png?alt=media" alt="Scroll up while Web Chat is generating a response; Back to Latest appears above the input box"><figcaption><p>The response is still being generated (the square Stop button appears on the right side of the input box). After you scroll up, "Back to Latest" appears above the input box</p></figcaption></figure>
{% endstep %}

{% step %}

### 3. Return to the Latest Message <a href="#press-back-to-latest" id="press-back-to-latest"></a>

Click <mark style="color:blue;">Back to Latest</mark>. The view returns to the position of the latest question and resumes automatically following new content.
{% endstep %}
{% endstepper %}


---

# Agent Instructions
This documentation is published with GitBook. GitBook is the documentation platform designed so that both humans and AI agents can read, navigate, and reason over technical content effectively. Learn more at gitbook.com.

## Querying This Documentation
If you need additional information that is not directly available in this page, you can query the documentation dynamically by asking a question.

Perform an HTTP GET request on the current page URL with the `ask` query parameter, and the optional `goal` query parameter:

```
GET https://docs.maiagent.ai/maiagent-user-guide/en/conversations/web-chat.md?ask=<question>&goal=<endgoal>
```

`ask` is the immediate question: it should be specific, self-contained, and written in natural language.
`goal` is optional and describes the broader end goal you are ultimately trying to accomplish on behalf of the user. GitBook uses it to tailor the answer towards what is most useful for that goal.

The response will contain a direct answer to the question and relevant excerpts and sources from the documentation.

Use this mechanism when the answer is not explicitly present in the current page, you need clarification or additional context, or you want to retrieve related documentation sections.