> For the complete documentation index, see [llms.txt](https://docs.maiagent.ai/llms.txt). Markdown versions of documentation pages are available by appending `.md` to page URLs; this page is available as [Markdown](https://docs.maiagent.ai/maiagent-user-guide/en/conversations/slack.md).

# Integrate with Platform: Slack

## Pre-Connection Checklist

* An "AI Assistant" has been created on the [MaiAgent platform](https://admin.maiagent.ai/)
* You have administrator permissions for a Slack Workspace

## Quick Install: Use an App Manifest <a href="#quick-install-app-manifest" id="quick-install-app-manifest"></a>

Go to the [Slack API](https://api.slack.com/apps), click <mark style="color:blue;">Create New App</mark>, select <mark style="color:blue;">From a manifest</mark>, and choose the Workspace where you want to install the App. Switch to the <mark style="color:blue;">YAML</mark> tab and paste the complete manifest below:

```yaml
display_information:
  name: MaiAgentBot
features:
  app_home:
    messages_tab_enabled: true
    messages_tab_read_only_enabled: false
  bot_user:
    display_name: MaiAgentBot
    always_online: false
oauth_config:
  scopes:
    bot:
      - chat:write
      - users:read
      - im:history
      - channels:history
      - groups:history
      - files:read
      - app_mentions:read
settings:
  org_deploy_enabled: false
  socket_mode_enabled: false
  token_rotation_enabled: false
```

`MaiAgentBot` is an example name. You can customize `display_information.name` and `features.bot_user.display_name` before creating the App.

{% hint style="info" %}
After creating the App from the manifest, you can skip Steps 1–3 in the manual instructions below (create the App, configure scopes, and enable App Home). You must still continue from Step 4 to create the chat platform in MaiAgent, then complete Event Subscriptions in Step 5 after obtaining the Webhook URL. The Request URL is only available after the MaiAgent chat platform has been created.
{% endhint %}

## Step 1: Create a Slack App

### 1. Go to Slack API to Create an App

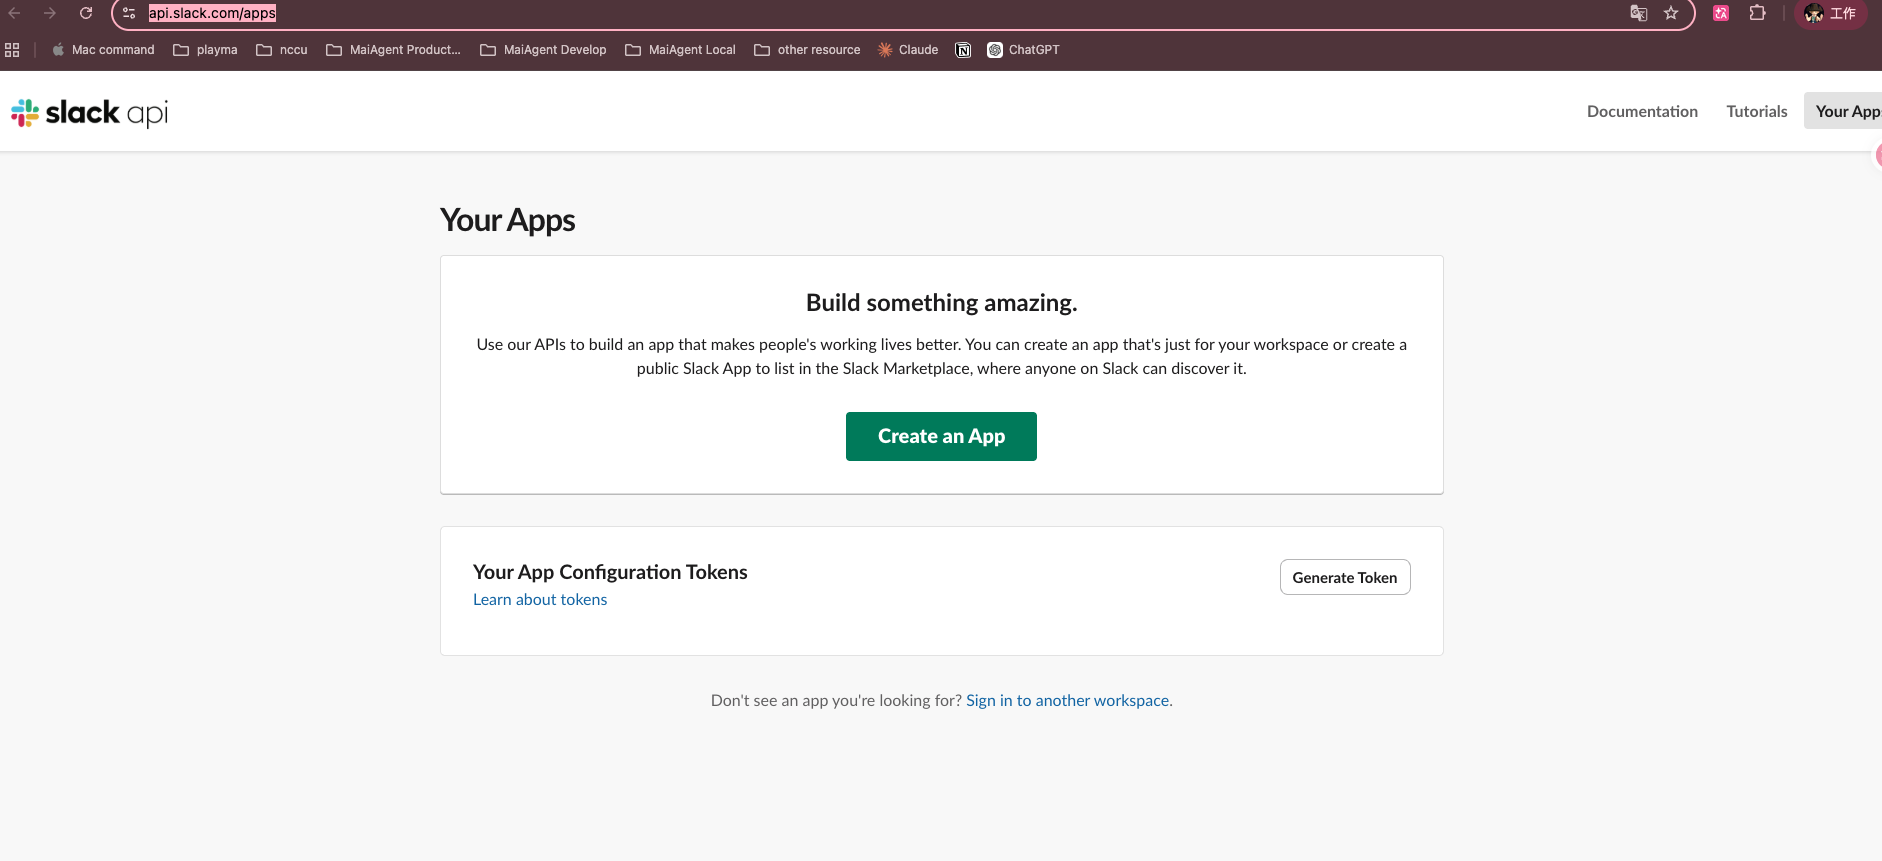
Go to <https://api.slack.com/apps> and click <mark style="color:blue;">Create an App</mark>.

<figure><img src="https://1360999650-files.gitbook.io/~/files/v0/b/gitbook-x-prod.appspot.com/o/spaces%2F6v6TNkkOQVfRYfcNirHL%2Fuploads%2Fgit-blob-ce0387658ad808d5a696fcaf41634fbc7876aab5%2Fslack-api-your-apps.png?alt=media" alt=""><figcaption><p>Slack API — Your Apps page</p></figcaption></figure>

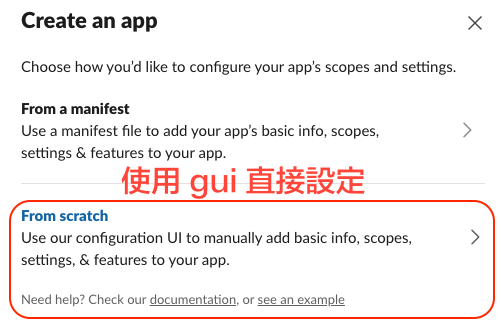
### 2. Select From scratch

Select <mark style="color:blue;">From scratch</mark> to manually configure using the graphical interface.

<figure><img src="https://1360999650-files.gitbook.io/~/files/v0/b/gitbook-x-prod.appspot.com/o/spaces%2F6v6TNkkOQVfRYfcNirHL%2Fuploads%2Fgit-blob-ef198579b66f80f26f2a9ff794bb4f55b74c9da2%2Fslack-create-app-scratch.png?alt=media" alt=""><figcaption><p>Select From scratch creation method</p></figcaption></figure>

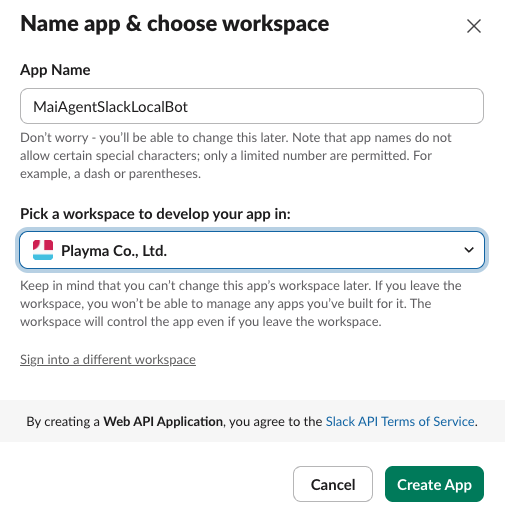
### 3. Enter App Name and Workspace

Enter the App name (e.g., `MaiAgentBot`) and select the Slack Workspace to install it in, then click <mark style="color:blue;">Create App</mark>.

<figure><img src="https://1360999650-files.gitbook.io/~/files/v0/b/gitbook-x-prod.appspot.com/o/spaces%2F6v6TNkkOQVfRYfcNirHL%2Fuploads%2Fgit-blob-0608dfa14ee9002008deb49bc7af2d9491057e78%2Fslack-create-app-name.png?alt=media" alt=""><figcaption><p>Enter App name and select Workspace</p></figcaption></figure>

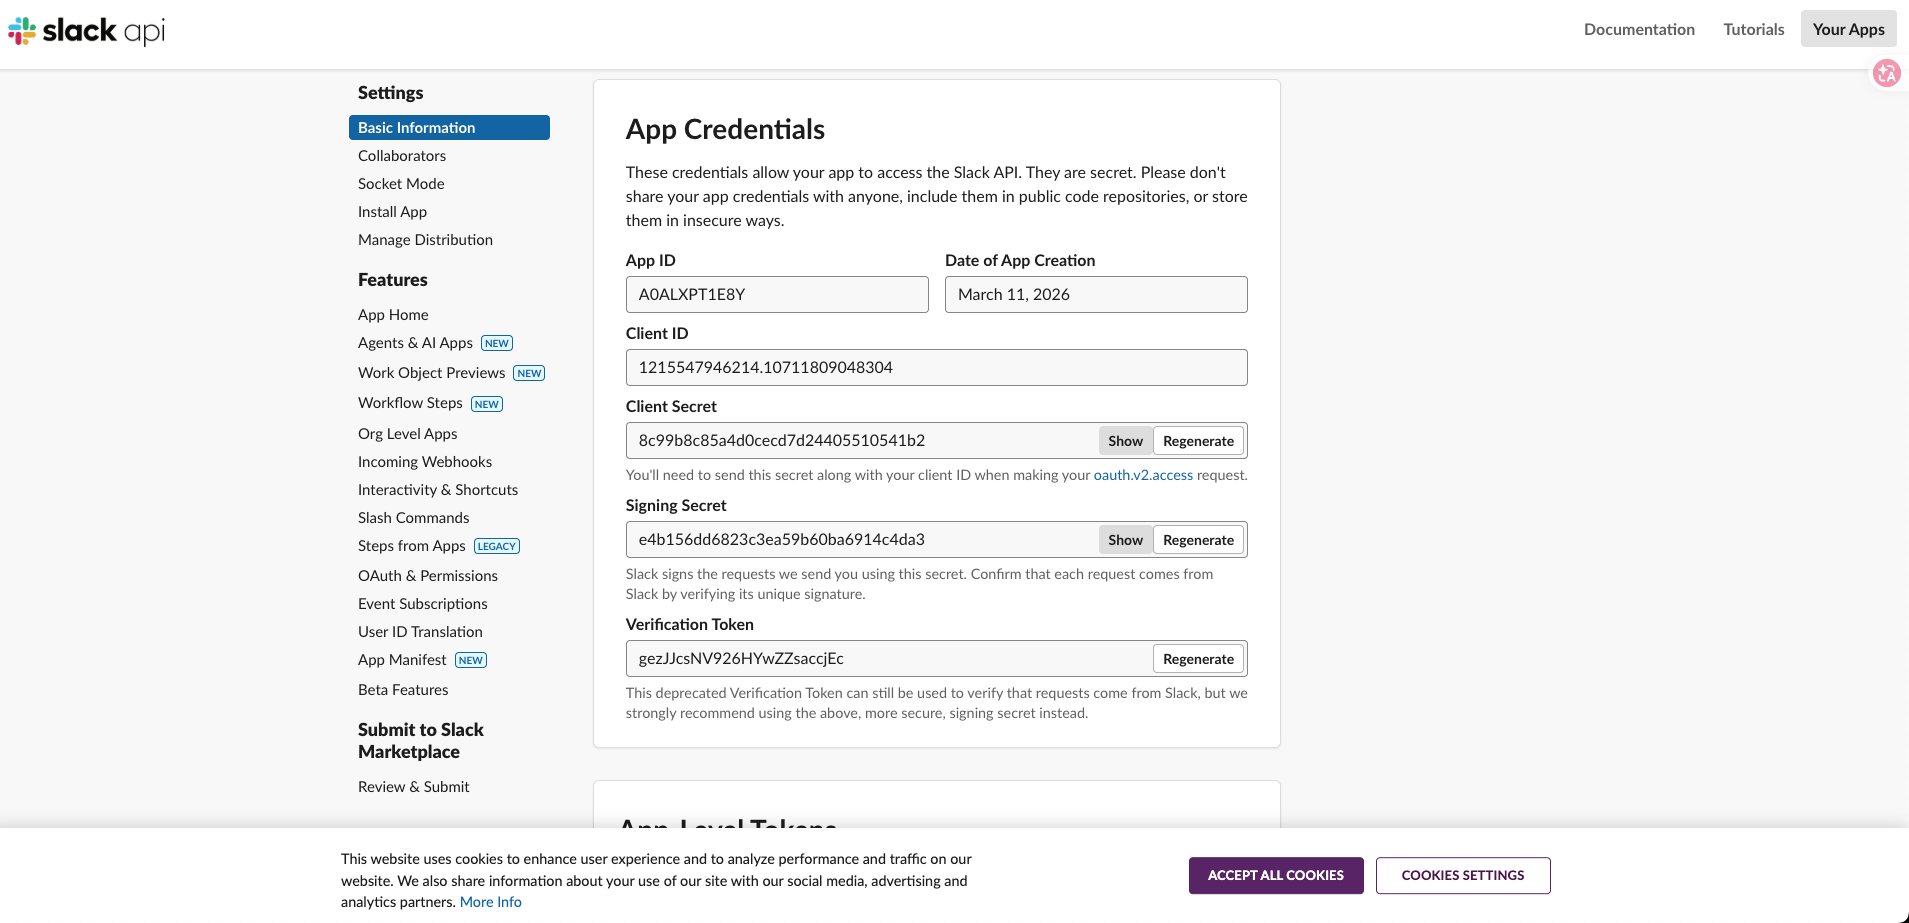
### 4. Obtain the Signing Secret

After creation, go to the <mark style="color:blue;">Basic Information</mark> page and find the <mark style="color:blue;">Signing Secret</mark> in the **App Credentials** section. Click <mark style="color:blue;">Show</mark> and copy it for later use.

<figure><img src="https://1360999650-files.gitbook.io/~/files/v0/b/gitbook-x-prod.appspot.com/o/spaces%2F6v6TNkkOQVfRYfcNirHL%2Fuploads%2Fgit-blob-03cc8ac710f1f811e11f2bc1a48b93d86e800736%2Fslack-app-credentials.png?alt=media" alt=""><figcaption><p>App Credentials — Copy Signing Secret</p></figcaption></figure>

***

## Step 2: Configure Bot Permissions

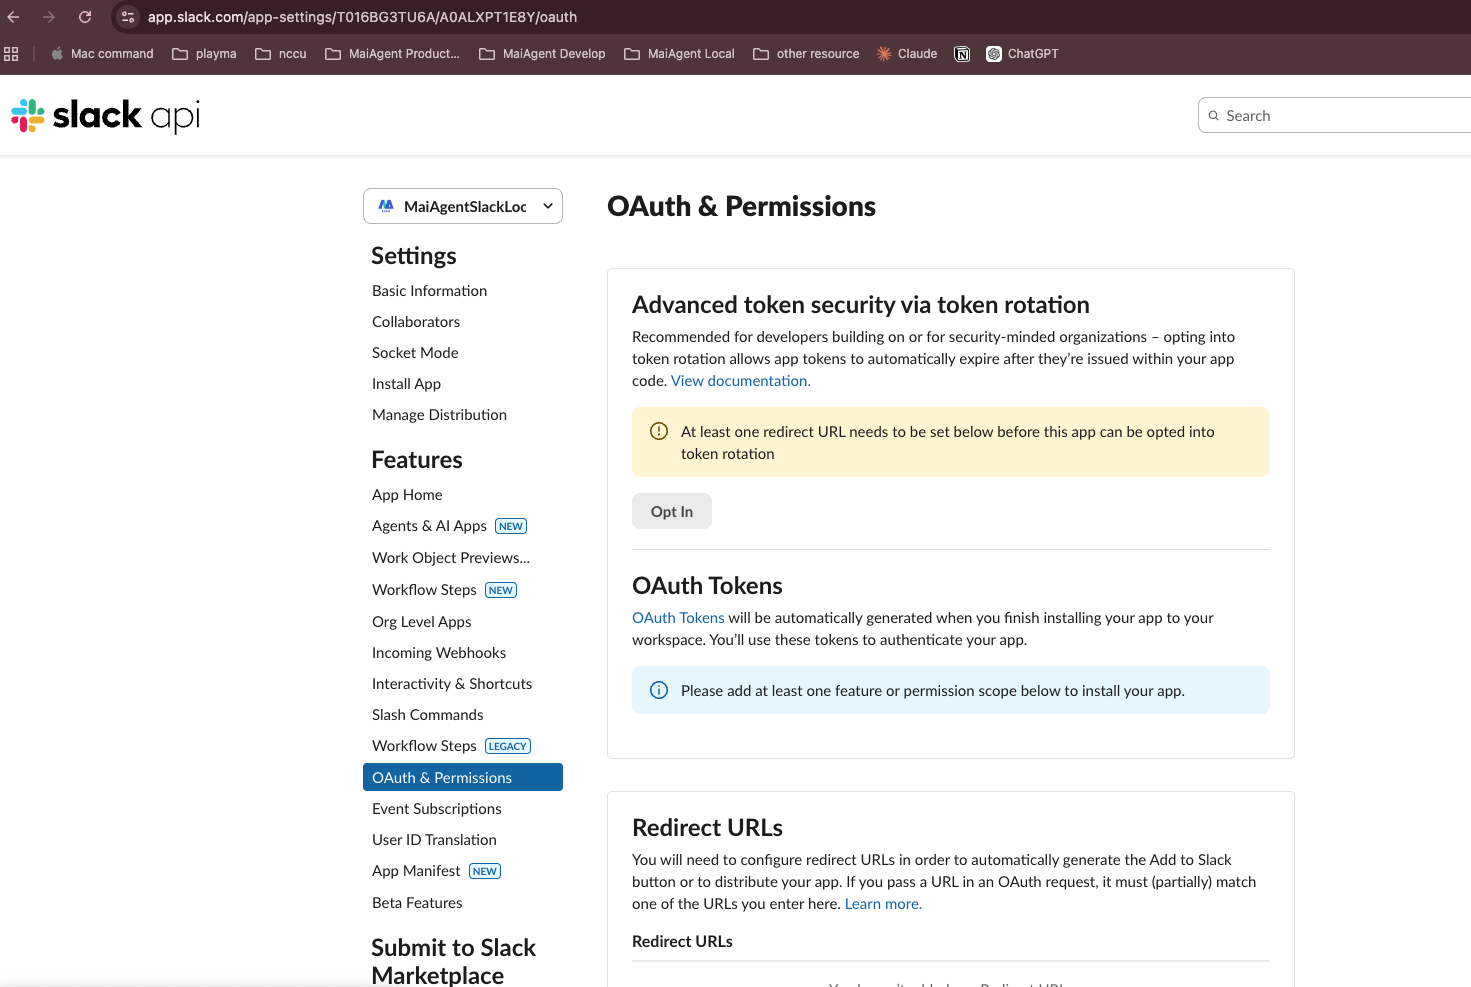
### 1. Go to OAuth & Permissions

Click <mark style="color:blue;">OAuth & Permissions</mark> in the left menu.

<figure><img src="https://1360999650-files.gitbook.io/~/files/v0/b/gitbook-x-prod.appspot.com/o/spaces%2F6v6TNkkOQVfRYfcNirHL%2Fuploads%2Fgit-blob-ccce8cfe52662eba88dc58278f7ab3fb48e34e29%2Fslack-oauth-permissions.png?alt=media" alt=""><figcaption><p>OAuth &#x26; Permissions page</p></figcaption></figure>

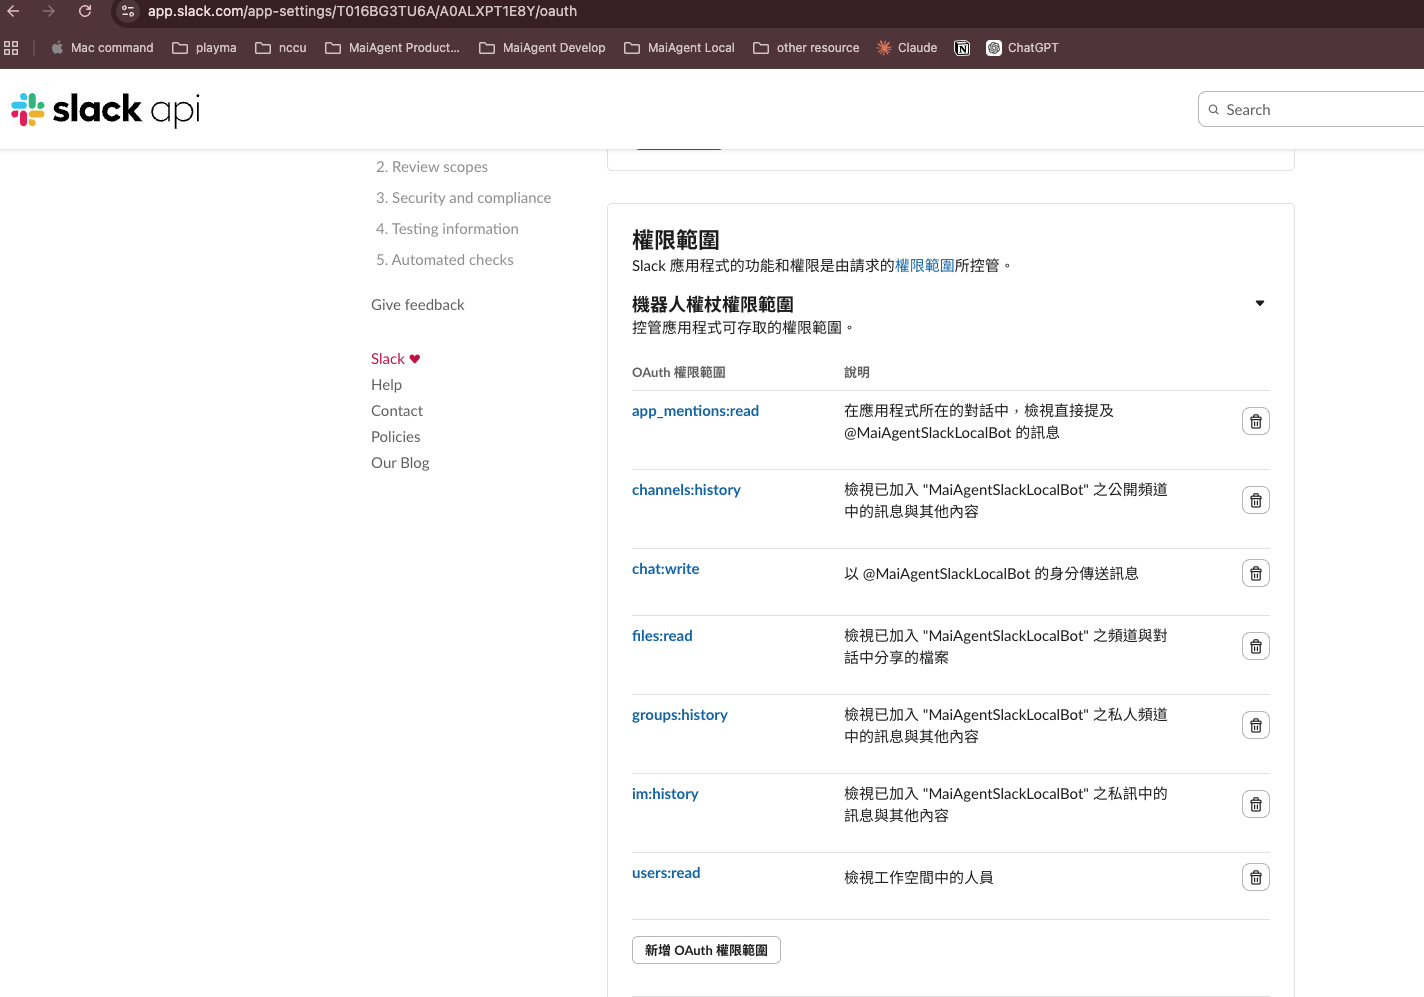
### 2. Add Bot Token Scopes

Scroll down to the **Bot Token Scopes** section, click <mark style="color:blue;">Add an OAuth Scope</mark>, and add the following permissions:

| Scope               | Description                          |
| ------------------- | ------------------------------------ |
| `app_mentions:read` | Read messages that @ mention the bot |
| `channels:history`  | Read public channel message history  |
| `chat:write`        | Send messages                        |
| `files:read`        | Read files (images/documents)        |
| `groups:history`    | Read private channel message history |
| `im:history`        | Read direct message history          |
| `mpim:history`      | Read group direct message history    |

<figure><img src="https://1360999650-files.gitbook.io/~/files/v0/b/gitbook-x-prod.appspot.com/o/spaces%2F6v6TNkkOQVfRYfcNirHL%2Fuploads%2Fgit-blob-ad151db9b82446f54dd72069c0a929050cc67403%2Fslack-bot-scopes.png?alt=media" alt=""><figcaption><p>Bot Token Scopes permission settings</p></figcaption></figure>

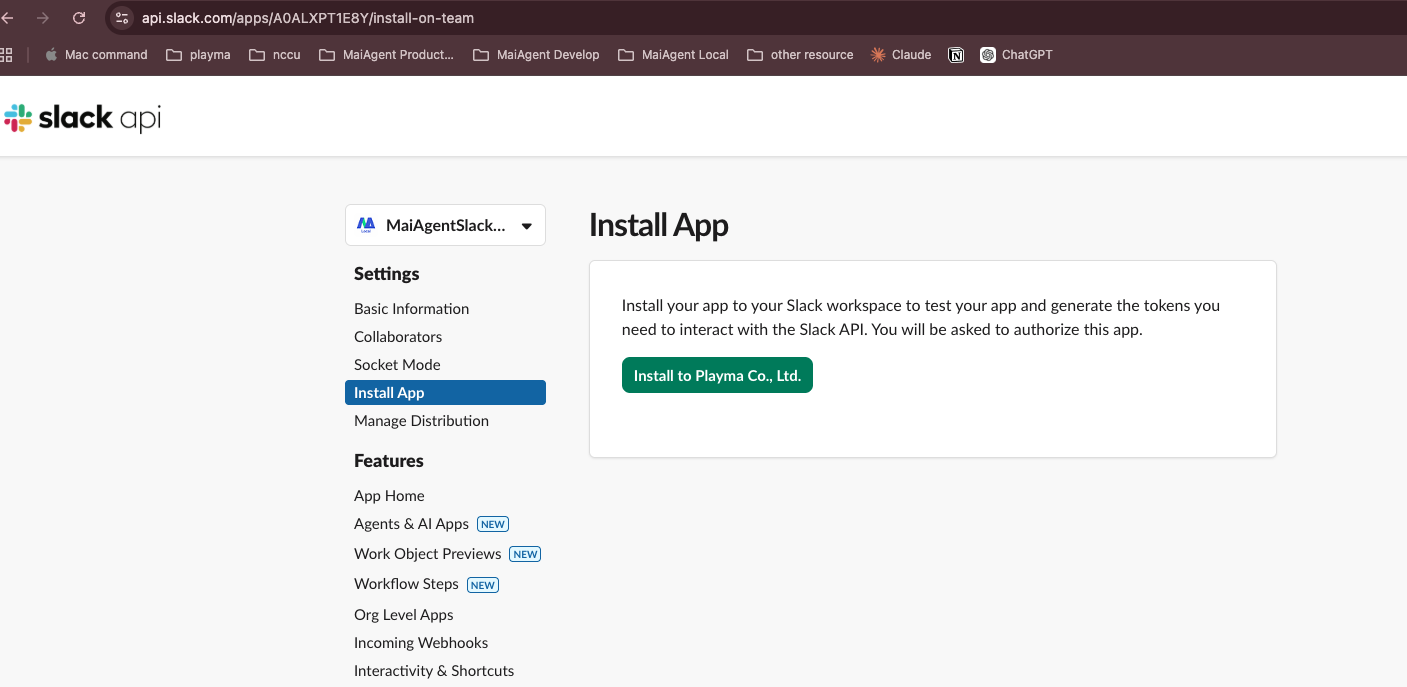
### 3. Install App to Workspace

Scroll back to the top of the page and click <mark style="color:blue;">Install to Workspace</mark> (or Reinstall to Workspace).

<figure><img src="https://1360999650-files.gitbook.io/~/files/v0/b/gitbook-x-prod.appspot.com/o/spaces%2F6v6TNkkOQVfRYfcNirHL%2Fuploads%2Fgit-blob-5b4dc93fd2fa5c1286e543b1825cfd92049da9e9%2Fslack-install-app.png?alt=media" alt=""><figcaption><p>Install App page</p></figcaption></figure>

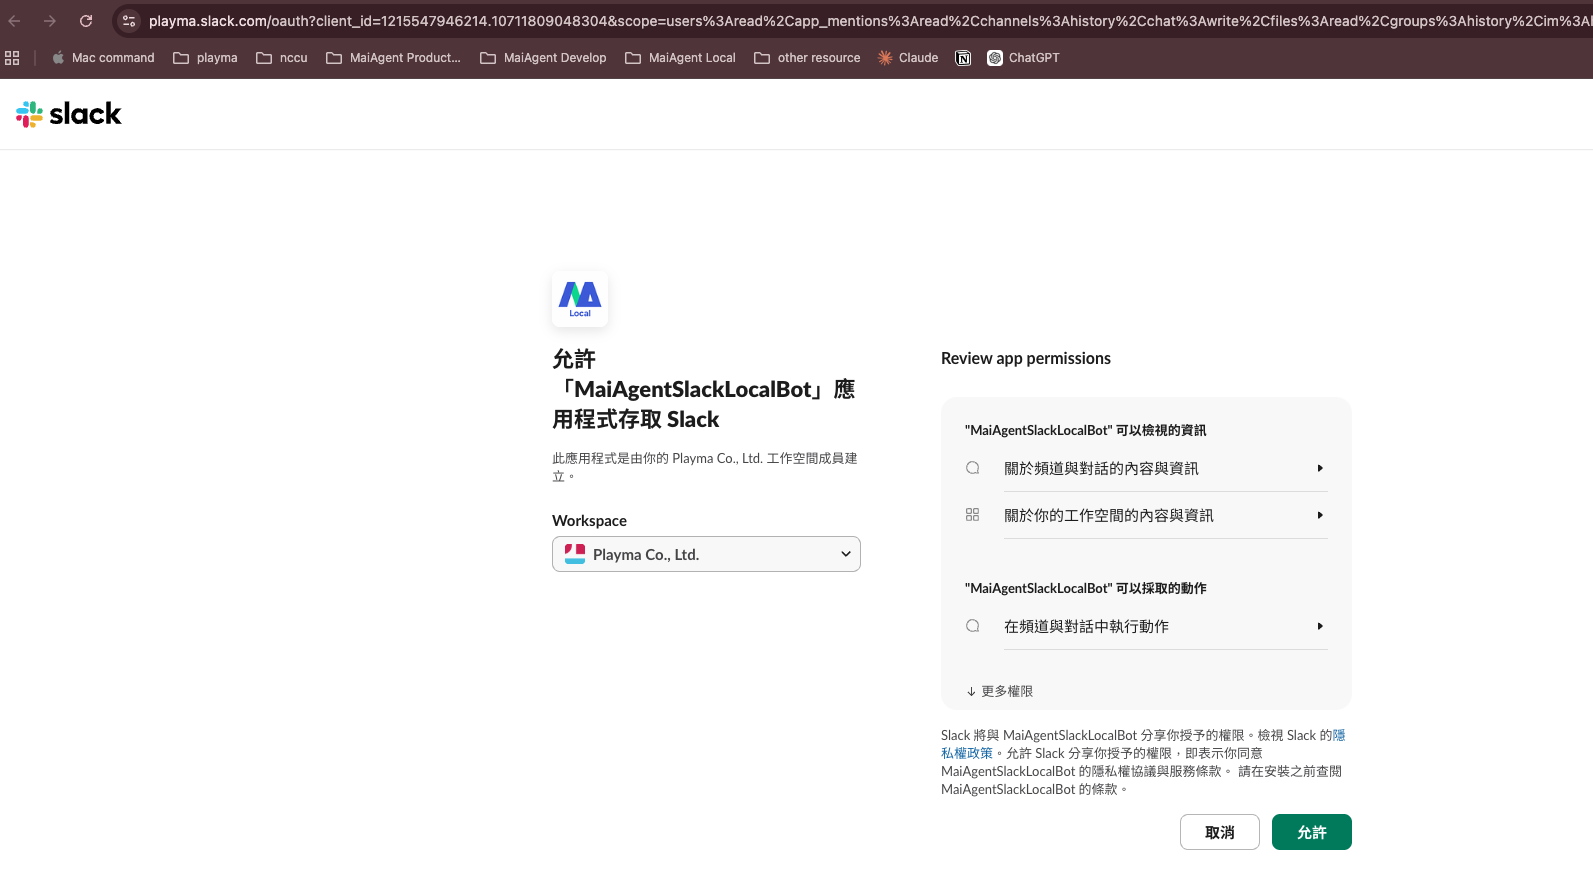
Slack will redirect to the authorization page. After confirming the permissions, click <mark style="color:blue;">Allow</mark>.

<figure><img src="https://1360999650-files.gitbook.io/~/files/v0/b/gitbook-x-prod.appspot.com/o/spaces%2F6v6TNkkOQVfRYfcNirHL%2Fuploads%2Fgit-blob-daf77d582ca9b5f01416b59e0c1c2733cf9b8d4d%2Fslack-authorize.png?alt=media" alt=""><figcaption><p>Authorize App access to the Workspace</p></figcaption></figure>

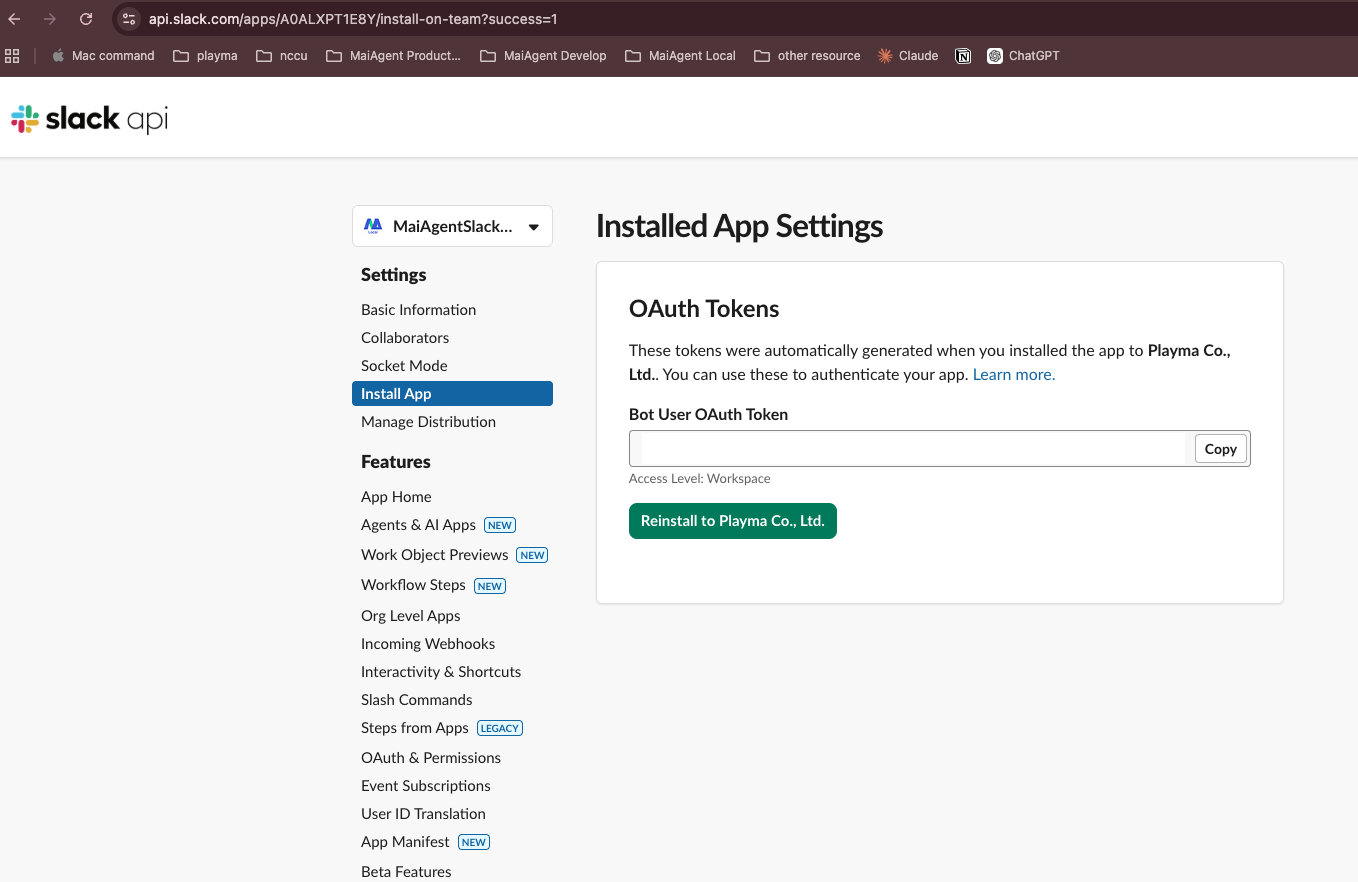
### 4. Copy the Bot User OAuth Token

After installation, return to the <mark style="color:blue;">OAuth & Permissions</mark> page and copy the <mark style="color:blue;">Bot User OAuth Token</mark> (format: `xoxb-...`).

<figure><img src="https://1360999650-files.gitbook.io/~/files/v0/b/gitbook-x-prod.appspot.com/o/spaces%2F6v6TNkkOQVfRYfcNirHL%2Fuploads%2Fgit-blob-0497bc9b32949a666883cab21c8da7cdbc013795%2Fslack-bot-token.png?alt=media" alt=""><figcaption><p>Copy Bot User OAuth Token</p></figcaption></figure>

***

## Step 3: Configure App Home (Enable Direct Messages)

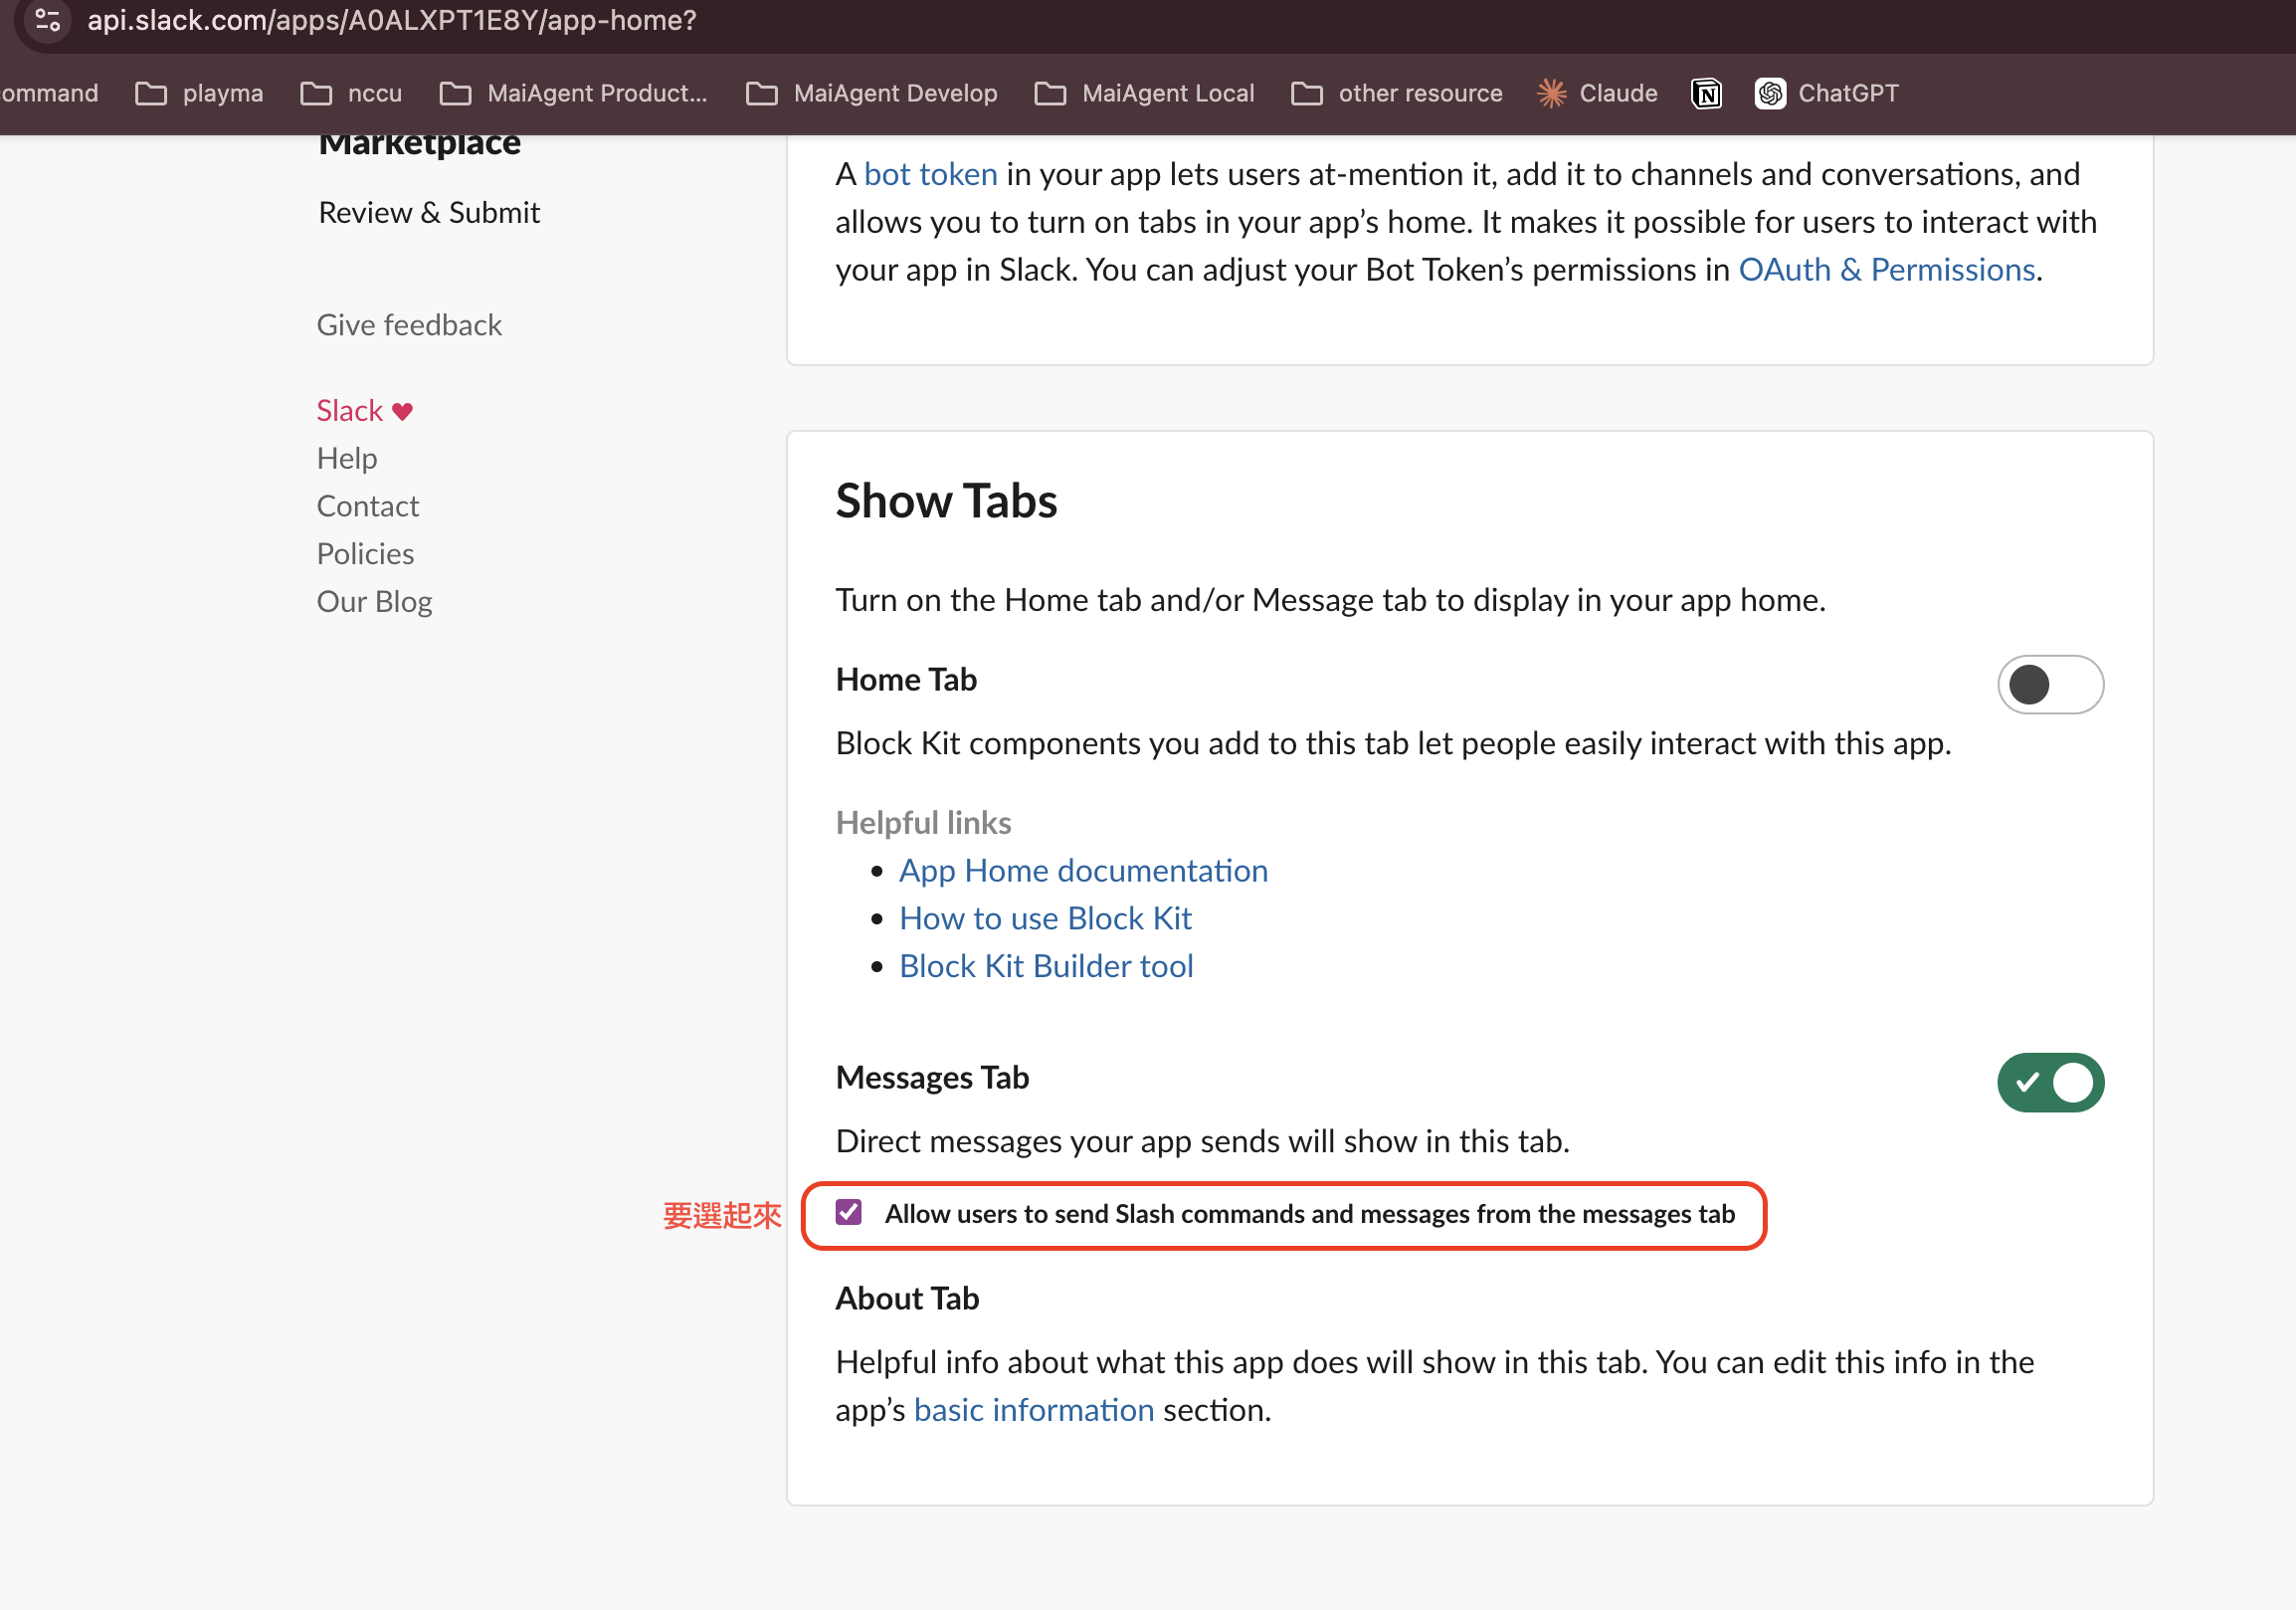
Go to the <mark style="color:blue;">App Home</mark> page in the left menu and in the **Show Tabs** section:

1. Enable <mark style="color:blue;">Messages Tab</mark>
2. Check <mark style="color:blue;">Allow users to send Slash commands and messages from the messages tab</mark>

<figure><img src="https://1360999650-files.gitbook.io/~/files/v0/b/gitbook-x-prod.appspot.com/o/spaces%2F6v6TNkkOQVfRYfcNirHL%2Fuploads%2Fgit-blob-2d94bf960a8fc3380a7d7558b963b1047874fd5e%2Fslack-app-home-messages.png?alt=media" alt=""><figcaption><p>Enable Messages Tab to allow users to DM the Bot</p></figcaption></figure>

{% hint style="warning" %}
This step must be completed; otherwise, users cannot interact with the Bot via direct messages.
{% endhint %}

***

## Step 4: Create a Slack Chat Platform in MaiAgent

### 1. Go to Connect Chat Platform

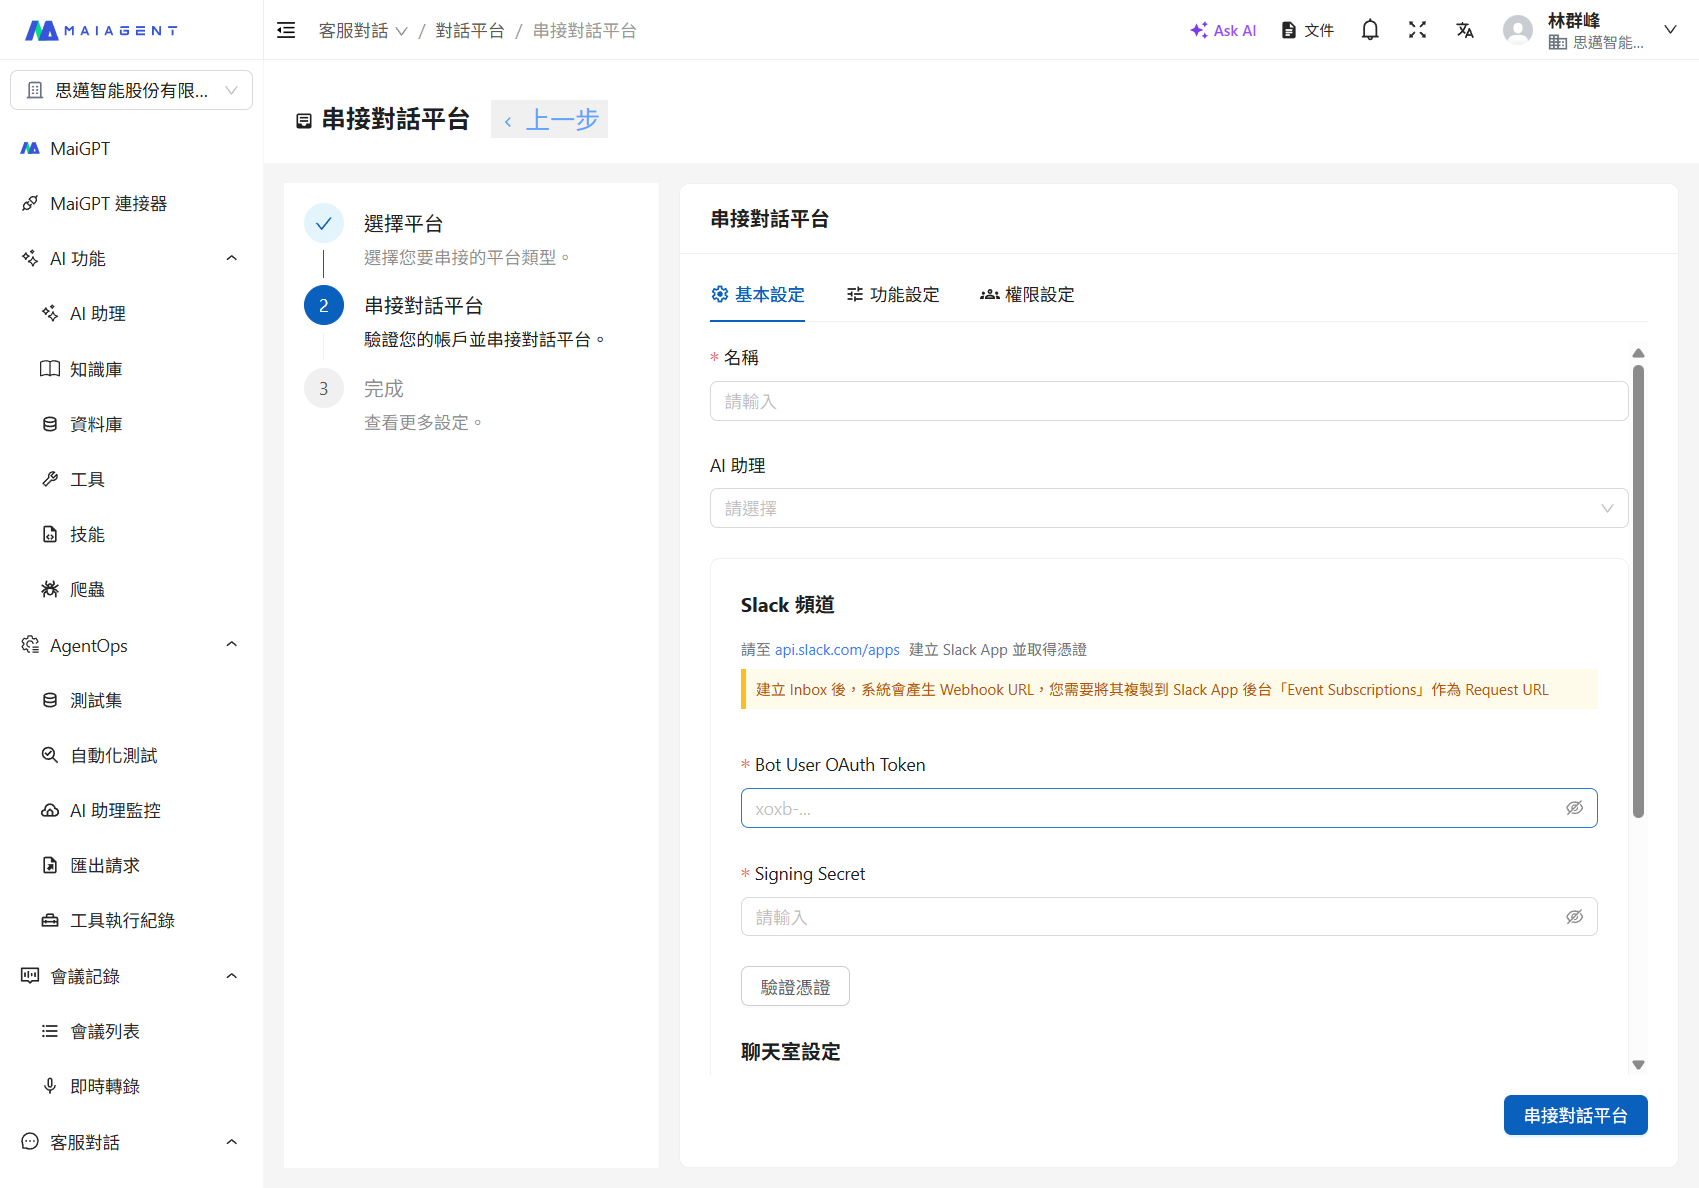
Click <mark style="color:blue;">Chat Platforms</mark> in the MaiAgent left menu, then click <mark style="color:blue;">Connect Chat Platform</mark> in the upper right corner and select <mark style="color:blue;">Slack</mark>.

<figure><img src="https://1360999650-files.gitbook.io/~/files/v0/b/gitbook-x-prod.appspot.com/o/spaces%2F6v6TNkkOQVfRYfcNirHL%2Fuploads%2Fgit-blob-c78fcec775d16d0d2f411678f3bd357d7cb92847%2Fchannel-slack-setup.png?alt=media" alt=""><figcaption><p>MaiAgent Slack connection setup screen</p></figcaption></figure>

### 2. Enter Basic Settings

| Field                    | Description                                            |
| ------------------------ | ------------------------------------------------------ |
| **Name**                 | Give this connection a name (required)                 |
| **AI Assistant**         | Select the AI Assistant to bind                        |
| **Bot User OAuth Token** | Paste the Bot Token obtained in Step 2 (required)      |
| **Signing Secret**       | Paste the Signing Secret obtained in Step 1 (required) |

### 3. Verify Credentials

Click the <mark style="color:blue;">Verify Credentials</mark> button to confirm the Token and Secret are correct.

### 4. Chat Room Settings

| Setting                                     | Description                                                            |
| ------------------------------------------- | ---------------------------------------------------------------------- |
| **Respond only when @ mentioned in groups** | When enabled, the Bot only responds in group channels when @ mentioned |
| **Enable reset command**                    | When enabled, users can restart the conversation using a command       |

### 5. Save and Obtain the Webhook URL

Click <mark style="color:blue;">Connect Chat Platform</mark> to complete the setup. The system will generate a **Webhook URL** — copy it for later use.

***

## Step 5: Return to Slack App to Configure Event Subscriptions

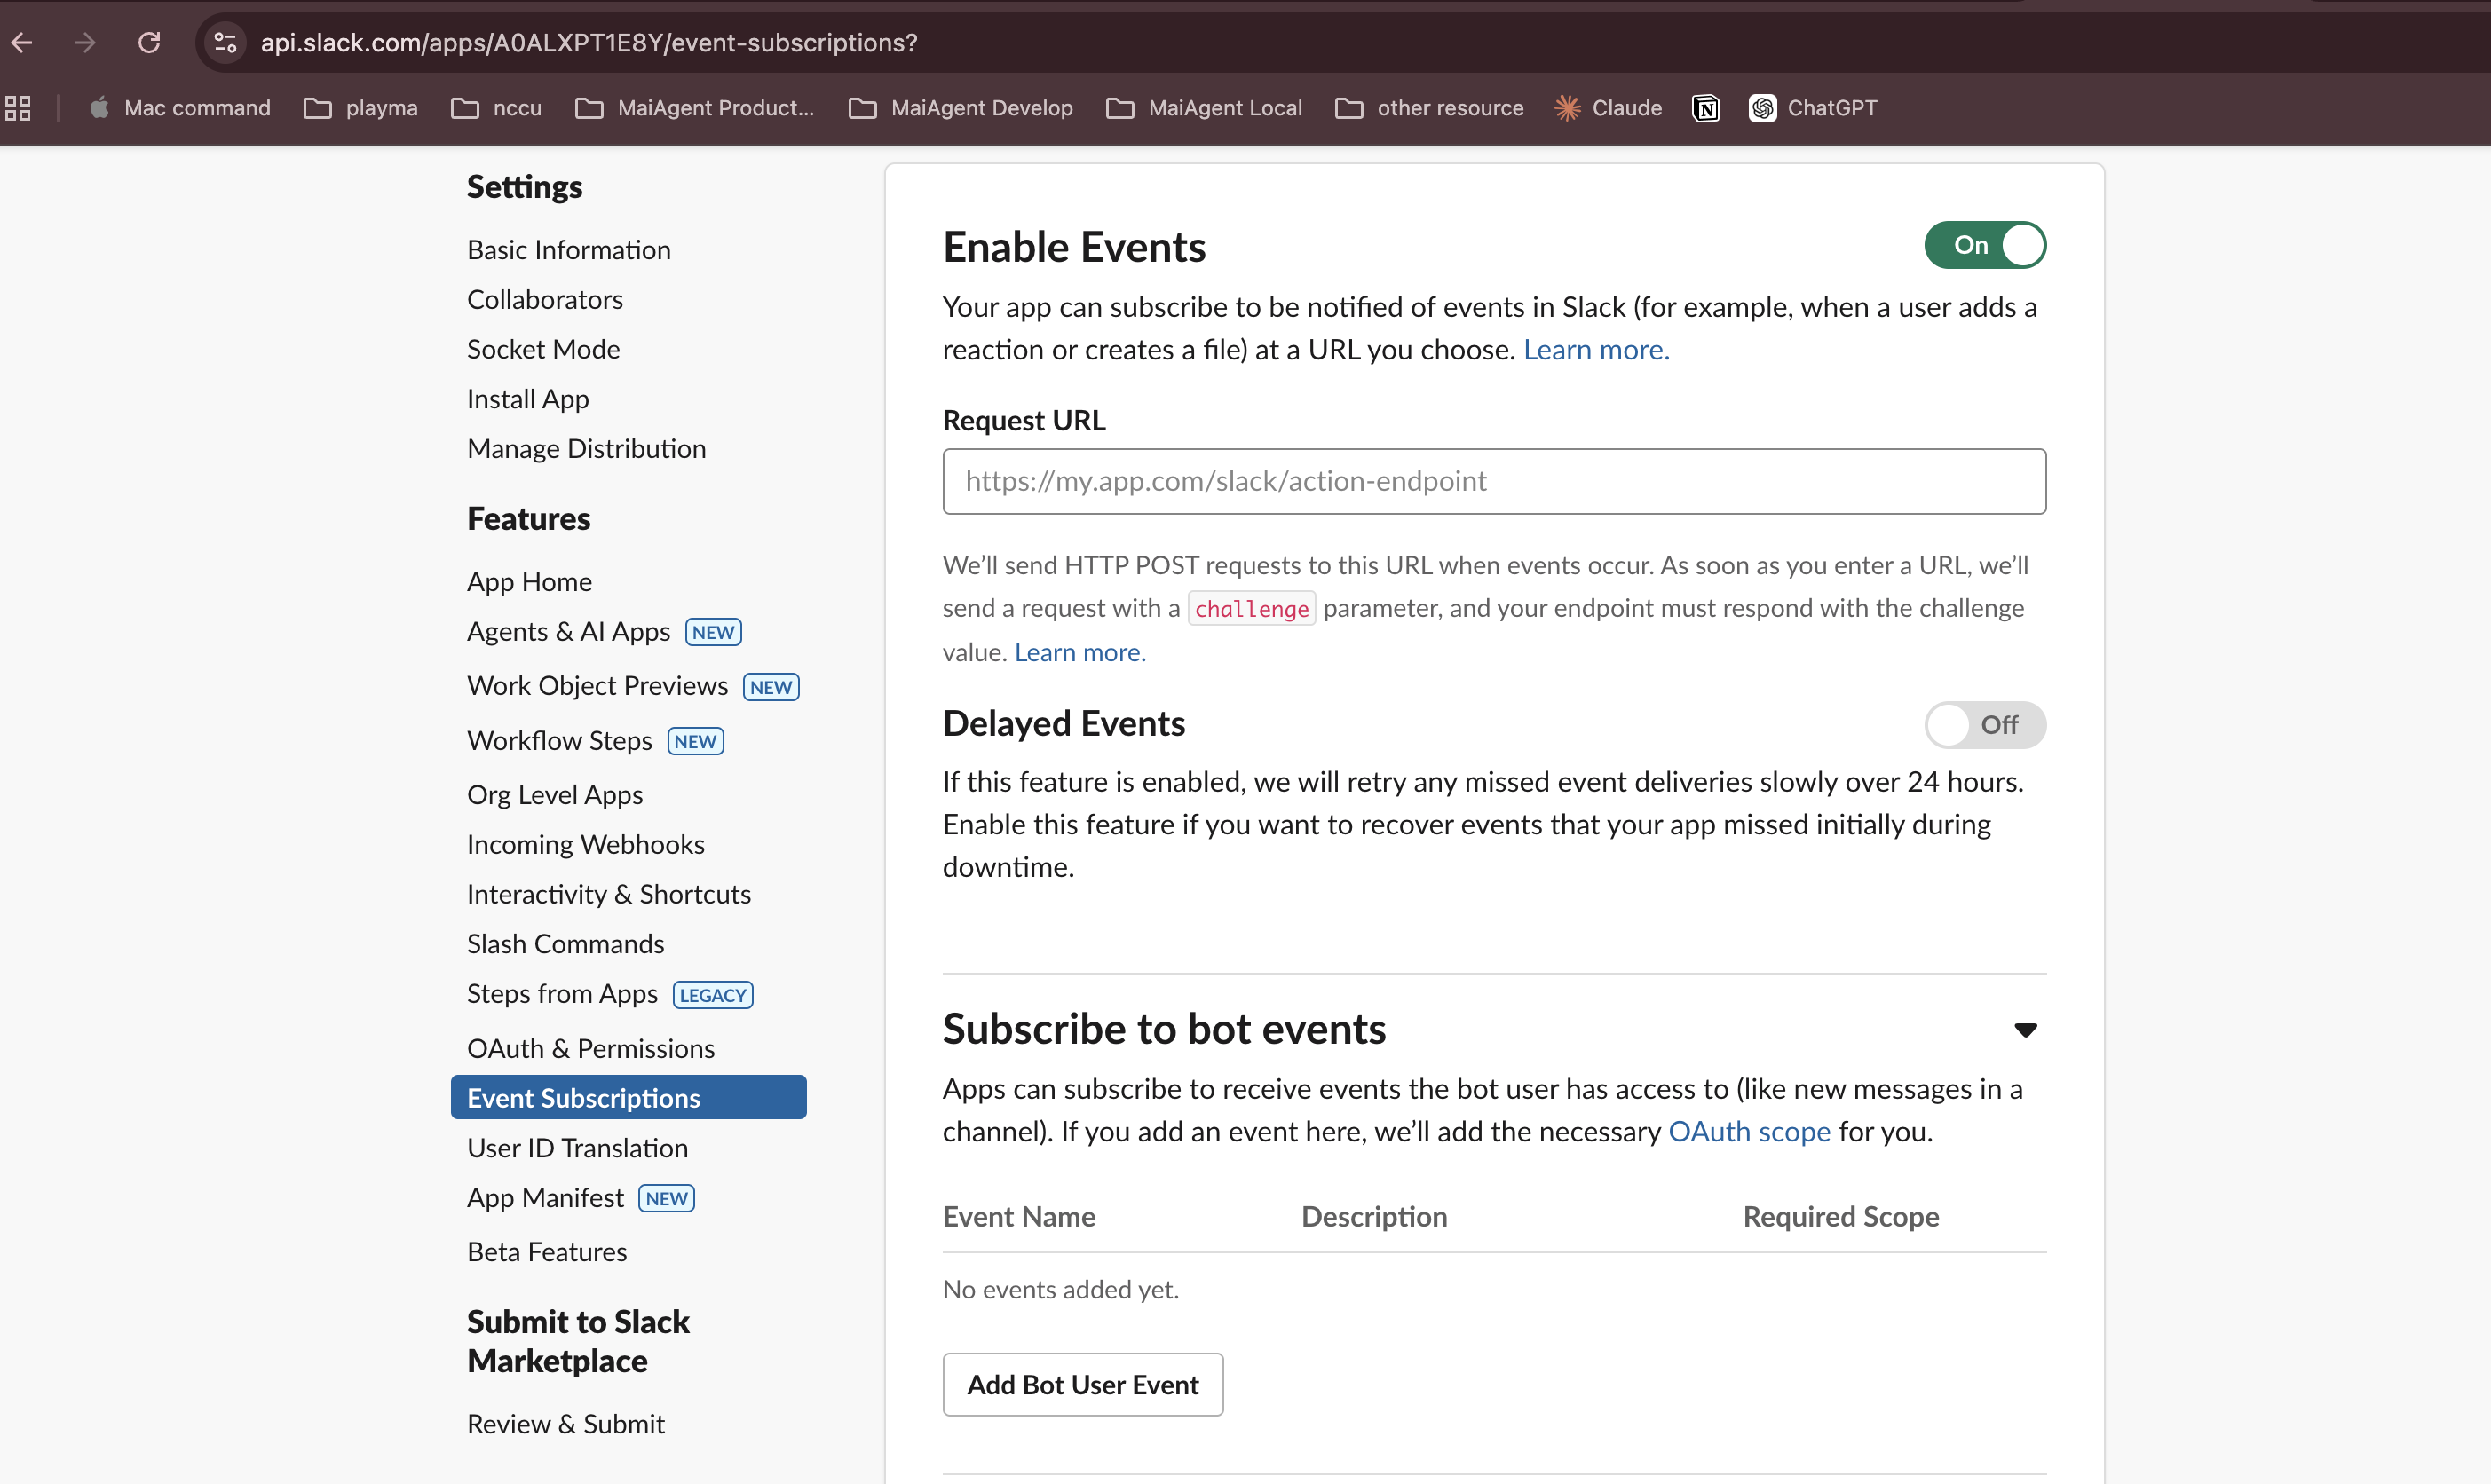
### 1. Enable Events

Click <mark style="color:blue;">Event Subscriptions</mark> in the Slack App left menu and turn on <mark style="color:blue;">Enable Events</mark>.

<figure><img src="https://1360999650-files.gitbook.io/~/files/v0/b/gitbook-x-prod.appspot.com/o/spaces%2F6v6TNkkOQVfRYfcNirHL%2Fuploads%2Fgit-blob-589c809a1adab5265cedad08dadedf9699b1cfeb%2Fslack-event-subscriptions.png?alt=media" alt=""><figcaption><p>Event Subscriptions settings page</p></figcaption></figure>

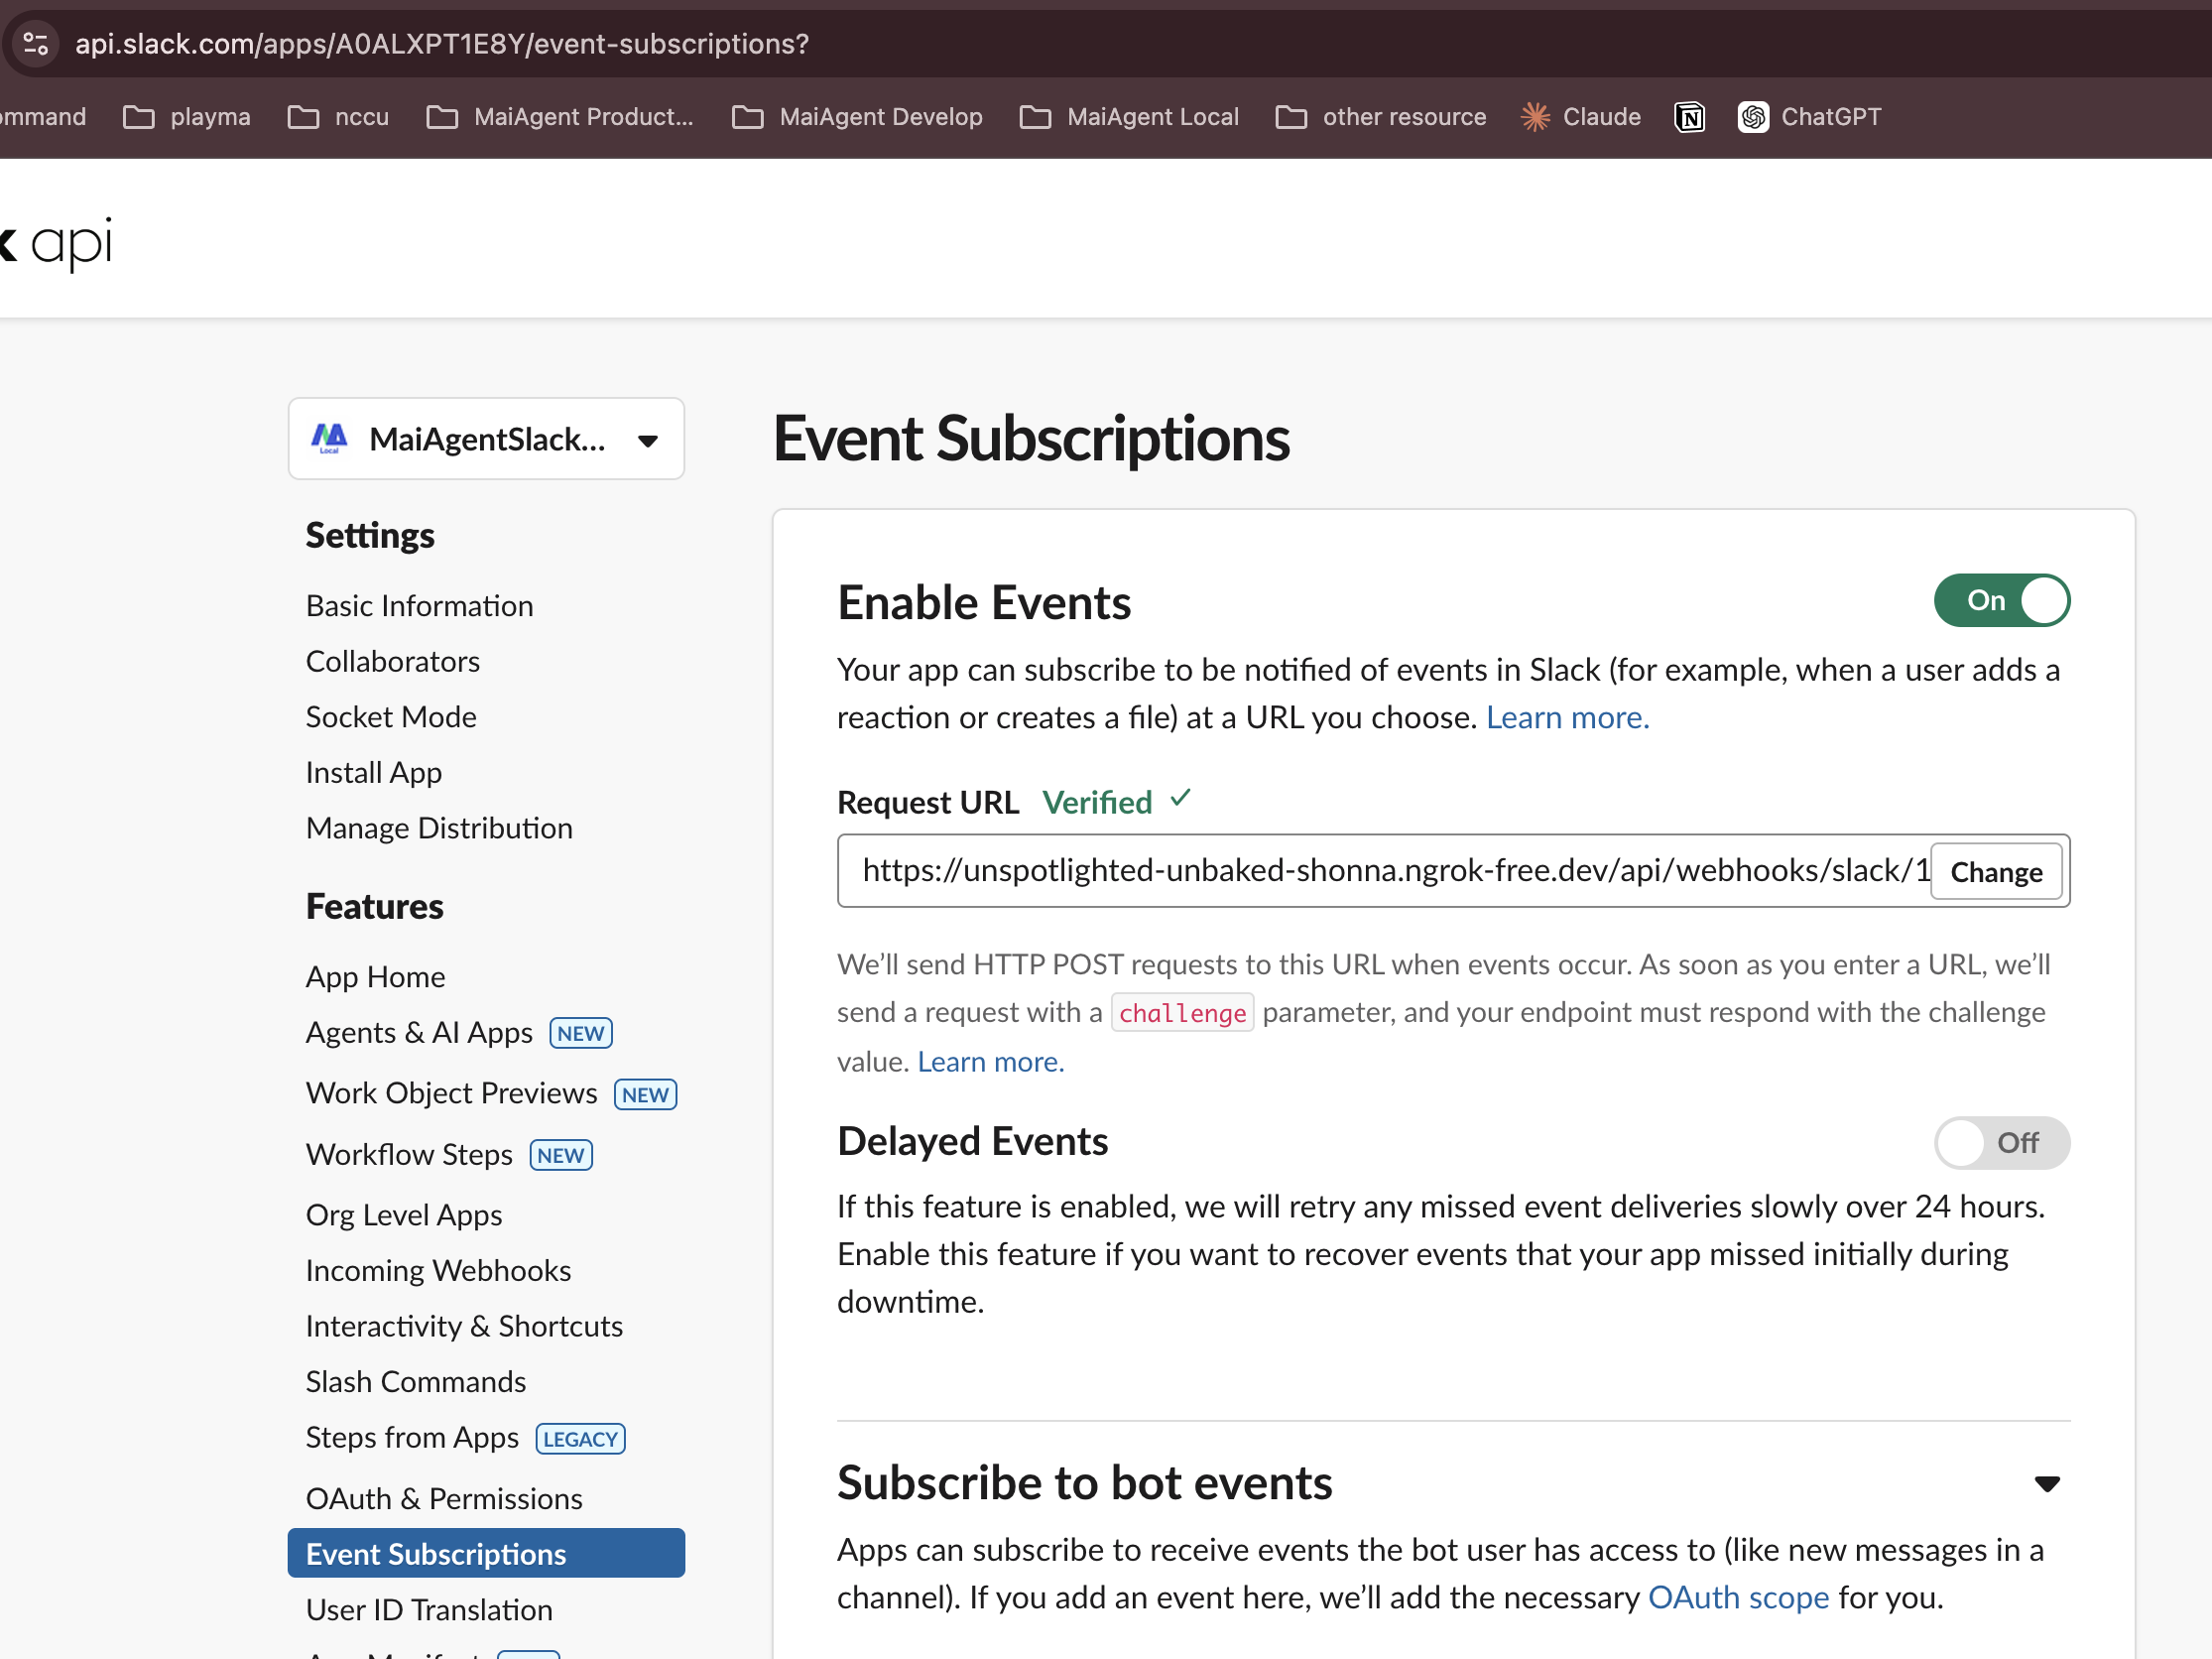
### 2. Paste the Request URL

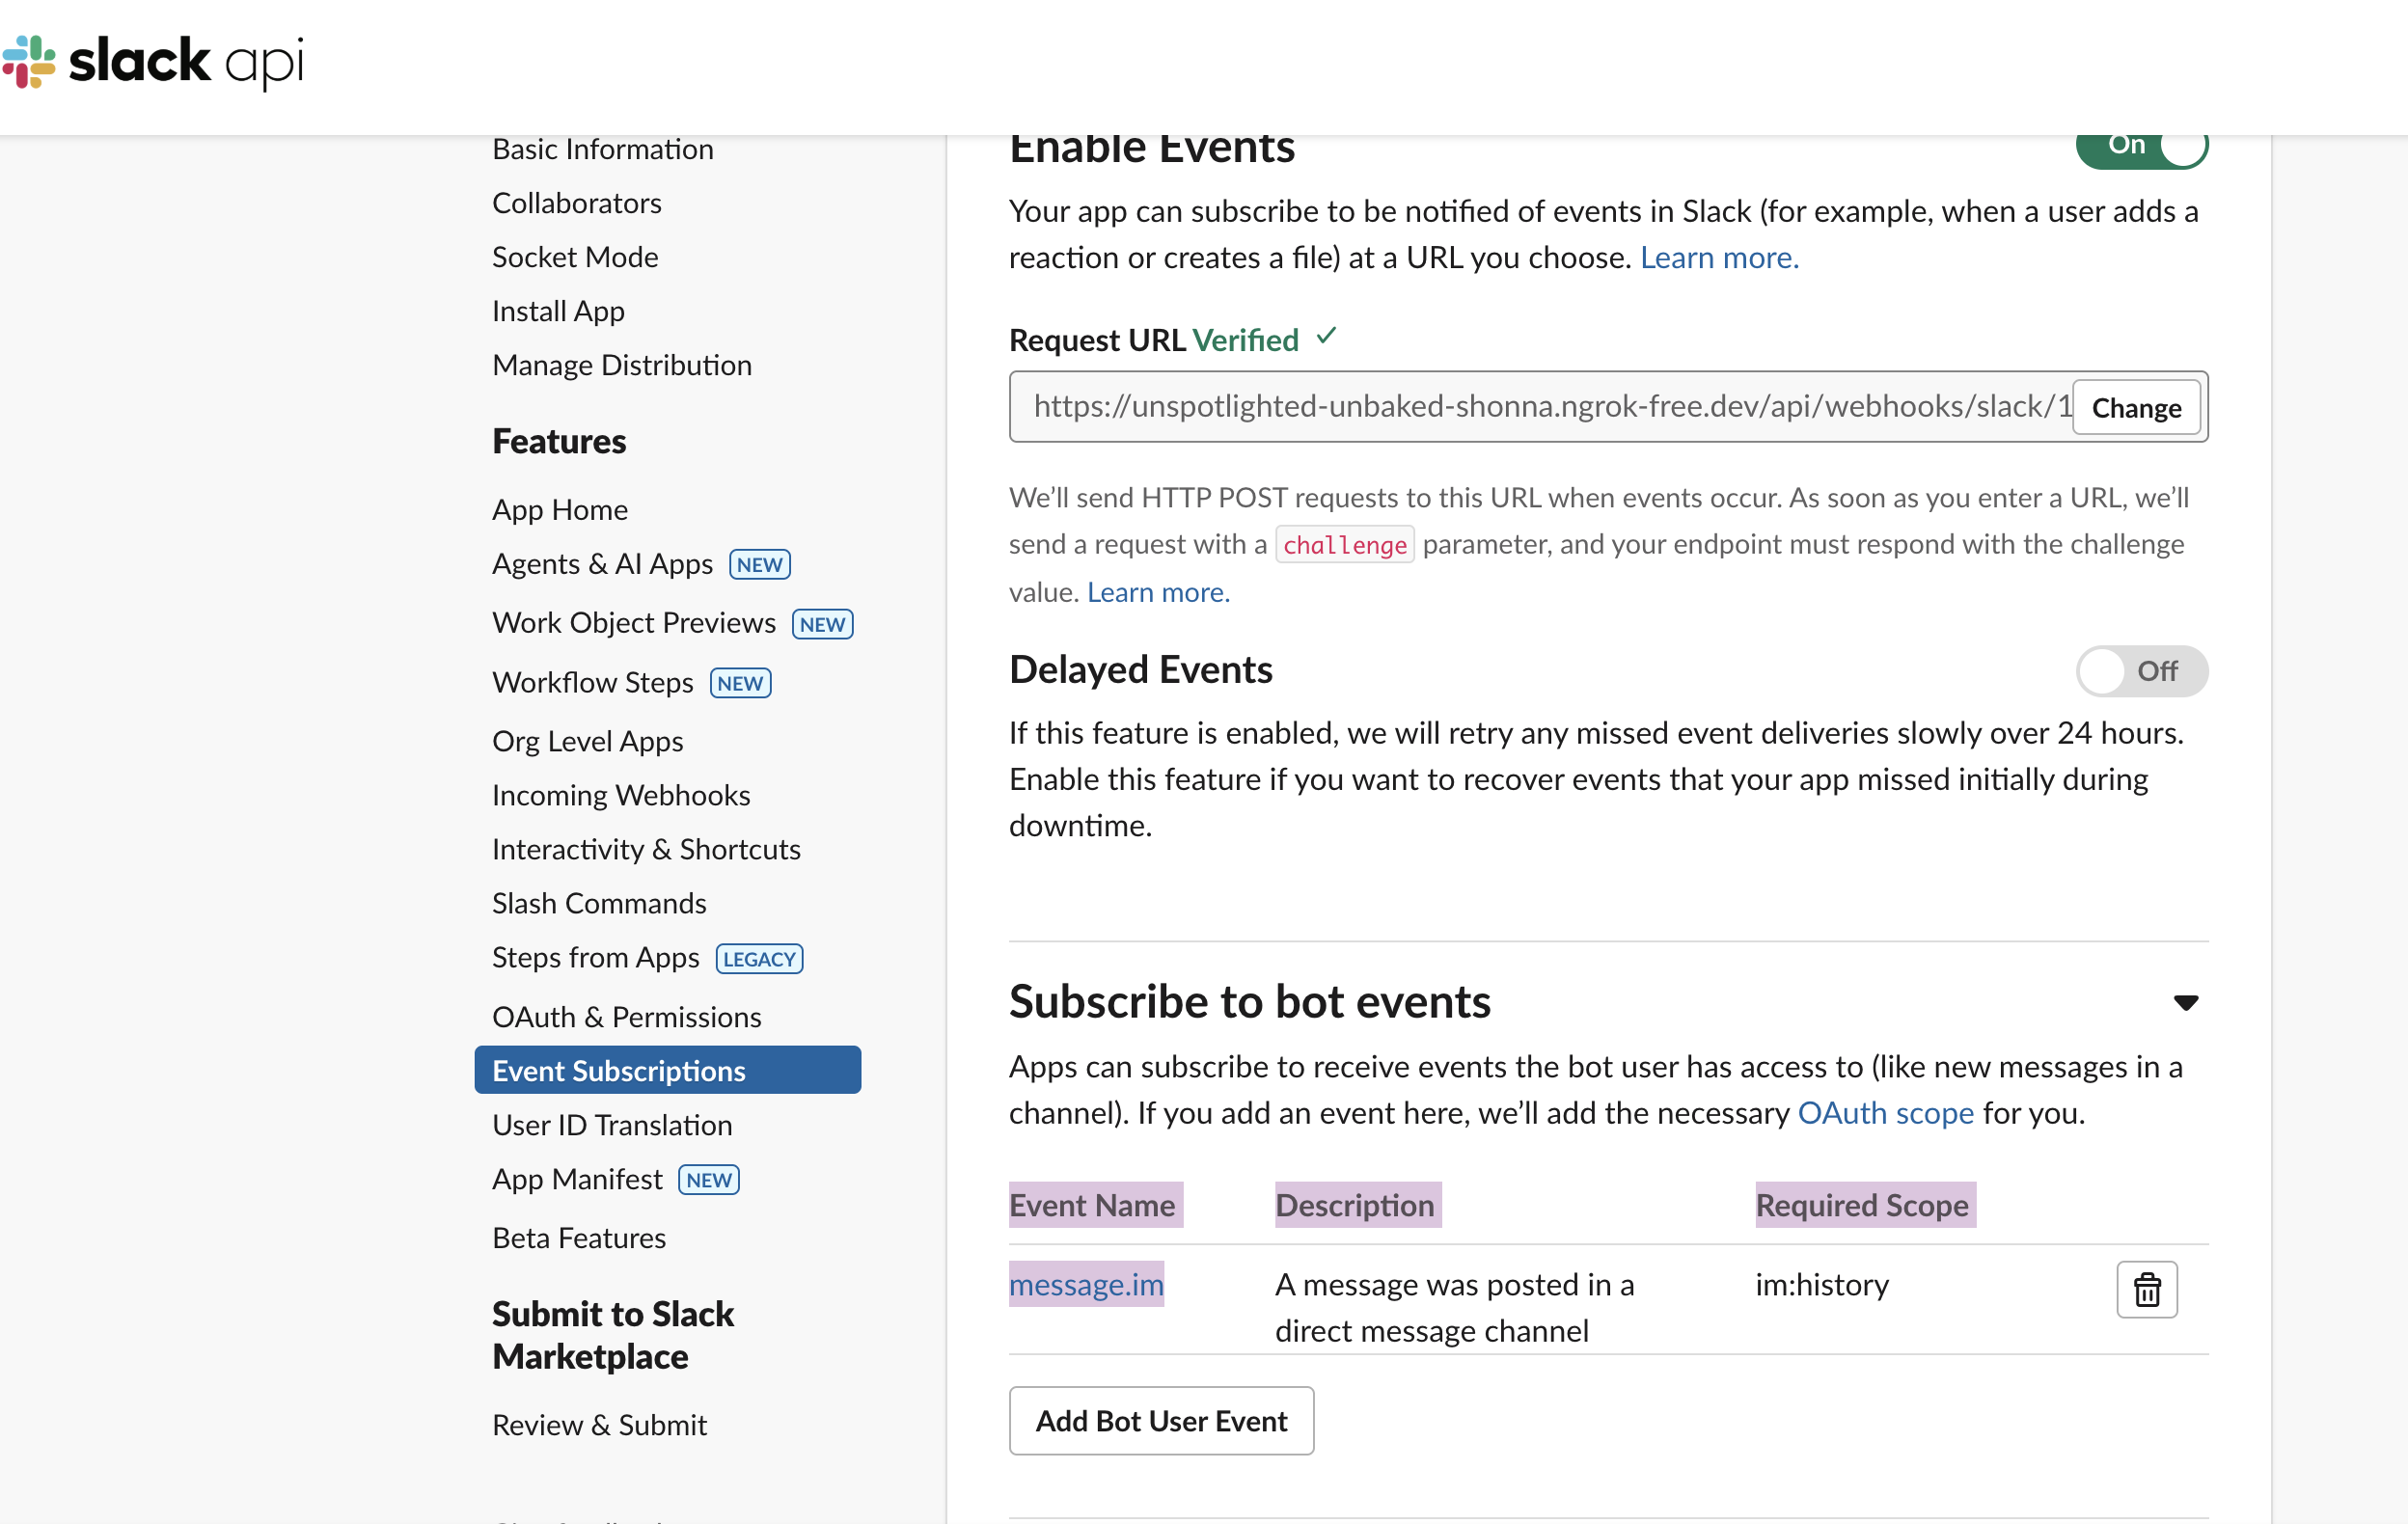
Paste the **Webhook URL** generated by MaiAgent into the <mark style="color:blue;">Request URL</mark> field. Slack will automatically verify it — <mark style="color:green;">Verified ✓</mark> indicates the setup is successful.

<figure><img src="https://1360999650-files.gitbook.io/~/files/v0/b/gitbook-x-prod.appspot.com/o/spaces%2F6v6TNkkOQVfRYfcNirHL%2Fuploads%2Fgit-blob-0166cb7b78b16d9424fb3d506b972ab76f6ed744%2Fslack-event-verified.png?alt=media" alt=""><figcaption><p>Request URL verification successful</p></figcaption></figure>

### 3. Subscribe to Bot Events

Expand the **Subscribe to bot events** section, click <mark style="color:blue;">Add Bot User Event</mark>, and add the following events:

| Event              | Description                           |
| ------------------ | ------------------------------------- |
| `message.im`       | New messages in direct messages       |
| `message.channels` | New messages in public channels       |
| `message.groups`   | New messages in private channels      |
| `message.mpim`     | New messages in group direct messages |
| `app_mention`      | @ mentioned in a channel              |

<figure><img src="https://1360999650-files.gitbook.io/~/files/v0/b/gitbook-x-prod.appspot.com/o/spaces%2F6v6TNkkOQVfRYfcNirHL%2Fuploads%2Fgit-blob-a739fd3cc31beba2fbb8aa335c6a9ca7bb6fd79f%2Fslack-event-bot-events.png?alt=media" alt=""><figcaption><p>Subscribe to Bot Events</p></figcaption></figure>

### 4. Save Changes

Click <mark style="color:blue;">Save Changes</mark> to complete the setup.

{% hint style="warning" %}
After saving, Slack may require you to reinstall the App. Click the prompt at the top of the page to reinstall and apply the new permissions.
{% endhint %}

***

## Getting Started

After the connection is complete, you can interact with the AI Assistant in the following ways:

### Direct Message Conversation

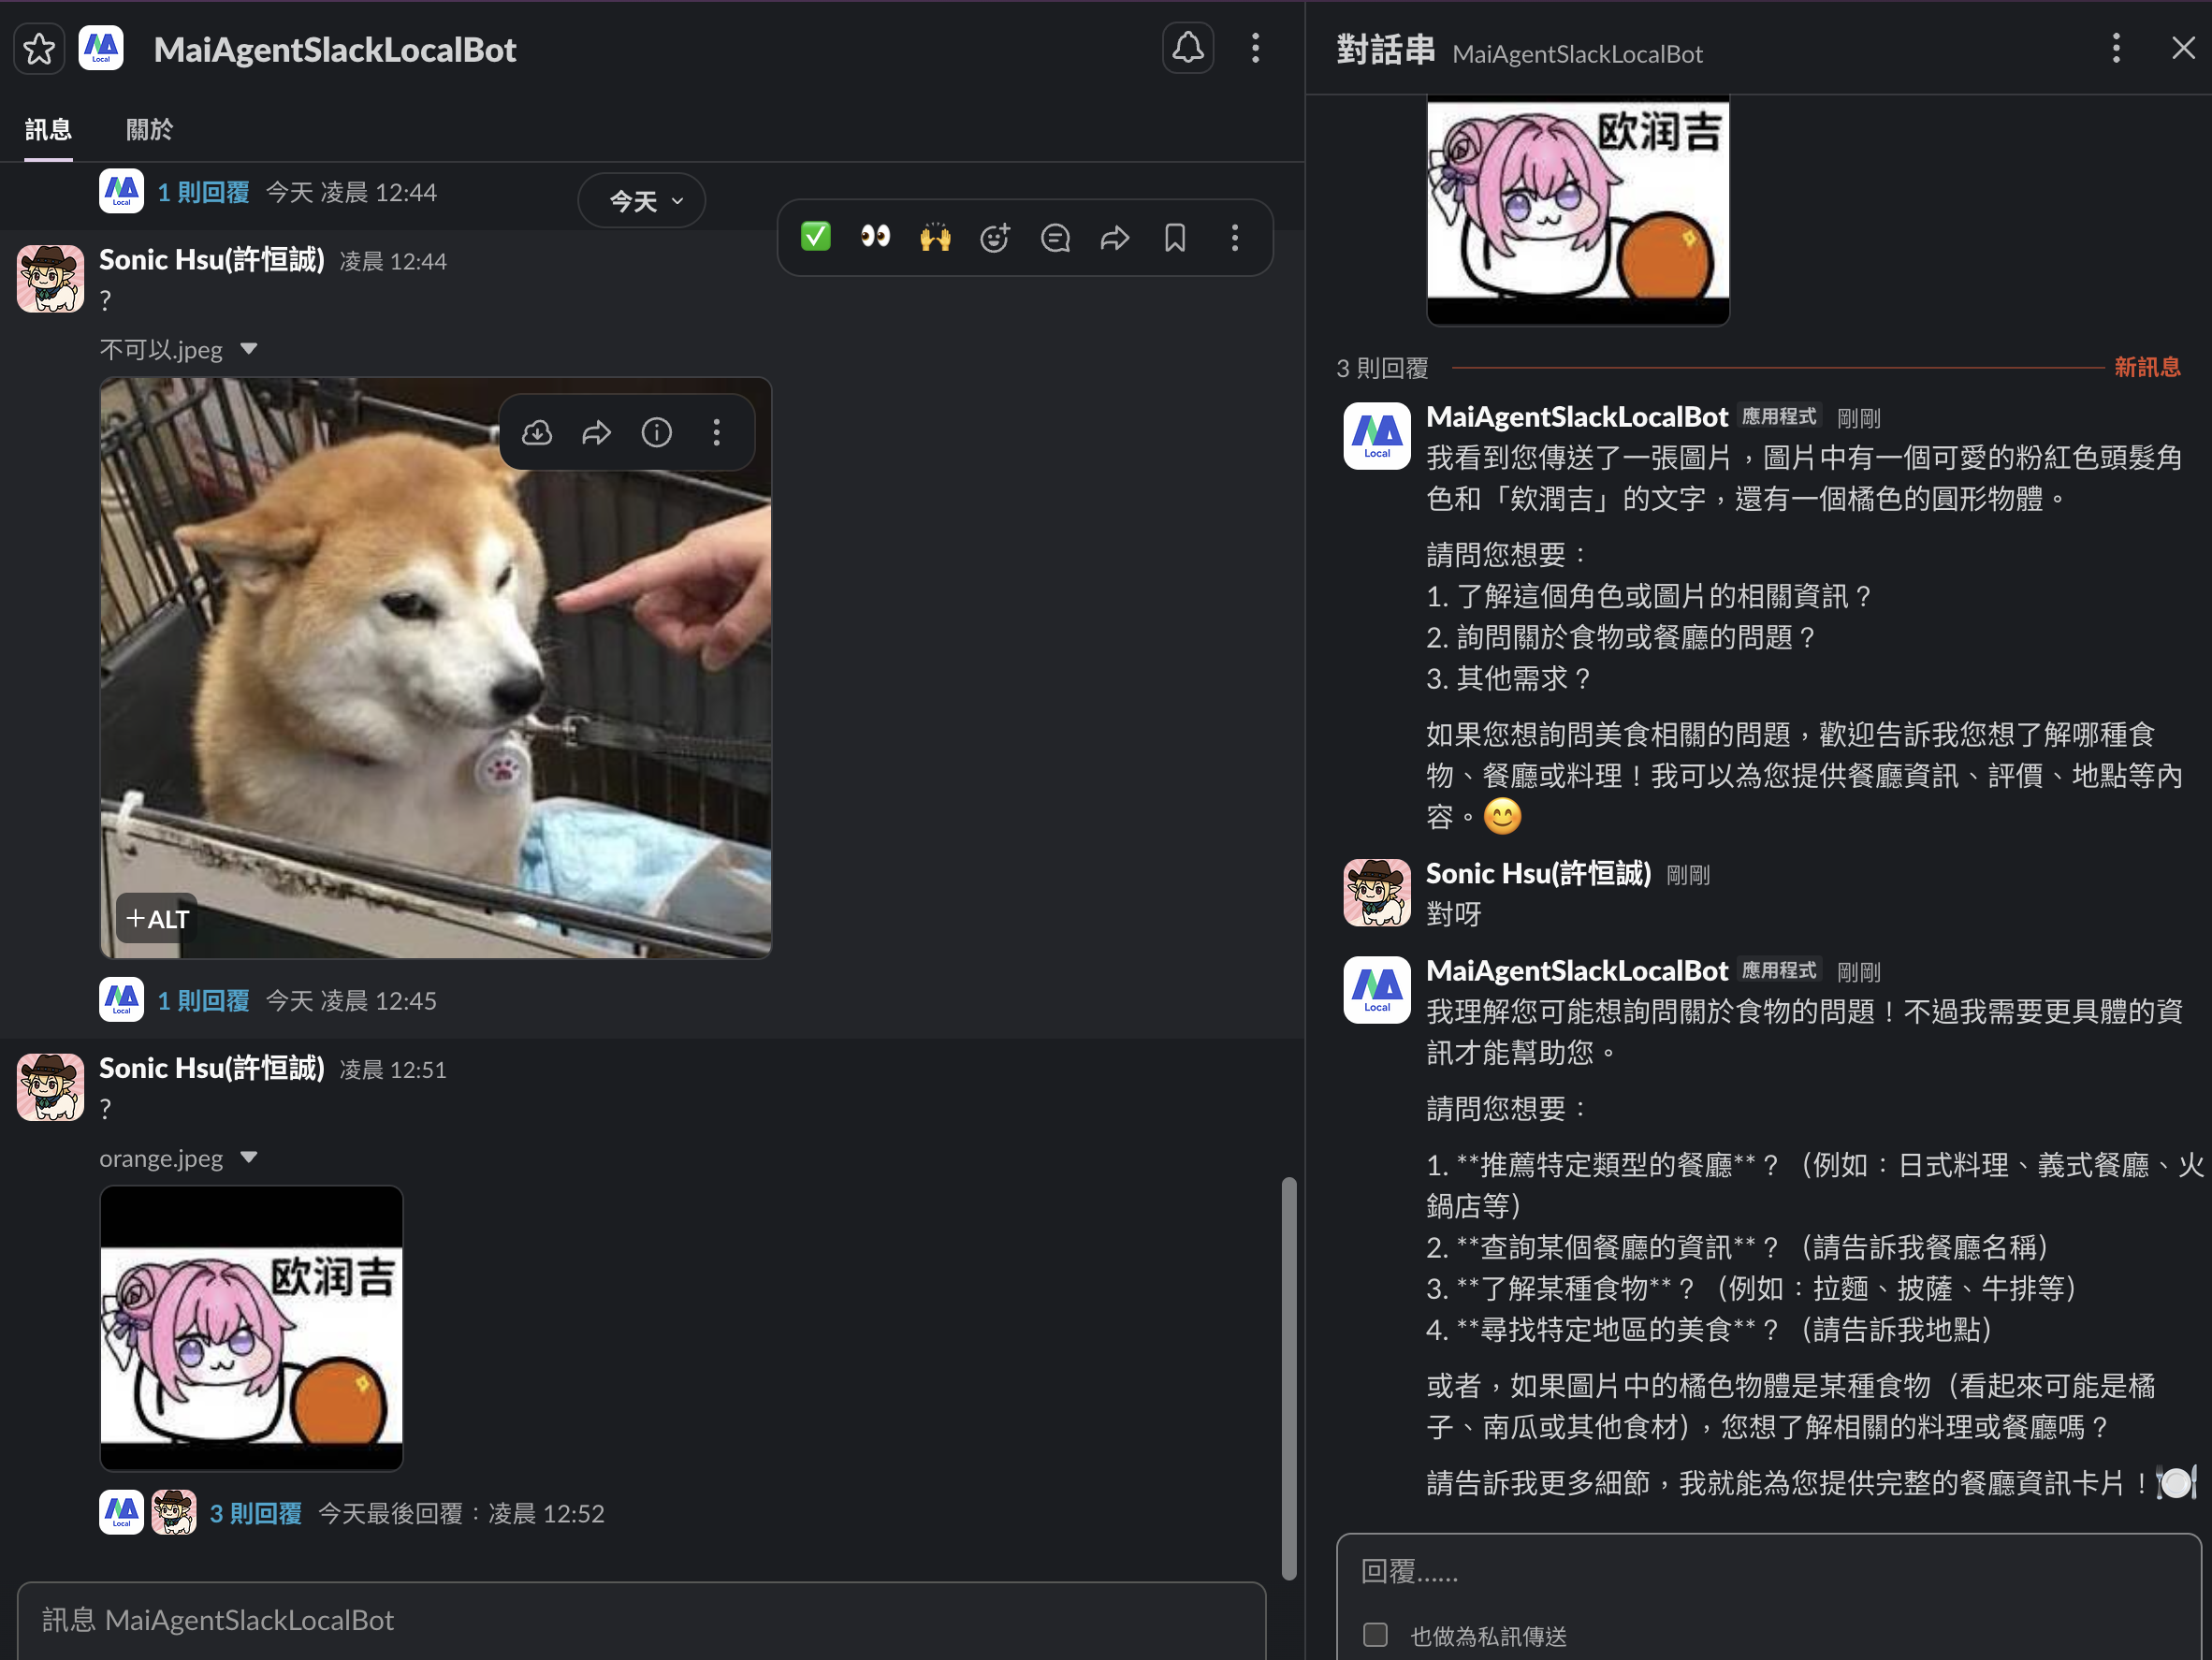
Send a direct message to the Bot in Slack, and the AI Assistant will reply automatically. Supports sending text, images, and files.

<figure><img src="https://1360999650-files.gitbook.io/~/files/v0/b/gitbook-x-prod.appspot.com/o/spaces%2F6v6TNkkOQVfRYfcNirHL%2Fuploads%2Fgit-blob-68e3c45433def55287a73cb4bc105b292f67dbed%2Fslack-demo-chat.png?alt=media" alt=""><figcaption><p>Slack direct message — AI Assistant auto-reply (supports image recognition)</p></figcaption></figure>

### File Upload and Analysis

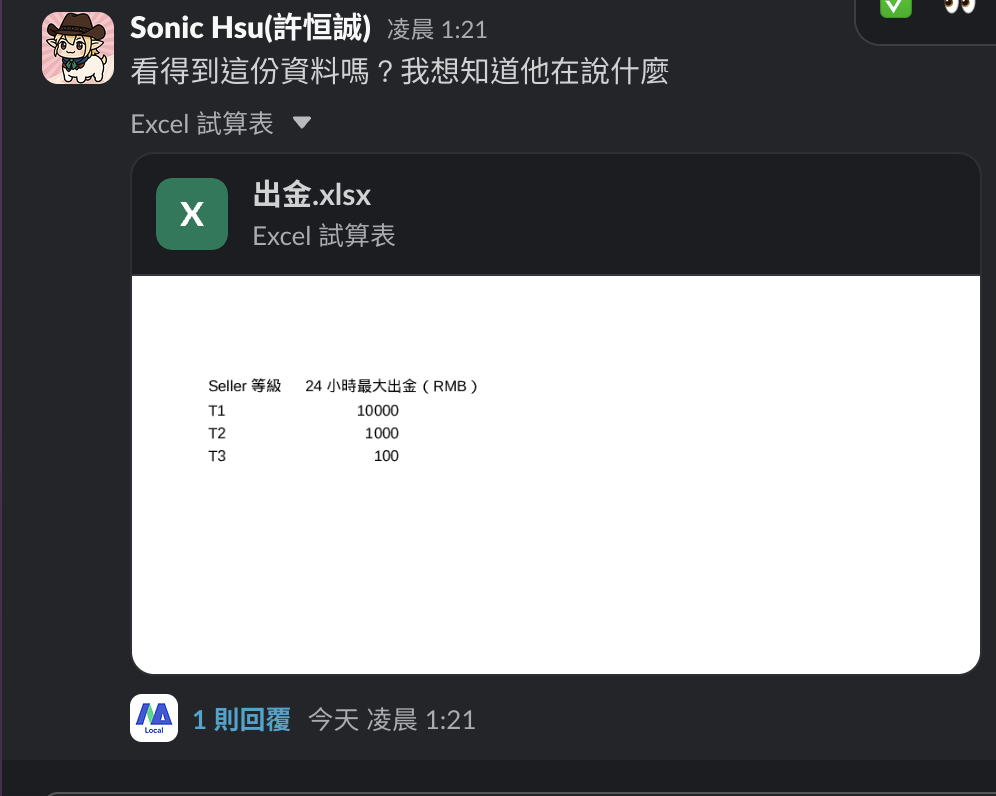
Users can upload Excel, PDF, and other files during conversations. The AI Assistant can read file content and answer related questions.

<figure><img src="https://1360999650-files.gitbook.io/~/files/v0/b/gitbook-x-prod.appspot.com/o/spaces%2F6v6TNkkOQVfRYfcNirHL%2Fuploads%2Fgit-blob-24e345a43b82ddc336bb259e0836fed468c027c7%2Fslack-demo-file.png?alt=media" alt=""><figcaption><p>Upload Excel file — AI Assistant automatically analyzes content</p></figcaption></figure>

### Channel @ Mention

In a channel, type `@BotName your question`, and the AI Assistant will reply in the channel.

{% hint style="info" %}
To add the Bot to a specific channel, type `/invite @BotName` in that channel, or add it through Channel Settings → Integrations → Add an App.
{% endhint %}


---

# Agent Instructions
This documentation is published with GitBook. GitBook is the documentation platform designed so that both humans and AI agents can read, navigate, and reason over technical content effectively. Learn more at gitbook.com.

## Querying This Documentation
If you need additional information that is not directly available in this page, you can query the documentation dynamically by asking a question.

Perform an HTTP GET request on the current page URL with the `ask` query parameter, and the optional `goal` query parameter:

```
GET https://docs.maiagent.ai/maiagent-user-guide/en/conversations/slack.md?ask=<question>&goal=<endgoal>
```

`ask` is the immediate question: it should be specific, self-contained, and written in natural language.
`goal` is optional and describes the broader end goal you are ultimately trying to accomplish on behalf of the user. GitBook uses it to tailor the answer towards what is most useful for that goal.

The response will contain a direct answer to the question and relevant excerpts and sources from the documentation.

Use this mechanism when the answer is not explicitly present in the current page, you need clarification or additional context, or you want to retrieve related documentation sections.