> For the complete documentation index, see [llms.txt](https://docs.maiagent.ai/llms.txt). Markdown versions of documentation pages are available by appending `.md` to page URLs; this page is available as [Markdown](https://docs.maiagent.ai/maiagent-user-guide/en/conversations/line-works.md).

# Integrate with Platform: LINE WORKS

LINE WORKS is the enterprise version of LINE's communication tool. Once integrated, employees can chat directly with the AI assistant within LINE WORKS without opening another system. Both one-on-one direct messages and group conversations are supported.

{% hint style="info" %}
LINE WORKS and LINE are two different platforms with entirely different credentials and configuration methods. If you want to integrate with a consumer-facing LINE Official Account, refer to [Integrate with Platform: LINE](/maiagent-user-guide/en/conversations/line.md).
{% endhint %}

## Pre-Integration Checklist <a href="#pre-integration-checklist" id="pre-integration-checklist"></a>

* An "AI Assistant" has already been created on the [MaiAgent platform](https://admin.maiagent.ai/)
* You have LINE WORKS administrator privileges (can log in to the [Admin console](https://admin.worksmobile.com/))
* You can access the [LINE WORKS Developer Console](https://developers.worksmobile.com/)

{% hint style="warning" %}
This integration requires 6 sets of credentials, and **credentials cannot be modified after the channel is created**. Complete Step 1 and Step 2 first to gather all 6 credentials before proceeding to Step 3.
{% endhint %}

***

## Step 1: Create a Client App and Obtain the Service Account <a href="#step-create-client-app" id="step-create-client-app"></a>

### 1. Go to the ClientApp Page in Developer Console <a href="#step-go-to-clientapp" id="step-go-to-clientapp"></a>

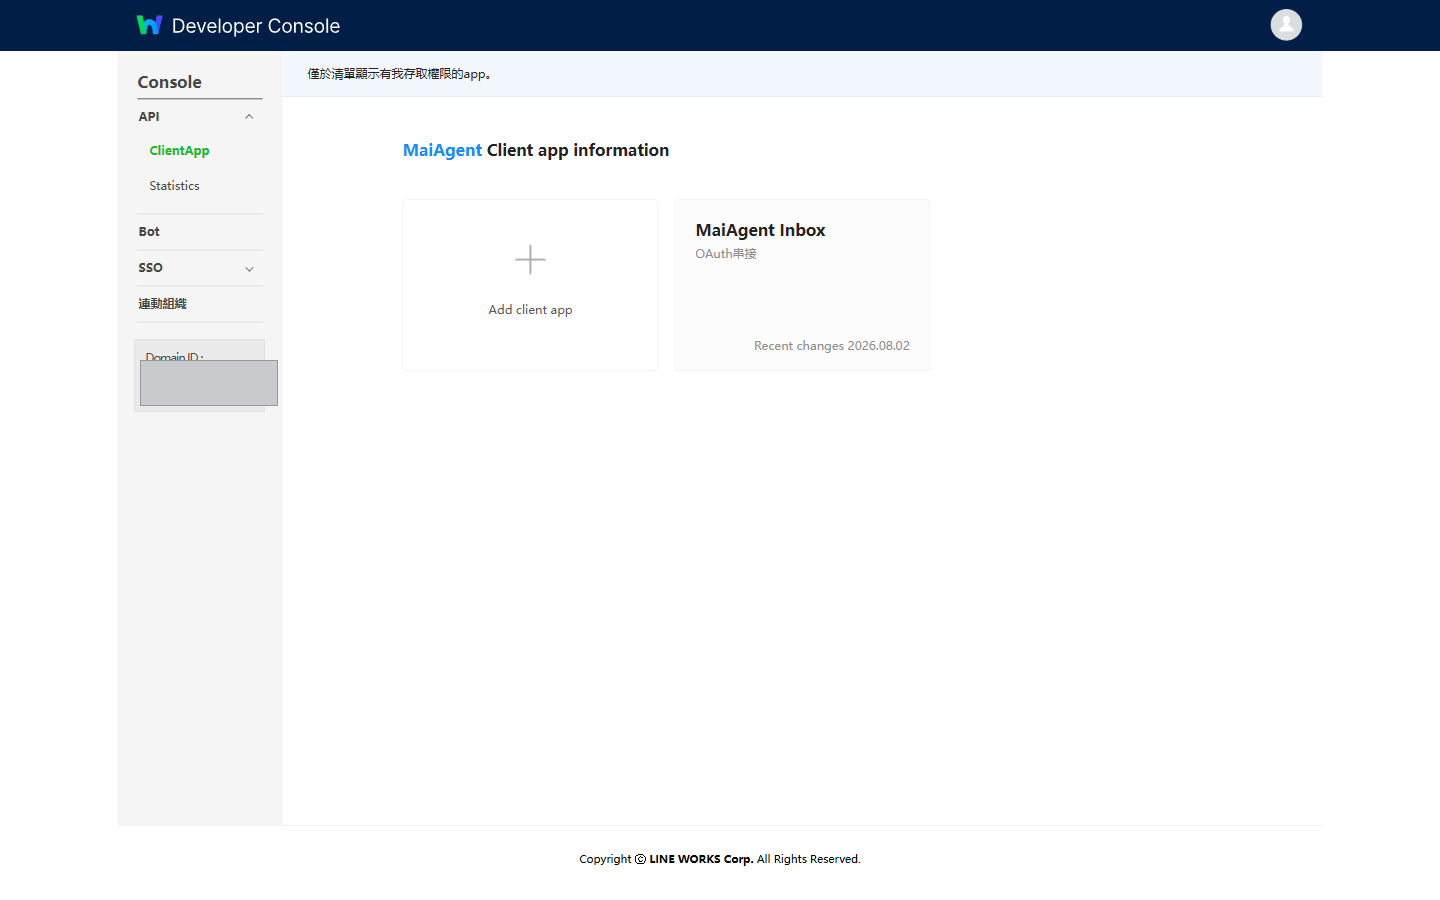
Log in to the [LINE WORKS Developer Console](https://developers.worksmobile.com/), click <mark style="color:blue;">API</mark> → <mark style="color:blue;">ClientApp</mark> in the left menu, then click <mark style="color:blue;">Add client app</mark> to create an App.

<figure><img src="https://1360999650-files.gitbook.io/~/files/v0/b/gitbook-x-prod.appspot.com/o/spaces%2F6v6TNkkOQVfRYfcNirHL%2Fuploads%2Fgit-blob-0d792c7b976ddc8399f167d41ee79992a0caa192%2Flineworks-console-clientapp-list.png?alt=media" alt="ClientApp list page in Developer Console"><figcaption><p>Developer Console → API → ClientApp</p></figcaption></figure>

### 2. Obtain Four Sets of Credentials <a href="#step-get-app-credentials" id="step-get-app-credentials"></a>

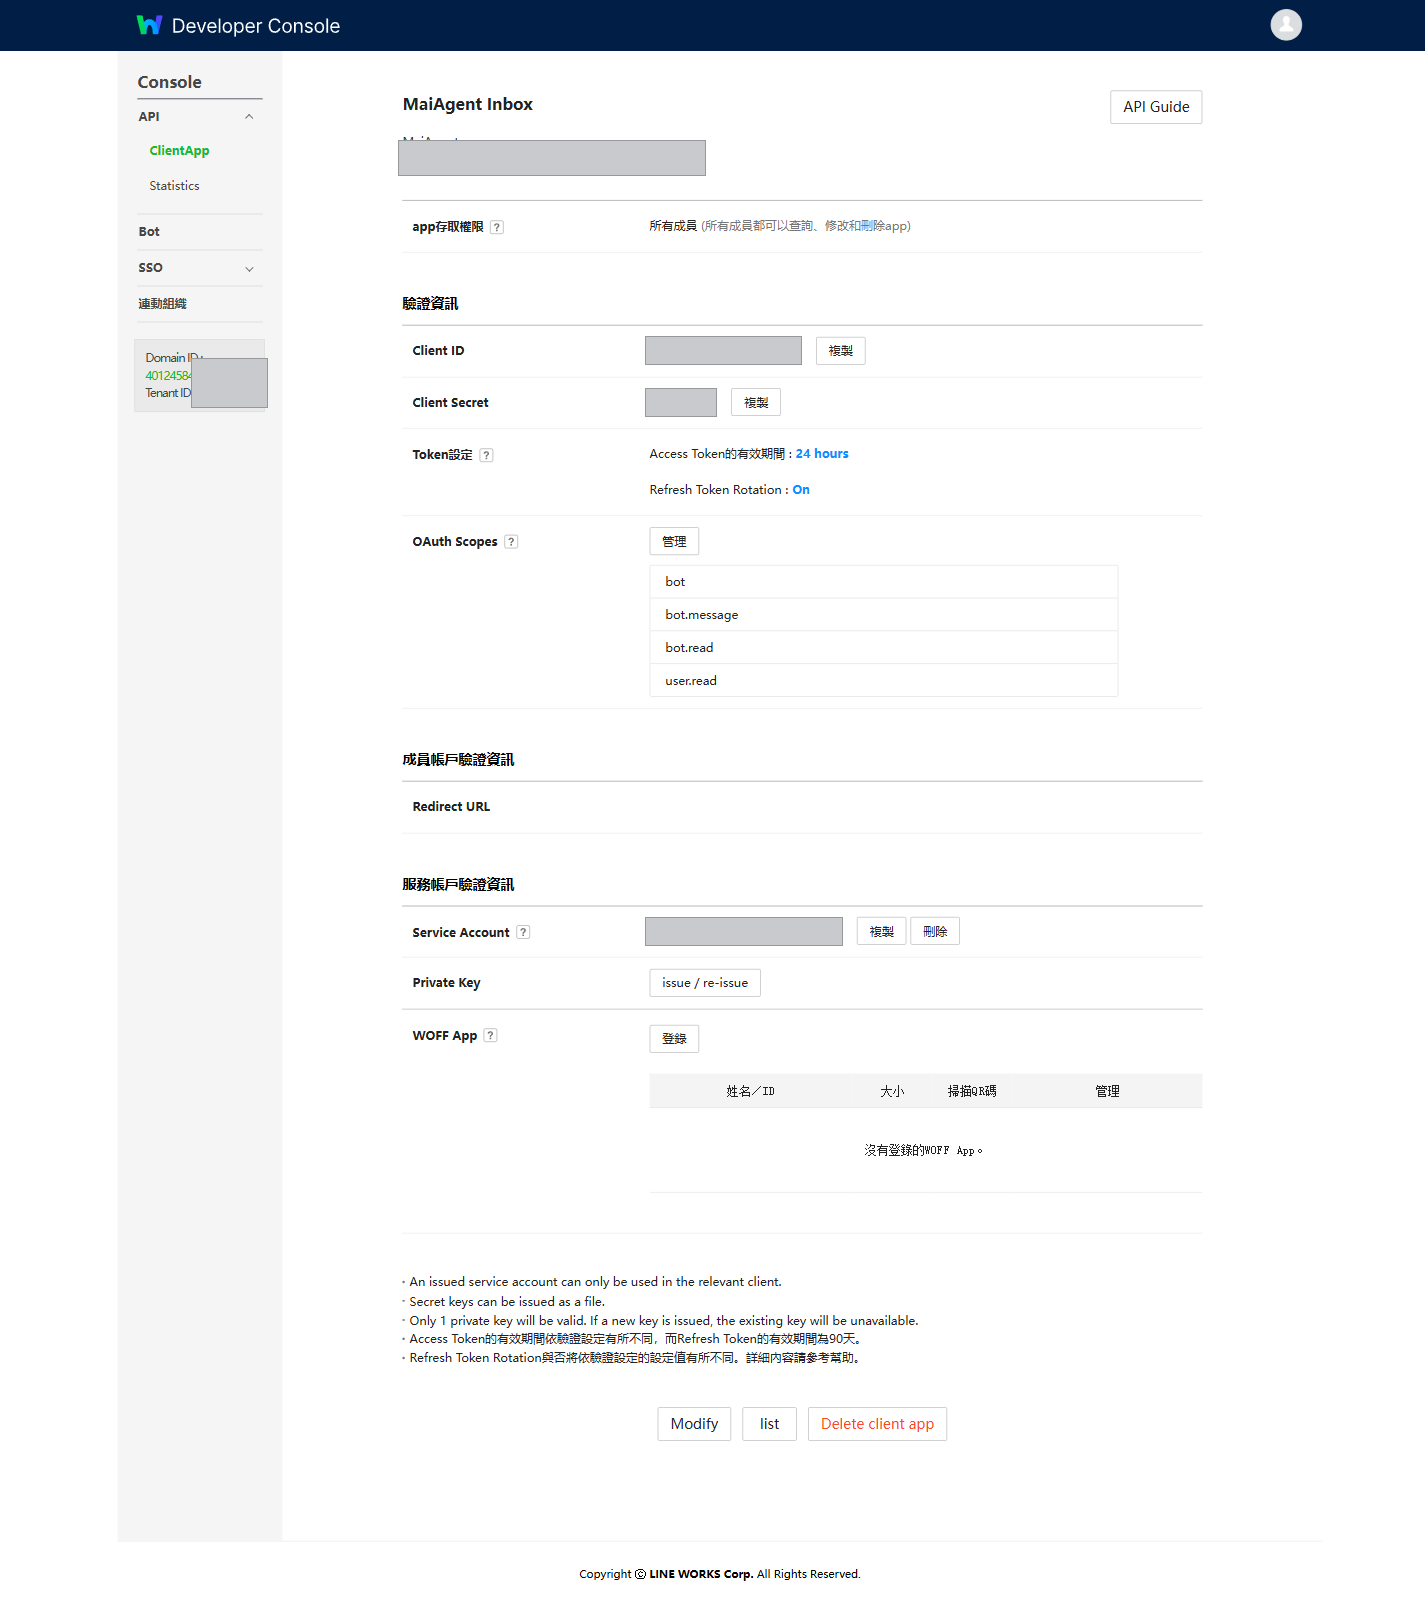
Go to the App's detail page and obtain the following four items:

| Credential          | Location in Console                                                                                     |
| ------------------- | ------------------------------------------------------------------------------------------------------- |
| **Client ID**       | <mark style="color:blue;">Client ID</mark> field                                                        |
| **Client Secret**   | <mark style="color:blue;">Client Secret</mark> field                                                    |
| **Service Account** | <mark style="color:blue;">Service Account</mark> field, in the format `xxxxx.serviceaccount@yourdomain` |
| **Private Key**     | <mark style="color:blue;">Private Key</mark> section, downloadable as a `.key` file during creation     |

<figure><img src="https://1360999650-files.gitbook.io/~/files/v0/b/gitbook-x-prod.appspot.com/o/spaces%2F6v6TNkkOQVfRYfcNirHL%2Fuploads%2Fgit-blob-22a6737d44f3e40f43a4b72a81fc4568dc81dfc8%2Flineworks-console-clientapp-detail.png?alt=media" alt="Client App detail page showing Client ID, Client Secret, OAuth Scopes, Service Account, and Private Key"><figcaption><p>Client App detail page — all four credentials and OAuth Scopes are on this page</p></figcaption></figure>

### 3. Configure OAuth Scopes <a href="#step-set-oauth-scopes" id="step-set-oauth-scopes"></a>

In the <mark style="color:blue;">OAuth Scopes</mark> section on the same page, grant the following permissions. Without these, the AI assistant cannot send or receive messages or look up member names:

| Scope         | Description                                                                  |
| ------------- | ---------------------------------------------------------------------------- |
| `bot`         | Manage Bot                                                                   |
| `bot.message` | Send messages                                                                |
| `bot.read`    | Read Bot settings                                                            |
| `user.read`   | Read member information (used to display the sender's name in conversations) |

{% hint style="info" %}
The <mark style="color:blue;">Token Settings</mark> on the same page allows you to adjust the Access Token expiration period. MaiAgent automatically manages token issuance and renewal, so keep the default values.
{% endhint %}

{% hint style="danger" %}
**The Private Key can only be downloaded once.** A `.key` file is provided for download when creating the Service Account. Once you leave the page, it cannot be retrieved again. Save it securely — if lost, you can only regenerate a new one, which will immediately invalidate the existing integration.
{% endhint %}

The private key must be in **unencrypted** PEM format: the first line is a `BEGIN PRIVATE KEY` or `BEGIN RSA PRIVATE KEY` marker (with five hyphens before and after), and the last line is the corresponding `END` marker. If your private key is password-protected, MaiAgent cannot use it — regenerate an unencrypted one.

***

## Step 2: Create a Bot and Obtain the Bot ID and Bot Secret <a href="#step-create-bot" id="step-create-bot"></a>

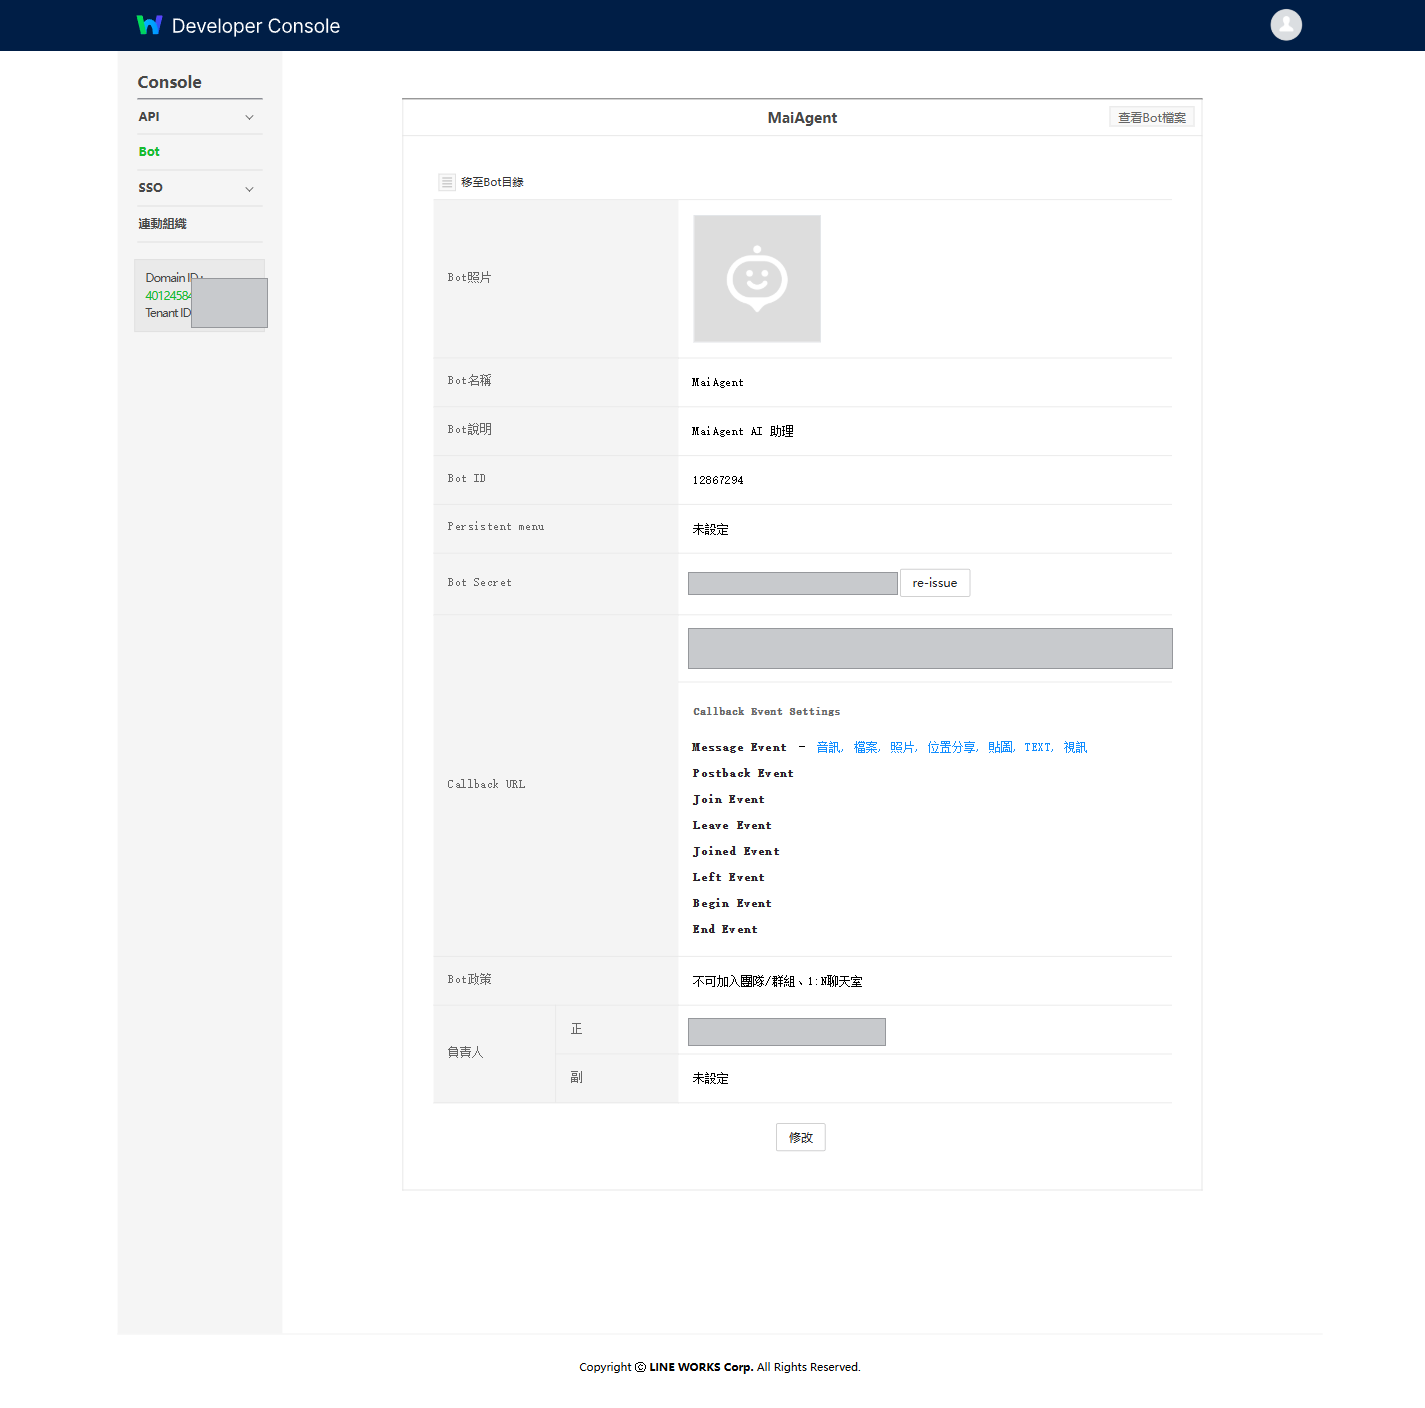
Click <mark style="color:blue;">Bot</mark> in the left menu of the Developer Console, create a Bot, and obtain:

| Credential     | Location in Console                                                                                                              |
| -------------- | -------------------------------------------------------------------------------------------------------------------------------- |
| **Bot ID**     | <mark style="color:blue;">Bot ID</mark> field                                                                                    |
| **Bot Secret** | <mark style="color:blue;">Bot Secret</mark> field, used to verify that messages from LINE WORKS actually originate from your Bot |

<figure><img src="https://1360999650-files.gitbook.io/~/files/v0/b/gitbook-x-prod.appspot.com/o/spaces%2F6v6TNkkOQVfRYfcNirHL%2Fuploads%2Fgit-blob-96baaf3f207c58a24ca25d1c10f0a2cdd692913a%2Flineworks-console-bot-detail.png?alt=media" alt="Bot detail page showing Bot name, Bot ID, Bot Secret, Callback URL, and Bot Policy"><figcaption><p>Bot detail page — Bot ID and Bot Secret are here</p></figcaption></figure>

### Required Settings for Group Conversations <a href="#step-enable-group-chat" id="step-enable-group-chat"></a>

On the Bot's <mark style="color:blue;">Edit</mark> page, find <mark style="color:blue;">Bot Policy</mark> → <mark style="color:blue;">Join Chat Room</mark>, and check <mark style="color:blue;">Allow to be invited to teams/groups and 1:N chat rooms</mark>.

Without this checked, the Bot can only handle one-on-one direct messages and cannot be invited to groups.

{% hint style="warning" %}
The <mark style="color:blue;">Bot Policy</mark> summary text on the Bot detail page has been observed to be inconsistent with the actual checkbox state in the edit form. If the two differ, rely on the checkbox state in the <mark style="color:blue;">Edit</mark> form.
{% endhint %}

**Bot Name** is also set on this page. This name is what users type when @mentioning the Bot in a group, so choose a name that is easy to type.

{% hint style="info" %}
Skip the Callback URL for now. It requires the Webhook URL generated by MaiAgent, which we will fill in during **Step 4**.
{% endhint %}

***

## Step 3: Create a LINE WORKS Channel in MaiAgent <a href="#step-create-channel-in-maiagent" id="step-create-channel-in-maiagent"></a>

### 1. Go to Channel Integration <a href="#step-go-to-channel-integration" id="step-go-to-channel-integration"></a>

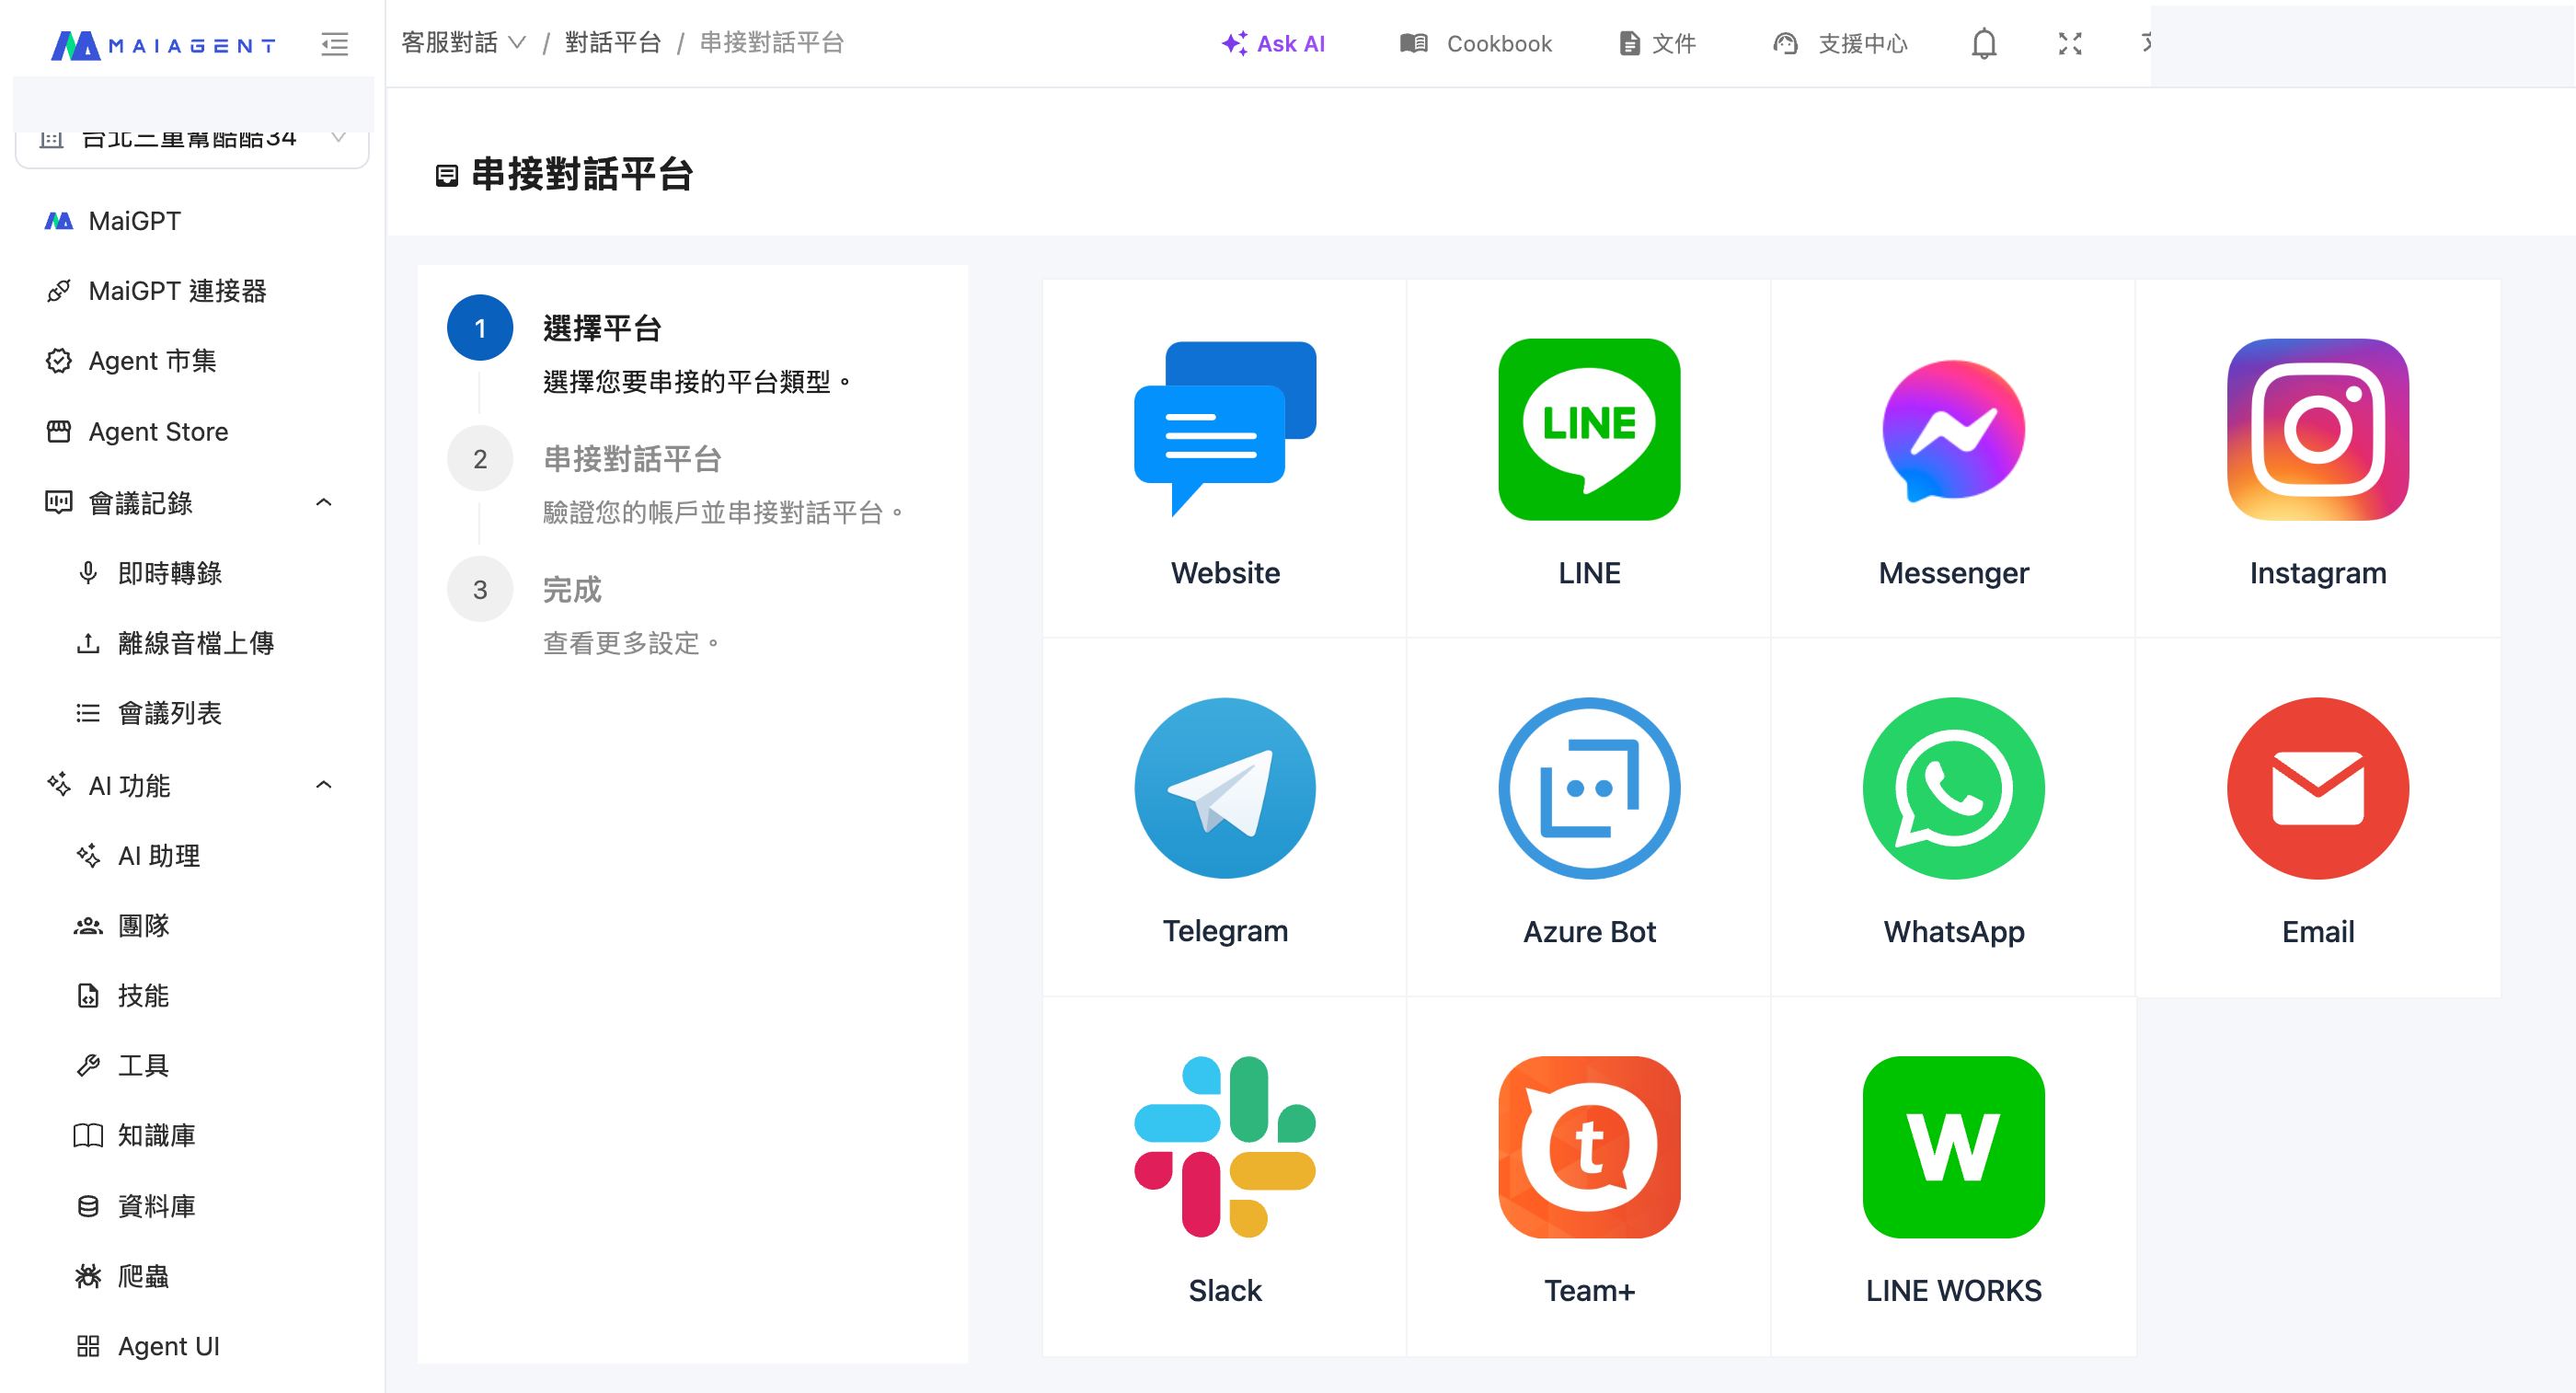
In the MaiAgent left menu, click <mark style="color:blue;">Channels</mark>, click <mark style="color:blue;">Integrate Channel</mark> in the upper right corner, and select <mark style="color:blue;">LINE WORKS</mark>.

<figure><img src="https://1360999650-files.gitbook.io/~/files/v0/b/gitbook-x-prod.appspot.com/o/spaces%2F6v6TNkkOQVfRYfcNirHL%2Fuploads%2Fgit-blob-d6428c5e7e78b5250be9c25783bceea3a59e636c%2Flineworks-choose-channel.png?alt=media" alt="LINE WORKS in the channel selection page"><figcaption><p>Select LINE WORKS from the platform list</p></figcaption></figure>

### 2. Fill in Basic Settings <a href="#step-fill-basic-settings" id="step-fill-basic-settings"></a>

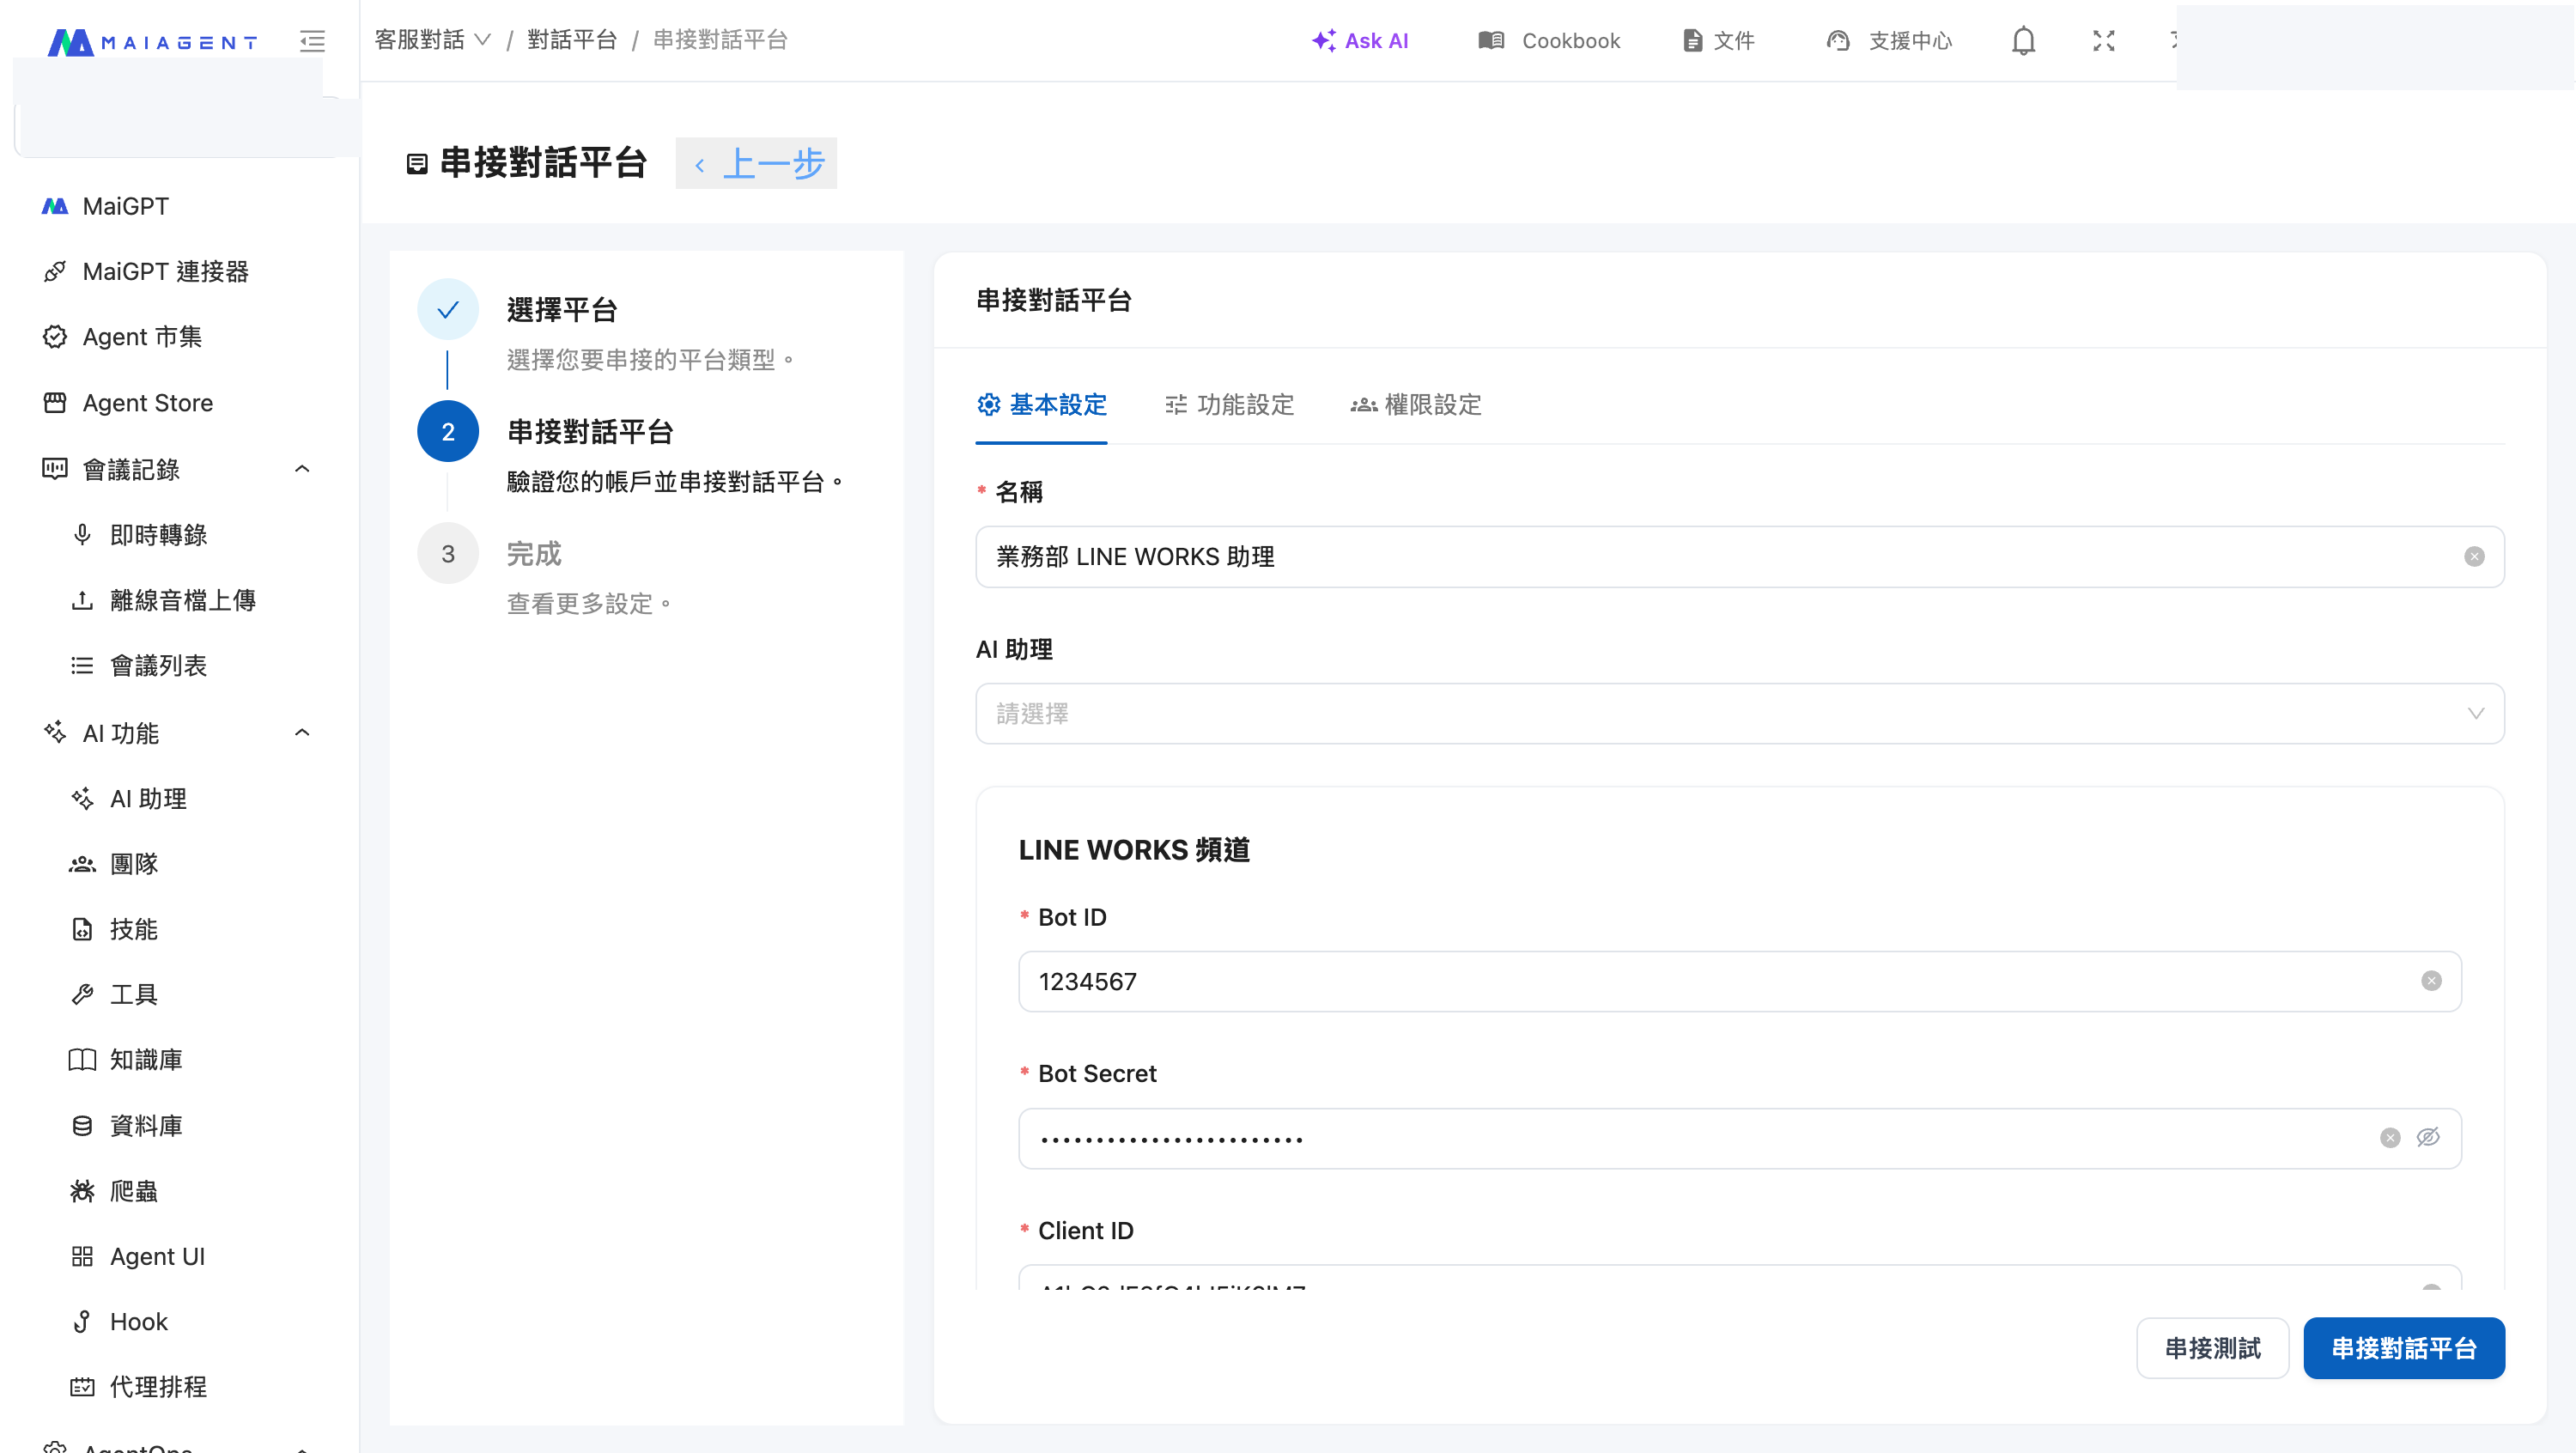
| Field               | Description                                                                                                                                  |
| ------------------- | -------------------------------------------------------------------------------------------------------------------------------------------- |
| **Name**            | Give this integration a name (required). This is only a label on the MaiAgent side and is unrelated to the Bot name displayed in LINE WORKS. |
| **AI Assistant**    | Select the AI assistant to bind                                                                                                              |
| **Bot ID**          | Obtained in Step 2 (required)                                                                                                                |
| **Bot Secret**      | Obtained in Step 2 (required)                                                                                                                |
| **Client ID**       | Obtained in Step 1 (required)                                                                                                                |
| **Client Secret**   | Obtained in Step 1 (required)                                                                                                                |
| **Service Account** | Obtained in Step 1 (required)                                                                                                                |
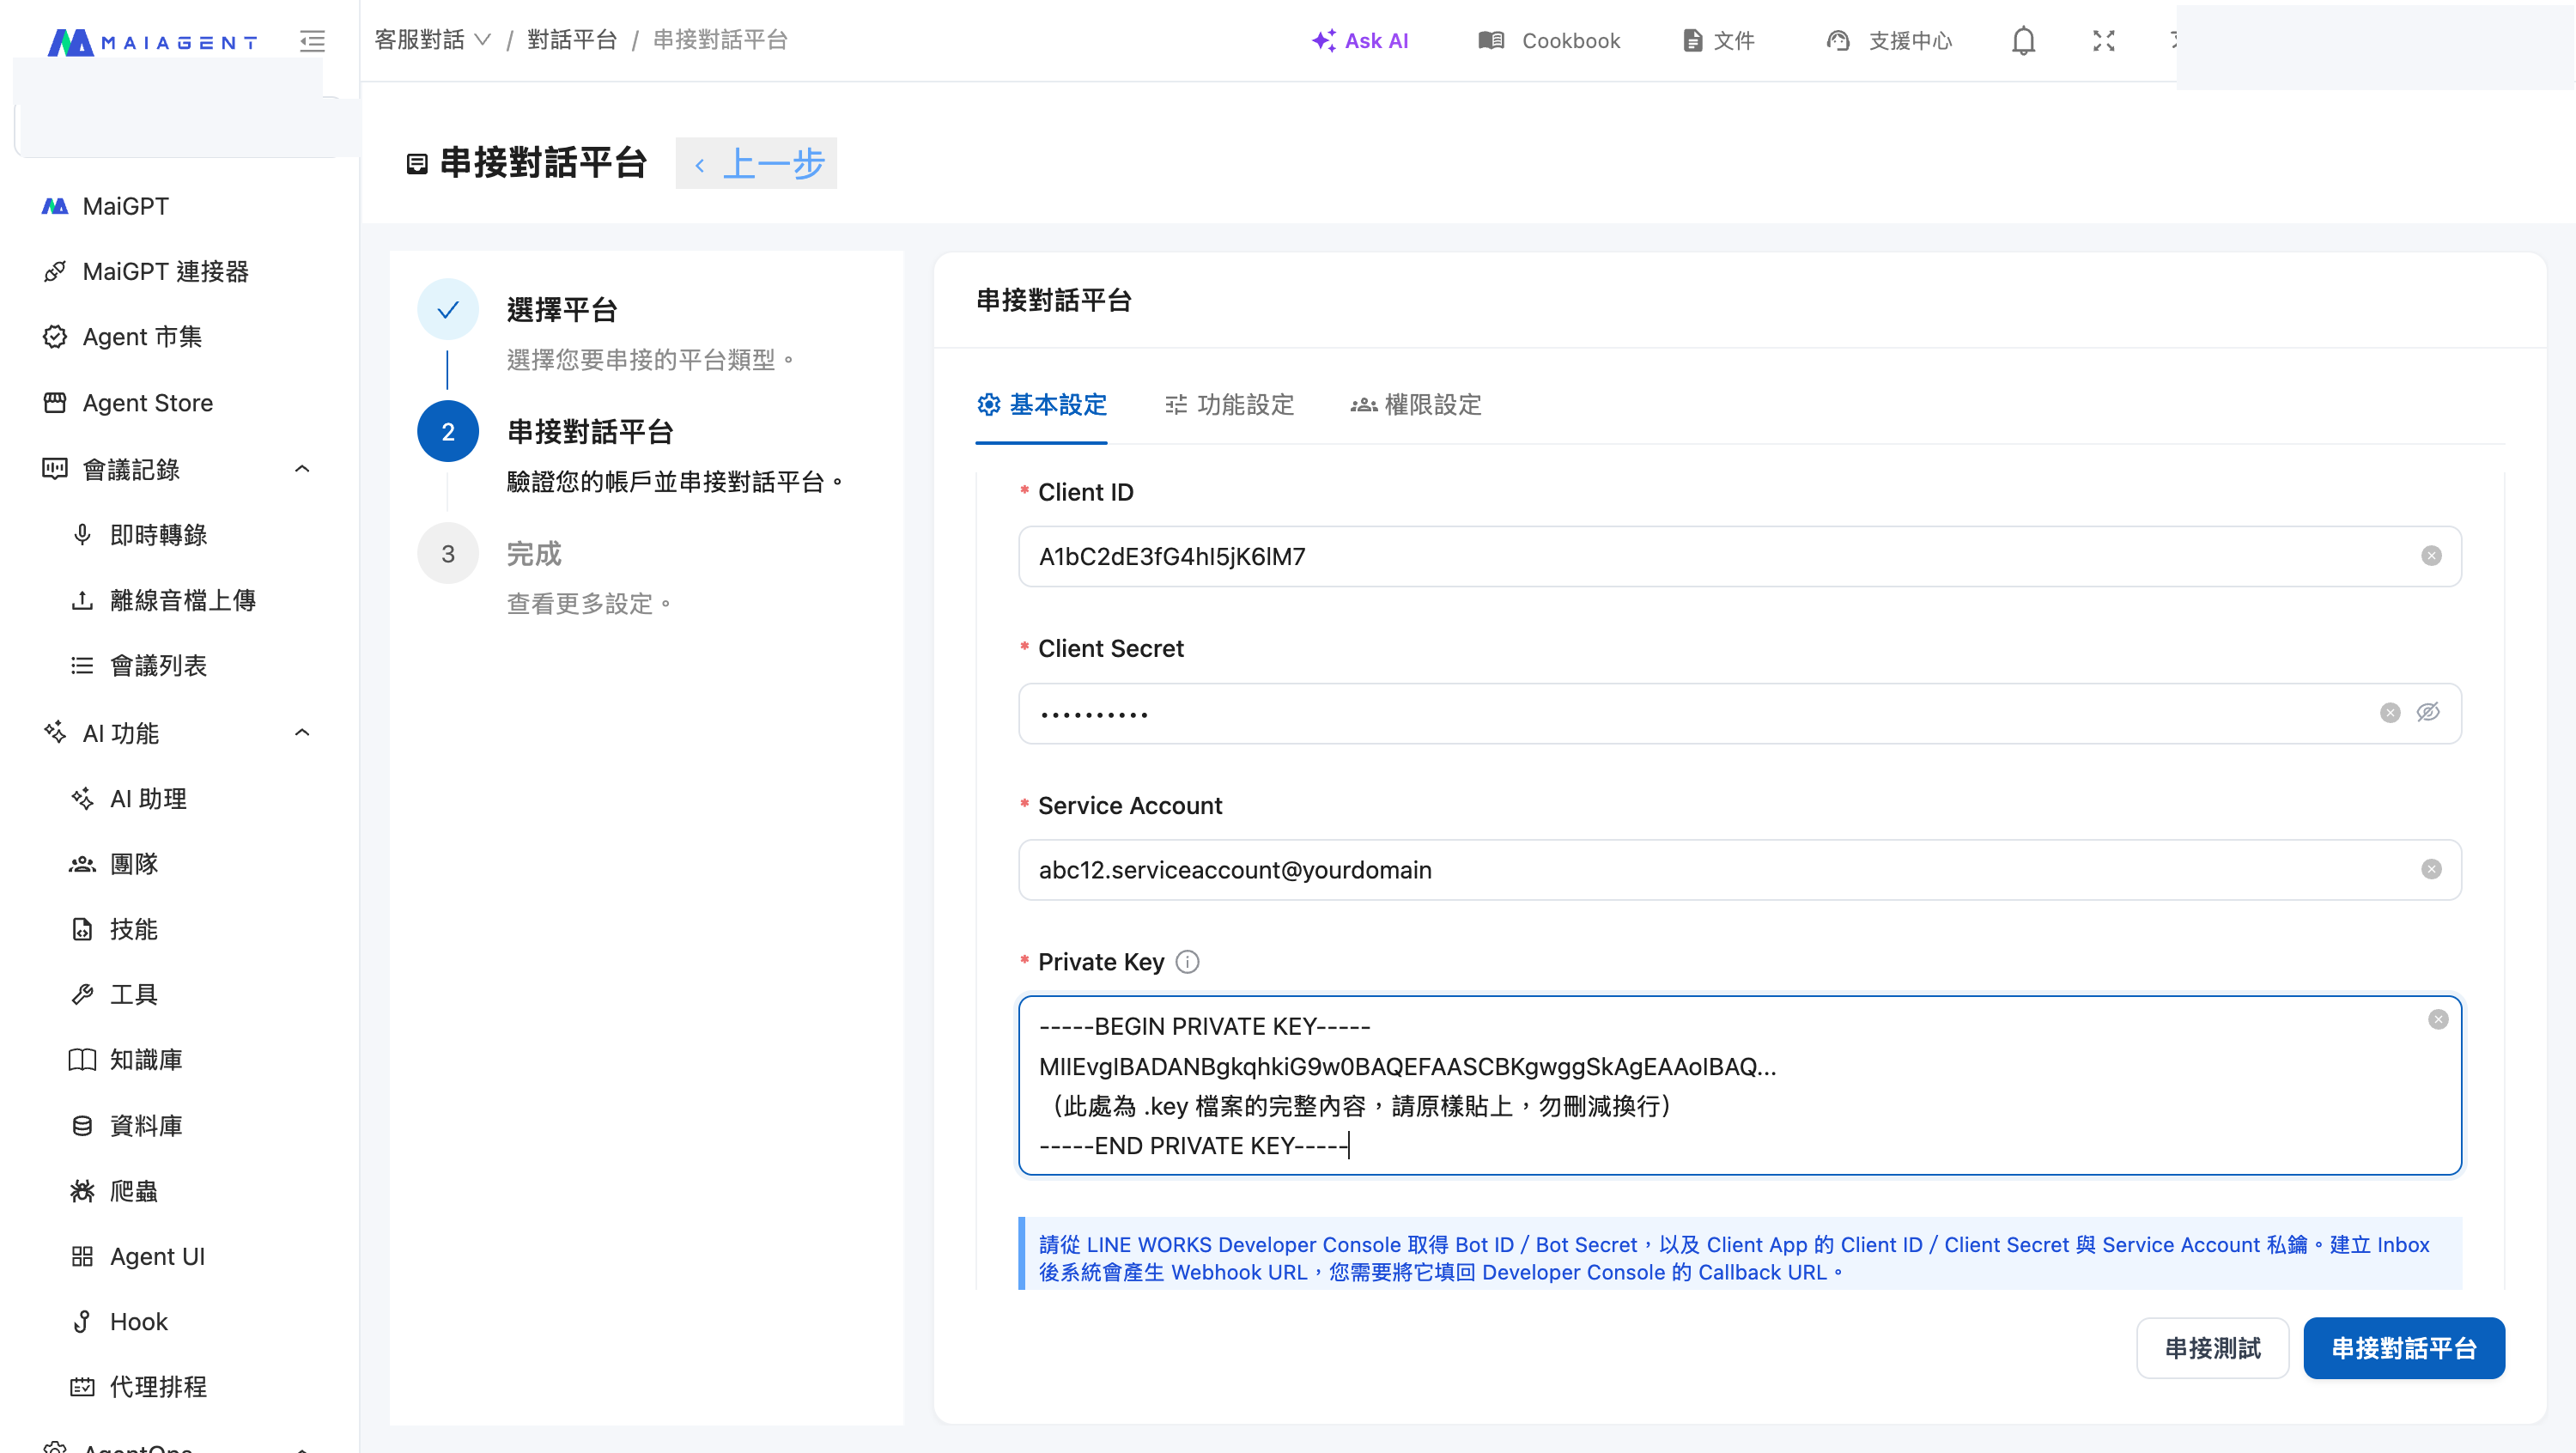
| **Private Key**     | Paste the full content of the `.key` file downloaded in Step 1, including the begin and end marker lines (required)                          |

The form is divided into two sections. The upper section contains the name, AI assistant, and the Bot ID and Bot Secret from Step 2:

<figure><img src="https://1360999650-files.gitbook.io/~/files/v0/b/gitbook-x-prod.appspot.com/o/spaces%2F6v6TNkkOQVfRYfcNirHL%2Fuploads%2Fgit-blob-684d5f59dd73accc1c7177b4c3bc3b02345ab1a3%2Flineworks-create-form.png?alt=media" alt="Upper section of the MaiAgent LINE WORKS creation form, containing Name, AI Assistant, Bot ID, and Bot Secret"><figcaption><p>Upper section of the creation form — Name, AI Assistant, Bot ID, Bot Secret (example values shown)</p></figcaption></figure>

Scroll down for the three Client App credentials and private key from Step 1:

<figure><img src="https://1360999650-files.gitbook.io/~/files/v0/b/gitbook-x-prod.appspot.com/o/spaces%2F6v6TNkkOQVfRYfcNirHL%2Fuploads%2Fgit-blob-456748551dd15070854358eaf0ceb8785d9f448d%2Flineworks-create-form-credentials.png?alt=media" alt="Lower section of the MaiAgent LINE WORKS creation form, containing Client ID, Client Secret, Service Account, and Private Key"><figcaption><p>Lower section of the creation form — Client ID, Client Secret, Service Account, Private Key (example values shown)</p></figcaption></figure>

{% hint style="info" %}
Bot Secret and Client Secret are masked with dots after entry. Click the eye icon on the right side of the field to verify the content. For Private Key, paste the full content of the `.key` file directly — line breaks are preserved as-is.
{% endhint %}

### 3. Chat Room Settings <a href="#step-chat-room-settings" id="step-chat-room-settings"></a>

| Setting                             | Description                                                                                                                                                                                |
| ----------------------------------- | ------------------------------------------------------------------------------------------------------------------------------------------------------------------------------------------ |
| **Require @Bot to reply in groups** | When enabled, the Bot only replies in group conversations when @mentioned. **Recommended when using in groups** — otherwise, every message in the group triggers an AI assistant response. |
| **Enable reset command**            | When enabled, you can customize a keyword that allows users to clear conversation memory and start over.                                                                                   |

{% hint style="info" %}
"Require @Bot to reply in groups" matches against the **Bot name set in Developer Console**, not the Inbox name entered in the "Name" field above. If you change the Bot name in Developer Console, the name to @ in the group also changes accordingly.
{% endhint %}

### 4. Integration Test <a href="#step-validate-credentials" id="step-validate-credentials"></a>

Click <mark style="color:blue;">Integration Test</mark>. MaiAgent will actually request an access token from LINE WORKS to verify the credential combination is correct.

On failure, the screen displays the specific reason. The two most common ones:

* <mark style="color:red;">Credential verification failed</mark> — Check in order: whether the Private Key was fully pasted (including the begin and end marker lines, with no missing line breaks), whether it is in unencrypted format, whether the Service Account is complete (including the `.serviceaccount@domain` suffix), whether Client ID and Client Secret are from the same App, and whether the App has been granted the four Scopes listed in Step 1
* <mark style="color:red;">This Bot ID is already bound to another inbox</mark> — The same Bot cannot be connected to two channels simultaneously. Use a different Bot, or delete the existing channel first

The failure message appears to the left of the button:

<figure><img src="https://1360999650-files.gitbook.io/~/files/v0/b/gitbook-x-prod.appspot.com/o/spaces%2F6v6TNkkOQVfRYfcNirHL%2Fuploads%2Fgit-blob-2861170cf6776a2e293279d60dc83f913bf8b18d%2Flineworks-validate-error.png?alt=media" alt="When integration test fails, the error message appears to the left of the Integration Test button"><figcaption><p>Location of the failure message (this example shows a duplicate Bot ID binding)</p></figcaption></figure>

### 5. Create and Copy the Webhook URL <a href="#step-save-and-get-webhook-url" id="step-save-and-get-webhook-url"></a>

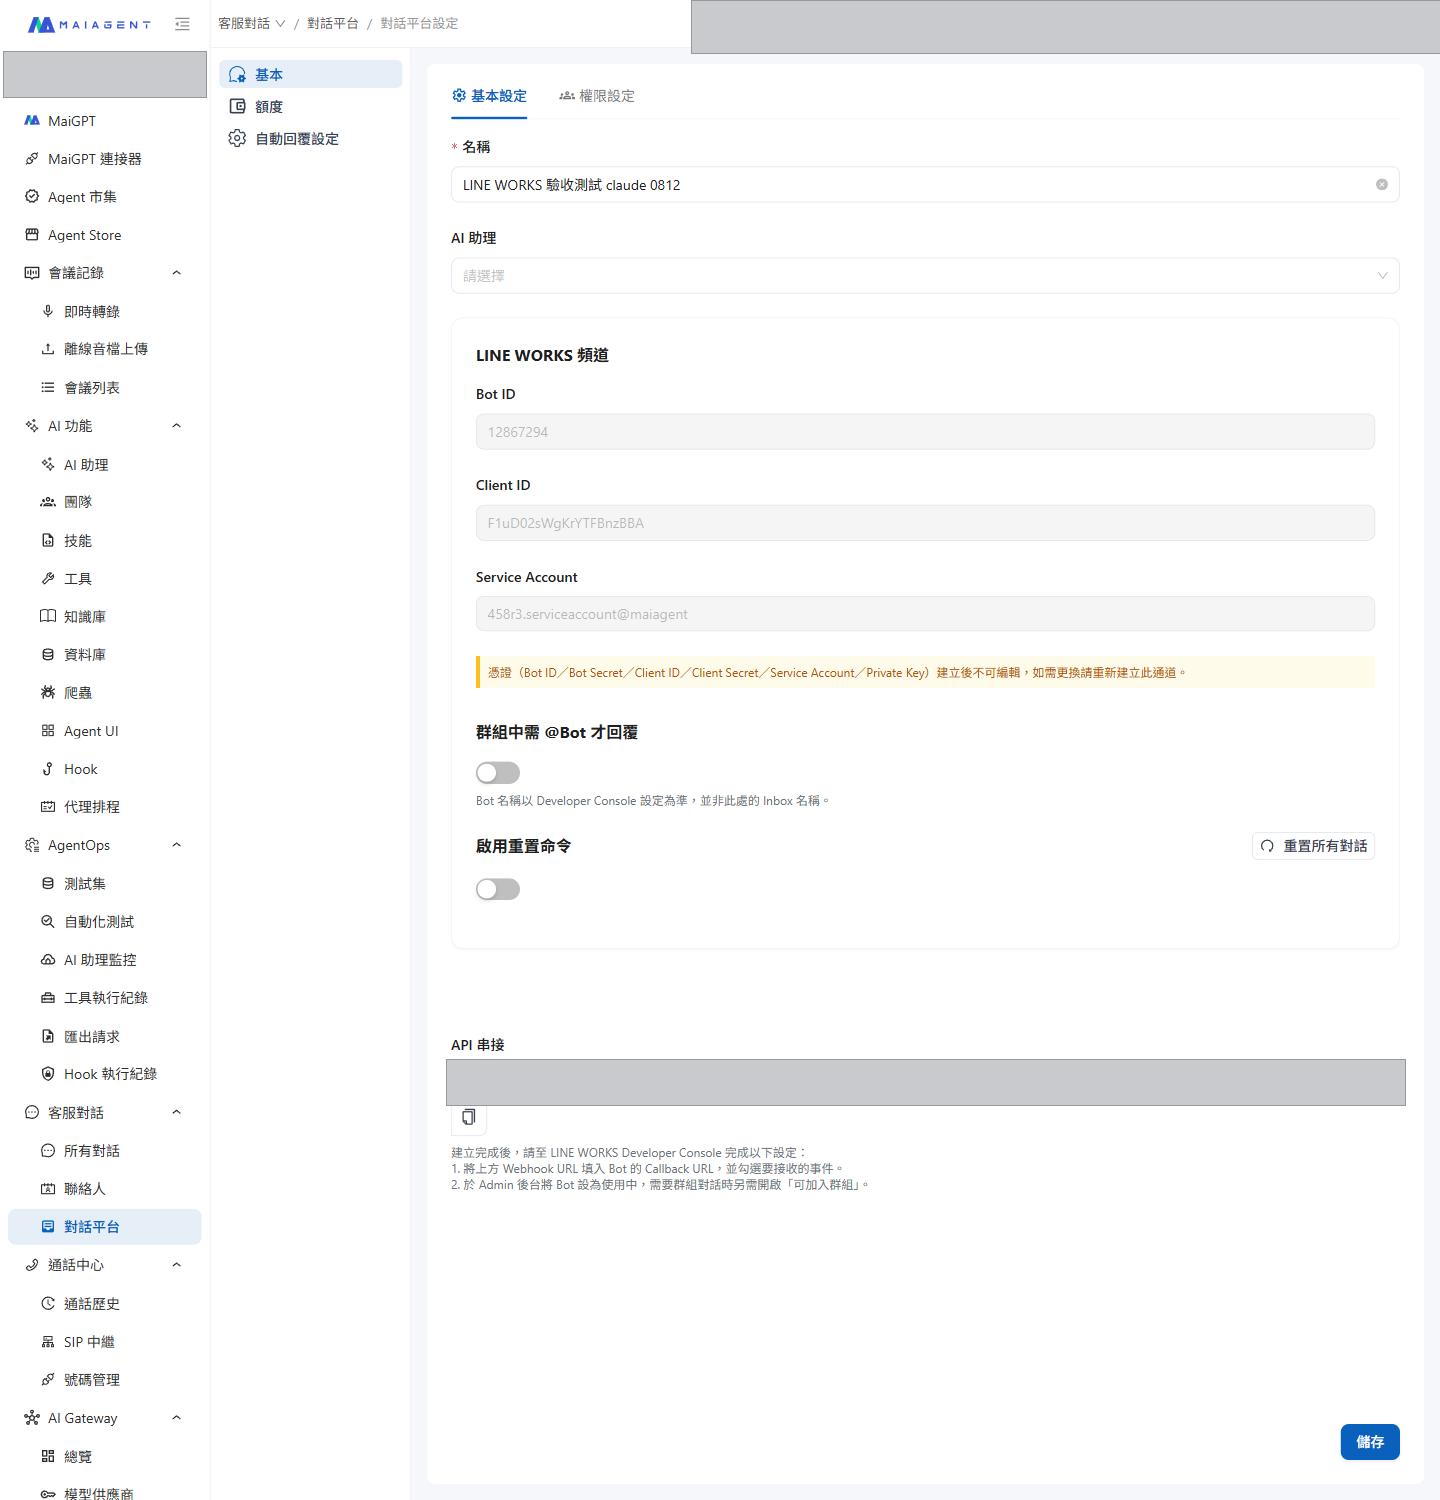
Click <mark style="color:blue;">Integrate Channel</mark> to complete the creation. The system generates a **Webhook URL** — copy it for the next step, where you will paste it back into the Developer Console.

You can also return to the channel's settings page at any time and copy this URL from the <mark style="color:blue;">API Integration</mark> field.

<figure><img src="https://1360999650-files.gitbook.io/~/files/v0/b/gitbook-x-prod.appspot.com/o/spaces%2F6v6TNkkOQVfRYfcNirHL%2Fuploads%2Fgit-blob-a78d5c06347c503ad3522890174f6e39d536e127%2Flineworks-edit-page.png?alt=media" alt="LINE WORKS channel settings page showing Bot ID, Client ID, and Service Account as read-only, with the API Integration Webhook URL"><figcaption><p>Settings page after creation — credentials are no longer displayed, and the Webhook URL can be copied at any time</p></figcaption></figure>

***

## Step 4: Return to Developer Console to Configure the Callback URL <a href="#step-configure-callback-url" id="step-configure-callback-url"></a>

Go back to the Bot created in Step 2 and open the <mark style="color:blue;">Edit</mark> page:

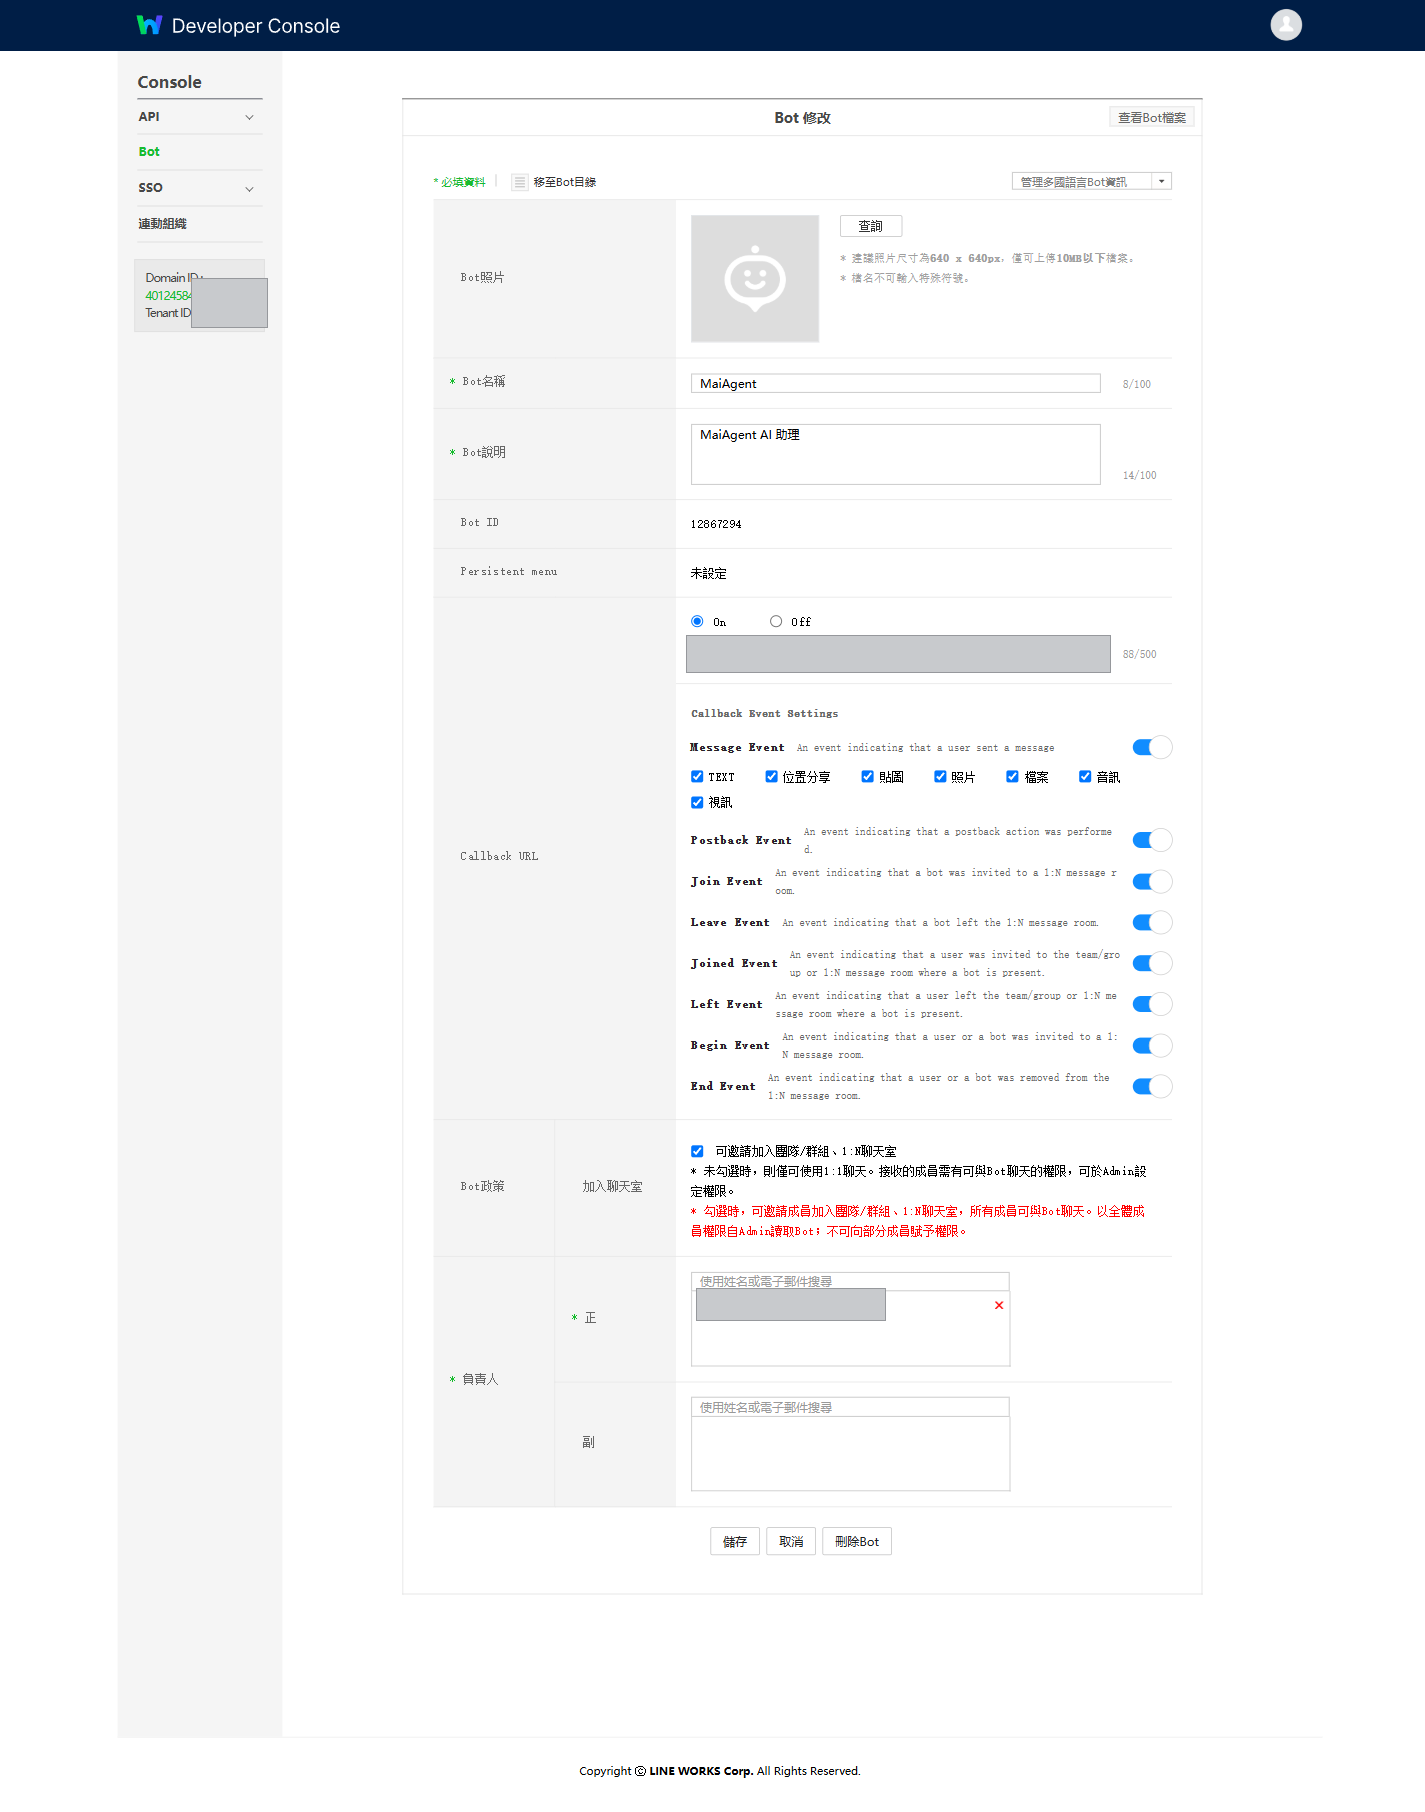
1. Set <mark style="color:blue;">Callback URL</mark> to <mark style="color:blue;">On</mark> and enter the **Webhook URL** generated by MaiAgent
2. Under <mark style="color:blue;">Callback Event Settings</mark>, check the events to receive. It is recommended to check all options under <mark style="color:blue;">Message Event</mark> so the AI assistant can handle all types of messages:

| Event                                     | Corresponding User Action |
| ----------------------------------------- | ------------------------- |
| <mark style="color:blue;">TEXT</mark>     | Send a text message       |
| <mark style="color:blue;">Photo</mark>    | Send an image             |
| <mark style="color:blue;">File</mark>     | Send a file               |
| <mark style="color:blue;">Audio</mark>    | Send a voice message      |
| <mark style="color:blue;">Video</mark>    | Send a video              |
| <mark style="color:blue;">Location</mark> | Share a location          |
| <mark style="color:blue;">Sticker</mark>  | Send a sticker            |

3. If using in groups, it is also recommended to check <mark style="color:blue;">Join Event</mark> and <mark style="color:blue;">Joined Event</mark>
4. Save the settings

<figure><img src="https://1360999650-files.gitbook.io/~/files/v0/b/gitbook-x-prod.appspot.com/o/spaces%2F6v6TNkkOQVfRYfcNirHL%2Fuploads%2Fgit-blob-b55d63f49e2c97ae83bd1ea6737402a710e03e06%2Flineworks-console-bot-callback.png?alt=media" alt="Callback URL and Callback Event Settings on the Bot edit page"><figcaption><p>Set Callback URL to On and enter the Webhook URL, then check event types below</p></figcaption></figure>

{% hint style="warning" %}
Unchecked event types will not be sent to MaiAgent by LINE WORKS. Those messages will be as if they never happened — the AI assistant will not reply, and no record will appear in the conversation.
{% endhint %}

***

## Step 5: Activate the Bot in the Admin Console <a href="#step-activate-bot" id="step-activate-bot"></a>

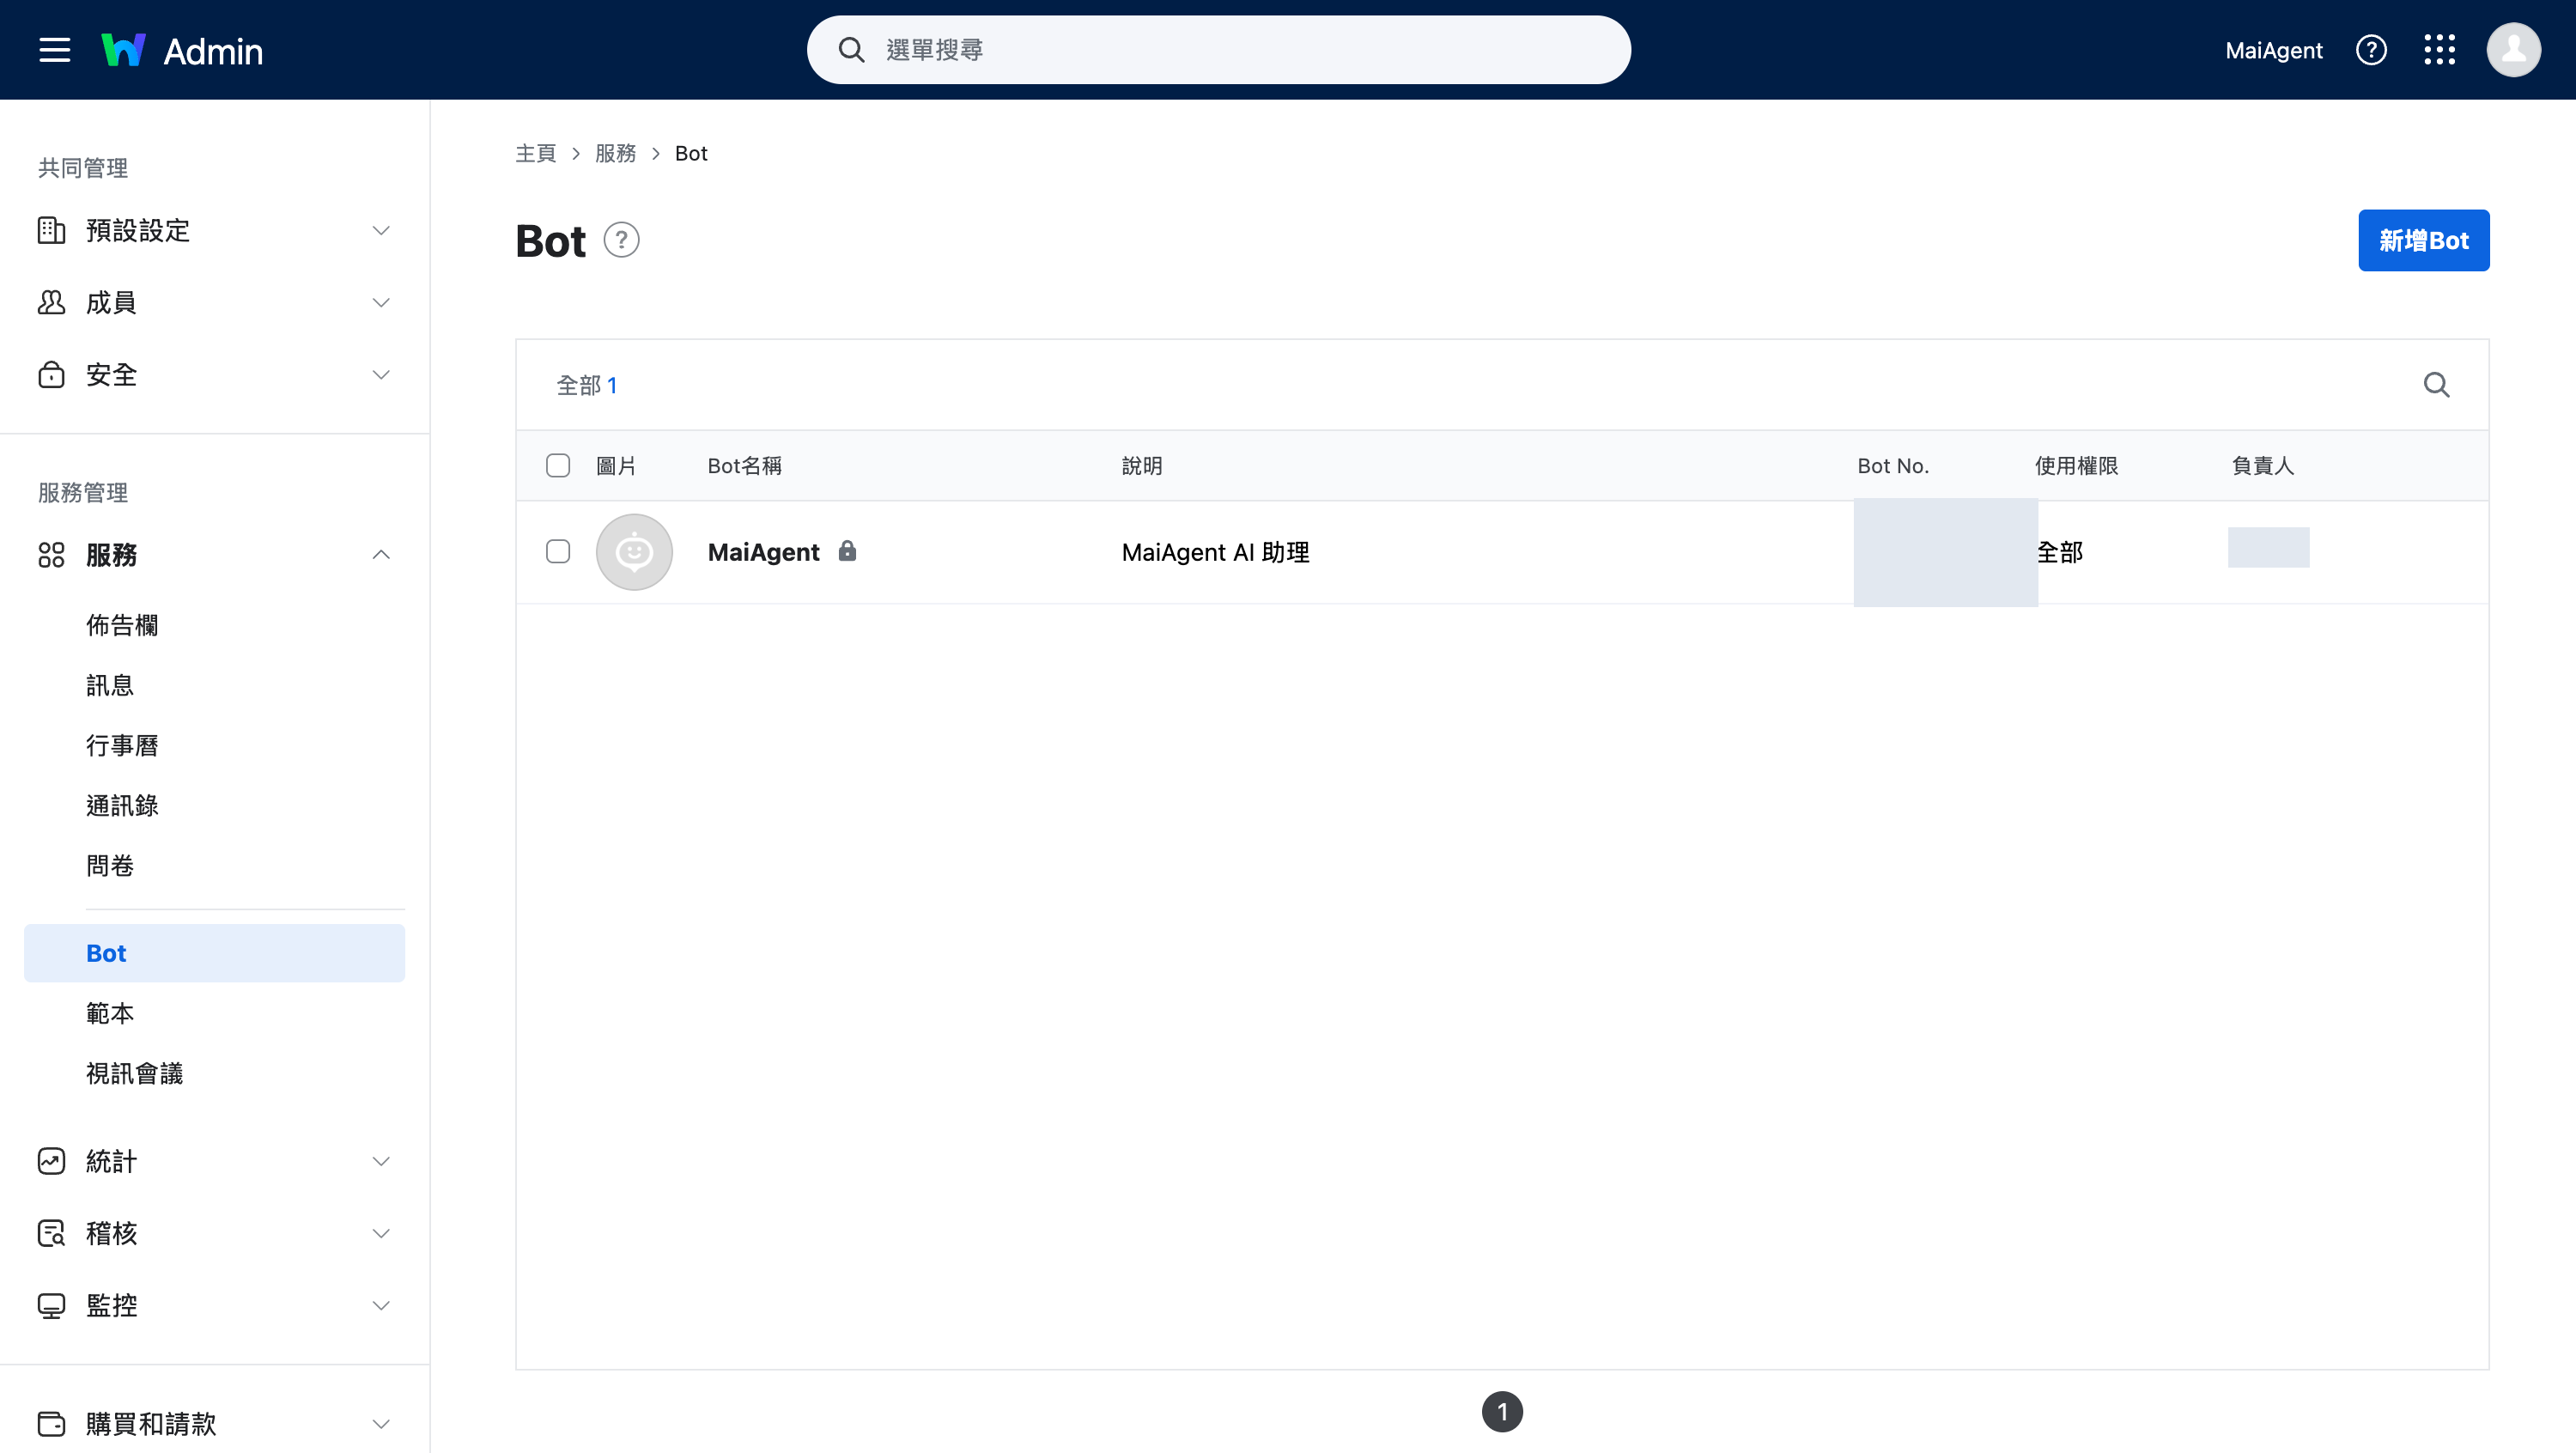
Log in to the [LINE WORKS Admin console](https://admin.worksmobile.com/), go to <mark style="color:blue;">Service</mark> → <mark style="color:blue;">Bot</mark> in the left menu, and click <mark style="color:blue;">Add Bot</mark> in the upper right corner to add the Bot created in Step 2.

After adding, this page lists the Bot and allows you to configure which members can see it in the <mark style="color:blue;">Usage Permissions</mark> column (set to <mark style="color:blue;">All</mark> for all members).

<figure><img src="https://1360999650-files.gitbook.io/~/files/v0/b/gitbook-x-prod.appspot.com/o/spaces%2F6v6TNkkOQVfRYfcNirHL%2Fuploads%2Fgit-blob-9bd2b2649536680af45839ab3c239677210c1100%2Flineworks-admin-bot.png?alt=media" alt="Service → Bot page in the LINE WORKS Admin console, showing the added Bot and its usage permissions"><figcaption><p>Admin console → Service → Bot — add the Bot and configure usage permissions</p></figcaption></figure>

{% hint style="warning" %}
This step is easy to miss. After creating the Bot in Developer Console, **it does not yet appear in employees' LINE WORKS**. A tenant administrator must add it in the Admin console before employees can find it.
{% endhint %}

***

## Getting Started <a href="#getting-started" id="getting-started"></a>

### Direct Message <a href="#direct-message" id="direct-message"></a>

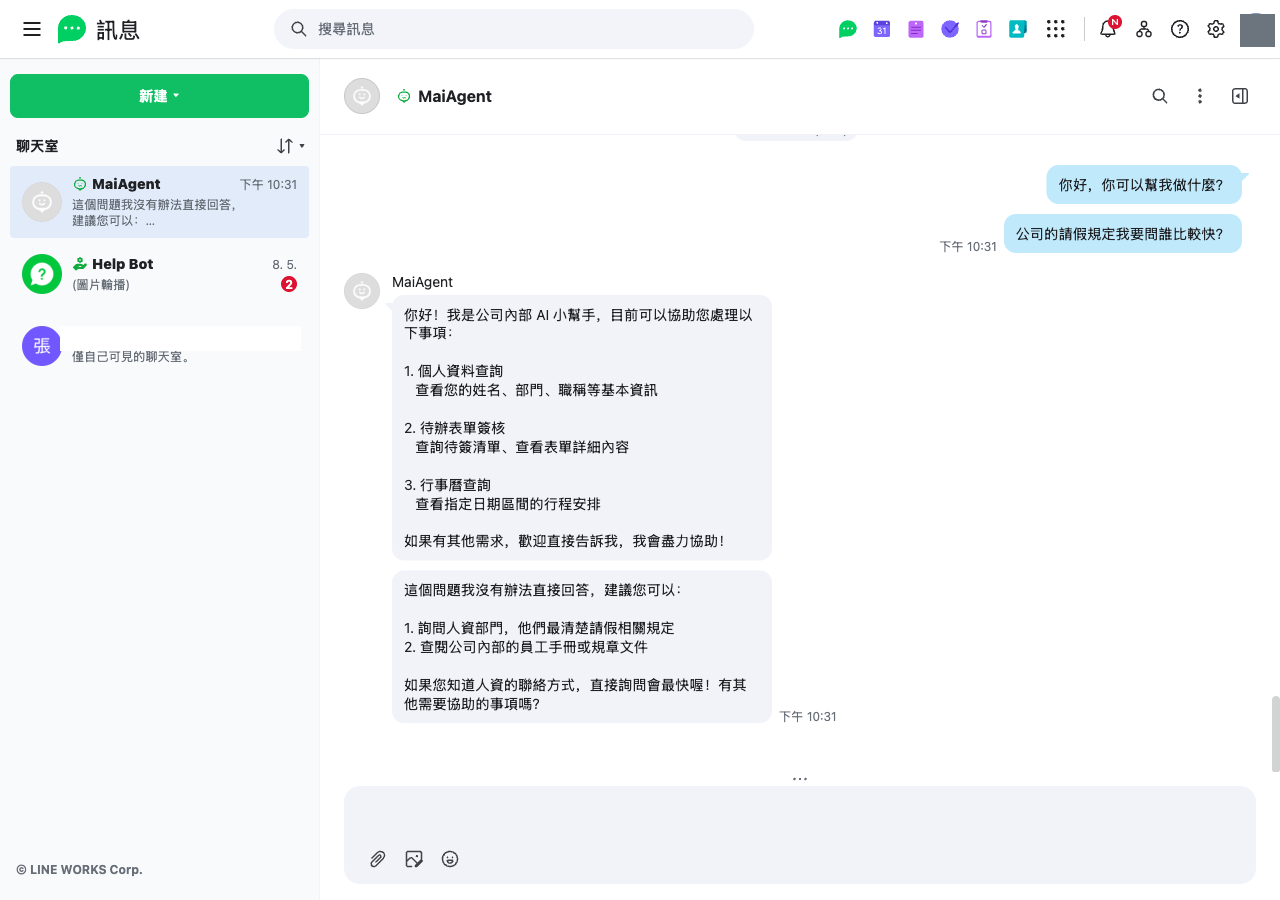
Search for the Bot name in LINE WORKS and start a conversation. The AI assistant replies automatically.

<figure><img src="https://1360999650-files.gitbook.io/~/files/v0/b/gitbook-x-prod.appspot.com/o/spaces%2F6v6TNkkOQVfRYfcNirHL%2Fuploads%2Fgit-blob-61671de9af211a3e38edec25ce37d9a382dceea4%2Flineworks-chat-demo.png?alt=media" alt="One-on-one conversation with the AI assistant in a LINE WORKS chat room"><figcaption><p>Chat directly with the AI assistant in a LINE WORKS chat room</p></figcaption></figure>

{% hint style="info" %}
LINE WORKS chat rooms display plain text only and **do not render Markdown**. If the AI assistant outputs tables or syntax like `**bold**` or `###`, users will see the raw symbols. It is recommended to add a formatting rule in the assistant's role prompt, requesting numbered lists with line breaks instead of Markdown syntax.
{% endhint %}

### Group Conversation <a href="#group-conversation" id="group-conversation"></a>

Invite the Bot to a group. If "Require @Bot to reply in groups" is enabled, type `@BotName your question` to trigger a reply.

In MaiAgent's <mark style="color:blue;">All Conversations</mark>, the same group appears as **a single conversation** with the sender's name displayed on each message. Multiple people speaking in the group will not be split into separate parallel conversations.

### Supported Message Types <a href="#supported-message-types" id="supported-message-types"></a>

| User Sends                    | AI Assistant Handling                                   |
| ----------------------------- | ------------------------------------------------------- |
| Text                          | Replies directly                                        |
| Image                         | Can recognize image content                             |
| File (PDF, Excel, Word, etc.) | Reads the content and answers related questions         |
| Voice message                 | Converts to text before processing                      |
| Video                         | Saved as an attachment and recorded in the conversation |
| Location                      | Displayed as "📍 Location shared"                       |
| Sticker                       | Displayed as "🏷 Sticker"                               |

The AI assistant supports text and attachments in replies. If a single text message exceeds LINE WORKS' 1,000-character limit, the system automatically splits it into segments — nothing is truncated.

***

## FAQ <a href="#faq" id="faq"></a>

### The AI Assistant Suddenly Stopped Replying <a href="#troubleshoot-no-reply" id="troubleshoot-no-reply"></a>

First, go to the channel's settings page and check whether a <mark style="color:red;">credentials expired</mark> warning is displayed.

The most common cause of credential expiration is **regenerating the private key or Service Account in Developer Console**. Once the old credentials are replaced, MaiAgent can no longer obtain an access token.

Since credentials cannot be modified in place, create a new LINE WORKS channel and enter the new credentials.

{% hint style="info" %}
The only external symptom of expired credentials is that the AI assistant goes silent — users will not receive any error message. If a colleague reports "the bot isn't responding," this is the first place to check.
{% endhint %}

### Why Can't Credentials Be Modified? <a href="#why-credentials-are-immutable" id="why-credentials-are-immutable"></a>

Credentials are sensitive data. After MaiAgent stores them, they are never sent back to the frontend, and the settings page does not accept modifications to avoid repeated exposure of credentials during transmission and on screen. Bot ID, Client ID, and Service Account are displayed in read-only mode so you can verify which Bot is currently connected.

To replace any credential, delete this channel and create a new one.

### @Mentioned the Bot in a Group but Got No Response <a href="#troubleshoot-group-mention" id="troubleshoot-group-mention"></a>

* Verify that the @ name matches the **Bot name in Developer Console**, not the Inbox name in MaiAgent
* Verify that on the Bot edit page, <mark style="color:blue;">Bot Policy</mark> → <mark style="color:blue;">Join Chat Room</mark> has <mark style="color:blue;">Allow to be invited to teams/groups and 1:N chat rooms</mark> checked
* Verify that <mark style="color:blue;">Callback Event Settings</mark> has <mark style="color:blue;">TEXT</mark> checked

### Do I Need to Periodically Renew the Token? <a href="#token-renewal" id="token-renewal"></a>

No. MaiAgent uses Service Account authentication, where access tokens are automatically issued and renewed by the system. They do not expire over time. As long as the credentials in Developer Console have not been regenerated, the integration remains active.


---

# Agent Instructions
This documentation is published with GitBook. GitBook is the documentation platform designed so that both humans and AI agents can read, navigate, and reason over technical content effectively. Learn more at gitbook.com.

## Querying This Documentation
If you need additional information that is not directly available in this page, you can query the documentation dynamically by asking a question.

Perform an HTTP GET request on the current page URL with the `ask` query parameter, and the optional `goal` query parameter:

```
GET https://docs.maiagent.ai/maiagent-user-guide/en/conversations/line-works.md?ask=<question>&goal=<endgoal>
```

`ask` is the immediate question: it should be specific, self-contained, and written in natural language.
`goal` is optional and describes the broader end goal you are ultimately trying to accomplish on behalf of the user. GitBook uses it to tailor the answer towards what is most useful for that goal.

The response will contain a direct answer to the question and relevant excerpts and sources from the documentation.

Use this mechanism when the answer is not explicitly present in the current page, you need clarification or additional context, or you want to retrieve related documentation sections.