For the complete documentation index, see llms.txt. This page is also available as Markdown.

Use Official Built-in Agents

Choose an official built-in Agent from the Agent Marketplace, upload source material, clarify requirements, and receive downloadable output.

This page is for all members. It explains how to find the right official built-in Agent in the Agent Marketplace, how to work with it, and who to contact if you run into an issue.

If you are an organization administrator deciding which Agents to make available to your team, see Enable and Manage.

How Official Built-in Agents Work

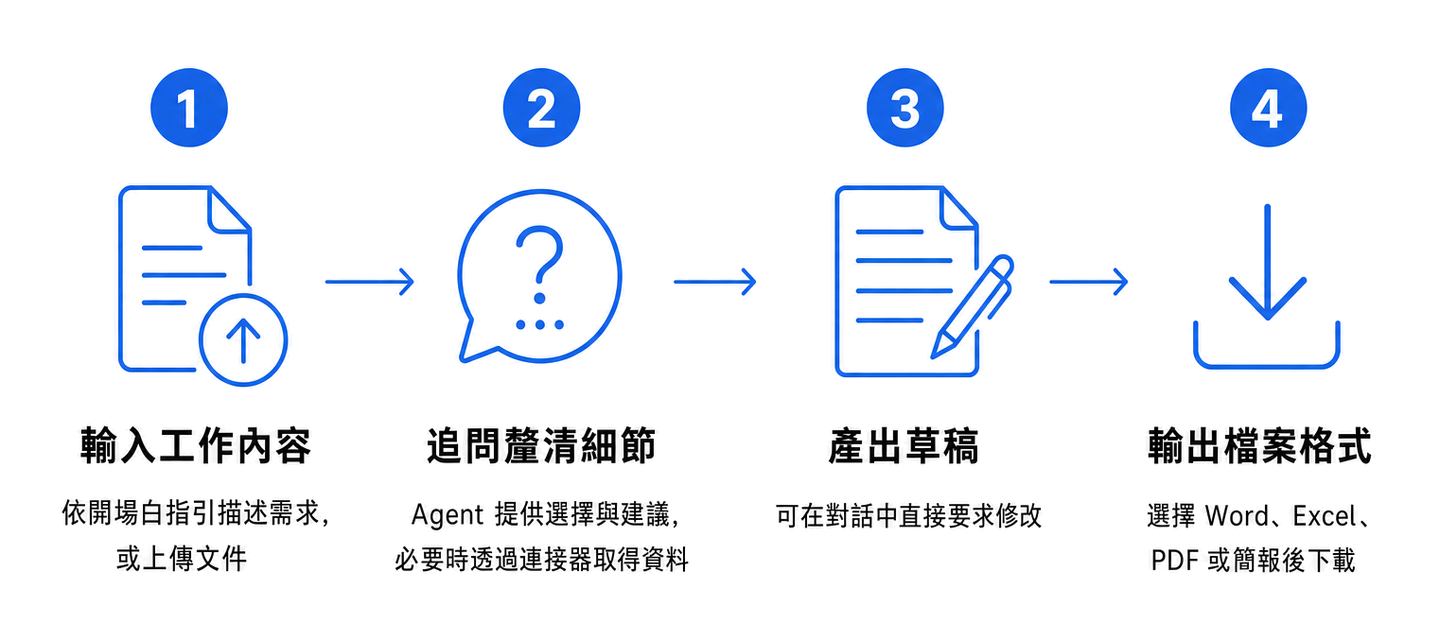
Every official built-in Agent follows the same workflow: you provide source material and requirements, it asks follow-up questions until the details are clear, and then it produces the result.

Four-step workflow for official built-in Agents
The four-step workflow for official built-in Agents

1. Follow the Greeting to Enter Your Task or Upload Files

When you start a conversation, the Agent first sends a greeting explaining what it can help with and what you need to provide. Follow its instructions: type a description of your request or upload files, such as contracts, résumés, reports, or meeting recordings, depending on the Agent.

2. The Agent Offers Options and Recommendations to Clarify the Output

The Agent does not immediately start working as soon as it receives your material. It asks about key decisions—for example, “How many years of experience should these interview questions target?” or “Should the report use bullets or prose?”—and provides options directly, so you can click one or add a short response.

At this stage, some Agents also retrieve external information through connectors, such as data from your calendar, cloud drive, or a third-party system. The first time a connector is used, you will be asked to authorize access.

Do not skip this step. The extra 30 seconds you spend answering clarification questions directly improves the accuracy of the output.

3. Generate a Draft

Once the details are confirmed, the Agent generates the result. You can continue asking for changes in the conversation—adjust the tone, add sections, or change the structure—without starting over.

4. Choose Whether to Export to a Specific File Format

When you are satisfied with the draft, ask the Agent to export it as a file. Supported formats vary by Agent and commonly include Word, Excel, PDF, and presentation files. The generated file appears in the conversation for you to download.

Choose an Agent from the Agent Marketplace

1

Open the Agent Marketplace

After signing in, select Agent Marketplace from the left sidebar.

2

Switch to the “Official Built-in” Tab

At the top of the marketplace, switch from the Organization-built tab to Official Built-in.

3

Search or Filter by Scenario Category

  • Search: Use the search bar at the top to search by Agent name, description, or scenario keyword

  • Scenario categories: Narrow the list using category tags such as Human Resources, Legal, Healthcare, or Manufacturing, or select All Scenarios to see everything

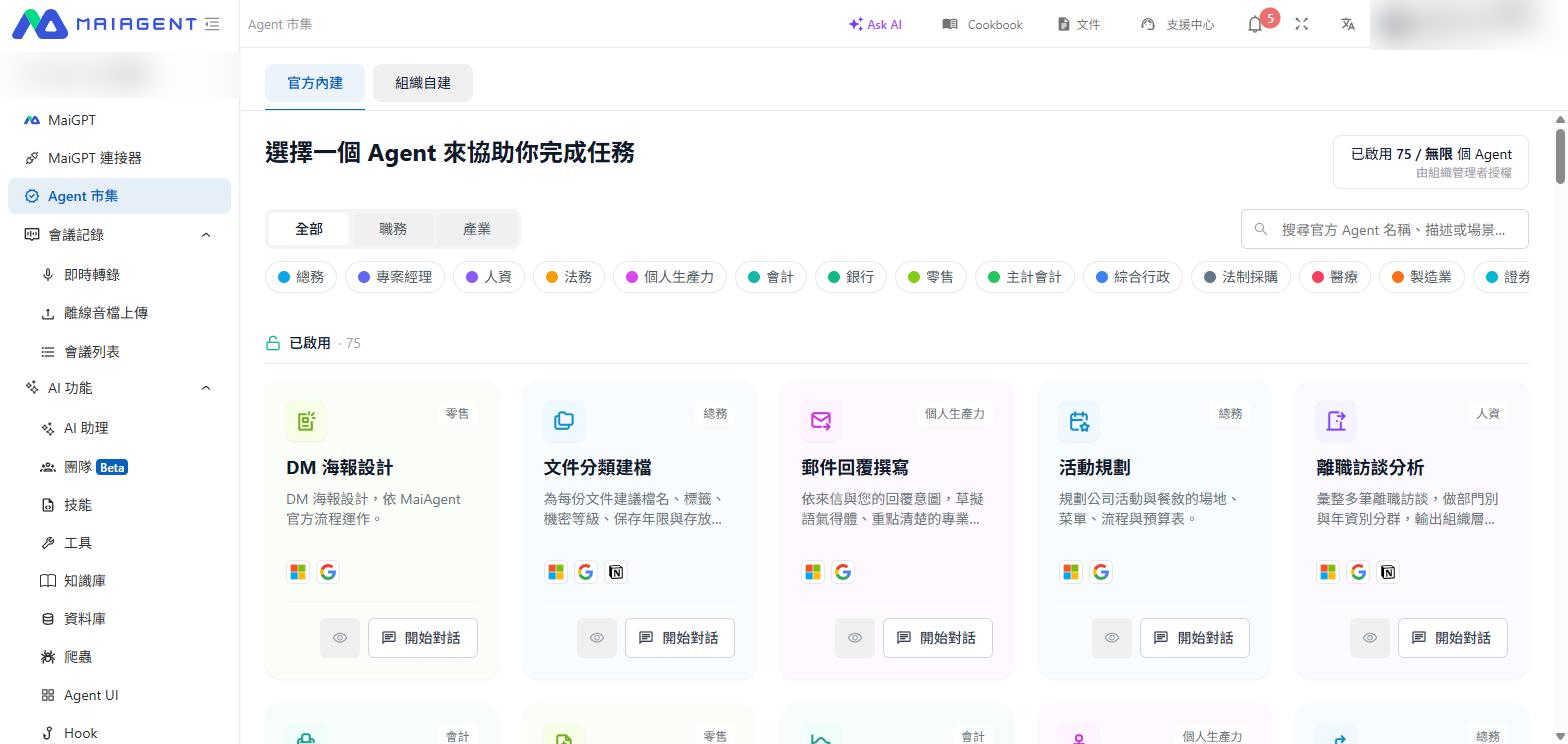
Official Built-in tab in the Agent Marketplace
Agent Marketplace → Official Built-in: tabs and scenario categories appear at the top, with the enabled count in the upper-right corner
Cards are divided into two sections:

Section
Meaning
Available on the Card

Enabled

Your organization has enabled the Agent, so you can use it immediately

Preview and Start Conversation

Not Enabled

Your organization has not enabled the Agent

Preview only; no Start Conversation option

The upper-right corner of the page shows the number of Agents currently Enabled by your organization and its limit. This allowance is managed by the organization administrator.

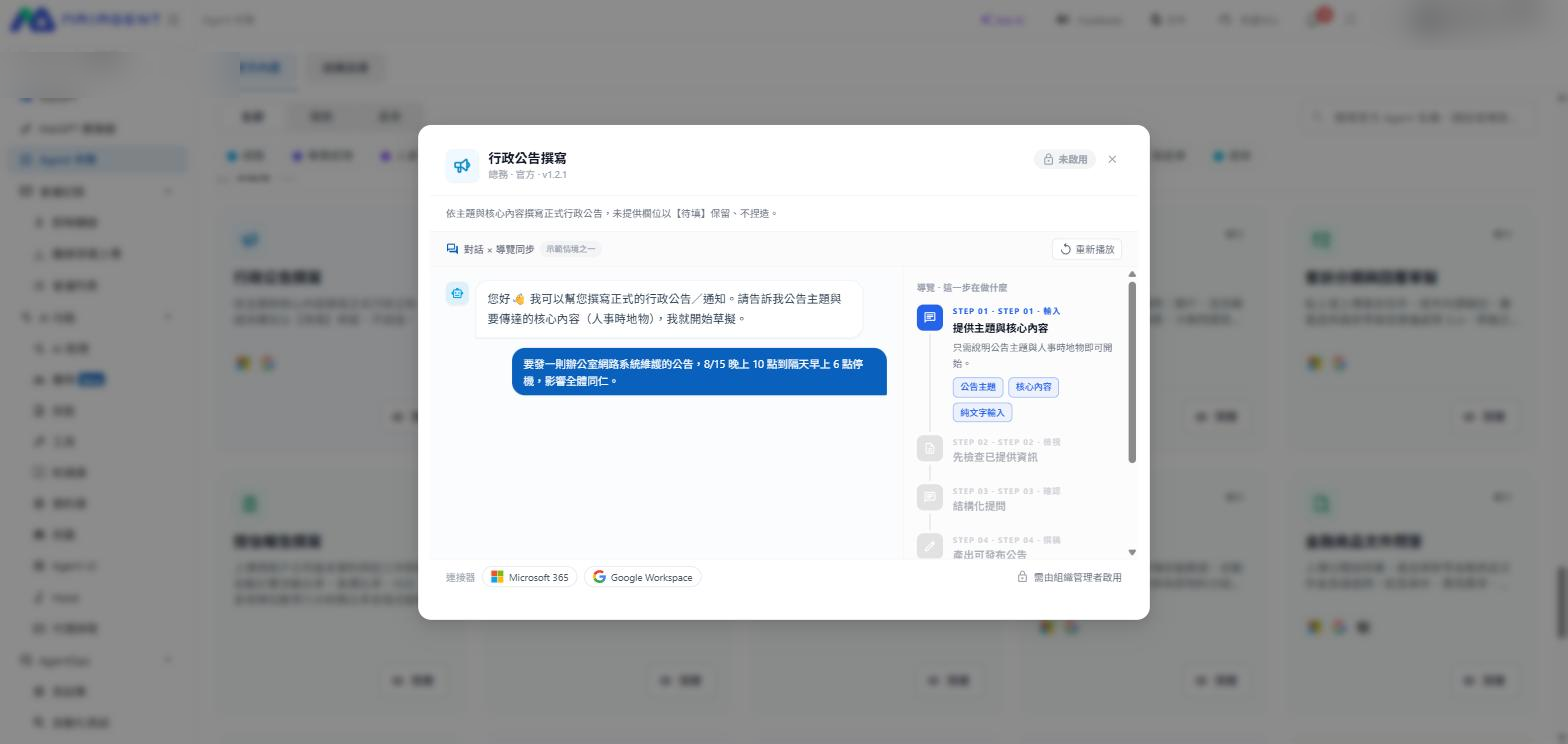
Preview Before You Decide

Not sure what an Agent actually does? Select Preview (the eye icon) in the upper-right corner of its card. You can preview it without enabling it.

The window is titled Conversation × Guide Sync and plays two synchronized columns:

  • Left column: Replays one Example Scenario, from the greeting and the user's request through each step completed by the Agent

  • Right column—Guide · What This Step Does: As the conversation advances, the corresponding STEP 01, STEP 02, and so on is highlighted, explaining what happens and which capabilities are used

After playback finishes, the right column changes to Guide · Select Each Step for Details. Select any step to expand it, or choose Replay to watch again.

Two more details appear at the bottom of the window:

  • Connectors: The third-party services used by this Agent, such as Microsoft 365 or Google Workspace

  • Enablement status: Agents that are not enabled display Must Be Enabled by an Organization Administrator; enabled Agents offer Start Conversation

Preview window for an official built-in Agent
Preview window: the left column replays an example conversation while the right column highlights the corresponding guide step
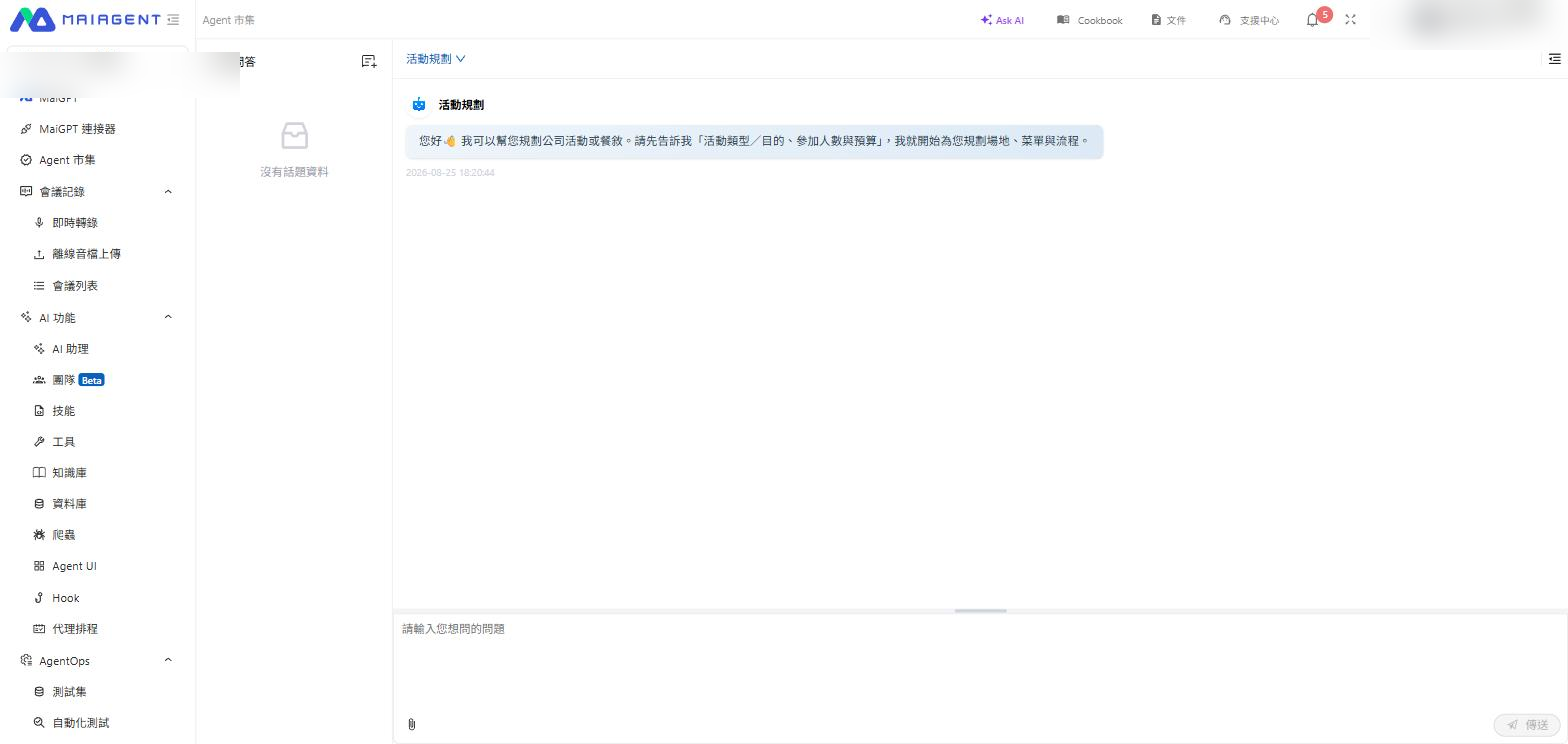
Start a Conversation

Select Start Conversation on a card in the Enabled section to open a new conversation, then follow the four steps under How Official Built-in Agents Work.

Greeting from an official built-in Agent
Step 1: The greeting tells you exactly what to provide; use the paper clip in the lower-left corner to upload files
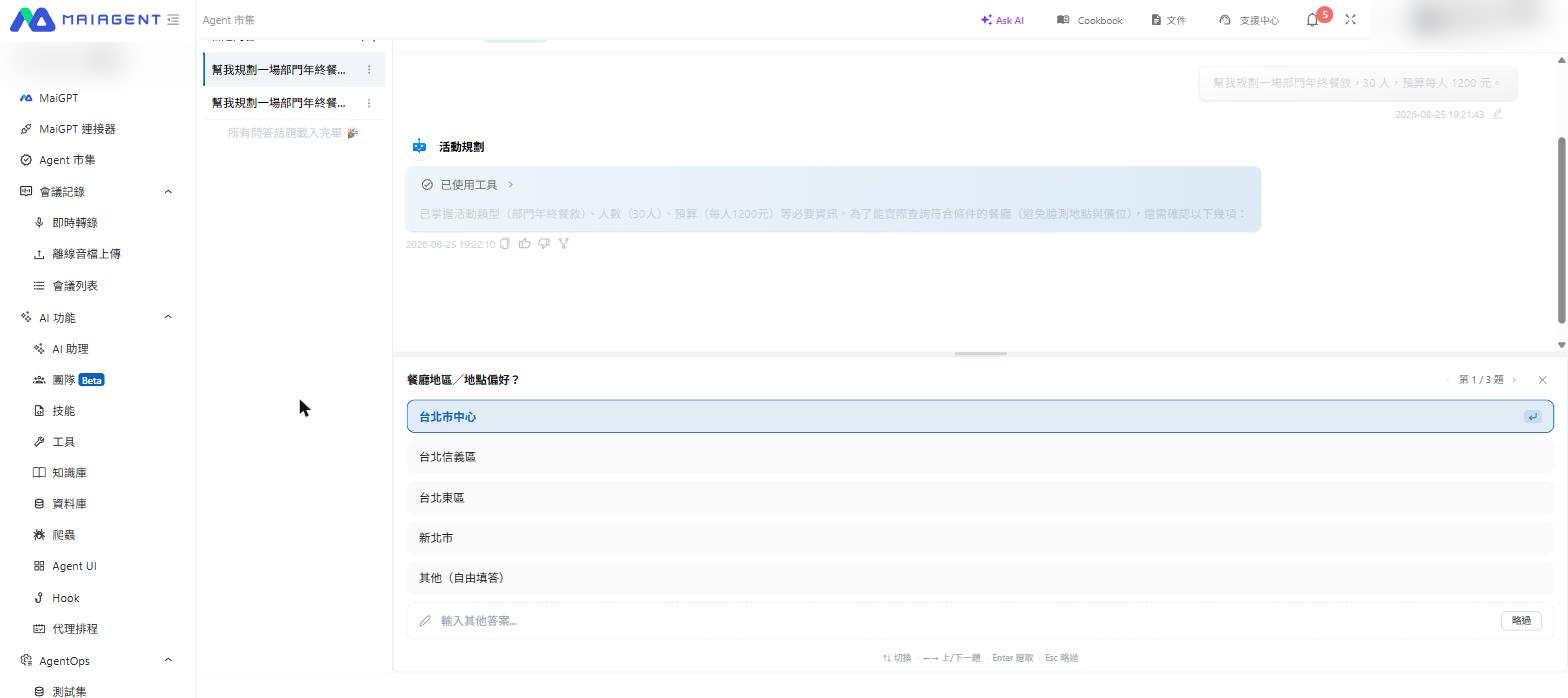
Agent asks follow-up questions to clarify details
Step 2: The Agent asks follow-up questions using option cards; the upper-right corner shows how many questions remain
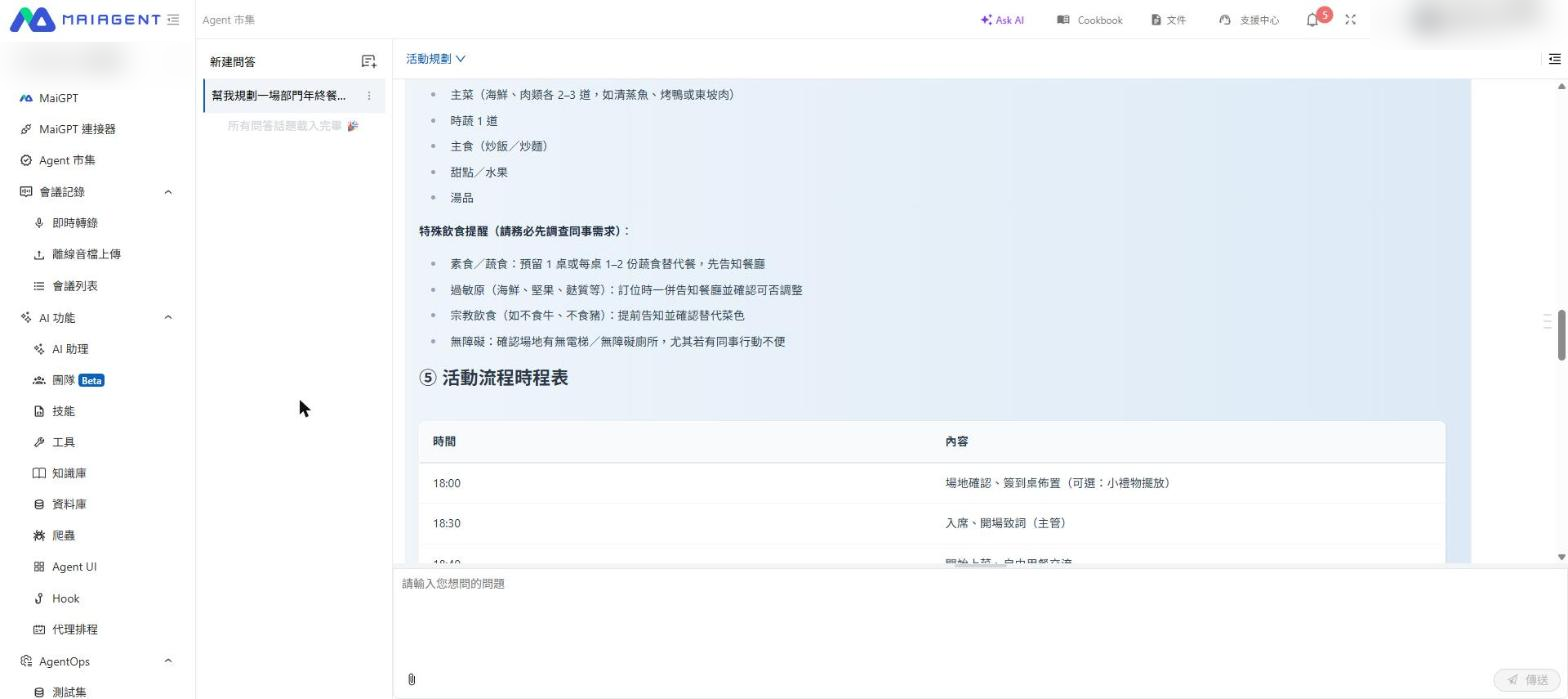
Draft generated by an Agent
Step 3: After confirming the details, the Agent generates a structured draft

Return to Recently Used Agents

After you have had a conversation with at least one official built-in Agent, a Recently Used row appears at the top of the marketplace, ordered from most to least recent conversation. Select Continue Conversation to resume your previous work without browsing through the categories again.

This row includes only Agents that are enabled and that you have personally used. It is normal for the row not to appear when you have just joined an organization and have not started using any Agents.

When an Official Built-in Agent Is Unavailable

These three situations look similar but have different causes:

What You See
What It Means
What to Do

The Agent is in the Not Enabled section and has Preview but no Start Conversation option

Your organization has not enabled this Agent

Ask your organization administrator to enable it

The Agent is in the Enabled section but displays No Permission to Use

Your organization enabled it, but you are not in this Agent's Authorized Users list

Ask your organization administrator to add your role/group to the authorized users

The Official Built-in tab does not appear in the marketplace

Your plan does not include official built-in Agents

Contact the sales team to upgrade your plan. See Trial and Subscription Plans

If a search returns no results, select Clear Search to view every Agent in the category, or select Clear Selected to remove the category filter.

If a category has no enabled Agents, it displays No Enabled Agents in This Category and a Request Enablement button. This button takes you to Built-in Agent Management, but an organization administrator with the required permission must still enable the Agent.

Last updated

Was this helpful?