> For the complete documentation index, see [llms.txt](https://docs.maiagent.ai/llms.txt). Markdown versions of documentation pages are available by appending `.md` to page URLs; this page is available as [Markdown](https://docs.maiagent.ai/maiagent-user-guide/en/built-in-agents/management.md).

# Enable and Manage

Learn how organization administrators enable official built-in Agents, configure authorized users and knowledge bases, and manage enablement limits, cooldown periods, and deactivation.

{% hint style="info" %}
This page is for **organization administrators**. For instructions for general members, see [Use Official Built-in Agents](/maiagent-user-guide/en/built-in-agents/use.md).
{% endhint %}

## Open Built-in Agent Management <a href="#open-management" id="open-management"></a>

Go to <mark style="color:blue;">Organization Settings</mark> → <mark style="color:blue;">Built-in Agent Management</mark>.

You can also select <mark style="color:blue;">Go to Built-in Agent Management</mark> in the <mark style="color:blue;">Agent Marketplace</mark> to open it directly.

{% hint style="warning" %}
If <mark style="color:blue;">Built-in Agent Management</mark> is not in the menu, your plan does not include official built-in Agents. The screen will display <mark style="color:blue;">Built-in Agents cannot be enabled under the current plan. Please upgrade your plan.</mark> Contact the sales team to upgrade.

If you can view the page but the switches are locked, you do not have permission to manage enablement. Contact your organization administrator.
{% endhint %}

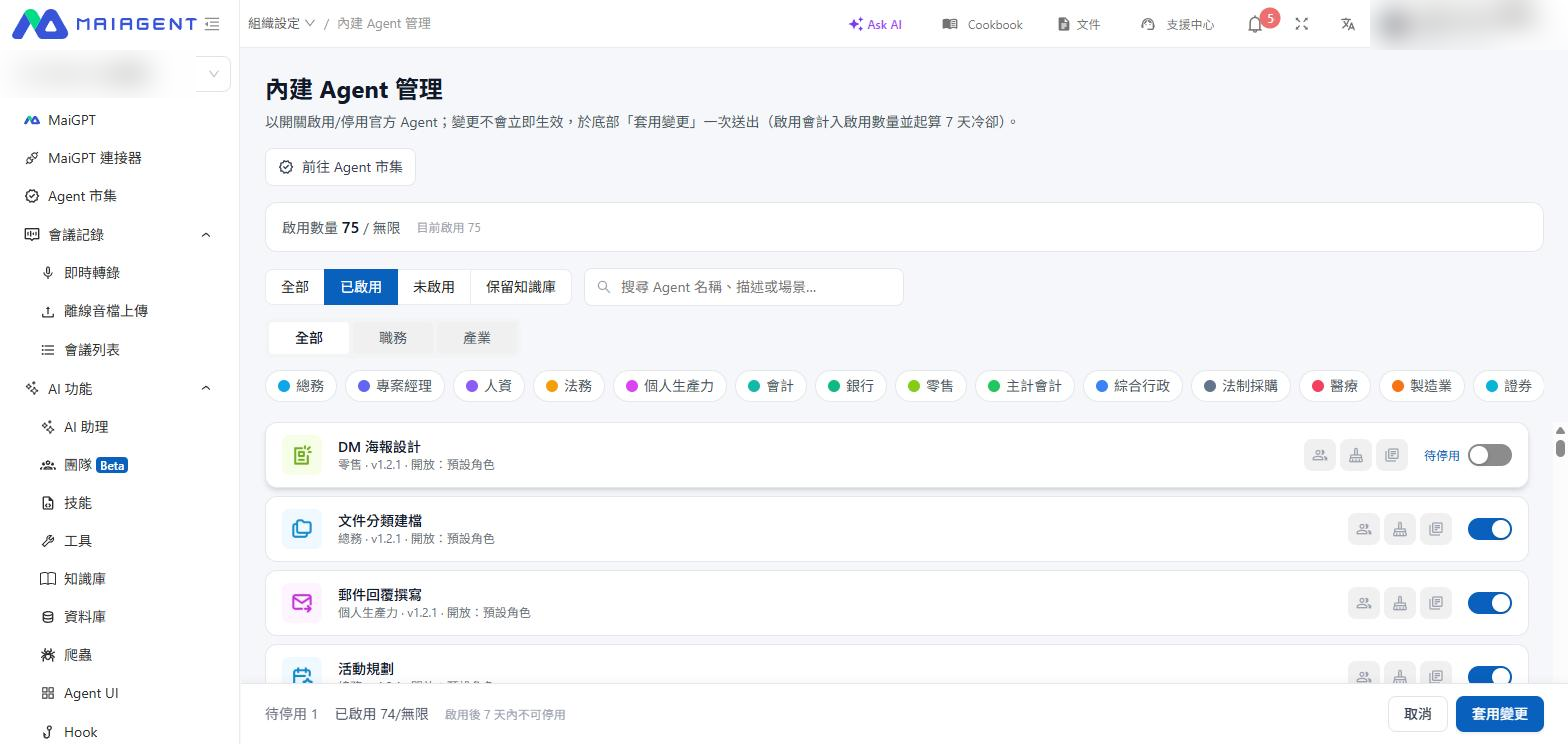
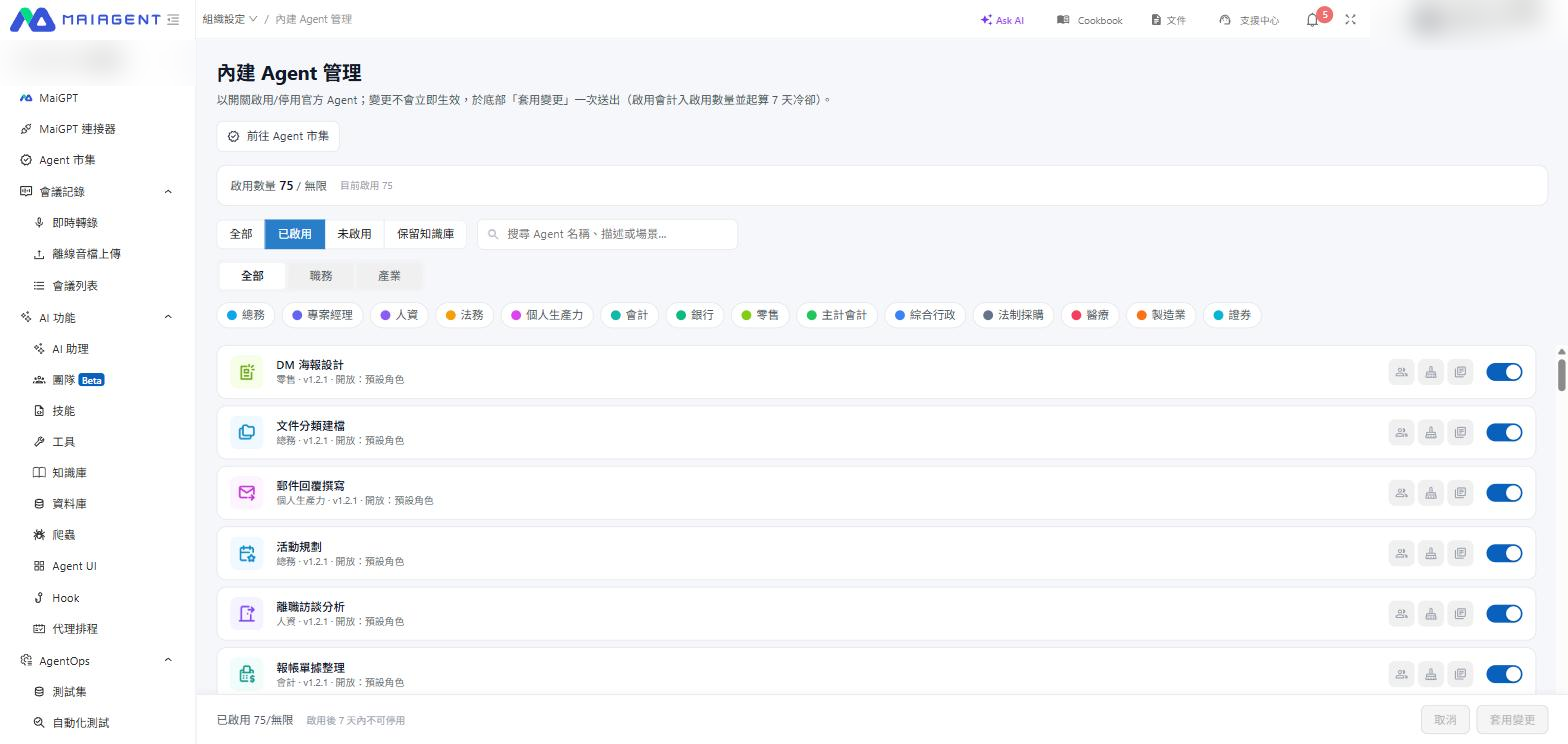
<figure><img src="https://1360999650-files.gitbook.io/~/files/v0/b/gitbook-x-prod.appspot.com/o/spaces%2F6v6TNkkOQVfRYfcNirHL%2Fuploads%2Fgit-blob-e9e835d3061c8f4129fa31f93d980f9c57f42fc6%2Fbuilt-in-agents-management.png?alt=media" alt="Built-in Agent Management page"><figcaption><p>Built-in Agent Management: enablement count and filters appear at the top; action icons and an enablement switch appear on the right of each row</p></figcaption></figure>

Each row shows the Agent's name, scenario category, version, and current <mark style="color:blue;">Authorized: {Role Name}</mark> setting. Deactivated Agents display <mark style="color:blue;">Deactivated, Knowledge Base Retained</mark>, while Agents in cooldown display <mark style="color:blue;">Cooldown: N Days Remaining</mark>.

Three action icons, followed by the enablement switch, appear from left to right on each row:

| Icon                                                        | Purpose                                                       |
| ----------------------------------------------------------- | ------------------------------------------------------------- |
| <mark style="color:blue;">Configure Authorized Users</mark> | Specify which roles/groups can use the Agent                  |
| <mark style="color:blue;">Clear Knowledge Base</mark>       | Delete all imported documents (cannot be undone)              |
| <mark style="color:blue;">Import to Knowledge Base</mark>   | Open the Agent's dedicated knowledge base to upload documents |

Use the search box at the top to search by keyword. You can also filter by status—<mark style="color:blue;">All</mark> / <mark style="color:blue;">Enabled</mark> / <mark style="color:blue;">Not Enabled</mark> / <mark style="color:blue;">Knowledge Base Retained</mark>—or by scenario category.

{% hint style="info" %}
Select the row itself, rather than an icon, to open the Agent's <mark style="color:blue;">Preview</mark> window. You can see how it works before deciding whether to enable it.
{% endhint %}

## Enable or Deactivate: Select “Apply Changes” to Take Effect <a href="#apply-changes" id="apply-changes"></a>

{% hint style="warning" %}
Changing a switch **does not take effect immediately**. All changes remain pending until you select <mark style="color:blue;">Apply Changes</mark> at the bottom to submit them together.
{% endhint %}

{% stepper %}
{% step %}

### Switch the Agents You Want to Enable or Deactivate

In the list, set the switch to <mark style="color:blue;">Enabled</mark> or <mark style="color:blue;">Deactivated</mark>. The row is then labeled <mark style="color:blue;">Pending Enablement</mark> or <mark style="color:blue;">Pending Deactivation</mark>.
{% endstep %}

{% step %}

### Review the Change Summary at the Bottom

A fixed action bar appears at the bottom of the screen. When changes are pending, it shows the number <mark style="color:blue;">Pending Enablement</mark>, the number <mark style="color:blue;">Pending Deactivation</mark>, and the resulting number of <mark style="color:blue;">Enabled</mark> Agents versus the limit. It also reminds you that <mark style="color:blue;">an Agent cannot be deactivated within 7 days of enablement</mark>. The <mark style="color:blue;">Apply Changes</mark> button becomes available at this point.
{% endstep %}

{% step %}

### Select “Apply Changes”

Select <mark style="color:blue;">Apply Changes</mark> to submit everything at once. To discard the changes, select <mark style="color:blue;">Cancel</mark> to restore all switches.
{% endstep %}
{% endstepper %}

<figure><img src="https://1360999650-files.gitbook.io/~/files/v0/b/gitbook-x-prod.appspot.com/o/spaces%2F6v6TNkkOQVfRYfcNirHL%2Fuploads%2Fgit-blob-d85a995aaeefc88503b48d9914d440bd0ee44b6d%2Fbuilt-in-agents-apply-changes.png?alt=media" alt="Apply Changes action bar at the bottom"><figcaption><p>After a switch is turned off, the row is labeled “Pending Deactivation,” and the counts and cooldown reminder update in the action bar below</p></figcaption></figure>

If an individual item fails after the changes are applied, the screen identifies the reason for each failure, such as reaching the limit, an active cooldown period, or insufficient permissions. Successful changes are unaffected.

## Enablement Limit and Cooldown Period <a href="#seats-and-cooldown" id="seats-and-cooldown"></a>

### Concurrent Enablement Limit <a href="#seat-limit" id="seat-limit"></a>

The <mark style="color:blue;">Enabled Count</mark> at the top of the page shows how many slots are currently used and the maximum allowed. The limit depends on your plan. See [Trial and Subscription Plans · Feature Differences](/maiagent-user-guide/en/others/trial-and-plans.md#feature-differences).

When the limit is reached, switches for Agents that are not enabled are locked and display <mark style="color:blue;">Enablement limit reached. Deactivate an Agent or upgrade your plan.</mark>

### 7-day Cooldown Period <a href="#cooldown" id="cooldown"></a>

**Each time an Agent is enabled, it cannot be deactivated for 7 days.** During this period, the list displays <mark style="color:blue;">Cooldown: N Days Remaining</mark>, and the switch is locked with the message <mark style="color:blue;">In cooldown. Can be deactivated in N days.</mark>

{% hint style="info" %}
The cooldown period restarts **each time the Agent is enabled**. If you deactivate and then re-enable it, you must wait another 7 days before deactivating it again.

We recommend using [Preview](/maiagent-user-guide/en/built-in-agents/use.md#preview) to confirm that an Agent is suitable before enabling it, because you cannot swap it out during the cooldown period.
{% endhint %}

### When You Want to Downgrade Your Plan <a href="#downgrade" id="downgrade"></a>

{% hint style="warning" %}
If the number of Agents currently enabled **exceeds the new plan's limit**, the system blocks the plan change. You must first deactivate enough Agents to meet the new plan's limit.

Because deactivation is also subject to the 7-day cooldown period, **allow time for the cooldown when planning a downgrade**.
{% endhint %}

## What Happens When You Deactivate an Agent <a href="#what-deactivation-does" id="what-deactivation-does"></a>

{% hint style="danger" %}
Deactivation **does more than hide the Agent**. The system removes the assistant along with its conversation channels:

* The assistant disappears from the <mark style="color:blue;">AI Assistants</mark> list, and members can no longer chat with it
* Its conversation channels, such as Web Chat, and group permissions are removed
* Its Agent schedules stop running
* **Your imported knowledge base is retained**, with the status <mark style="color:blue;">Deactivated, Knowledge Base Retained</mark>
  {% endhint %}

If you re-enable it later, the system creates **a new assistant** based on the latest official blueprint and **automatically reconnects the original knowledge base**, so you do not need to upload the documents again. However, conversations from before deactivation do not appear under the new assistant.

## Configure Authorized Users <a href="#group-permissions" id="group-permissions"></a>

**Enabling an Agent does not make it available to the entire organization.** You must also specify which roles/groups can use it.

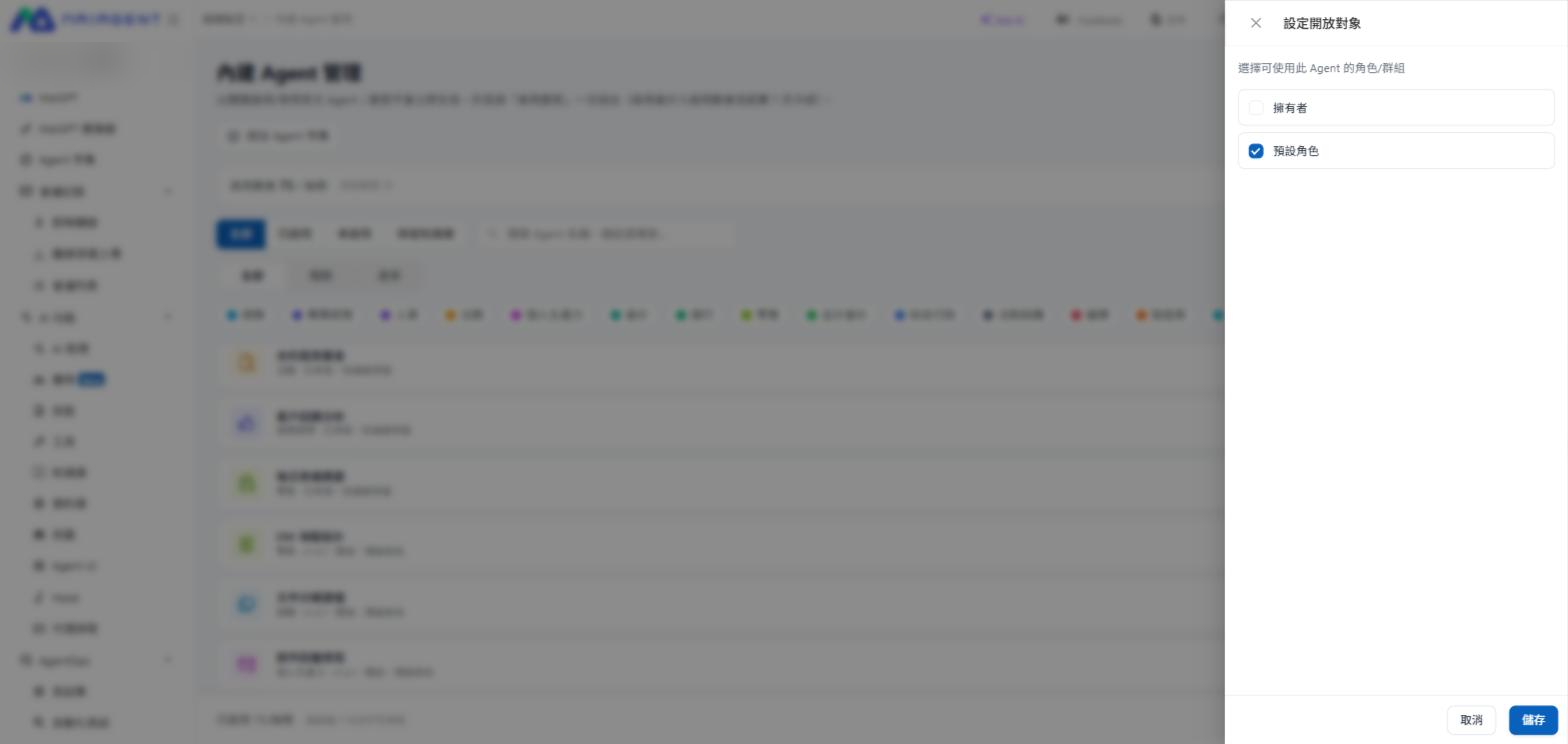
Select <mark style="color:blue;">Configure Authorized Users</mark> on the Agent's row. In the drawer, select the roles/groups that can use it, then select <mark style="color:blue;">Save</mark>.

* Configured Agents display <mark style="color:blue;">Authorized: {Role Name}</mark> in the list
* Agents without authorized users display <mark style="color:blue;">Not Yet Available</mark>

<figure><img src="https://1360999650-files.gitbook.io/~/files/v0/b/gitbook-x-prod.appspot.com/o/spaces%2F6v6TNkkOQVfRYfcNirHL%2Fuploads%2Fgit-blob-e9732cae183c294306ca4d752d6afa2007e20be8%2Fbuilt-in-agents-group-permission.png?alt=media" alt="Configure Authorized Users drawer"><figcaption><p>Select the roles/groups allowed to use this Agent in the drawer</p></figcaption></figure>

{% hint style="info" %}
If a member sees <mark style="color:blue;">No Permission to Use</mark> on an enabled Agent in the <mark style="color:blue;">Agent Marketplace</mark>, they have not been added to its authorized users. Return here and add them.
{% endhint %}

## Import to the Dedicated Knowledge Base <a href="#knowledge-base" id="knowledge-base"></a>

You cannot change the role instructions or tools of an official built-in Agent, but **you can give it your organization's documents**. Every enabled Agent has a dedicated knowledge base.

Select <mark style="color:blue;">Import to Knowledge Base</mark> on the Agent's row to open its knowledge base settings. From there, use it like any other knowledge base: upload documents, create FAQs, and configure tags. See [Knowledge Base Overview](/maiagent-user-guide/en/km/km.md).

{% hint style="info" %}
For example, you could import your company's contract templates and review guidelines into a “Contract Risk Review” Agent, or internal administrative policies into an “Administrative Process Q\&A” Agent, so its answers reflect your organization's actual rules.
{% endhint %}

## Clear the Knowledge Base <a href="#purge-knowledge-base" id="purge-knowledge-base"></a>

Select <mark style="color:blue;">Clear Knowledge Base</mark> on the Agent's row to delete its imported documents.

{% hint style="danger" %}
**This permanently deletes all imported documents and cannot be undone.** Before proceeding, make sure the documents are backed up elsewhere.
{% endhint %}

The outcome depends on the Agent's current status:

| Agent Status                                                          | After Clearing                                                                                                                                         |
| --------------------------------------------------------------------- | ------------------------------------------------------------------------------------------------------------------------------------------------------ |
| <mark style="color:blue;">Enabled</mark>                              | Only the knowledge base **content** is deleted. The knowledge base itself remains connected to the Agent, and you can continue importing new documents |
| <mark style="color:blue;">Deactivated, Knowledge Base Retained</mark> | **The entire knowledge base is deleted and disconnected**. Re-enabling the Agent later creates a new, empty knowledge base                             |

## Connectors: Which Ones You Need to Configure First <a href="#connectors" id="connectors"></a>

Some official built-in Agents must connect to third-party services, such as Google Workspace, Microsoft 365, or Notion, to retrieve data. Cards indicate one of two authorization types:

| Label                                                                          | Meaning                                           | Who Takes Action                                                                                      |
| ------------------------------------------------------------------------------ | ------------------------------------------------- | ----------------------------------------------------------------------------------------------------- |
| <mark style="color:blue;">Administrator Must Configure Connection First</mark> | The connector uses organization-level credentials | An **organization administrator** completes the connection setup before members can use it            |
| No label                                                                       | Personal user authorization                       | **Each member** authorizes their own account in the conversation the first time the connector is used |

{% hint style="info" %} <mark style="color:blue;">Administrator Must Configure Connection First</mark> does not mean that you must authorize every user. It is a one-time, organization-level setup. For connectors without this label, each member authorizes their own account, and the administrator does not need to be involved.
{% endhint %}

For more information, see [Connectors](/maiagent-user-guide/en/maigpt/connectors.md).


---

# Agent Instructions
This documentation is published with GitBook. GitBook is the documentation platform designed so that both humans and AI agents can read, navigate, and reason over technical content effectively. Learn more at gitbook.com.

## Querying This Documentation
If you need additional information that is not directly available in this page, you can query the documentation dynamically by asking a question.

Perform an HTTP GET request on the current page URL with the `ask` query parameter, and the optional `goal` query parameter:

```
GET https://docs.maiagent.ai/maiagent-user-guide/en/built-in-agents/management.md?ask=<question>&goal=<endgoal>
```

`ask` is the immediate question: it should be specific, self-contained, and written in natural language.
`goal` is optional and describes the broader end goal you are ultimately trying to accomplish on behalf of the user. GitBook uses it to tailor the answer towards what is most useful for that goal.

The response will contain a direct answer to the question and relevant excerpts and sources from the documentation.

Use this mechanism when the answer is not explicitly present in the current page, you need clarification or additional context, or you want to retrieve related documentation sections.