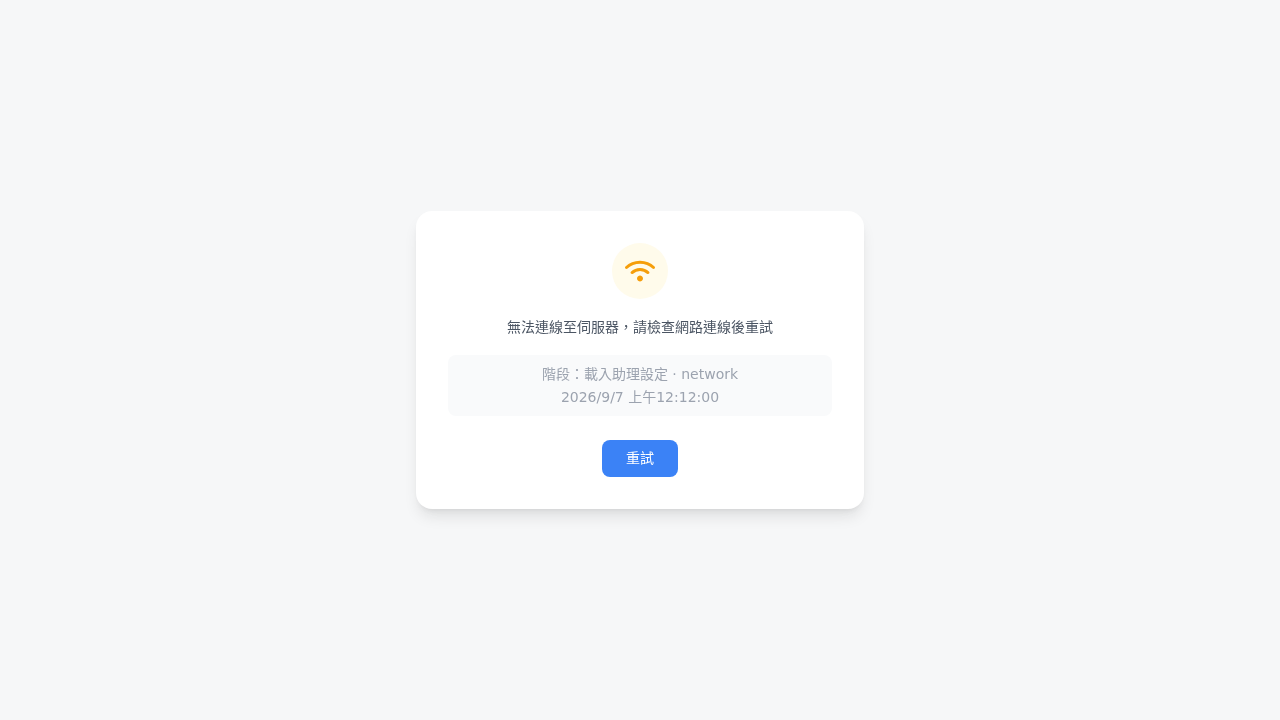
> For the complete documentation index, see [llms.txt](https://docs.maiagent.ai/llms.txt). Markdown versions of documentation pages are available by appending `.md` to page URLs; this page is available as [Markdown](https://docs.maiagent.ai/maiagent-user-guide/en/build/choose-channel/web-chat.md).

# Web Chat Overview

This page introduces Web Chat interactions and interface customization to help you build a Web Chat service that matches your corporate brand

On this page: [1. What Is Web Chat?](#what-is-webchat)｜[2. Build a Branded Web Chat Service](#branding)｜[3. Message Customization](#messages)｜[Stop a Response in Progress](#stop-generating)｜[4. Diverse Q\&A Content](#multimodal-qa)｜[5. Conversation Memory and Sharing](#memory-and-sharing)｜[6. Choose Whether to Display Tools Used and Cited Documents](#display-tools-and-citations)｜[7. Conversation Access Control - A Secure, Controlled Environment](#access-control)｜[8. Data Collection (Pre-chat Form)](#pre-chat-form)｜[What to Do When a Connection Fails](#connection-failure)｜[Review Earlier Messages During Response Generation](#review-during-generation)

## <mark style="color:blue;">1. What Is Web Chat?</mark> <a href="#what-is-webchat" id="what-is-webchat"></a>

You can embed an Agent created in MaiAgent into your website to provide live customer support or other conversations. Web Chat also features a **responsive design that adapts seamlessly to desktops, tablets, and phones.**

MaiAgent currently offers three embedding options:

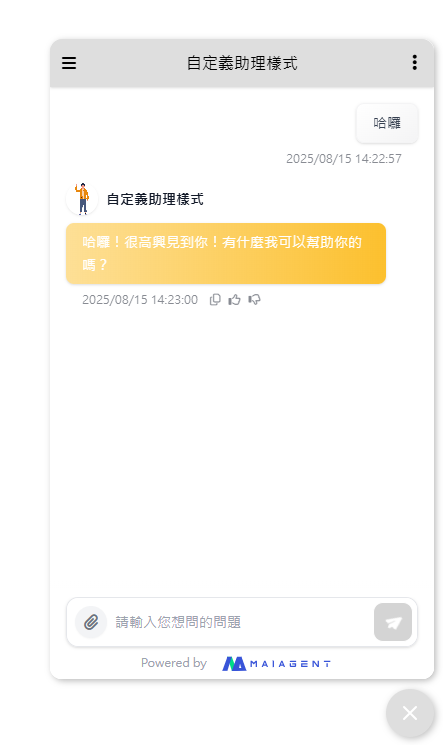
### 1. Bottom-Right Website Widget <a href="#embed-widget" id="embed-widget"></a>

* Embed it in your official website as a built-in intelligent assistant
* Keep it available whenever needed without interrupting normal browsing
* Suitable for general customer support and inquiries

<figure><img src="https://1360999650-files.gitbook.io/~/files/v0/b/gitbook-x-prod.appspot.com/o/spaces%2F6v6TNkkOQVfRYfcNirHL%2Fuploads%2Fgit-blob-3880f664a77d58888b950e5e5612652da2b1fbcc%2F%E8%9E%A2%E5%B9%95%E6%93%B7%E5%8F%96%E7%95%AB%E9%9D%A2%202025-08-15%20125237.png?alt=media" alt=""><figcaption><p>Bottom-right widget (draggable window)</p></figcaption></figure>

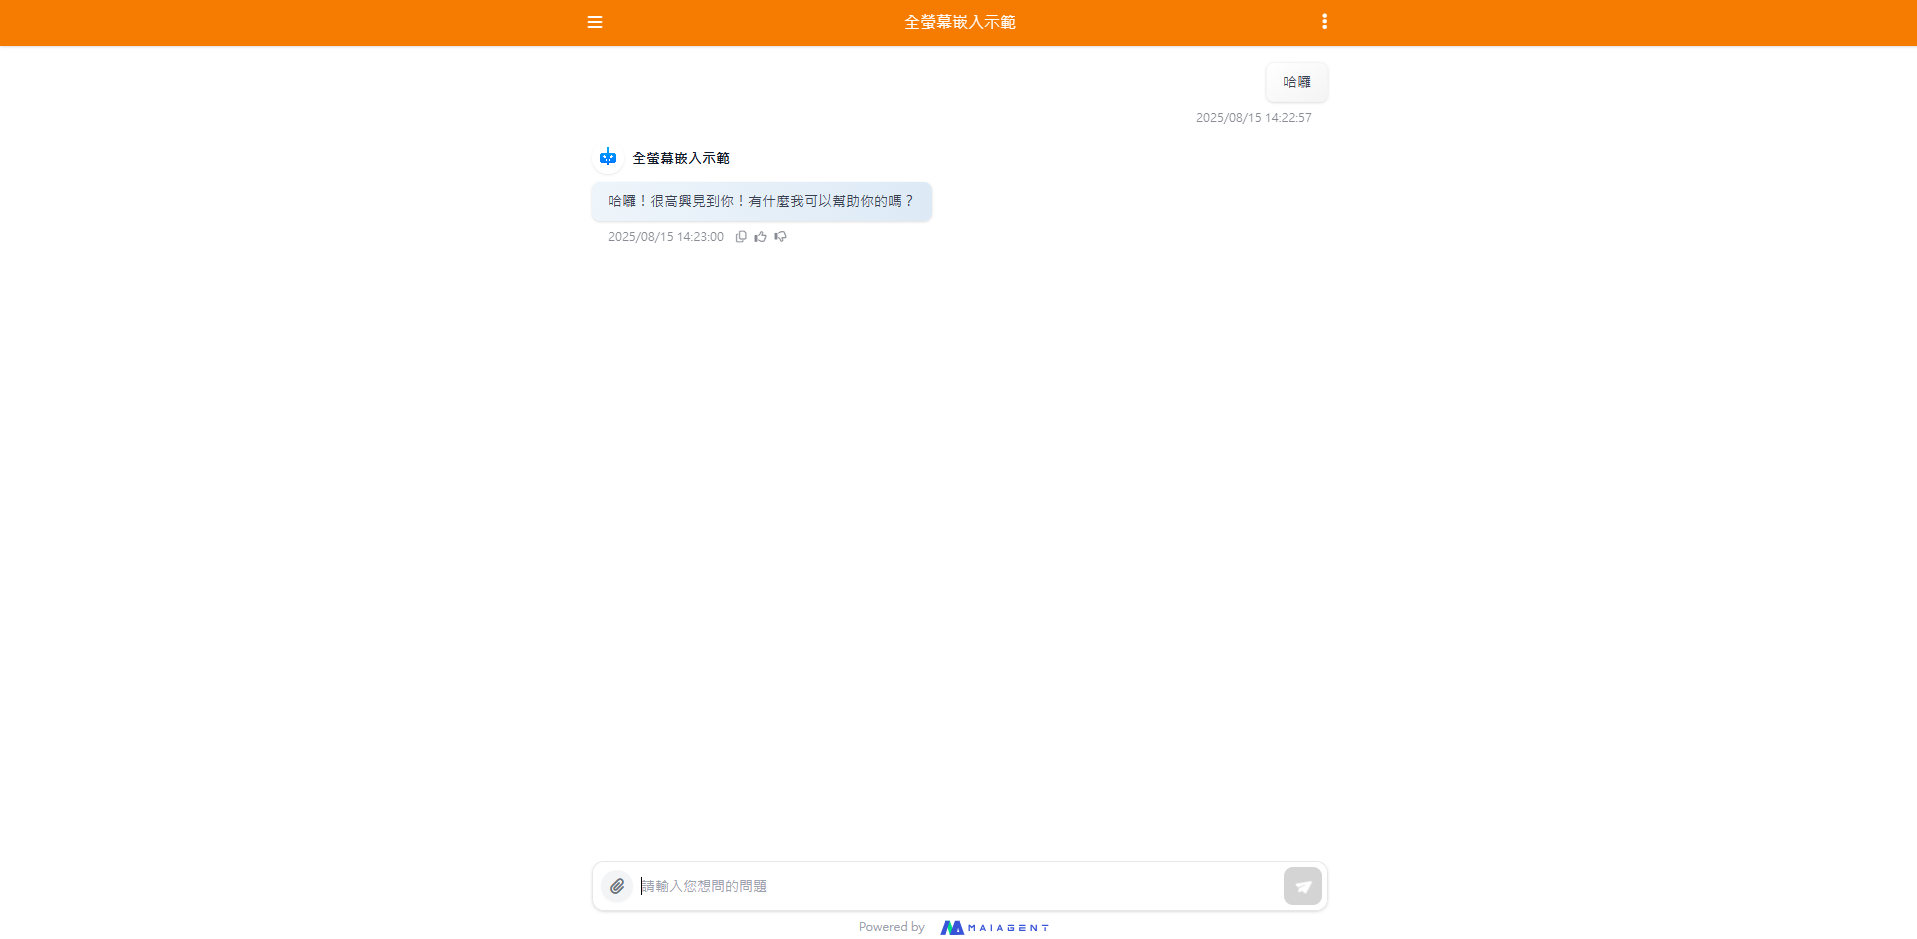
### 2. Full-Screen Embed <a href="#embed-fullscreen" id="embed-fullscreen"></a>

* Provide a complete conversation experience
* Suitable for complex inquiries and service workflows
* Customize the design to meet business needs

<figure><img src="https://1360999650-files.gitbook.io/~/files/v0/b/gitbook-x-prod.appspot.com/o/spaces%2F6v6TNkkOQVfRYfcNirHL%2Fuploads%2Fgit-blob-84b25bce62e614b0545b739650995c0f8fc43225%2Fimage%20(116).png?alt=media" alt=""><figcaption><p>Full-screen embed example</p></figcaption></figure>

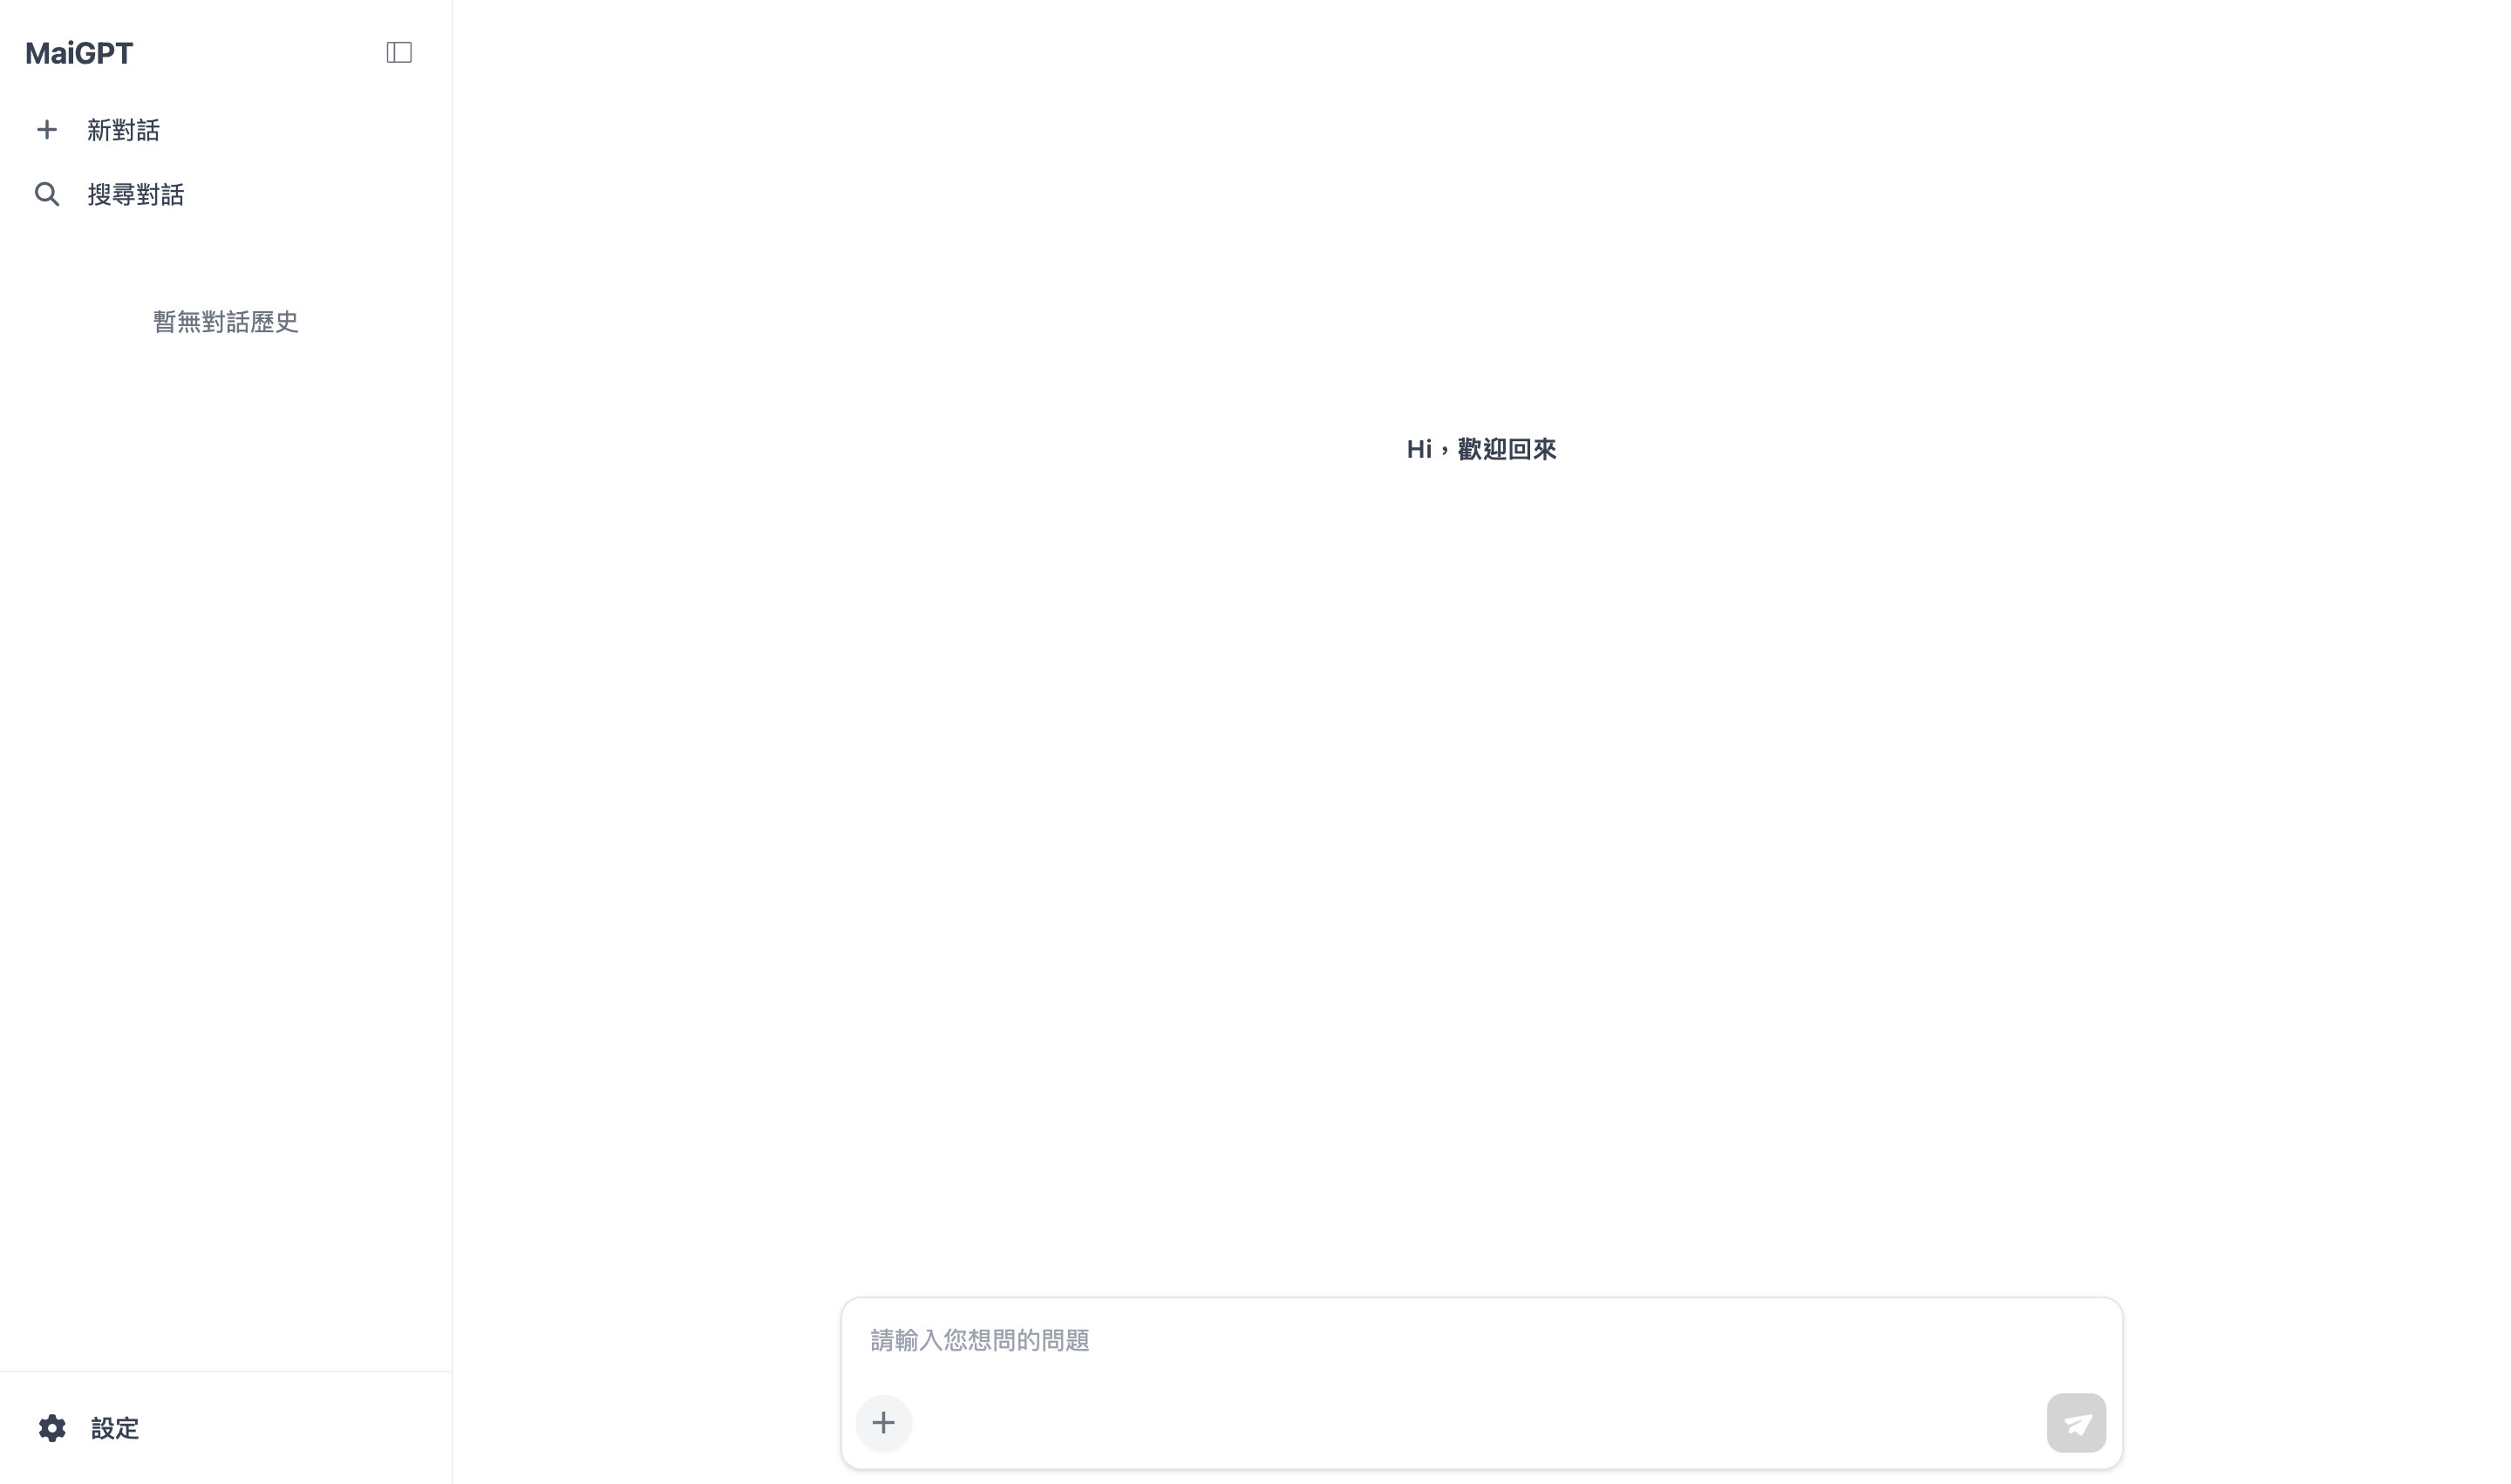
### 3. MaiGPT Window Embed <a href="#embed-maigpt" id="embed-maigpt"></a>

* A complete ChatGPT-style conversation interface (conversation history on the left + main conversation area on the right) that can be embedded directly into a page as its main UI
* Keep it visible in a designated container, or expand it to full screen by clicking a floating button in the bottom-right corner
* Suitable as an AI portal, internal knowledge portal, or a product's main conversation interface

<figure><img src="https://1360999650-files.gitbook.io/~/files/v0/b/gitbook-x-prod.appspot.com/o/spaces%2F6v6TNkkOQVfRYfcNirHL%2Fuploads%2Fgit-blob-40da32c6e68a4607ef47a4430950a10cbb1765b5%2Fmaigpt-embed-overview.png?alt=media" alt="MaiGPT window embed"><figcaption><p>MaiGPT window mode: a complete ChatGPT-style interface</p></figcaption></figure>

{% hint style="info" %}
Select MaiGPT window mode in the “<mark style="color:blue;">Embed</mark>” window in the conversation platform settings. For complete setup instructions, see [MaiGPT Window Embed](https://docs.maiagent.ai/maiagent-user-guide/en/build/choose-channel/web-chat/maigpt-embed.md).
{% endhint %}

### Window Modes Visitors Can Switch Between <a href="#visitor-window-modes" id="visitor-window-modes"></a>

In addition to the default <mark style="color:blue;">Floating Window</mark>, the bottom-right widget can offer a <mark style="color:blue;">Sidebar</mark> mode: the conversation window sits flush against the right edge of the page and fills its height, making it convenient to ask questions while browsing. When a website engineer enables both modes in the embed code, desktop visitors see a <mark style="color:blue;">Switch Window Mode</mark> button in the title bar. Click it to switch between the two modes; sidebar mode also has a <mark style="color:blue;">Collapse</mark> button to temporarily hide it. Other options include inline mode, which places the conversation directly in a section of the page, and a mode without a floating button. These are all controlled by the embed code. See [Web Chat Embedding and SDK: Window Modes](https://docs.maiagent.ai/tech/serve/web-chat-sdk#window-modes) in the Technical Guide.

This design provides:

* **Immediate responses**: Visitors receive professional answers without waiting, improving the user experience
* **Convenience**: The bottom-right floating widget stays out of the way during normal browsing and is available whenever needed
* **Cost efficiency**: The Agent provides 24/7 service, significantly reducing staffing costs
* **A professional image**: Showcase your company's technology capabilities and service quality

## <mark style="color:blue;">2. Build a Branded Web Chat Service</mark> <a href="#branding" id="branding"></a>

MaiAgent offers customization options such as logos, avatars, and Q\&A theme colors to help you build a Web Chat service that matches your corporate brand

You can:

1. Choose the Agent's display name
2. Upload your corporate logo
3. Choose the Agent's display avatar
4. Choose the Web Chat theme color
5. Choose the message background color for Agent responses

Use these features to create your own Web Chat appearance:

<div><figure><img src="https://1360999650-files.gitbook.io/~/files/v0/b/gitbook-x-prod.appspot.com/o/spaces%2F6v6TNkkOQVfRYfcNirHL%2Fuploads%2Fgit-blob-98048f7b5e57344d70831936ed727a91a00604c0%2Fimage%20(118).png?alt=media" alt=""><figcaption><p>Default style</p></figcaption></figure> <figure><img src="https://1360999650-files.gitbook.io/~/files/v0/b/gitbook-x-prod.appspot.com/o/spaces%2F6v6TNkkOQVfRYfcNirHL%2Fuploads%2Fgit-blob-256f1d936b5145c36cf8f1106d1f9dbd1fbd9103%2Fimage%20(119)%20(1).png?alt=media" alt=""><figcaption><p>Custom style</p></figcaption></figure></div>

You can then build a Web Chat service that matches your company's brand colors and style

Web Chat displays the platform's brand logo below the conversation input area. The login, registration, and loading screens also display brand images with consistent proportions, without squashing or stretching them.

<figure><img src="https://1360999650-files.gitbook.io/~/files/v0/b/gitbook-x-prod.appspot.com/o/spaces%2F6v6TNkkOQVfRYfcNirHL%2Fuploads%2Fgit-blob-08a452dcf190d99fb18802f136241351607d360a%2Fwebchat-brand-footer.png?alt=media" alt="Powered by and the MaiAgent brand logo displayed below the Web Chat input area"><figcaption><p>The brand logo at the bottom of Web Chat stays clear and proportionally scaled</p></figcaption></figure>

### Dark Mode Improvements <a href="#dark-mode" id="dark-mode"></a>

MaiAgent's Web Chat dark mode has been comprehensively optimized for a more comfortable viewing experience:

**Dynamic Color Adjustment**

* Automatically adjust theme color brightness to keep colors clearly visible against dark backgrounds
* Intelligently adjust text contrast for optimal readability
* Optimize icon and button colors to make them stand out in dark mode

**Contrast Improvements**

* Carefully designed message bubble backgrounds help prevent eye strain
* Links and important information use high-contrast colors for clear recognition
* Optimized input field and button border colors improve usability

**Seamless Switching**

* Users can switch between light and dark modes at any time
* Conversation content and interaction state are preserved when switching
* The system remembers each user's theme preference

Dark mode is particularly suitable for:

* Nighttime use or low-light environments
* Long conversations, helping reduce eye strain
* Dark color schemes that match your corporate branding

## <mark style="color:blue;">3. Message Customization</mark> <a href="#messages" id="messages"></a>

You can customize the Agent's greeting shown when users first enter Web Chat to suit scenarios such as those below. The greeting is fixed text rather than AI-generated content, so it has no thumbs-up or thumbs-down feedback buttons and is excluded from user satisfaction in [Usage Analytics](https://docs.maiagent.ai/maiagent-user-guide/en/build/agent/usage.md#user-satisfaction-rate).

### **1. Custom Greetings** <a href="#greeting" id="greeting"></a>

#### **Branded Greeting**

Set a greeting such as “Welcome to our website! I'm your dedicated customer support assistant” to convey a professional image and a friendly service attitude

#### **Guided Opening**

Set a greeting such as “I can help you find product information, answer usage questions, and assist with orders” to clearly explain the available services and build users' confidence in the service

<figure><img src="https://1360999650-files.gitbook.io/~/files/v0/b/gitbook-x-prod.appspot.com/o/spaces%2F6v6TNkkOQVfRYfcNirHL%2Fuploads%2Fgit-blob-b21ad3d1aa1d753ca4a0e9b2b73af621c62e8e8c%2F%E8%9E%A2%E5%B9%95%E6%93%B7%E5%8F%96%E7%95%AB%E9%9D%A2%202025-08-15%20152318.png?alt=media" alt=""><figcaption><p>Custom greeting</p></figcaption></figure>

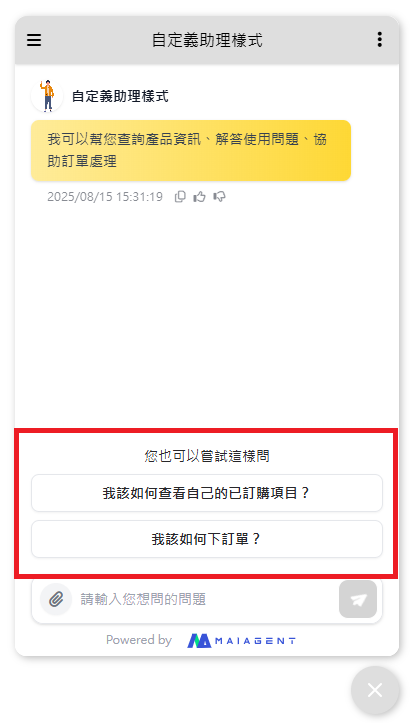
### 2. Starter Questions <a href="#starter-questions" id="starter-questions"></a>

* Set “<mark style="color:blue;">Conversation Starter Questions</mark>” as quick options
* Users can click common questions directly without typing
* **Example questions**:
  * “How do I view the items I've ordered?”
  * “How do I place an order?”
  * “Membership points rules”
  * “Business hours”

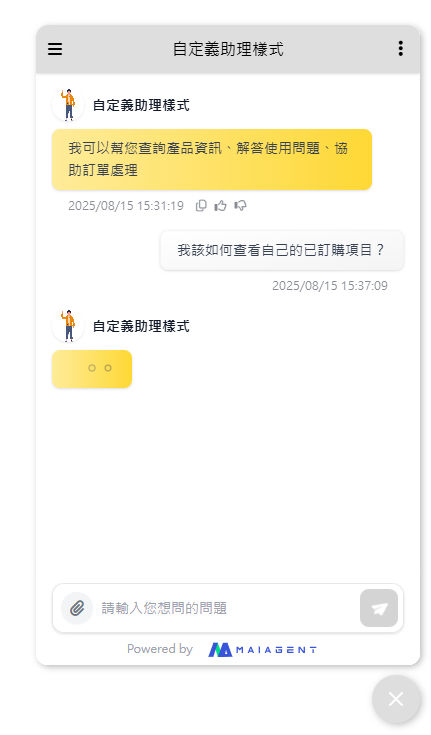
Users can click a starter question to begin a conversation and get answers faster:

<div><figure><img src="https://1360999650-files.gitbook.io/~/files/v0/b/gitbook-x-prod.appspot.com/o/spaces%2F6v6TNkkOQVfRYfcNirHL%2Fuploads%2Fgit-blob-ba6c8e8005961ff727708c56c2df863893c7e59b%2F%E8%9E%A2%E5%B9%95%E6%93%B7%E5%8F%96%E7%95%AB%E9%9D%A2%202025-08-15%20153127.png?alt=media" alt=""><figcaption><p>Example starter question settings</p></figcaption></figure> <figure><img src="https://1360999650-files.gitbook.io/~/files/v0/b/gitbook-x-prod.appspot.com/o/spaces%2F6v6TNkkOQVfRYfcNirHL%2Fuploads%2Fgit-blob-c2847c1a6f8cdbfe8c6066e8d85089987d336d56%2F%E8%9E%A2%E5%B9%95%E6%93%B7%E5%8F%96%E7%95%AB%E9%9D%A2%202025-08-15%20153719.png?alt=media" alt=""><figcaption><p>User clicks to start a conversation</p></figcaption></figure></div>

## Stop a Response in Progress <a href="#stop-generating" id="stop-generating"></a>

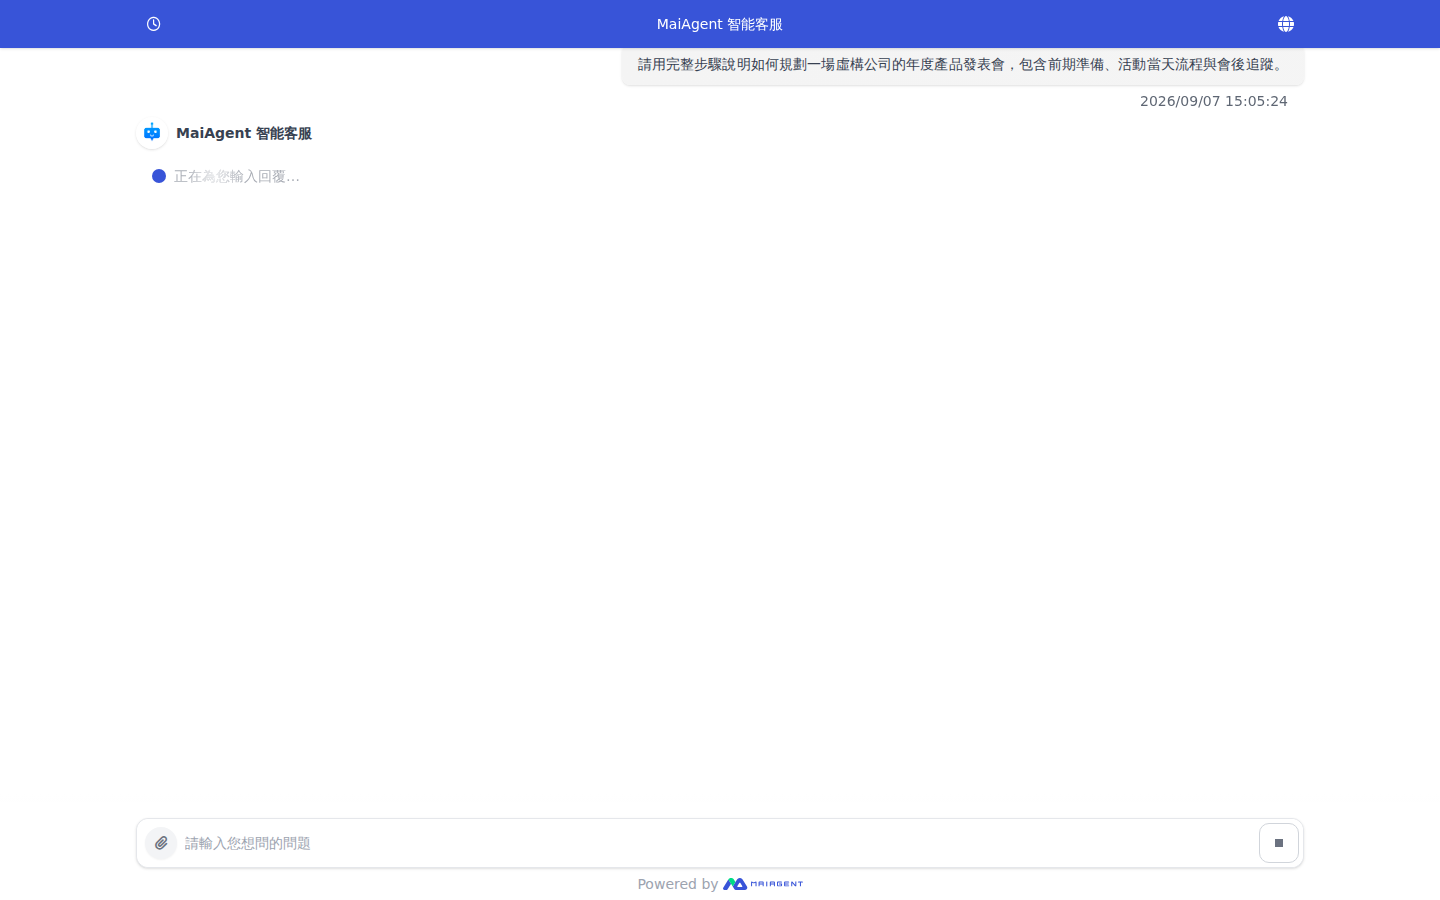
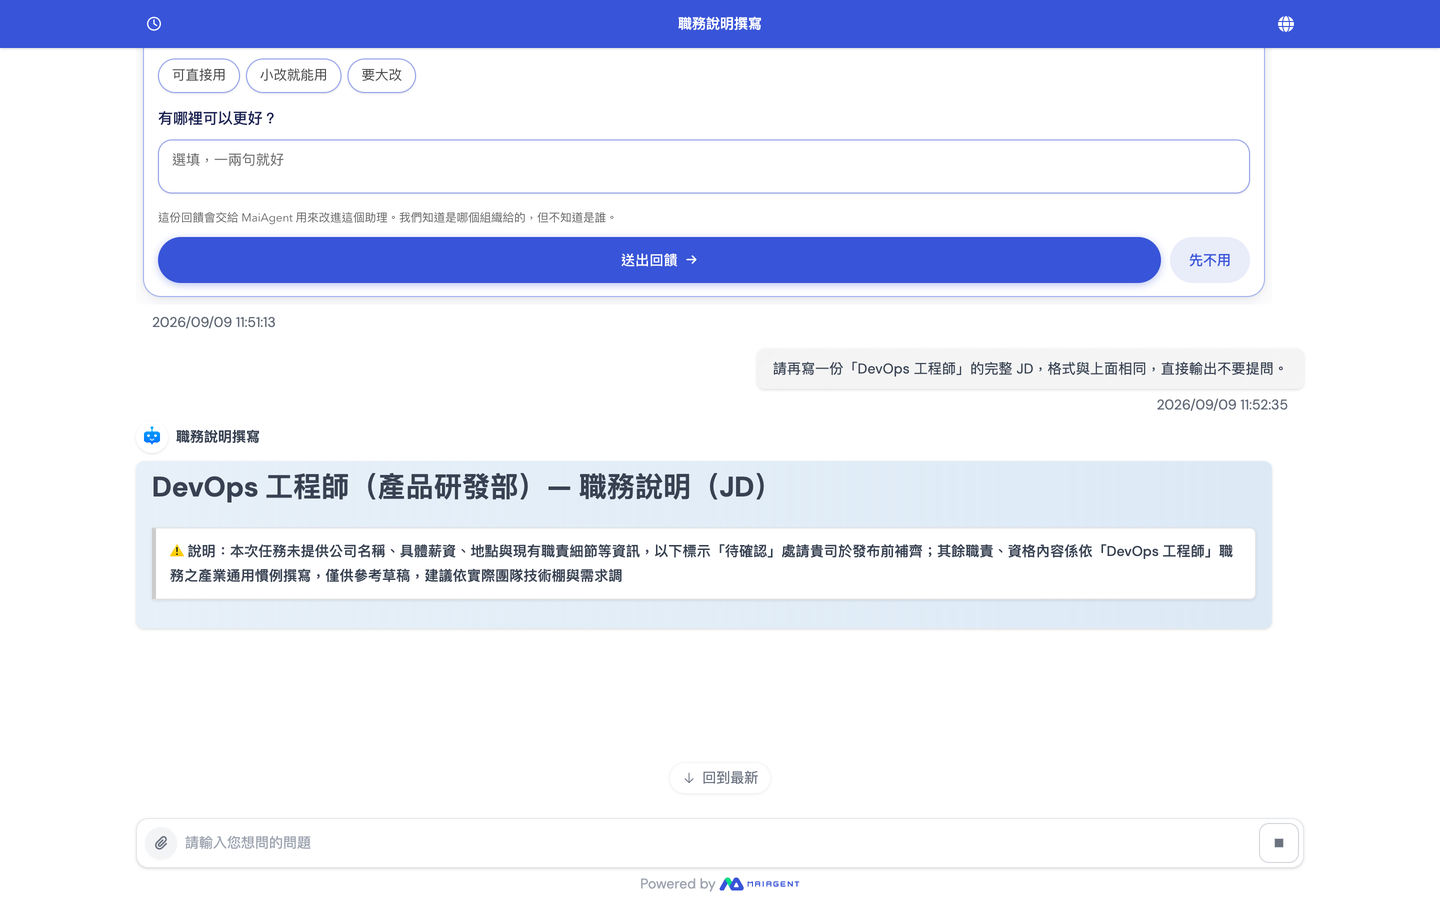
If you notice a mistake after sending a question, you do not need to wait for the Agent to finish its entire response. While a response is being generated, the send button to the right of the input field becomes a square <mark style="color:blue;">Stop</mark> button. Click it to stop this response, then enter your corrected question.

For example, a customer service representative asks the Agent to plan an annual product launch, then realizes they forgot to specify the budget. They can click <mark style="color:blue;">Stop</mark> while the Agent is responding, then ask again with the budget and attendee count, avoiding the wait for an unsuitable response to finish.

### Stop a Response <a href="#stop-current-response" id="stop-current-response"></a>

{% stepper %}
{% step %}

### 1. Find the Stop Button <a href="#find-stop-button" id="find-stop-button"></a>

After sending a question, wait for the Agent to start generating a response. A square <mark style="color:blue;">Stop</mark> button appears to the right of the input field.

<figure><img src="https://1360999650-files.gitbook.io/~/files/v0/b/gitbook-x-prod.appspot.com/o/spaces%2F6v6TNkkOQVfRYfcNirHL%2Fuploads%2Fgit-blob-5b470980c305488984de0c77295cf0ef2ae6f57f%2Fwebchat-stop-response.png?alt=media" alt="A square Stop button appears to the right of the input field while Web Chat generates a response"><figcaption><p>Click the Stop button to the right of the input field while a response is being generated</p></figcaption></figure>
{% endstep %}

{% step %}

### 2. Stop and Ask Again <a href="#stop-and-ask-again" id="stop-and-ask-again"></a>

Click <mark style="color:blue;">Stop</mark>. “Response interrupted” appears below the stopped response, and the button to the right of the input field immediately switches back to Send. You can then enter and send your corrected question.
{% endstep %}
{% endstepper %}

{% hint style="info" %}
Stopping only interrupts the response currently being generated. It does not delete the question you sent or any earlier conversation history.
{% endhint %}

### Stop with the Keyboard: Press Esc <a href="#stop-with-esc" id="stop-with-esc"></a>

On a computer, press Esc while the cursor is in the input field to do the same thing as clicking <mark style="color:blue;">Stop</mark>, without moving the mouse. Pressing Esc when no response is being generated has no effect and preserves any text you are typing in the input field.

### Send More Messages During a Response: Message Queue <a href="#message-queue" id="message-queue"></a>

While the Agent is responding, visitors on a computer can keep typing and press Enter to submit messages. These messages are not sent to the Agent immediately. Instead, they appear in a list above the input field labeled “Will be sent in order after the response finishes (N messages)” and are automatically sent in order when the current response ends. While a response is in progress, the button to the right of the input field is <mark style="color:blue;">Stop</mark>, so use Enter to queue messages. For queued messages:

* Click a message to return it to the input field, edit it, and submit it again
* Click <mark style="color:blue;">Remove</mark> on the right to cancel it
* When the queue is full, a message says “You can queue up to N messages. Please wait for the response to finish”

<figure><img src="https://1360999650-files.gitbook.io/~/files/v0/b/gitbook-x-prod.appspot.com/o/spaces%2F6v6TNkkOQVfRYfcNirHL%2Fuploads%2Fgit-blob-697fc31a977d189aef4631a049501e43b61e988d%2Fwebchat-message-queue.png?alt=media" alt="Above the input field, a list labeled “Will be sent in order after the response finishes (1 message)” contains one queued message with a Remove button on the right; the input field has a Stop button on its right"><figcaption><p>Messages submitted with Enter during a response are queued above the input field</p></figcaption></figure>

To have the Agent handle a new question immediately, first press <mark style="color:blue;">Stop</mark> or Esc, then send it. Messages already queued when you stop are retained and sent automatically once the interrupted response finishes wrapping up (within about 10 seconds).

For example, a visitor asks the Agent in the website's Web Chat to describe all platform features in detail, then decides halfway through the response that they want a bullet list instead. They type “One more thing: please organize it as a bullet list.” and press Enter to queue it. Next, they press Esc to stop the lengthy response. The screen shows “Response interrupted,” and shortly afterward the queued message is sent automatically and the Agent responds to it.

{% hint style="warning" %}
Messages are not queued in the following situations:

* **Messages with attachments**: If you attach a file and try to send it during a response, the screen shows “AI is responding.” The text and file stay in the input field until you send them after the response finishes. If you click <mark style="color:blue;">Stop</mark>, wait briefly (up to about 10 seconds) for the interrupted response to wrap up.
* **Phones and tablets**: Enter inserts a line break in the input field. During a response, only the <mark style="color:blue;">Stop</mark> button appears on the right, so stop the response or wait for it to finish before sending the next message.
  {% endhint %}

## <mark style="color:blue;">4. Diverse Q\&A Content</mark> <a href="#multimodal-qa" id="multimodal-qa"></a>

### 1. Multilingual Support <a href="#multi-language" id="multi-language"></a>

Respond in the user's language to eliminate communication barriers.

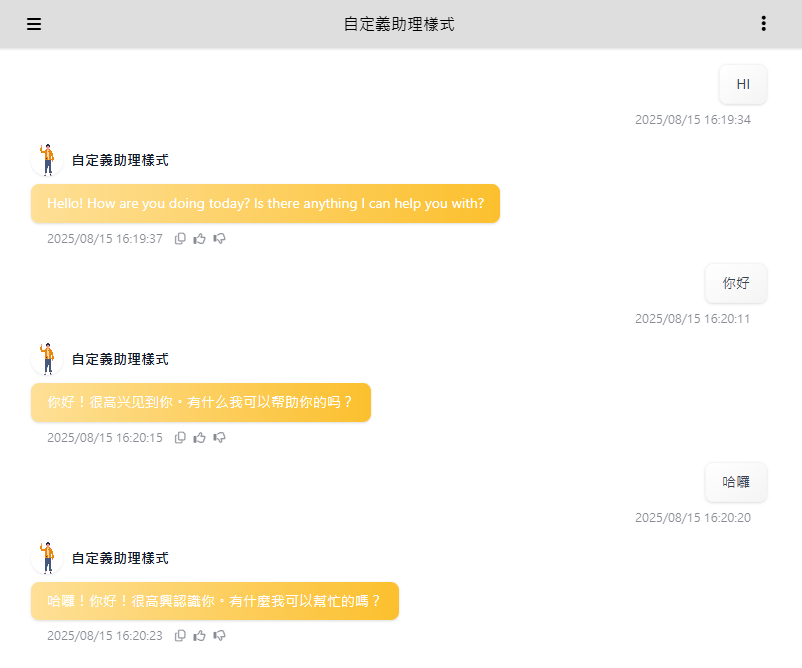
* **Automatic detection**: When users have not selected a language, the Agent responds in the language of their question

<figure><img src="https://1360999650-files.gitbook.io/~/files/v0/b/gitbook-x-prod.appspot.com/o/spaces%2F6v6TNkkOQVfRYfcNirHL%2Fuploads%2Fgit-blob-6ddc78047a3aef2815f71e26c3d498588224141c%2Fimage%20(127).png?alt=media" alt="Without a selected language, users greet the Agent in English, Simplified Chinese, and Traditional Chinese, and the Agent responds in each corresponding language"><figcaption><p>Without a selected language, the Agent responds in the language of the question</p></figcaption></figure>

**Switch the interface language**:

1. Visitors select a language in the Web Chat language menu (if no messages have been sent, a new conversation starts in the new language; if messages have already been sent, they stay in the same conversation and subsequent responses use the new language). See [Multilingual Support: Web Chat Language Settings](https://docs.maiagent.ai/maiagent-user-guide/en/build/agent/multi-language-support.md#web-chat-language-settings).
2. Use `locale` in the Web Chat initialization script (javascript) to specify the interface language and the Agent's response language. See [Technical Guide—Web Chat Embedding and SDK (`locale` Setting)](https://docs.maiagent.ai/tech/serve/web-chat-sdk#config-basic).

Once visitors select a language or the embedding page specifies one, the platform instructs the Agent to answer in that language unless the user explicitly requests another language in a message. The Agent generally follows the language of the question only when the interface language is inferred from the browser. See [Multilingual Support: How the AI Response Language Is Determined](https://docs.maiagent.ai/maiagent-user-guide/en/build/agent/multi-language-support.md#reply-language).

{% hint style="info" %}
For the list of supported languages, see [Multilingual Support: Supported Language List](https://docs.maiagent.ai/maiagent-user-guide/en/build/agent/multi-language-support.md#supported-language-list)
{% endhint %}

### Voice Input and Playback <a href="#voice-input-and-playback" id="voice-input-and-playback"></a>

When voice services are enabled for the Agent, three features appear in the visitor's Web Chat interface:

| Location                                                                        | Function                                                                                                                                                                                                                                                                                                                                                                                                                                                                                                           |
| ------------------------------------------------------------------------------- | ------------------------------------------------------------------------------------------------------------------------------------------------------------------------------------------------------------------------------------------------------------------------------------------------------------------------------------------------------------------------------------------------------------------------------------------------------------------------------------------------------------------ |
| <mark style="color:blue;">Microphone</mark> icon to the left of the input field | **Voice input**: Click to start speaking. The screen shows “Listening,” and when you finish, the recognized text is automatically sent as a message                                                                                                                                                                                                                                                                                                                                                                |
| <mark style="color:blue;">Voice</mark> in the settings menu                     | Choose the speech recognition language and provider: <mark style="color:blue;">Microsoft Azure</mark> (Mandarin, Simplified Chinese, English, Japanese, Korean, Thai, Vietnamese, Indonesian, Malay, Filipino, Burmese, Khmer, Lao, Singapore English), <mark style="color:blue;">Bronci</mark> (Taiwanese), or <mark style="color:blue;">Built-in</mark> (Mandarin and English, using the browser's own speech recognition). Match the recognition language to the visitor's spoken language for accurate results |
| <mark style="color:blue;">Voice Playback</mark> in the settings menu            | When enabled, Agent responses are read aloud automatically; when disabled, only text is displayed. Enabled by default                                                                                                                                                                                                                                                                                                                                                                                              |

On computers, the settings menu is the settings bar in the title bar. On phones, it is the <mark style="color:blue;">⋮</mark> in the top-right corner.

{% hint style="info" %}
Voice input here means “speak a sentence, convert it to text, and send it.” If the Agent has [Voice Agent](https://docs.maiagent.ai/maiagent-user-guide/en/build/agent/voice-agent.md) enabled, an additional <mark style="color:blue;">Headphones</mark> icon appears beside the input field for real-time voice calls. See [Voice Agent: How Users Talk](https://docs.maiagent.ai/maiagent-user-guide/en/build/agent/voice-agent.md#how-users-talk).
{% endhint %}

### 2. Multimodal Q\&A <a href="#multimodal" id="multimodal"></a>

In addition to text Q\&A, the Agent can support uploads of different file types:

* Spreadsheets: .xls, .xlsx, .csv, .ods
* Word processing documents: .doc, .docx, .odt, .pdf, .md, .txt
* Presentations: .ppt, .pptx, .odp
* Web documents: .html, .htm
* Data formats: .json, .jsonl
* Audio files: .wav, .mp3, .m4a, .aac
* Video files: .mp4
* CAD template files: .dxf (only for Agents in Agent mode with Code Interpreter enabled; see [Code Interpreter](https://docs.maiagent.ai/maiagent-user-guide/en/build/agent/code-interpreter.md#faq-dxf))

{% hint style="info" %}
You can disallow attachment uploads and restrict conversations to text to keep them secure.
{% endhint %}

#### Image Content Processing

**Image Recognition and Analysis**

* **Analyze uploaded images**: Users can upload product images for AI to identify automatically and provide related information
* **Process screenshots**: Analyze screenshots to help resolve usage questions
* **Describe images**: Automatically generate image descriptions and related suggestions

**Image Responses**

* **Product image display**: Include actual product images in responses
* **Visual instructions**: Provide screenshots with step-by-step instructions

Examples:

1. A user asks where to configure a MaiAgent Agent, and the Agent responds with an image of the settings screen
2. A user submits a screenshot to ask whether the path is correct, and the Agent interprets it correctly and responds

<div><figure><img src="https://1360999650-files.gitbook.io/~/files/v0/b/gitbook-x-prod.appspot.com/o/spaces%2F6v6TNkkOQVfRYfcNirHL%2Fuploads%2Fgit-blob-71263c2534efc1ba8bb19b493e761d88f0ef2c5f%2Fimage%20(122).png?alt=media" alt=""><figcaption><p>Agent responds with an image</p></figcaption></figure> <figure><img src="https://1360999650-files.gitbook.io/~/files/v0/b/gitbook-x-prod.appspot.com/o/spaces%2F6v6TNkkOQVfRYfcNirHL%2Fuploads%2Fgit-blob-c71336dcd8110e7f04f15a551ff3d4b3fd2dbdb1%2Fimage%20(123).png?alt=media" alt=""><figcaption><p>Agent interprets the user's screenshot</p></figcaption></figure></div>

#### Document Processing Capabilities

**Supported Document Formats**

* **PDF documents**: Automatically parse PDF content and answer related questions
* **Word documents**: Process .doc/.docx documents
* **Excel spreadsheets**: Analyze spreadsheet data and provide insights
* **PowerPoint presentations**: Extract presentation content and answer questions
* **Email files**: Process Outlook .msg and .eml emails, reading message information, body text, and attached documents

<figure><img src="https://1360999650-files.gitbook.io/~/files/v0/b/gitbook-x-prod.appspot.com/o/spaces%2F6v6TNkkOQVfRYfcNirHL%2Fuploads%2Fgit-blob-fb182a0ccc7d4f5fd35c125480e6582808f3dfda%2Fwebchat-email-attachments.png?alt=media" alt="Web Chat reads an uploaded EML email and answers questions about PDF and CSV test results, the sender, and the date"><figcaption><p>Visitors can upload emails through the attachment option and ask about the email and its document attachments</p></figcaption></figure>

**Document Interaction Features**

* **Query document content**: Answer specific questions based on uploaded documents
* **Data analysis**: Automatically analyze tabular data and present statistics in tables
* **Document summaries**: Generate summaries of key points in long documents

***

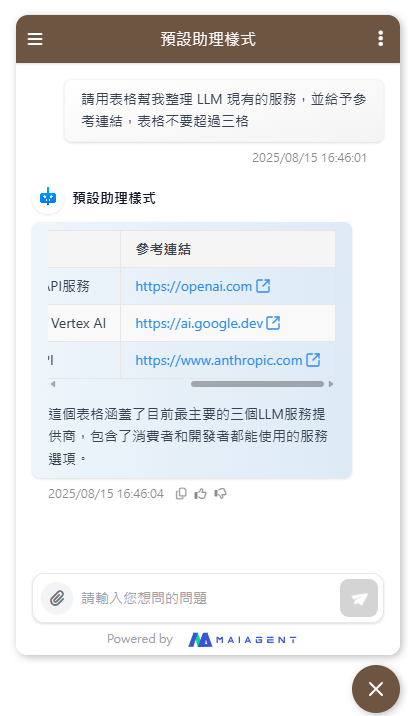
Example 1: Ask the Agent to present information in a table and provide reference links

<div><figure><img src="https://1360999650-files.gitbook.io/~/files/v0/b/gitbook-x-prod.appspot.com/o/spaces%2F6v6TNkkOQVfRYfcNirHL%2Fuploads%2Fgit-blob-b31d4a6935949e33bd1007689bb0fba9782f730f%2Fimage%20(132).png?alt=media" alt=""><figcaption><p>Information organized in a table</p></figcaption></figure> <figure><img src="https://1360999650-files.gitbook.io/~/files/v0/b/gitbook-x-prod.appspot.com/o/spaces%2F6v6TNkkOQVfRYfcNirHL%2Fuploads%2Fgit-blob-f7cd38de66136fd5b12b73f4f143fff7ae00aa30%2Fimage%20(133).png?alt=media" alt=""><figcaption><p>External links provided</p></figcaption></figure></div>

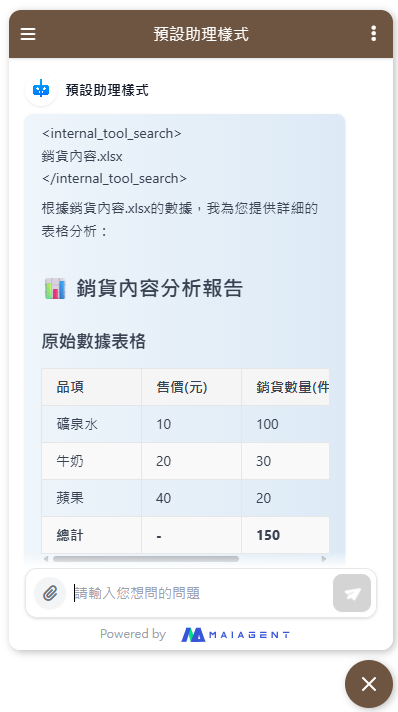
Example 2: Ask the Agent to analyze sales information and provide a table-based analysis

<figure><img src="https://1360999650-files.gitbook.io/~/files/v0/b/gitbook-x-prod.appspot.com/o/spaces%2F6v6TNkkOQVfRYfcNirHL%2Fuploads%2Fgit-blob-150fb2de65a75b631b5dcb1721f03e2c73ae297d%2Fimage%20(131).png?alt=media" alt=""><figcaption></figcaption></figure>

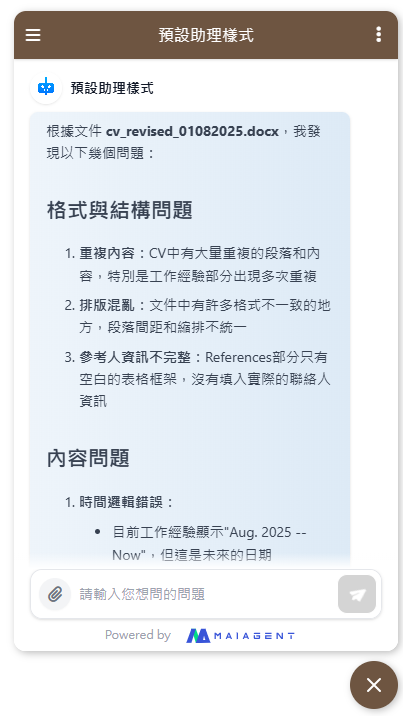
Example 3: Upload a docx file and ask the Agent to help analyze issues with CV writing

<figure><img src="https://1360999650-files.gitbook.io/~/files/v0/b/gitbook-x-prod.appspot.com/o/spaces%2F6v6TNkkOQVfRYfcNirHL%2Fuploads%2Fgit-blob-4354e35d4f0e524745e7859982782380ca89d980%2Fimage%20(134).png?alt=media" alt=""><figcaption></figcaption></figure>

{% hint style="success" %}
The Agent always responds in Markdown format, keeping its answers clearly organized.
{% endhint %}

**Files Delivered by the Agent**: When the Agent generates files with Code Interpreter for users, Web Chat displays file cards in the response (file name, type, and download button). Click a card to preview the file directly. Files produced by sub-Agents in Agent Teams appear in the same way.

## <mark style="color:blue;">5. Conversation Memory and Sharing</mark> <a href="#memory-and-sharing" id="memory-and-sharing"></a>

### **1. Conversation History Memory** <a href="#chat-history" id="chat-history"></a>

To provide a continuous service experience, Web Chat automatically remembers users' conversation history, allowing each conversation to build on earlier interactions.

**What Is Remembered**

* **Conversation content**: Complete Q\&A records, including text, images, and documents
* **Service status**: Unfinished inquiries and pending issues

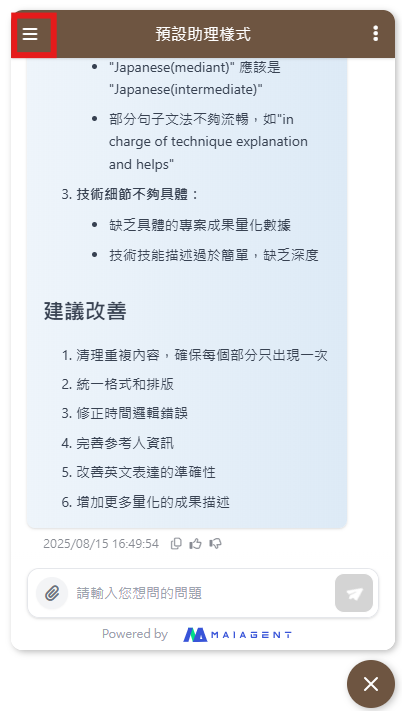
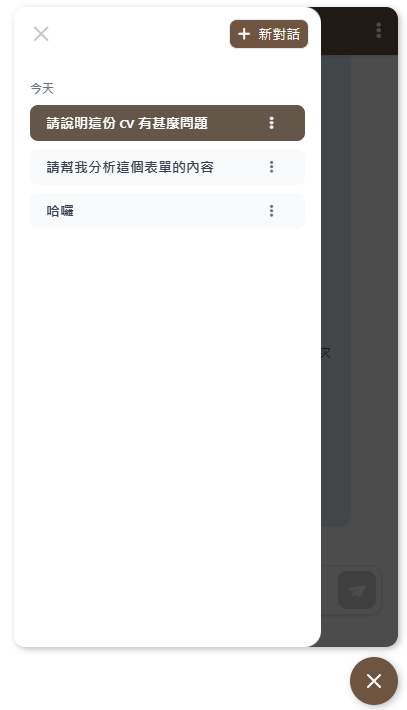
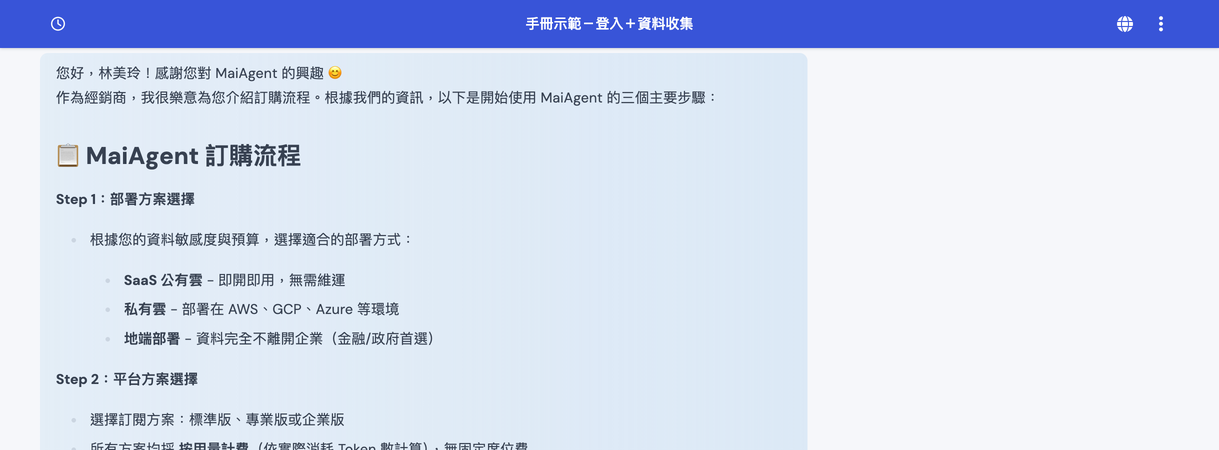
When “Show Conversation History” is enabled (see [Interaction Settings](https://docs.maiagent.ai/maiagent-user-guide/en/build/conversation-settings/platform-settings/interaction-settings.md#conversation-display)), a <mark style="color:blue;">Clock</mark> icon appears on the left of the title bar. Click it to open the conversation history sidebar:

<div><figure><img src="https://1360999650-files.gitbook.io/~/files/v0/b/gitbook-x-prod.appspot.com/o/spaces%2F6v6TNkkOQVfRYfcNirHL%2Fuploads%2Fgit-blob-516cd7f27f014ac3d1ccd66d011d495c1db67266%2F%E8%9E%A2%E5%B9%95%E6%93%B7%E5%8F%96%E7%95%AB%E9%9D%A2%202025-08-15%20171142.png?alt=media" alt=""><figcaption></figcaption></figure> <figure><img src="https://1360999650-files.gitbook.io/~/files/v0/b/gitbook-x-prod.appspot.com/o/spaces%2F6v6TNkkOQVfRYfcNirHL%2Fuploads%2Fgit-blob-e794f1deb35a654a2724917cd732fa298ed7ccb9%2Fimage%20(135).png?alt=media" alt=""><figcaption></figcaption></figure></div>

| Location                                                                        | Function                                                                                                                                                                                                                                                                                                                                                                                                                                                                         |
| ------------------------------------------------------------------------------- | -------------------------------------------------------------------------------------------------------------------------------------------------------------------------------------------------------------------------------------------------------------------------------------------------------------------------------------------------------------------------------------------------------------------------------------------------------------------------------- |
| <mark style="color:blue;">Search Conversations</mark> at the top of the sidebar | Open the search panel and type keywords to filter conversations instantly; you can also click <mark style="color:blue;">New Conversation</mark> directly in the panel                                                                                                                                                                                                                                                                                                            |
| <mark style="color:blue;">New Conversation</mark> at the top of the sidebar     | Start a completely new conversation                                                                                                                                                                                                                                                                                                                                                                                                                                              |
| <mark style="color:blue;">Edit Conversations</mark> at the top of the sidebar   | Visible only to logged-in visitors; select multiple conversations to delete at once. See [Delete Multiple Conversations at Once](#history-batch-delete) below                                                                                                                                                                                                                                                                                                                    |
| Conversation list                                                               | Automatically grouped into <mark style="color:blue;">Today</mark> / <mark style="color:blue;">Yesterday</mark> / <mark style="color:blue;">Previous 7 Days</mark> / <mark style="color:blue;">Previous 30 Days</mark> / <mark style="color:blue;">Earlier</mark>; conversations that used [Conversation Handoff](https://docs.maiagent.ai/maiagent-user-guide/en/work/maigpt/chat/conversation-handoff.md) are labeled “Handed off to” or “Continued from original conversation” |
| <mark style="color:blue;">⋯</mark> on each conversation                         | <mark style="color:blue;">Rename</mark> (change the title) and <mark style="color:blue;">Delete</mark> (delete after confirmation; cannot be undone); when conversation sharing is enabled on the platform, <mark style="color:blue;">Share</mark> is also available. See [Conversation Sharing](#chat-sharing) below                                                                                                                                                            |

When conversation history is disabled, the clock icon is replaced by a <mark style="color:blue;">New Conversation</mark> icon. Visitors can only start new conversations and cannot view previous records.

#### Delete Multiple Conversations at Once <a href="#history-batch-delete" id="history-batch-delete"></a>

When login is enabled on the conversation platform (see [Website: Login Settings](https://docs.maiagent.ai/maiagent-user-guide/en/build/choose-channel/web-chat/website.md#login-settings)), logged-in visitors can select multiple conversations of their own in the conversation history sidebar and delete them at once. Visitors who are not logged in do not see this option, but can still use each conversation's <mark style="color:blue;">⋯</mark> menu to delete conversations individually.

For example, a member of an online store has asked about order shipping, return documents, and invoice details in the customer support Web Chat. Once all three issues are resolved, she wants to remove two conversations and retain only the order conversation for reference. She opens the conversation history sidebar, clicks <mark style="color:blue;">Edit Conversations</mark>, selects the other two conversations, clicks <mark style="color:blue;">Delete</mark>, and confirms. Only the order conversation remains in the sidebar. One of the conversations she deleted was currently open, so the screen also automatically switches to a new conversation.

1. Click the <mark style="color:blue;">Clock</mark> icon on the left of the title bar to open the conversation history sidebar, then click the pencil icon, <mark style="color:blue;">Edit Conversations</mark>, to the left of <mark style="color:blue;">New Conversation</mark>. In edit mode, the button becomes a checkmark icon, <mark style="color:blue;">Done</mark>, checkboxes appear before each conversation, and the <mark style="color:blue;">⋯</mark> menus are temporarily hidden.
2. Click conversation rows to select conversations to delete. In edit mode, clicking a row only selects it and does not open the conversation. You can also click <mark style="color:blue;">Select All</mark> above the list to select the conversations currently loaded in the sidebar, up to 100 at a time. Click it again to deselect all. “N selected” appears above the list.

<figure><img src="https://1360999650-files.gitbook.io/~/files/v0/b/gitbook-x-prod.appspot.com/o/spaces%2F6v6TNkkOQVfRYfcNirHL%2Fuploads%2Fgit-blob-67fcd800c92fa8d2619c5611e3e41c9151c11ab4%2Fweb-chat-history-batch-select.png?alt=media" alt="The Web Chat conversation history sidebar in edit mode, with two of three conversations selected; Select All, 2 selected, and a red Delete button appear above the list"><figcaption><p>After selecting conversations to delete, the number selected appears above the list.</p></figcaption></figure>

3. Click <mark style="color:blue;">Delete</mark>. The confirmation dialog shows “Delete N conversations?” Check the count, then click <mark style="color:blue;">Delete</mark>. If all deletions succeed, “N conversations deleted” appears and edit mode closes.

<figure><img src="https://1360999650-files.gitbook.io/~/files/v0/b/gitbook-x-prod.appspot.com/o/spaces%2F6v6TNkkOQVfRYfcNirHL%2Fuploads%2Fgit-blob-591662080b4c39ecc5d9866a7e92be769b976202%2Fweb-chat-history-batch-delete-confirm.png?alt=media" alt="A confirmation dialog titled Delete 2 conversations? explains that all messages in these conversations will also be deleted and that deletion cannot be undone; Cancel and Delete buttons appear below"><figcaption><p>The confirmation dialog shows the number of conversations to delete.</p></figcaption></figure>

{% hint style="warning" %}
All messages in the conversations are deleted as well. The interface provides no undo option.
{% endhint %}

* If the deleted conversations include the one currently open, the screen automatically switches to a new conversation.
* If some conversations cannot be deleted (for example, a conversation was already deleted in another tab), the message “Deleted N conversations; failed to delete M” appears: successful deletions are removed from the list, while failed ones remain selected. The screen stays in edit mode, so you can click <mark style="color:blue;">Delete</mark> again to retry or <mark style="color:blue;">Done</mark> to exit. If the entire batch fails to send (for example, because of a network interruption), “Deletion failed. Please try again later” appears, and the list and selections remain unchanged.
* To cancel, click <mark style="color:blue;">Done</mark> or close the sidebar. This exits edit mode and clears the selections.
* If the sidebar has no conversations yet, <mark style="color:blue;">Edit conversations</mark> does not appear.

<figure><img src="https://1360999650-files.gitbook.io/~/files/v0/b/gitbook-x-prod.appspot.com/o/spaces%2F6v6TNkkOQVfRYfcNirHL%2Fuploads%2Fgit-blob-fc25fd8d962b878f53f7002f6eaea49f828d5612%2Fweb-chat-history-batch-partial-failed.png?alt=media" alt="After a partial deletion failure, the conversation history sidebar remains in edit mode with one undeleted conversation still selected, and the top shows 1 selected"><figcaption><p>Conversations that could not be deleted remain in the list and stay selected.</p></figcaption></figure>

Conversation memory can be used for:

* **Follow-up consultations**: When a user asks “What was the tent model you recommended last time?”, the AI can immediately recall it and respond
* **Progress tracking**: When a user says “Continue my previous order inquiry”, the AI automatically retrieves the relevant information
* **Personalized service**: Provide more accurate recommendations and suggestions based on conversation history

{% hint style="info" %}
When a conversation becomes too long, you can enable “Conversation handoff” so visitors can ask the Agent to prepare a handoff summary and continue in a new conversation. For Web Chat setup and limitations, see [Conversation handoff: Enable in Web Chat](https://docs.maiagent.ai/maiagent-user-guide/en/work/maigpt/chat/conversation-handoff.md#enable-on-web-chat); to create a continuation conversation through the API, see [Conversation Handoff and Continuation API](https://docs.maiagent.ai/tech/serve/conversation-handoff-continuation) in the technical guide.
{% endhint %}

### **2. Conversation Sharing** <a href="#chat-sharing" id="chat-sharing"></a>

Use MaiAgent to generate a conversation sharing link when you want to share an Agent consultation with friends or colleagues, or when an internal team needs to collaborate on a customer issue:

<figure><img src="https://1360999650-files.gitbook.io/~/files/v0/b/gitbook-x-prod.appspot.com/o/spaces%2F6v6TNkkOQVfRYfcNirHL%2Fuploads%2Fgit-blob-5a43d6523e30f0539424a2d220e71f053420d7df%2Fimage%20(136).png?alt=media" alt=""><figcaption></figcaption></figure>

Click <mark style="color:blue;">Share</mark> in the upper-right corner of the conversation window, then click <mark style="color:blue;">Copy link</mark> in the “Public link to share this conversation” window and send it to the recipient. You can also get the same type of link from <mark style="color:blue;">⋯</mark> → <mark style="color:blue;">Share</mark> for each conversation in the history sidebar.

**What recipients see**

* A read-only conversation page containing all messages in the conversation so far, including text, images, and attachments
* The page opens without logging in, so share it only with people who should have access
* Recipients can only view the page, not continue typing there; to ask more questions, return to the original Web Chat and open a conversation

{% hint style="info" %}
Sharing links display only the conversation history itself. They do not generate a separate summary or organize related resources.
{% endhint %}

Conversation history sharing can be used for:

* **Customer sharing**: “These camping gear recommendations are great—I'll share them with my hiking club”
* **Internal collaboration**: Customer service staff share complex issues with the technical support team
* **Training**: Share representative conversations as employee training materials

### **3. Conversation Timeout Management** <a href="#chat-timeout" id="chat-timeout"></a>

To maintain conversation quality and system performance, Web Chat includes intelligent conversation timeout management:

**Intelligent filtering**

* **Automatically filter greetings**: The system identifies and filters opening greetings, excluding them from conversation timeout calculations
* **Reset message counts correctly**: The message counter resets correctly when a conversation restarts
* **Improve timeout detection**: Timeout calculations apply only to substantive conversation content for more accurate conversation management

**Conversation continuity**

* Helps prevent unexpected timeouts during normal conversations
* Allows users to continue after taking time to think or pausing
* The system intelligently determines whether a conversation is still in progress

**How it works**

1. **Start a conversation**: A user sends a greeting (such as “Hello”), which the system excludes from the timeout calculation
2. **Enter the discussion**: The user starts asking substantive questions, and the timeout timer starts
3. **Pause the conversation**: If the user steps away temporarily, the system maintains the conversation state
4. **Resume**: The user returns and continues the conversation, and the message count updates correctly

This improvement makes conversations smoother and more natural, so users do not need to worry about a conversation ending because they spent too long thinking.

### **4. Message Actions: Editing, Feedback, and Branching** <a href="#message-actions" id="message-actions"></a>

Action icons appear when you hover over a message. They work the same way as in MaiGPT; see [MaiGPT: Message actions](https://docs.maiagent.ai/maiagent-user-guide/en/work/maigpt/chat.md#message-actions) for full instructions. The difference in Web Chat is **which visitors have access**:

| Action                                                                                                                                   | Who can use it                                                            | Description                                                                                                                                                                                                                                                                                                                                                                                                               |
| ---------------------------------------------------------------------------------------------------------------------------------------- | ------------------------------------------------------------------------- | ------------------------------------------------------------------------------------------------------------------------------------------------------------------------------------------------------------------------------------------------------------------------------------------------------------------------------------------------------------------------------------------------------------------------- |
| <mark style="color:blue;">Copy</mark>, <mark style="color:blue;">Like</mark>, and <mark style="color:blue;">Dislike</mark> on AI replies | All visitors                                                              | Dislike opens the “Provide feedback” window, where visitors can select reasons, add other feedback, and submit it. Feedback appears in the admin [Conversation Viewer](https://docs.maiagent.ai/maiagent-user-guide/en/serve/daily-operations/reply/conversation-viewer.md) and satisfaction statistics in [Usage Analytics](https://docs.maiagent.ai/maiagent-user-guide/en/build/agent/usage.md#user-satisfaction-rate) |
| <mark style="color:blue;">Edit message</mark> and the version selector <mark style="color:blue;">‹ N / M ›</mark> on your own messages   | Logged-in visitors (with [login enabled](#login-config) for the platform) | Editing deletes subsequent messages and prompts the Agent to respond again; you cannot submit if the content is unchanged                                                                                                                                                                                                                                                                                                 |
| <mark style="color:blue;">Branch conversation</mark> on AI replies                                                                       | Logged-in visitors                                                        | Starts a separate conversation including everything up to this reply, without affecting the original conversation                                                                                                                                                                                                                                                                                                         |

### **5. Connected Services** <a href="#connected-services" id="connected-services"></a>

When an Agent needs to access an external service on a visitor's behalf (for example, checking a calendar using the visitor's own account), it sends an authorization card in the conversation. Visitors can view, reauthorize, or disconnect previously authorized services from <mark style="color:blue;">Connected services</mark> (the link icon) in the title bar. Only visitors whose identity has been established (by logging in or through a Source ID supplied by the website; completing a Pre-chat form alone does not count) can see this button. The conversation platform's [Show connected services](https://docs.maiagent.ai/maiagent-user-guide/en/build/conversation-settings/platform-settings/function-settings.md#show-connected-services) setting must also be enabled (it is off by default for newly created platforms). See [Connected Services](https://docs.maiagent.ai/maiagent-user-guide/en/build/choose-channel/web-chat/connected-services.md) for details.

## <mark style="color:blue;">6. Choose Whether to Show Tools Used and Cited Documents</mark> <a href="#display-tools-and-citations" id="display-tools-and-citations"></a>

### **1. Show the Tools Used** <a href="#show-tools" id="show-tools"></a>

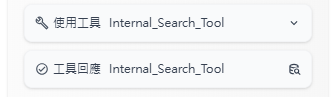
You can choose whether users can see the list of tools the Agent uses during reasoning. When enabled, the following appears while the Agent generates a reply:

<figure><img src="https://1360999650-files.gitbook.io/~/files/v0/b/gitbook-x-prod.appspot.com/o/spaces%2F6v6TNkkOQVfRYfcNirHL%2Fuploads%2Fgit-blob-397b3d1960642ae0a98c9097422f2fa66f89c543%2Fimage%20(140).png?alt=media" alt=""><figcaption></figcaption></figure>

Use this list to check whether the Agent is using tools correctly.

If an MCP tool called by the Agent includes an interactive interface, an interactive card also appears below the reply. See [MCP Interactive Cards (MCP Apps)](https://docs.maiagent.ai/maiagent-user-guide/en/build/tools/mcp-apps.md).

### **2. Show Cited Documents** <a href="#show-citations" id="show-citations"></a>

Each AI answer automatically generates a list of cited documents, clearly identifying its sources to improve credibility and traceability.

**Display settings**

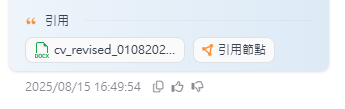
Organizations can choose whether users can see the cited tools and reference document names and content. When enabled, the following list appears at the bottom of the Agent's response. Click a “Citation node” to view the referenced document excerpt:

<figure><img src="https://1360999650-files.gitbook.io/~/files/v0/b/gitbook-x-prod.appspot.com/o/spaces%2F6v6TNkkOQVfRYfcNirHL%2Fuploads%2Fgit-blob-380a3f1aadb6212090fd6ed70f0c93d56a2224e9%2Fimage%20(139).png?alt=media" alt=""><figcaption></figcaption></figure>

Choose whether to disclose citation information based on your use case:

* **Public customer service**: Show all citation information to build trust
* **Internal support**: Hide sensitive documents to protect confidential information
* **Educational institutions**: Show learning resources so students can consult them

## Panels Beside Replies: Canvas and Browser <a href="#side-panels" id="side-panels"></a>

Agent replies can include more than text. When the Agent generates documents, diagrams, web pages, or maps, a panel opens to the right of the conversation on desktop, or covers the entire conversation on mobile. You can close the panel; a card for the generated output remains in the message, and you can click it later to reopen the panel. This section describes the three types of panels visitors may see.

### Canvas <a href="#web-chat-canvas" id="web-chat-canvas"></a>

Canvas opens automatically when the Agent generates a Markdown document, Mermaid diagram, HTML page, or interactive React page as a canvas. The toolbar at the top of the panel includes:

| Button                                                                                             | What it does                                                                                                                                                                                                                              |
| -------------------------------------------------------------------------------------------------- | ----------------------------------------------------------------------------------------------------------------------------------------------------------------------------------------------------------------------------------------- |
| <mark style="color:blue;">Switch to code</mark>／<mark style="color:blue;">Switch to preview</mark> | Switches between the rendered view and the source content                                                                                                                                                                                 |
| <mark style="color:blue;">Console</mark>, <mark style="color:blue;">Reset code</mark>              | Available only for interactive React pages: view runtime messages or restore the code to the version originally generated by the Agent                                                                                                    |
| <mark style="color:blue;">Full screen</mark>／<mark style="color:blue;">Exit full screen</mark>     | Expands the canvas to fill the window                                                                                                                                                                                                     |
| <mark style="color:blue;">Download</mark>                                                          | <mark style="color:blue;">Download source file</mark> (.md, .mmd, .html, or .jsx, depending on the type) or <mark style="color:blue;">Download PDF</mark>; while the content is compiling, “Download available after compilation” appears |
| <mark style="color:blue;">Close</mark>                                                             | Collapses the panel; the canvas card in the message can still reopen it                                                                                                                                                                   |

On desktop, drag the panel's left edge to adjust its width. Canvas uses, suitable prompts, and export details are the same as in MaiGPT. See [Canvas](https://docs.maiagent.ai/maiagent-user-guide/en/work/maigpt/canvas.md).

### Map Canvas <a href="#map-canvas" id="map-canvas"></a>

When answering questions about places or itineraries (such as restaurant recommendations or a three-day, two-night trip), the Agent may use a map canvas: a Google map with place markers appears on the left, and a list of place cards appears on the right (below the map on mobile).

* **Filters**: The <mark style="color:blue;">Filter</mark> dropdown filters by <mark style="color:blue;">Category</mark> (restaurants, cafés, accommodations, attractions, shopping, nature, transportation, other), <mark style="color:blue;">Conditions</mark> (<mark style="color:blue;">Open now only</mark>, <mark style="color:blue;">4.5★ and above</mark>), and <mark style="color:blue;">Display</mark> (rating badges, name labels). If no places match, “No places match your filters” appears.
* **Multi-day itineraries**: For itineraries split across days, <mark style="color:blue;">All</mark>／<mark style="color:blue;">Day N</mark> controls appear at the top left of the map. The list groups places by morning, afternoon, evening, and unscheduled.
* **Place details**: Click a place card to open its details, with two tabs: <mark style="color:blue;">Overview</mark> (introduction, address, website, phone number, opening hours, and <mark style="color:blue;">Open</mark>／<mark style="color:blue;">Closed</mark>) and <mark style="color:blue;">Reviews</mark>. Below are <mark style="color:blue;">Directions</mark>, <mark style="color:blue;">Call</mark>, <mark style="color:blue;">Open website</mark>, and <mark style="color:blue;">Open in Google Maps</mark>. Details come from Google; if they cannot be loaded, “Unable to retrieve details” appears.

In the map canvas, <mark style="color:blue;">Switch to code</mark> shows the raw place data, and <mark style="color:blue;">Download source file</mark> saves it as .json.

### Browser Panel <a href="#browser-panel" id="browser-panel"></a>

When an Agent with [Browser Tool](https://docs.maiagent.ai/maiagent-user-guide/en/build/agent/browser-tool.md) enabled starts operating a web page, a <mark style="color:blue;">Browser</mark> panel appears on the right, showing live screenshots of the page the Agent sees and its current URL. While the Agent is acting, <mark style="color:blue;">AI operating</mark> appears; before an image is available, it shows “Waiting for browser view…”.

Visitors can step in when the Agent stops, for example to enter a verification code, account credentials, or select an option:

* Click, double-click, right-click, or scroll directly on the screenshot. These actions are sent to the page the Agent is operating.
* The input box at the bottom of the panel, <mark style="color:blue;">Type here and press Enter to send to the browser</mark>: type text and press Enter to send it. When the box is empty, keys such as Enter, Esc, and arrow keys are also sent directly to the page. The input box is temporarily disabled while the Agent is operating.
* After clicking <mark style="color:blue;">Close</mark> at the top right to collapse the panel, <mark style="color:blue;">Reopen browser view</mark> appears above the input box. Click it to view the browser again.

{% hint style="warning" %}
Account credentials entered in the panel are sent to the page the Agent is operating. Enter them only if you trust this Agent and the organization behind it.
{% endhint %}

#### Collapse the Panel by Default <a href="#collapse-by-default" id="collapse-by-default"></a>

To prevent the panel from opening automatically, enable <mark style="color:blue;">Collapse by default</mark> in the panel header (to the left of <mark style="color:blue;">Close</mark>). When enabled, the panel stays collapsed while the Agent operates web pages. To view it, click <mark style="color:blue;">Reopen browser view</mark> above the input box.

* This setting is saved only in the current browser and shared by Web Chat on the same website. Set it again if you switch browsers or devices.
* If the browser blocks third-party cookies or site data, the setting turns off again after a refresh.
* For logged-in organization members, this setting is also saved only in the browser. It is separate from [Collapse by default](https://docs.maiagent.ai/maiagent-user-guide/en/build/agent/browser-tool.md#collapse-by-default) in internal conversations, so each must be set separately.

## <mark style="color:blue;">7. Conversation Access Control - A Secure, Controlled Conversation Environment</mark> <a href="#access-control" id="access-control"></a>

### 1. Login Settings <a href="#login-config" id="login-config"></a>

**Require login**

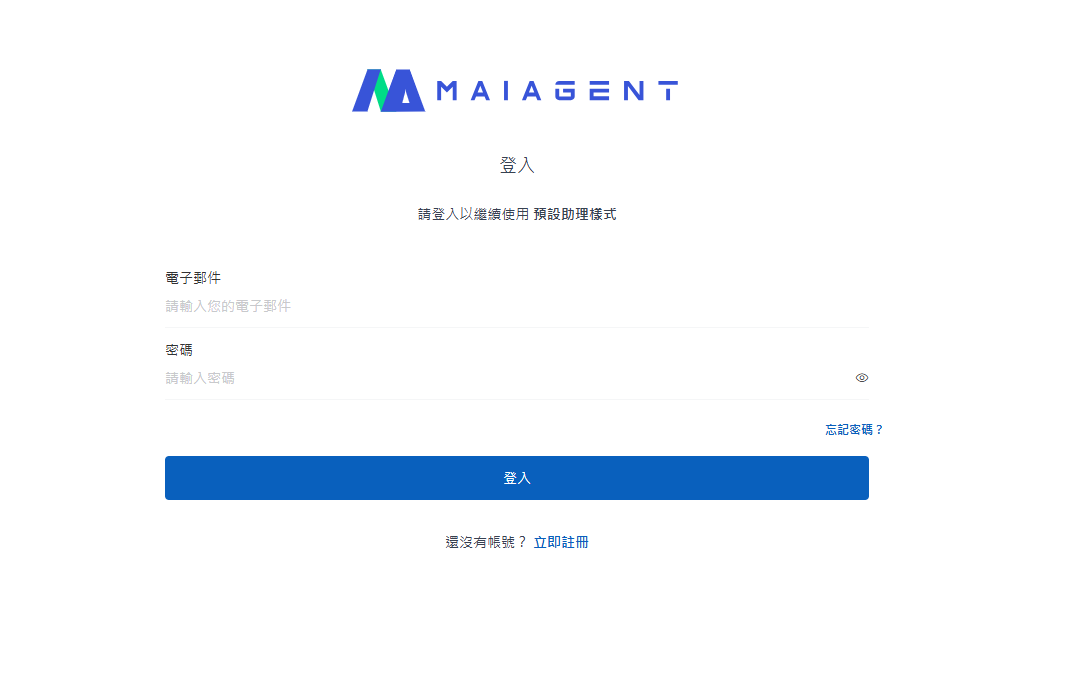
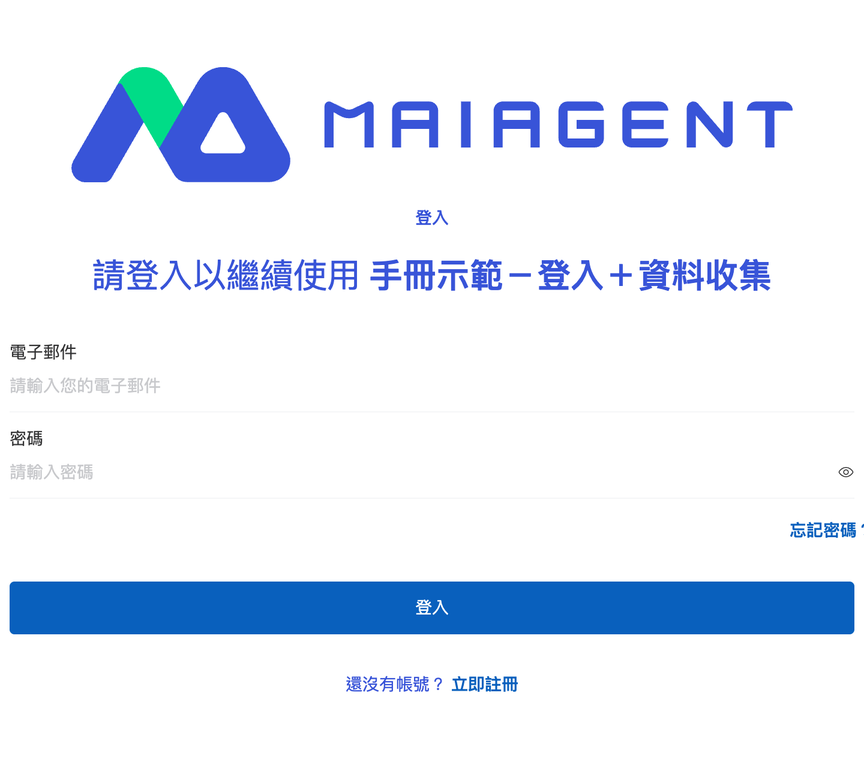
To keep conversation content secure and controlled, organizations can enable login and require users to log in before using Agent services. Once configured, visitors first see a login page when they click Web Chat. Only users who log in successfully can start a conversation with the Agent

**Security benefits**

* **Identity verification**: Ensures every user in a conversation has a known identity
* **Access control**: Provides services appropriate to each user's identity
* **Conversation tracking**: Records each user's complete conversation history
* **Data protection**: Prevents unauthorized users from accessing sensitive information

### 2. Three Login Methods <a href="#login-methods" id="login-methods"></a>

**AD (Active Directory) Login**

* **Use case**: Internal employees, with integration into an existing AD system
* **Features**: Single sign-on (SSO), with no additional account management needed
* **Setup**: Configure AD server connection information and synchronization rules
* **Example**: Employees log in directly with their company accounts and automatically receive the appropriate permissions

**Keycloak Login**

* **Use case**: Organizations with complex identity management needs, supporting multiple identity providers
* **Features**: Supports standard protocols such as OAuth2, SAML, and OpenID Connect
* **Setup**: Configure the Keycloak server, user pool, and identity providers
* **Example**: Integrate user identities across multiple systems and manage permissions centrally
* **Further use**: Let the Agent reuse the visitor's Keycloak login identity when calling MCP／API tools. See [Use the Keycloak Login Identity for Tool Calls](#keycloak-token-passthrough)

**MaiAgent Login**

* **Use case**: Simple user management needs and quick deployment
* **Features**: Built-in user management with a simple, intuitive interface
* **Setup**: Create user accounts and permissions on the MaiAgent platform
* **Example**: Create a dedicated login system for a specific group of users
* **Visitor self-registration**: The login page includes <mark style="color:blue;">Sign up now</mark> and <mark style="color:blue;">Forgot password?</mark>. The registration form is the same as the account application in the MaiAgent admin interface (real name, company name, company email, password, invitation code). It creates a MaiAgent platform account that can return directly to the login page to log in to Web Chat; this does not make the account a member of your organization or grant any admin permissions. The page is protected by human verification. See [Other Prompts Visitors May See](#other-visitor-prompts) below.

Once enabled, the following screen appears to require login before starting a conversation:

<figure><img src="https://1360999650-files.gitbook.io/~/files/v0/b/gitbook-x-prod.appspot.com/o/spaces%2F6v6TNkkOQVfRYfcNirHL%2Fuploads%2Fgit-blob-64de17901f8cb6979d092e523f309cbf98c493d2%2F%E8%9E%A2%E5%B9%95%E6%93%B7%E5%8F%96%E7%95%AB%E9%9D%A2%202025-08-15%20174017.png?alt=media" alt=""><figcaption></figcaption></figure>

### 3. Use the Keycloak Login Identity for Tool Calls <a href="#keycloak-token-passthrough" id="keycloak-token-passthrough"></a>

After a visitor logs in to Web Chat with Keycloak, the Agent can automatically include **the visitor's own Keycloak login credentials** when calling [MCP tools](https://docs.maiagent.ai/maiagent-user-guide/en/build/tools/mcp-setup.md) or [API tools](https://docs.maiagent.ai/maiagent-user-guide/en/build/tools/setup_api_tool.md) on their behalf. Your backend system can then use the same Keycloak authentication to identify the visitor and return only data they are allowed to see, without configuring separate accounts for each tool or asking the visitor to log in again.

This feature is off by default. When off, all tool calls work exactly as before.

#### Use Case <a href="#keycloak-token-passthrough-scenario" id="keycloak-token-passthrough-scenario"></a>

An organization's internal service portal uses Keycloak to manage employee accounts and Web Chat as an employee-only Agent. The IT administrator enables this feature on the conversation platform and adds the company's leave management system host to the allowlist. After logging in to Web Chat, an employee asks, “How many days of annual leave do I have left?” The Agent calls the leave system's API tool with that employee's own login credentials in the request. The leave system identifies the employee from the credentials and returns only their attendance and leave data. When another employee asks, they receive their own data.

#### Prerequisites <a href="#keycloak-token-passthrough-prerequisites" id="keycloak-token-passthrough-prerequisites"></a>

* Your organization has completed [Keycloak integration](https://docs.maiagent.ai/maiagent-user-guide/en/org/sso/sso-keycloak.md). Visitors must be members of this organization; when they first log in through the organization's configured Keycloak, the system automatically creates an account and adds it to the organization (see [Third-party Login: First Login](https://docs.maiagent.ai/maiagent-user-guide/en/org/sso.md#first-login)).
* In the conversation platform's “<mark style="color:blue;">Login settings</mark>”, “<mark style="color:blue;">Enable login</mark>” is on and “<mark style="color:blue;">Login source</mark>” is set to Keycloak.
* The MCP／API tools that will receive credentials have been created and assigned to the Agent used by this conversation platform; the receiving system can validate credentials issued by your Keycloak Realm.

#### Setup Steps <a href="#keycloak-token-passthrough-steps" id="keycloak-token-passthrough-steps"></a>

Location: In the left menu, go to “<mark style="color:blue;">Customer Conversations > Conversation Platforms</mark>”, select a website-type conversation platform, and open the “<mark style="color:blue;">Login settings</mark>” tab. This section appears after you select Keycloak as the login source.

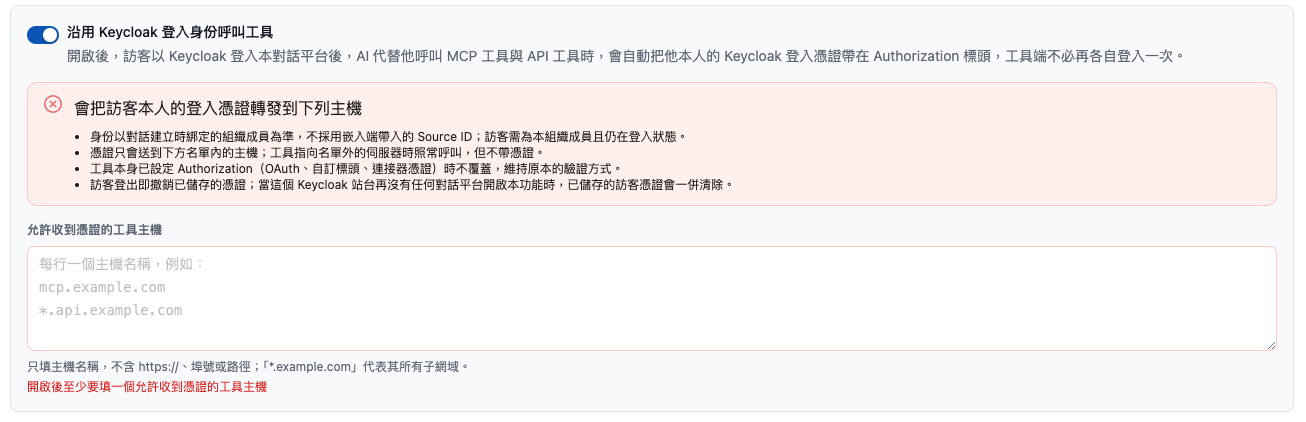
1. Enable “<mark style="color:blue;">Use Keycloak login identity for tool calls</mark>”.
2. Read the red warning below the switch, “<mark style="color:blue;">Forwards the visitor's own login credentials to the following hosts</mark>”, and confirm that you understand where the credentials will be sent.
3. Under “<mark style="color:blue;">Tool hosts allowed to receive credentials</mark>”, enter the hosts that should receive credentials, one per line (or separated by commas):
   * Enter only the hostname, without `https://`, a port number, or a path, for example `mcp.example.com`.
   * `*.example.com` matches `example.com` itself and all its subdomains; a hostname without `*.` matches only that exact host.
   * Hostnames are matched against the tool's “MCP server URL” or “API URL”.
4. Save the settings.

<figure><img src="https://1360999650-files.gitbook.io/~/files/v0/b/gitbook-x-prod.appspot.com/o/spaces%2F6v6TNkkOQVfRYfcNirHL%2Fuploads%2Fgit-blob-affd050ebc568fa2c5cad82c542d3f53cefe8493%2Fwebchat-keycloak-token-passthrough.png?alt=media" alt="Warning and allowed host list after enabling Keycloak login identity for tool calls"><figcaption><p>Enabling the feature displays a credential forwarding warning and requires tool hosts allowed to receive credentials</p></figcaption></figure>

When the switch is on, the list must contain at least one host. If the list is empty or contains an invalid hostname, the screen shows “<mark style="color:blue;">Enter at least one tool host allowed to receive credentials when enabled</mark>” or “<mark style="color:blue;">The following are not valid hostnames</mark>”, and the settings are not submitted.

{% hint style="warning" %}
**Visitors need to log in again after you enable this feature.** The platform saves Keycloak credentials only when visitors log in, and only when at least one conversation platform has this feature enabled. Ask visitors who logged in before it was enabled to log out and log back in so subsequent tool calls can include their credentials.
{% endhint %}

#### What the Receiving System Gets <a href="#keycloak-token-passthrough-request" id="keycloak-token-passthrough-request"></a>

When the Agent calls an MCP／API tool on an allowlisted host, the request includes an additional HTTP header:

```
Authorization: Bearer <visitor's Keycloak access token>
```

This is the standard access token issued to the visitor by your Keycloak Realm. Engineers handling the integration can identify users through standard Keycloak token validation (verifying the signature, expiration, and Realm). If the credentials have expired, the platform first renews them with the same Keycloak using the visitor's login session before sending the request. The tool does not need to handle renewal.

#### When Credentials Are and Are Not Included <a href="#keycloak-token-passthrough-behavior" id="keycloak-token-passthrough-behavior"></a>

| Situation                                                                                                                                                                                                 | Result                                                                                                                                                                    |
| --------------------------------------------------------------------------------------------------------------------------------------------------------------------------------------------------------- | ------------------------------------------------------------------------------------------------------------------------------------------------------------------------- |
| The visitor logged in with Keycloak, is still logged in, and the tool host is on the allowlist                                                                                                            | Includes the visitor's own credentials                                                                                                                                    |
| The tool host is not on the allowlist                                                                                                                                                                     | Calls the tool normally without credentials                                                                                                                               |
| The tool already has `Authorization` configured (OAuth, API tool headers, [Contact MCP credentials](https://docs.maiagent.ai/maiagent-user-guide/en/build/tools/setup-contacts-mcp-credentials.md), etc.) | Does not override it; retains the tool's original authentication method                                                                                                   |
| The visitor has logged out or is not a member of this organization                                                                                                                                        | Does not include credentials                                                                                                                                              |
| The visitor enters the conversation through [Source ID access without login](https://docs.maiagent.ai/maiagent-user-guide/en/build/choose-channel/web-chat/source-id-access.md)                           | Does not include credentials; identity is based on the organization member associated when the conversation was created, not the Source ID supplied by the embedding site |
| The switch is off                                                                                                                                                                                         | Same behavior as when this feature is not enabled                                                                                                                         |

{% hint style="danger" %}
The visitor's full login credentials are forwarded. The receiving system can use the visitor's identity to access other services protected by the same Keycloak. Include only hosts you trust that actually need to identify users, and avoid overly broad wildcards.
{% endhint %}

{% hint style="info" %}
When visitors log out, the platform revokes their saved credentials. When no conversation platform on the same Keycloak site has this feature enabled (because the switch was turned off, the login source was changed, or the platform was deleted), the platform also clears all saved visitor credentials.
{% endhint %}

## <mark style="color:blue;">8. Data Collection (Pre-chat Form)</mark> <a href="#pre-chat-form" id="pre-chat-form"></a>

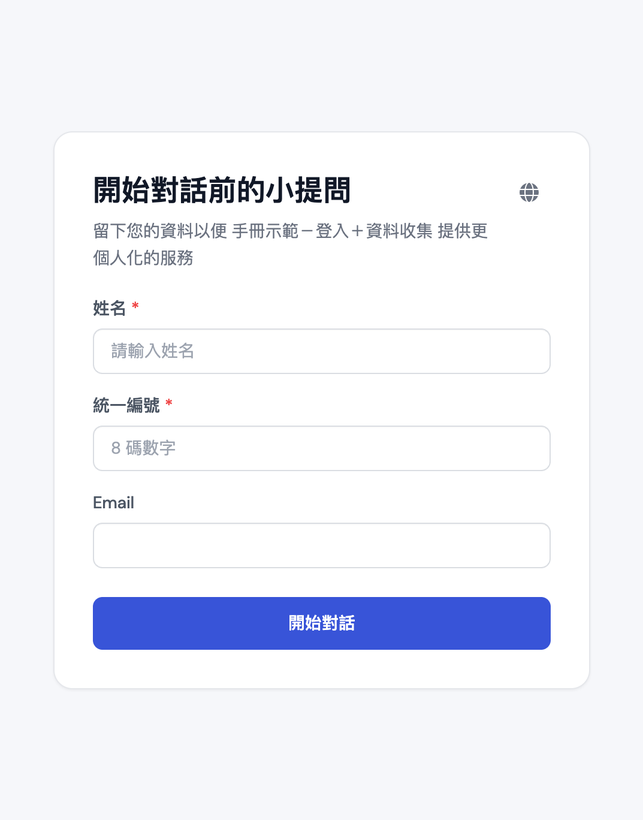
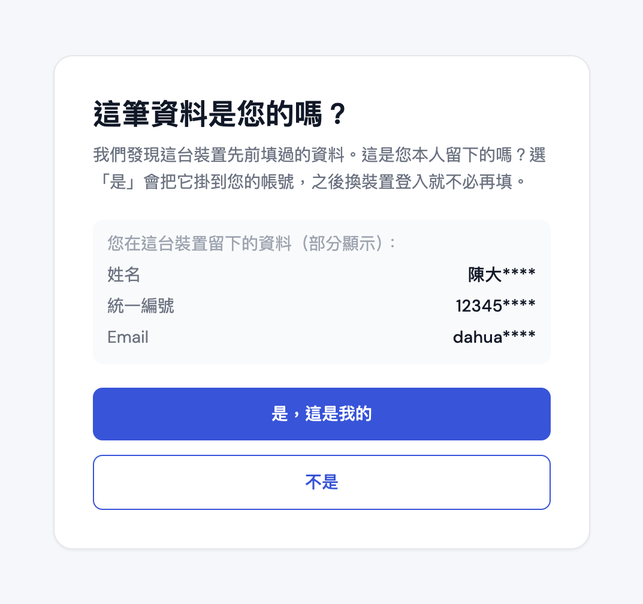
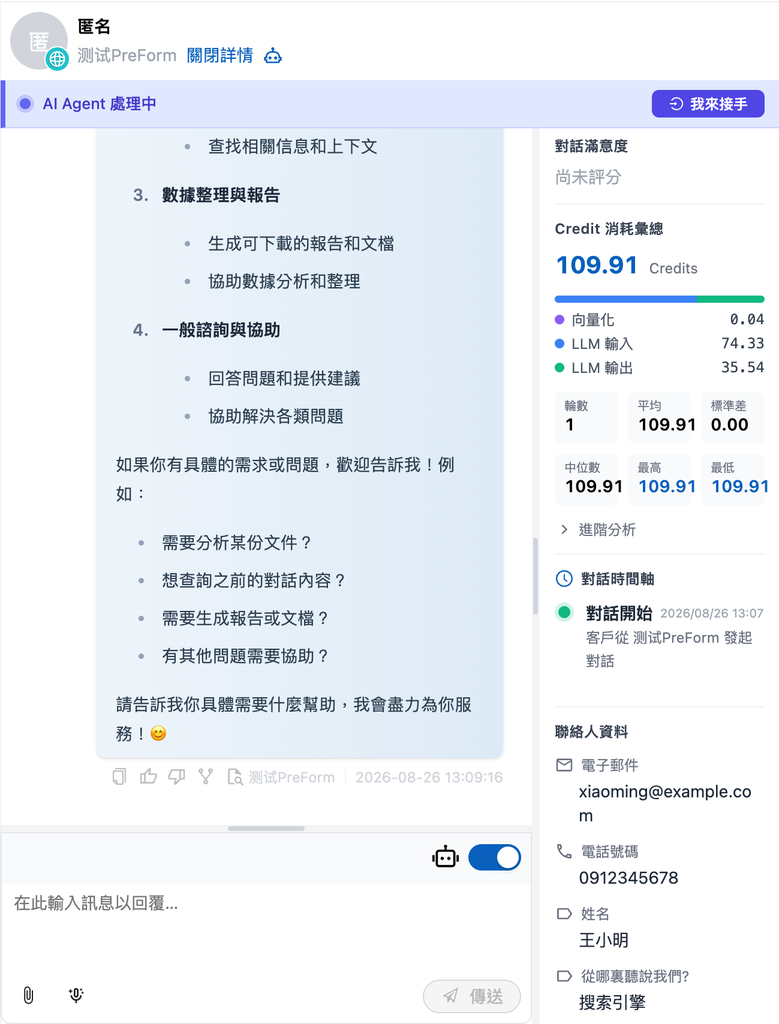
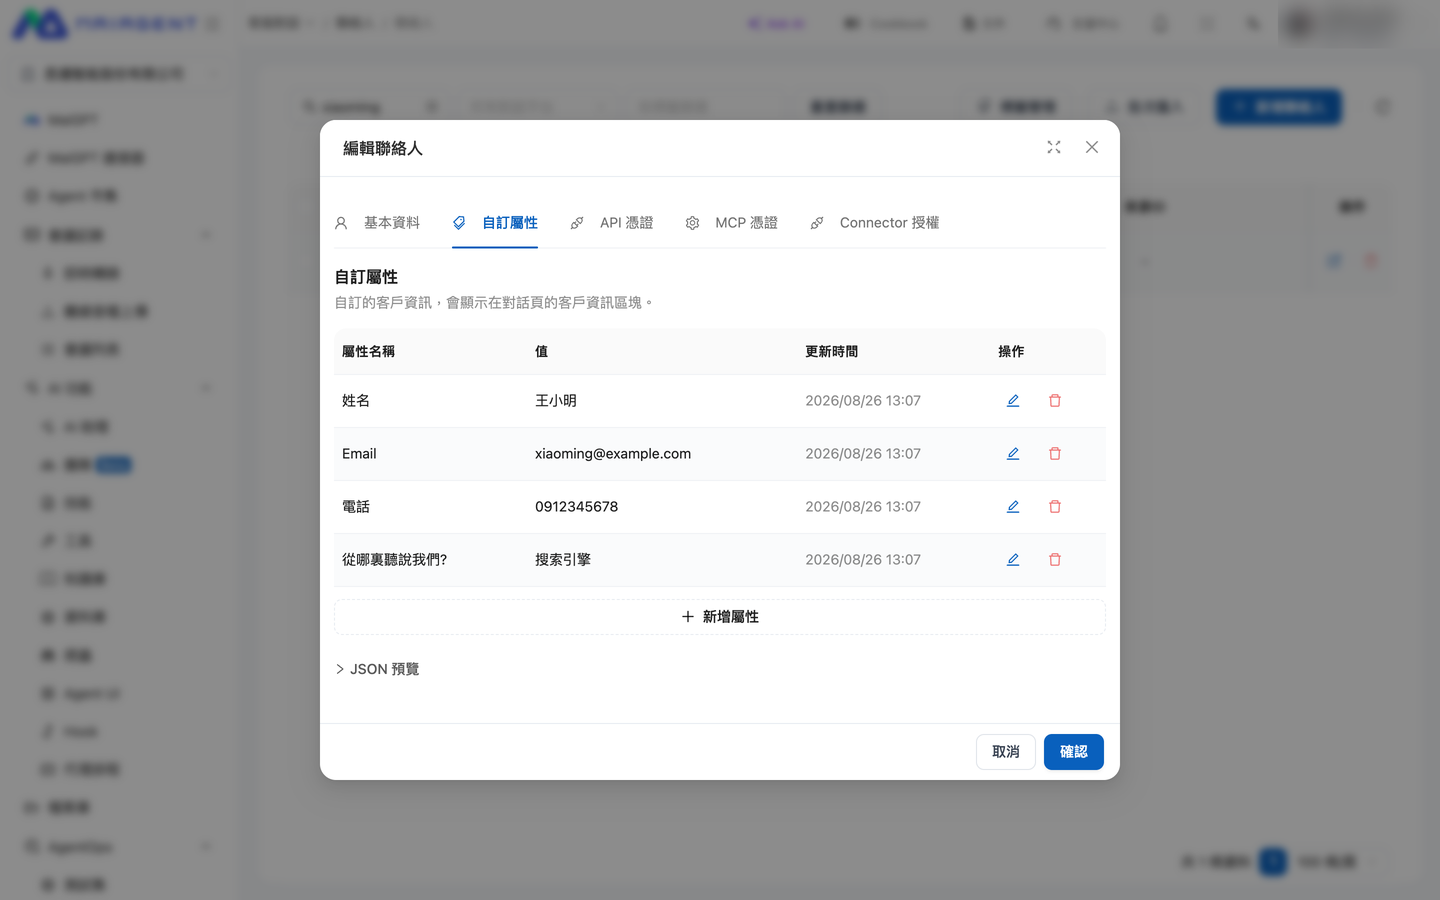
When data collection is enabled, visitors see a form before starting a conversation and must complete it to enter the chat. The information is saved to the visitor's [Contact](https://docs.maiagent.ai/maiagent-user-guide/en/serve/daily-operations/contact.md), so customer service staff can view it directly on the conversation page. This suits cases where you need to know who the visitor is first, such as collecting a company name and tax ID for dealer services, or a name and email for event inquiries.

### 1. Configure the Data Collection Form <a href="#pre-chat-config" id="pre-chat-config"></a>

Path: <mark style="color:blue;">Customer Conversations</mark> → <mark style="color:blue;">Conversation Platforms</mark> → Select the Web Chat conversation platform → <mark style="color:blue;">Data collection</mark> tab.

<figure><img src="https://1360999650-files.gitbook.io/~/files/v0/b/gitbook-x-prod.appspot.com/o/spaces%2F6v6TNkkOQVfRYfcNirHL%2Fuploads%2Fgit-blob-df589272e7045f7e939b7cba60f075968b08b741%2Fweb-chat-prechat-settings.png?alt=media" alt="Data collection tab"><figcaption><p>“Data collection” tab: configure the switch, title, and fields on the left; “Live preview” on the right shows the form's appearance as you edit</p></figcaption></figure>

{% stepper %}
{% step %}

### Enable the Form <a href="#pre-chat-enable-form" id="pre-chat-enable-form"></a>

Turn on <mark style="color:blue;">Enable Pre-chat form</mark>. When off, visitors enter the conversation directly, following the existing flow.
{% endstep %}

{% step %}

### Set a Title and Subtitle (Optional) <a href="#pre-chat-form-title" id="pre-chat-form-title"></a>

* <mark style="color:blue;">Form title</mark>: Appears at the top of the form. If left blank, the default text is “A few questions before we chat”.
* <mark style="color:blue;">Form subtitle</mark>: Explanatory text for the form. Use `{name}` to insert the conversation platform's name. If left blank, the default text is “Leave your details so {name} can provide more personalized service”.

Both support multiple languages. Switch language tabs to enter text for each language.
{% endstep %}

{% step %}

### Add fields <a href="#pre-chat-add-fields" id="pre-chat-add-fields"></a>

Click <mark style="color:blue;">Add field</mark>. Each field has the following settings:

| Setting                                                | Description                                                                                                                                                                                                                                                                                |
| ------------------------------------------------------ | ------------------------------------------------------------------------------------------------------------------------------------------------------------------------------------------------------------------------------------------------------------------------------------------ |
| <mark style="color:blue;">Field type</mark>            | Four types: text, Email, phone, and dropdown                                                                                                                                                                                                                                               |
| <mark style="color:blue;">Field label</mark>           | The field name visitors see; you can enter a separate label for each language                                                                                                                                                                                                              |
| <mark style="color:blue;">Placeholder</mark>           | Gray hint text inside the field                                                                                                                                                                                                                                                            |
| <mark style="color:blue;">Required</mark>              | When selected, visitors cannot submit the form without filling in this field                                                                                                                                                                                                               |
| <mark style="color:blue;">Contact field mapping</mark> | Determines where the data is saved in the contact: <mark style="color:blue;">Name (Contact.name)</mark>, <mark style="color:blue;">Email (Contact.email)</mark>, <mark style="color:blue;">Phone (Contact.phoneNumber)</mark>, or <mark style="color:blue;">Custom field (Metadata)</mark> |

Dropdown fields also have an <mark style="color:blue;">Options</mark> list. You can select <mark style="color:blue;">Allow custom input for “Other”</mark> so visitors can choose “Other” and enter their own text.

<figure><img src="https://1360999650-files.gitbook.io/~/files/v0/b/gitbook-x-prod.appspot.com/o/spaces%2F6v6TNkkOQVfRYfcNirHL%2Fuploads%2Fgit-blob-619c49c3340c2461c44fc92d965e6a2d40c77538%2Fweb-chat-prechat-field-editor.png?alt=media" alt="Field editor"><figcaption><p>Each field lets you configure its type, label (in multiple languages), placeholder, Contact field mapping, and whether it is required</p></figcaption></figure>

Drag fields to reorder them. A form can have up to 10 fields. The preview on the right updates immediately; switch the <mark style="color:blue;">Preview language</mark> to check each language version.
{% endstep %}

{% step %}

### Save <a href="#pre-chat-save-form" id="pre-chat-save-form"></a>

Check the preview and save. The changes take effect in Web Chat immediately.
{% endstep %}
{% endstepper %}

{% hint style="info" %}
**Contact field mapping restrictions**

* Name can only map to a text field, Email to an Email field, and phone to a phone field. Incompatible types are disabled with an explanatory message.
* Name, Email, and phone can each be mapped to only one form field. For other fields, such as a tax ID or company name, select “Custom field (Metadata)”.
  {% endhint %}

### 2. Visitor form flow <a href="#pre-chat-visitor-flow" id="pre-chat-visitor-flow"></a>

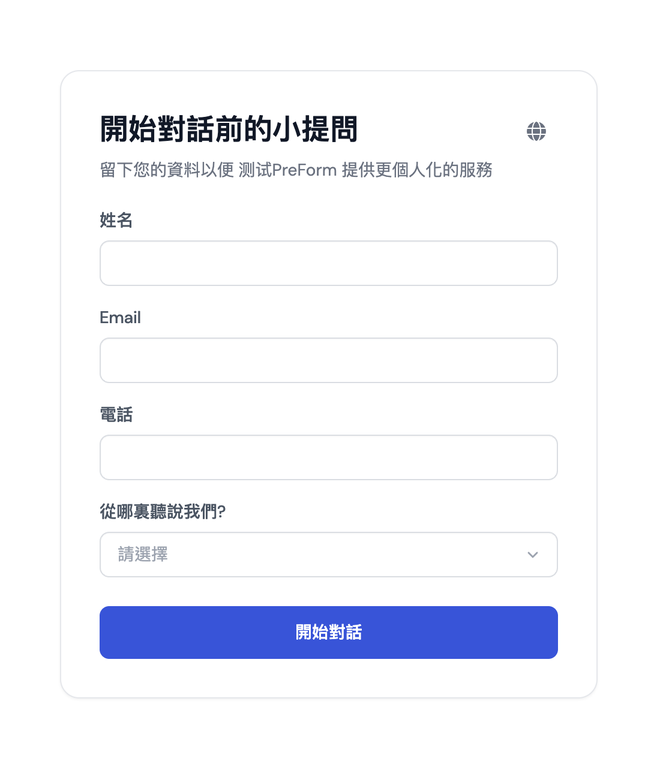
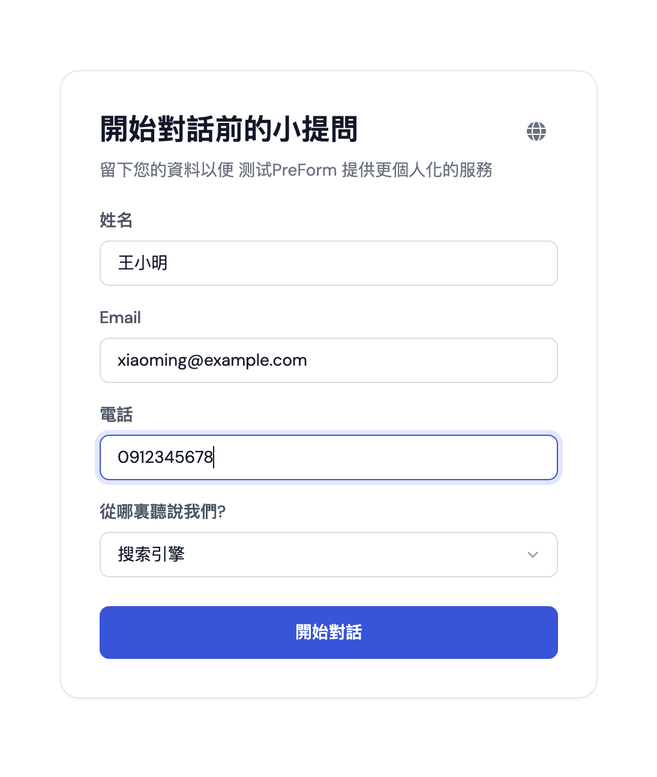
When visitors open Web Chat, they first see the form: the title, subtitle, configured fields, and a language switcher in the upper-right corner. After filling it in, they click <mark style="color:blue;">Start conversation</mark> to enter the chat.

<div><figure><img src="https://1360999650-files.gitbook.io/~/files/v0/b/gitbook-x-prod.appspot.com/o/spaces%2F6v6TNkkOQVfRYfcNirHL%2Fuploads%2Fgit-blob-72d96183b2932a7f3a53fa26e25b0c44693d9976%2Fweb-chat-prechat-form.png?alt=media" alt="Form shown to visitors"><figcaption><p>Visitors see the form first when they open Web Chat</p></figcaption></figure> <figure><img src="https://1360999650-files.gitbook.io/~/files/v0/b/gitbook-x-prod.appspot.com/o/spaces%2F6v6TNkkOQVfRYfcNirHL%2Fuploads%2Fgit-blob-80e055ba2910bb69258325f5f6f23ee481ba7342%2Fweb-chat-prechat-form-filled.png?alt=media" alt="Completed form"><figcaption><p>Click “Start conversation” after filling in the form</p></figcaption></figure></div>

* If a required field is empty or the Email or phone format is invalid, an error appears below the field and the form cannot be submitted.
* Once visitors have filled in the form in a browser, they will not be asked to fill it in again when reopening the same Web Chat in that browser.
* To correct their information, visitors can click <mark style="color:blue;">Update your information</mark> in the <mark style="color:blue;">⋮</mark> menu in the upper-right corner of Web Chat to reopen the form.

<figure><img src="https://1360999650-files.gitbook.io/~/files/v0/b/gitbook-x-prod.appspot.com/o/spaces%2F6v6TNkkOQVfRYfcNirHL%2Fuploads%2Fgit-blob-cc226e66c15e542470c95f0dd2b494f604ad81ec%2Fweb-chat-prechat-menu-refill.png?alt=media" alt="Update your information"><figcaption><p>“Update your information” in the upper-right ⋮ menu</p></figcaption></figure>

### 3. Using login: link data to the signed-in account <a href="#pre-chat-with-login" id="pre-chat-with-login"></a>

If both [login](#login-config) and data collection are enabled for the same Web Chat, the flow is: **Log in → Fill in the form → Start conversation**. The submitted data is linked to the user's account rather than the browser.

<figure><img src="https://1360999650-files.gitbook.io/~/files/v0/b/gitbook-x-prod.appspot.com/o/spaces%2F6v6TNkkOQVfRYfcNirHL%2Fuploads%2Fgit-blob-06b9fe480a3b4194110f3ebf618909d604be8274%2Fweb-chat-prechat-login-settings.png?alt=media" alt="Login settings tab"><figcaption><p>The “Login settings” tab: enable “Enable login” and select a login provider; these settings are independent of the “Data collection” tab</p></figcaption></figure>

<div><figure><img src="https://1360999650-files.gitbook.io/~/files/v0/b/gitbook-x-prod.appspot.com/o/spaces%2F6v6TNkkOQVfRYfcNirHL%2Fuploads%2Fgit-blob-f9c71c232b1bbdd9ee1880cf922a6361d2420e5e%2Fweb-chat-prechat-login-page.png?alt=media" alt="Login screen"><figcaption><p>① The login screen appears first when opening Web Chat</p></figcaption></figure> <figure><img src="https://1360999650-files.gitbook.io/~/files/v0/b/gitbook-x-prod.appspot.com/o/spaces%2F6v6TNkkOQVfRYfcNirHL%2Fuploads%2Fgit-blob-020c77245a78280ffc81ed879bdb2a9613f3cdeb%2Fweb-chat-prechat-login-form.png?alt=media" alt="Form after login"><figcaption><p>② The data collection form appears after login</p></figcaption></figure></div>

| Situation                                                                                                   | Web Chat behavior                                                                         |
| ----------------------------------------------------------------------------------------------------------- | ----------------------------------------------------------------------------------------- |
| The account is being used for the first time and has not completed the form                                 | The form appears after login; submitting it creates a contact linked to that account      |
| The same account logs in on a different device or browser                                                   | The form does not appear again; the conversation starts using the account's existing data |
| Someone previously filled in the form on this device without logging in, and the account itself has no data | A “Is this your information?” confirmation screen appears (see below)                     |
| The account already has data, and the device also has data submitted without login                          | The account's data takes precedence; no confirmation or merge occurs                      |
| A signed-in user clicks <mark style="color:blue;">Update your information</mark>                            | The existing contact linked to the account is updated; no additional contact is created   |

**Confirmation screen: Is this your information?**

If someone previously filled in the form on this device without logging in, and the account now signing in has no data, a confirmation screen appears after login instead of opening the form immediately. It shows the information previously submitted on this device (partially masked) and two buttons:

* <mark style="color:blue;">Yes, this is mine</mark>: Links that data to the current account. Future logins with the same account on any device will not require the form again.
* <mark style="color:blue;">No</mark>: Does not merge the data and leaves the original record unchanged. The form then opens so the user can enter their own information.

<figure><img src="https://1360999650-files.gitbook.io/~/files/v0/b/gitbook-x-prod.appspot.com/o/spaces%2F6v6TNkkOQVfRYfcNirHL%2Fuploads%2Fgit-blob-f8d35bfa6b85a7ec60a08eb8e73cc09904338eb6%2Fweb-chat-prechat-claim.png?alt=media" alt="Is this your information? confirmation screen"><figcaption><p>The confirmation screen masks some of the information, showing only enough for users to recognize whether they submitted it</p></figcaption></figure>

{% hint style="info" %}

* Web Chats without login enabled are unaffected; the browser still determines whether the form has been completed.
* The system does not automatically populate the form with account data. The first time an account is used, the user is still asked to complete the form, even if their data already exists in the admin console.
  {% endhint %}

After the conversation starts, the Agent and the customer service admin console both use this same contact linked to the account:

<div><figure><img src="https://1360999650-files.gitbook.io/~/files/v0/b/gitbook-x-prod.appspot.com/o/spaces%2F6v6TNkkOQVfRYfcNirHL%2Fuploads%2Fgit-blob-f9a99f4c93d7d3395efb4d6f27175d2469857745%2Fweb-chat-prechat-login-chat.png?alt=media" alt="Conversation after login"><figcaption><p>The Agent addresses the user by the name entered in the form</p></figcaption></figure> <figure><img src="https://1360999650-files.gitbook.io/~/files/v0/b/gitbook-x-prod.appspot.com/o/spaces%2F6v6TNkkOQVfRYfcNirHL%2Fuploads%2Fgit-blob-c054d2802f3905081dd7f8f997b1ac7ef7dc9697%2Fweb-chat-prechat-conversation-login.png?alt=media" alt="Admin conversation page"><figcaption><p>The admin conversation page shows the contact and the tax ID received through the form</p></figcaption></figure></div>

### 4. View collected data in the admin console <a href="#pre-chat-view-data" id="pre-chat-view-data"></a>

**In a conversation**: Go to <mark style="color:blue;">Customer service conversations</mark> → <mark style="color:blue;">All conversations</mark> → open a conversation. The <mark style="color:blue;">Contact information</mark> section on the right lists each item received through the form. Fields mapped to Email and phone appear as “Email” and “Phone number”; custom fields use the labels you configured.

<figure><img src="https://1360999650-files.gitbook.io/~/files/v0/b/gitbook-x-prod.appspot.com/o/spaces%2F6v6TNkkOQVfRYfcNirHL%2Fuploads%2Fgit-blob-efe6eb93e6c245a6c4dd2e98e793cc07bd69668f%2Fweb-chat-prechat-conversation-contact.png?alt=media" alt="Contact information section on the right of the conversation page"><figcaption><p>The “Contact information” section on the right of the conversation page lists each item received through the form</p></figcaption></figure>

{% hint style="info" %}
The “Contact” column in the contact list displays the Contact's name. If the form's name field is mapped to “Custom field (Metadata)” rather than “Name (Contact.name)”, contacts for visitors who are not signed in appear as “Anonymous”, and the name appears only in custom attributes. To show visitors' names directly in the list, map the name field to “Name (Contact.name)”.
{% endhint %}

**On the contact page**: Go to <mark style="color:blue;">Customer service conversations</mark> → <mark style="color:blue;">Contacts</mark> → open a contact. The <mark style="color:blue;">Basic information</mark> tab shows the name and phone number, and the <mark style="color:blue;">Custom attributes</mark> tab shows the other form fields.

<div><figure><img src="https://1360999650-files.gitbook.io/~/files/v0/b/gitbook-x-prod.appspot.com/o/spaces%2F6v6TNkkOQVfRYfcNirHL%2Fuploads%2Fgit-blob-efb6b695dd61855fd1e9963f8cfd34597bc31f73%2Fweb-chat-prechat-contacts-list.png?alt=media" alt="Contact list"><figcaption><p>Search the contact list by name, Email, or phone number</p></figcaption></figure> <figure><img src="https://1360999650-files.gitbook.io/~/files/v0/b/gitbook-x-prod.appspot.com/o/spaces%2F6v6TNkkOQVfRYfcNirHL%2Fuploads%2Fgit-blob-9bc3a0bf13c97c7eed1f5223b76a9bca113962f5%2Fweb-chat-prechat-contact-attributes.png?alt=media" alt="Custom attributes tab"><figcaption><p>The “Custom attributes” tab lists the value of each form field</p></figcaption></figure></div>

Data submitted by signed-in users is linked to their accounts, so their contacts are no longer anonymous records without an account owner. The contact name depends on the form settings: if a name field maps to “Name (Contact.name)”, the name entered in the form is displayed; if there is no name field, the signed-in account's name is displayed.

## Other prompts visitors may see <a href="#other-visitor-prompts" id="other-visitor-prompts"></a>

The following prompts occasionally appear during conversations and require no administrator configuration. They are listed here to help answer visitors' questions:

| Screen                                                                                                                                      | When it appears                                                                                                                                                                                                                                                                                           | What to do                                                                                                                                                                                                                           |
| ------------------------------------------------------------------------------------------------------------------------------------------- | --------------------------------------------------------------------------------------------------------------------------------------------------------------------------------------------------------------------------------------------------------------------------------------------------------- | ------------------------------------------------------------------------------------------------------------------------------------------------------------------------------------------------------------------------------------ |
| Verification widget on the login, sign-up, and password reset pages; “Too many requests. Please try again later.”                           | Web Chats with login enabled add Cloudflare Turnstile verification to these three pages; sending too many requests in a short time (such as repeatedly opening new conversations or sending messages) triggers rate limiting                                                                              | Wait for a check mark in the verification widget before submitting; if rate-limited, wait a little and try again                                                                                                                     |
| Bottom panel: “Install {App name} App”                                                                                                      | When opening the standalone full-screen page in a mobile browser, visitors can add Web Chat to their home screen as an app. Android shows <mark style="color:blue;">Install now</mark>; Safari on iPhone shows “Add to Home Screen” instructions, while other iPhone browsers suggest switching to Safari | Click <mark style="color:blue;">Remind me later</mark> to dismiss it for a day; the panel does not appear when Web Chat is opened as an installed app                                                                                |
| “Content is too long (N characters). Displaying as plain text” + <mark style="color:blue;">Show full content</mark>                         | When a single reply exceeds 50,000 characters (or a single line exceeds 2,000 characters), Markdown formatting is disabled and only the first 2,000 characters are shown initially                                                                                                                        | Click <mark style="color:blue;">Show full content</mark> to expand or <mark style="color:blue;">Collapse</mark> to collapse                                                                                                          |
| “Content is too large (N characters). Only the beginning is shown”                                                                          | A tool returns excessively large JSON data                                                                                                                                                                                                                                                                | Only the display is truncated; the Agent has received the complete data                                                                                                                                                              |
| “Earlier long messages have been partially omitted (approximately N characters in total). The assistant may not have seen the full content” | In a long conversation, the system omits earlier long messages to keep the context length under control                                                                                                                                                                                                   | Paste the relevant passages again if the Agent needs to refer to them; you can also use [Conversation handoff](https://docs.maiagent.ai/maiagent-user-guide/en/work/maigpt/chat/conversation-handoff.md) to start a new conversation |
| Small label beside a reply: “This reply was generated by team member ‘{Name}’”                                                              | The Agent belongs to an [Agent team](https://docs.maiagent.ai/maiagent-user-guide/en/build/teams.md), and this reply comes from one of its member Agents                                                                                                                                                  | No action needed                                                                                                                                                                                                                     |
| “Delegating to / Handing off to / Switching to {Agent}”; subagent task cards                                                                | During multi-Agent collaboration, the main Agent delegates tasks to subagents                                                                                                                                                                                                                             | The card shows whether a reply is in progress or completed; wait for it to finish                                                                                                                                                    |
| “Getting your location...”, “Unable to get your location. Please enable location access in settings”, “Location retrieved successfully”     | The administrator has enabled [location information](https://docs.maiagent.ai/maiagent-user-guide/en/build/conversation-settings/platform-settings/function-settings.md#gps-location), and the browser requests permission to access the visitor's location                                               | Allow location access before submitting; if access is denied, the Agent still replies, but without location information                                                                                                              |
| “Connect {Service}” authorization card                                                                                                      | The Agent needs to access an external service using the visitor's own account                                                                                                                                                                                                                             | See [Connected services](https://docs.maiagent.ai/maiagent-user-guide/en/build/choose-channel/web-chat/connected-services.md)                                                                                                        |
| Video generation card (queued / generating / estimated time: 60–90 seconds)                                                                 | The Agent uses a video generation tool                                                                                                                                                                                                                                                                    | Wait for it to finish; see [AI video generation](https://docs.maiagent.ai/maiagent-user-guide/en/work/maigpt/video.md)                                                                                                               |

## What to do if the connection fails <a href="#connection-failure" id="connection-failure"></a>

For example, a visitor reports to a website administrator that Web Chat displays a connection error when opened. The visitor should first wait for the system to retry automatically. If the error screen persists, they should capture the entire screen, including the failed stage, error category, and time of occurrence, and send it to the administrator to help diagnose the issue.

If a network interruption occurs while Web Chat loads the Agent configuration, it retries automatically and continues to show a loading screen during this time. If it still cannot connect after retrying, the error screen shows:

* The loading stage that failed
* The error category, along with the HTTP status code if available
* The local time when the error occurred

<figure><img src="https://1360999650-files.gitbook.io/~/files/v0/b/gitbook-x-prod.appspot.com/o/spaces%2F6v6TNkkOQVfRYfcNirHL%2Fuploads%2Fgit-blob-e24edbd1a83fd7f69430443a8a74158aeb6a117b%2Fweb-chat-connection-failure-network.png?alt=media" alt="Web Chat diagnostics showing a network connection failure while loading the Agent configuration"><figcaption><p>If automatic retries fail, the screen lists the failed stage, error category, and time of occurrence</p></figcaption></figure>

If the system has received an HTTP error status code, the server has responded. In this case, it displays the diagnostic error screen directly without retrying automatically.

{% hint style="info" %}
First check that the device can access the internet, then click <mark style="color:blue;">Retry</mark> on the error screen. If the issue persists, include all diagnostic information in the screenshot and avoid capturing conversation content or personal data.
{% endhint %}

## Review earlier messages while a reply is being generated <a href="#review-during-generation" id="review-during-generation"></a>

While the Agent is still generating a reply, visitors can scroll up to review earlier messages. The reply continues to generate below, but the screen stays where the visitor scrolled and does not jump as new text appears. Once the visitor moves away from the latest content, <mark style="color:blue;">Back to latest</mark> appears above the input box.

### Example scenario <a href="#generation-scroll-scenario" id="generation-scroll-scenario"></a>

A visitor asks the Agent to compare several plans at once. Before the reply is finished, she scrolls up to check the first plan's price. The screen stays in place instead of jumping as more text appears below. After checking, she clicks <mark style="color:blue;">Back to latest</mark>. The screen returns to her last question so she can continue reading the rest of the comparison.

### How to use it <a href="#generation-scroll-steps" id="generation-scroll-steps"></a>

{% stepper %}
{% step %}

### 1. Scroll up <a href="#scroll-up-during-generation" id="scroll-up-during-generation"></a>

While the Agent generates a reply, scroll up using the mouse wheel, a touch gesture, or the scrollbar.
{% endstep %}

{% step %}

### 2. Read in place <a href="#read-in-place" id="read-in-place"></a>

The screen stays where you scrolled. New content being generated does not change your current position.

<figure><img src="https://1360999650-files.gitbook.io/~/files/v0/b/gitbook-x-prod.appspot.com/o/spaces%2F6v6TNkkOQVfRYfcNirHL%2Fuploads%2Fgit-blob-537d8652530560963f91fe83d44727c547068051%2Fwebchat-back-to-latest.png?alt=media" alt="Scrolling up while Web Chat generates a reply shows “Back to latest” above the input box"><figcaption><p>While a reply is still being generated (the square stop button appears to the right of the input box), scrolling up shows “Back to latest” above the input box</p></figcaption></figure>
{% endstep %}

{% step %}

### 3. Back to latest <a href="#press-back-to-latest" id="press-back-to-latest"></a>

Click <mark style="color:blue;">Back to latest</mark> to return to the last question and resume automatically following the latest content.
{% endstep %}
{% endstepper %}


---

# Agent Instructions
This documentation is published with GitBook. GitBook is the documentation platform designed so that both humans and AI agents can read, navigate, and reason over technical content effectively. Learn more at gitbook.com.

## Querying This Documentation
If you need additional information that is not directly available in this page, you can query the documentation by asking a question.

Perform an HTTP GET request on the following URL with the `ask` and `goal` query parameters:

```
GET https://docs.maiagent.ai/maiagent-user-guide/en/build/choose-channel/web-chat.md?ask=<question>&goal=<user_goal>
```

`ask` is the immediate question: it should be specific, self-contained, and written in natural language.
`goal` is what the user is ultimately trying to achieve, the reason they need the answer. Sharing it helps GitBook give you a better, more relevant answer. A goal is most helpful when it describes the outcome the user wants rather than restating the question. For example, with `ask=how do I create an API token`, a goal like `automate deployments from our CI pipeline` lets GitBook tailor the answer to that use case.

The response will contain a direct answer to the question and relevant excerpts and sources from the documentation.

Use this mechanism when the answer is not explicitly present in the current page, you need clarification or additional context, or you want to retrieve related documentation sections.