> For the complete documentation index, see [llms.txt](https://docs.maiagent.ai/llms.txt). Markdown versions of documentation pages are available by appending `.md` to page URLs; this page is available as [Markdown](https://docs.maiagent.ai/maiagent-user-guide/en/build/choose-channel/connect-telegram.md).

# Connect a Conversation Platform: Telegram

Connect Telegram as a messaging channel: create a Telegram Bot, get its Bot Token, and add a channel linked to an Agent in MaiAgent.

## <mark style="color:blue;">Before You Begin</mark> <a href="#pre-integration-checklist" id="pre-integration-checklist"></a>

* Create an AI Assistant on the [MaiAgent platform](https://admin.maiagent.ai/)
* Register a Telegram account

## <mark style="color:blue;">Set Up the Integration</mark> <a href="#start-integration" id="start-integration"></a>

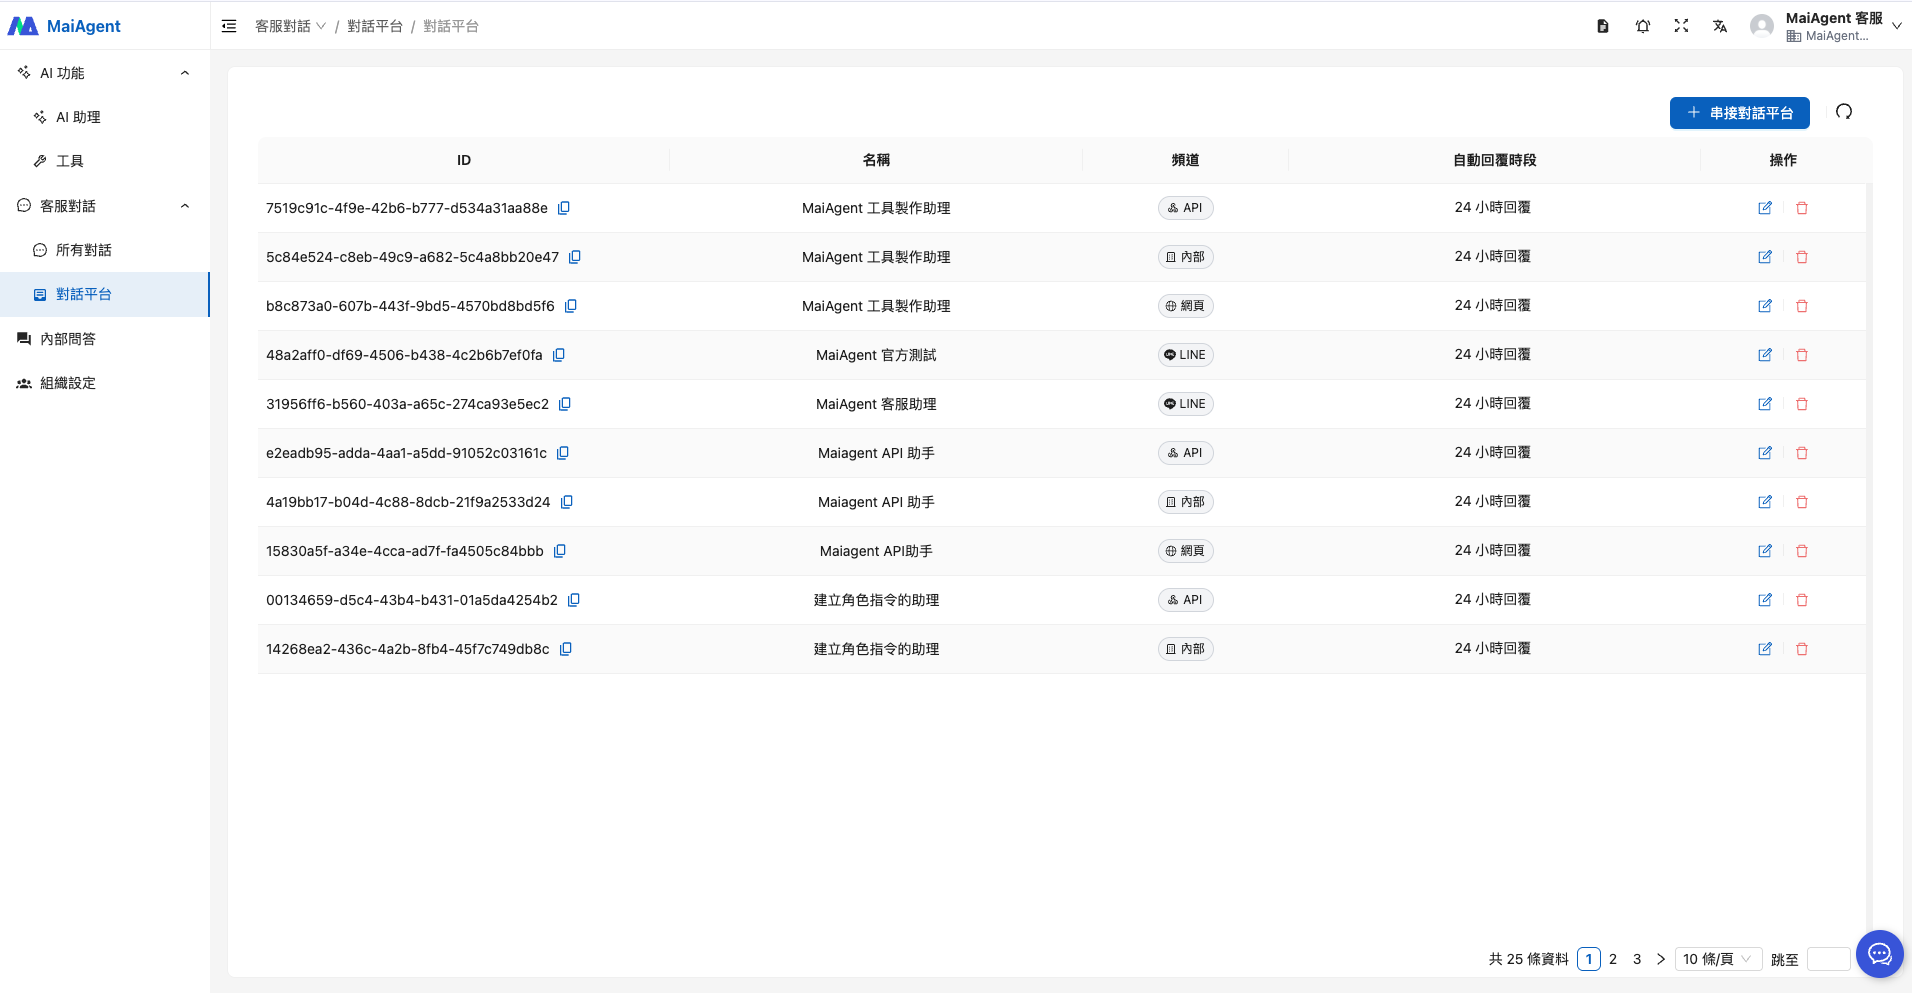
### 1. Open "Channels" in the left menu, then click <mark style="color:blue;">"＋ Connect Channel"</mark> in the upper right <a href="#step-go-to-channel-menu" id="step-go-to-channel-menu"></a>

<figure><img src="https://1360999650-files.gitbook.io/~/files/v0/b/gitbook-x-prod.appspot.com/o/spaces%2F6v6TNkkOQVfRYfcNirHL%2Fuploads%2Fgit-blob-cfa83521237f42113d84ee922d67815b61bcbcc4%2F%E6%88%AA%E5%9C%96%202025-05-06%20%E4%B8%8B%E5%8D%882.29.25.png?alt=media" alt=""><figcaption></figcaption></figure>

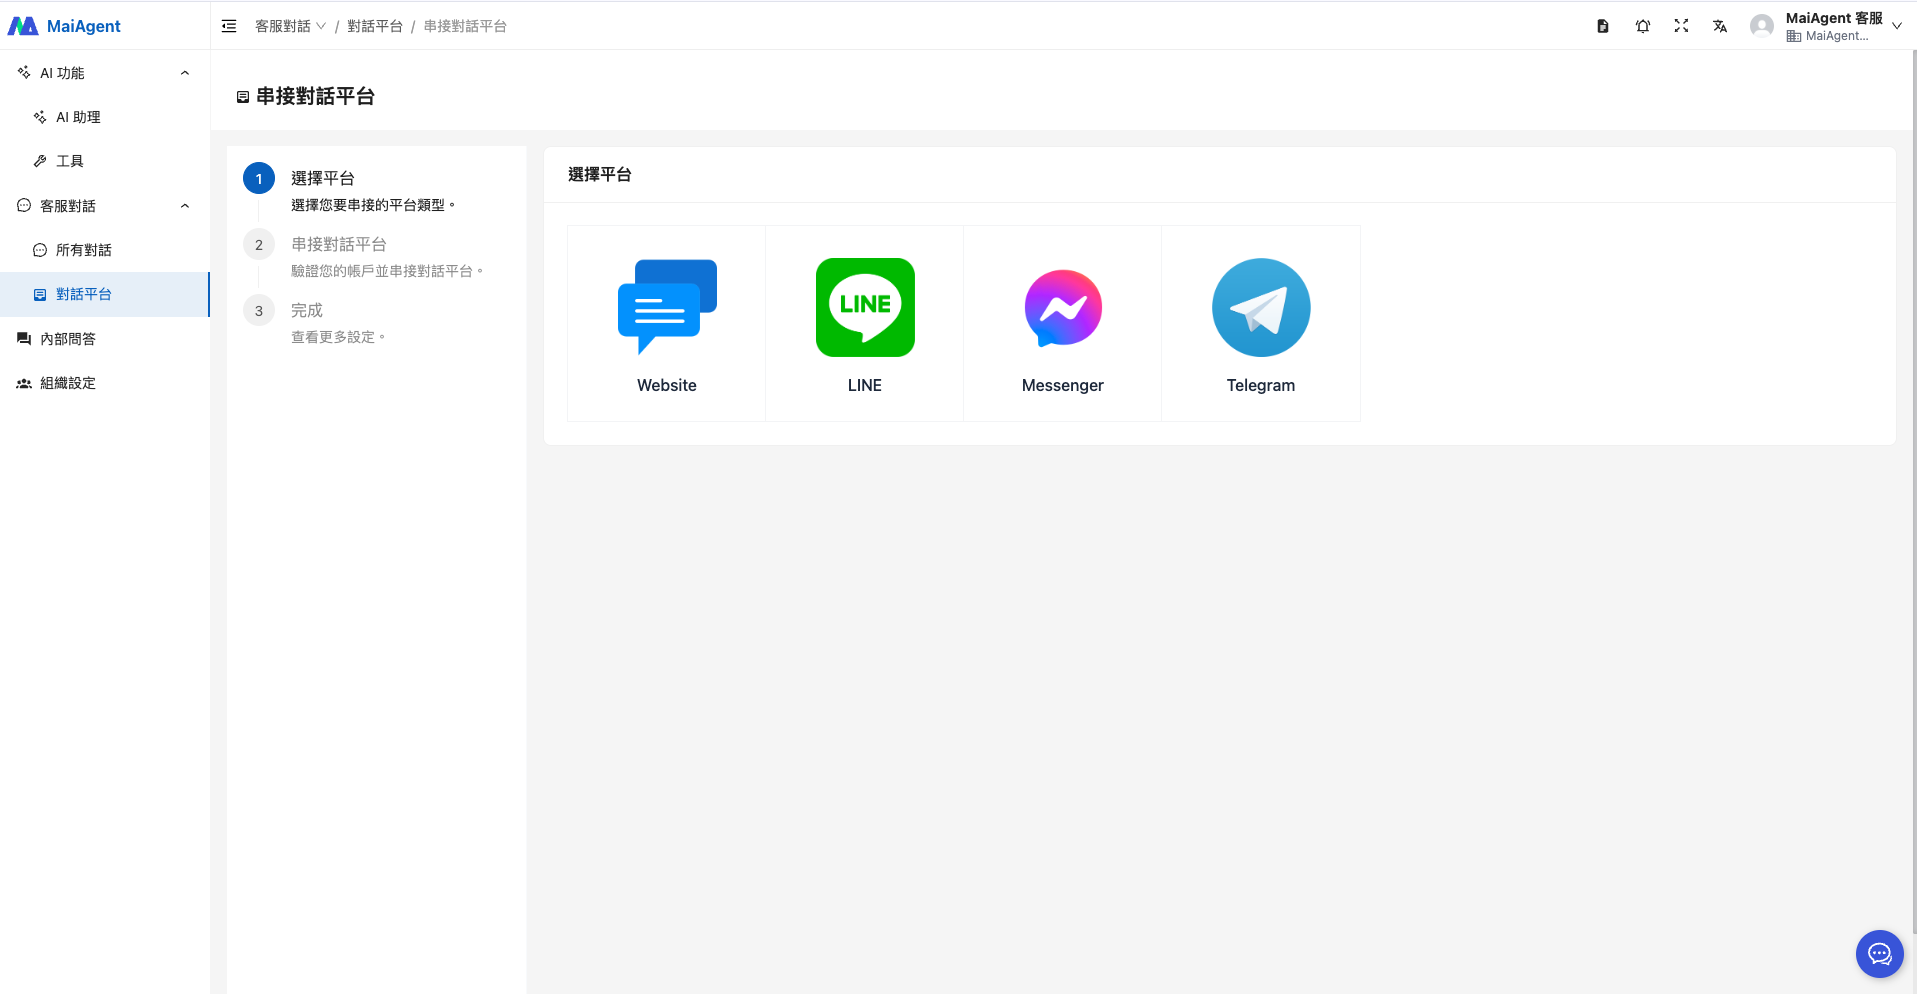
### 2. Select Telegram as the messaging platform <a href="#step-select-telegram" id="step-select-telegram"></a>

<figure><img src="https://1360999650-files.gitbook.io/~/files/v0/b/gitbook-x-prod.appspot.com/o/spaces%2F6v6TNkkOQVfRYfcNirHL%2Fuploads%2Fgit-blob-bdcede59dc7b50838e69ec050c1a23e4c542f895%2F%E6%88%AA%E5%9C%96%202025-05-06%20%E4%B8%8B%E5%8D%882.32.08.png?alt=media" alt=""><figcaption></figcaption></figure>

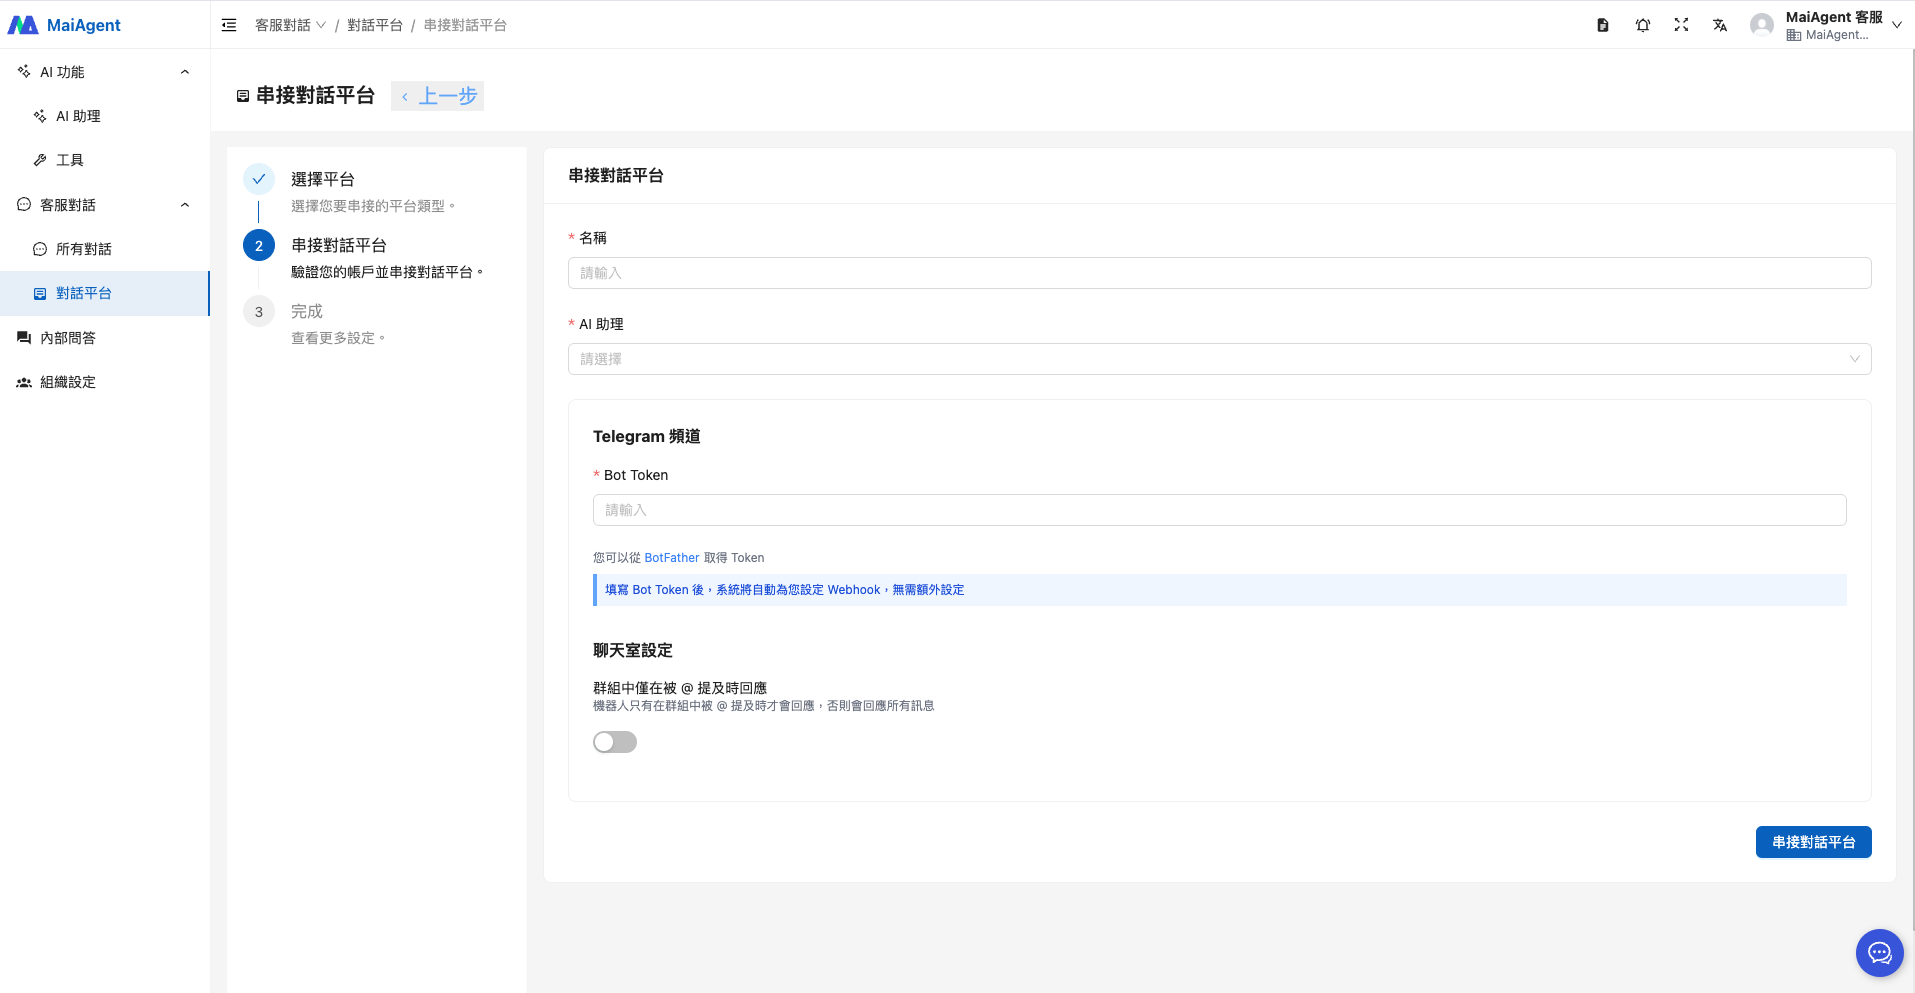
### 3. Enter a channel name and select an Agent <a href="#step-fill-channel-name-and-ai-agent" id="step-fill-channel-name-and-ai-agent"></a>

<figure><img src="https://1360999650-files.gitbook.io/~/files/v0/b/gitbook-x-prod.appspot.com/o/spaces%2F6v6TNkkOQVfRYfcNirHL%2Fuploads%2Fgit-blob-91d5396a37d928491b1e057dfdd698873ff60173%2F%E6%88%AA%E5%9C%96%202025-05-06%20%E4%B8%8B%E5%8D%882.35.01.png?alt=media" alt=""><figcaption></figcaption></figure>

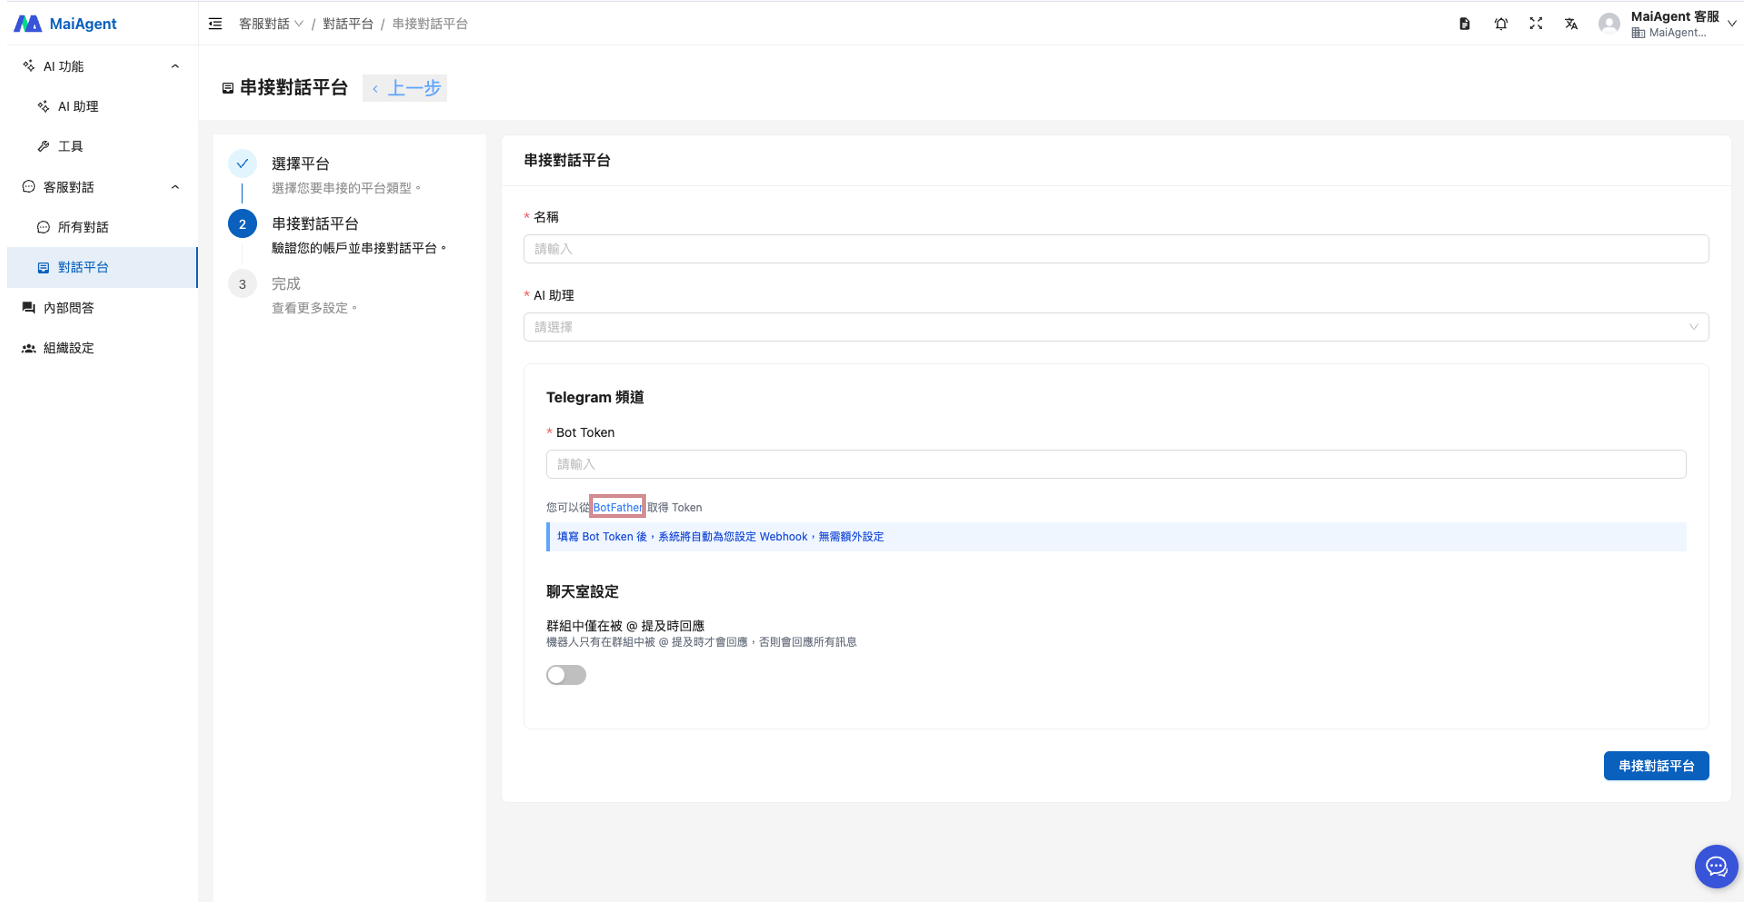
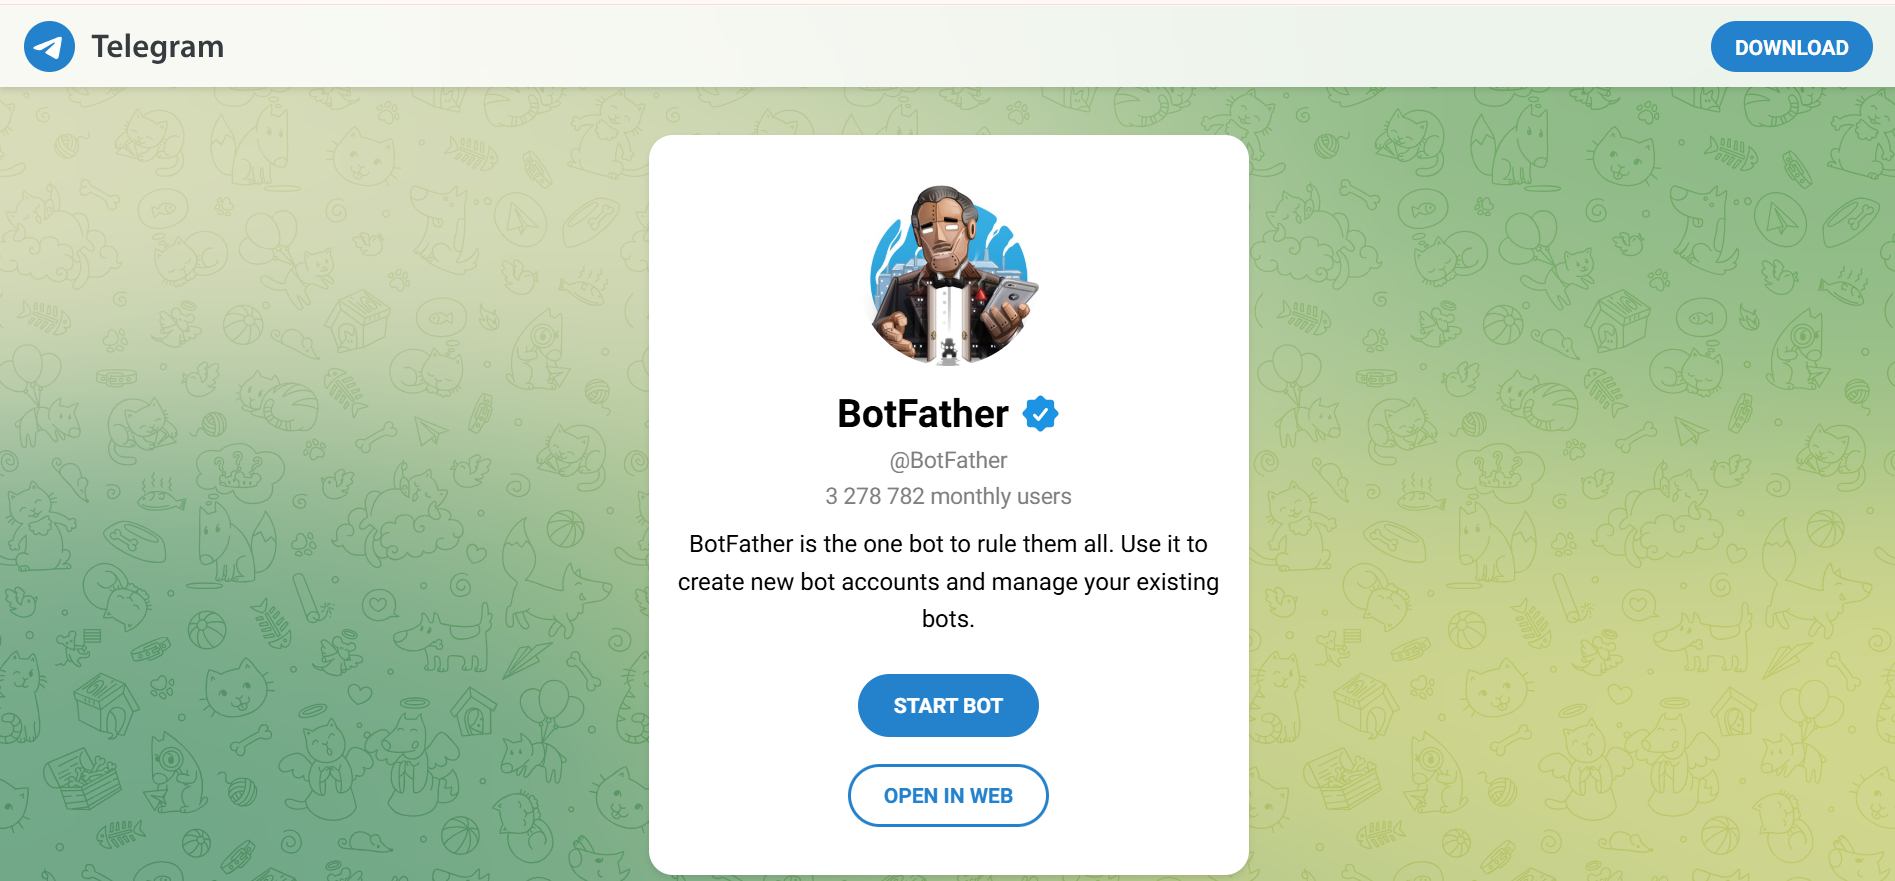
### 4. Get a Bot Token from BotFather <https://t.me/BotFather> <a href="#step-get-bot-token-from-botfather" id="step-get-bot-token-from-botfather"></a>

#### a. Click the "BotFather" link: <https://t.me/BotFather> <a href="#sub-step-open-botfather-link" id="sub-step-open-botfather-link"></a>

<figure><img src="https://1360999650-files.gitbook.io/~/files/v0/b/gitbook-x-prod.appspot.com/o/spaces%2F6v6TNkkOQVfRYfcNirHL%2Fuploads%2Fgit-blob-744702f30502faa32b469df8900384fffaf9690d%2Fimage%20(1)%20(1)%20(1)%20(1)%20(1)%20(1)%20(1).png?alt=media" alt=""><figcaption></figcaption></figure>

#### b. Open the Telegram BotFather channel <a href="#sub-step-enter-botfather-channel" id="sub-step-enter-botfather-channel"></a>

<figure><img src="https://1360999650-files.gitbook.io/~/files/v0/b/gitbook-x-prod.appspot.com/o/spaces%2F6v6TNkkOQVfRYfcNirHL%2Fuploads%2Fgit-blob-7f3c18769c6fcf3002319c8c975c114fbd9adda9%2F%E8%9E%A2%E5%B9%95%E6%93%B7%E5%8F%96%E7%95%AB%E9%9D%A2%202025-08-21%20123314.png?alt=media" alt=""><figcaption></figcaption></figure>

#### c. Click "OPEN IN WEB" (if using the web version) <a href="#sub-step-open-in-web" id="sub-step-open-in-web"></a>

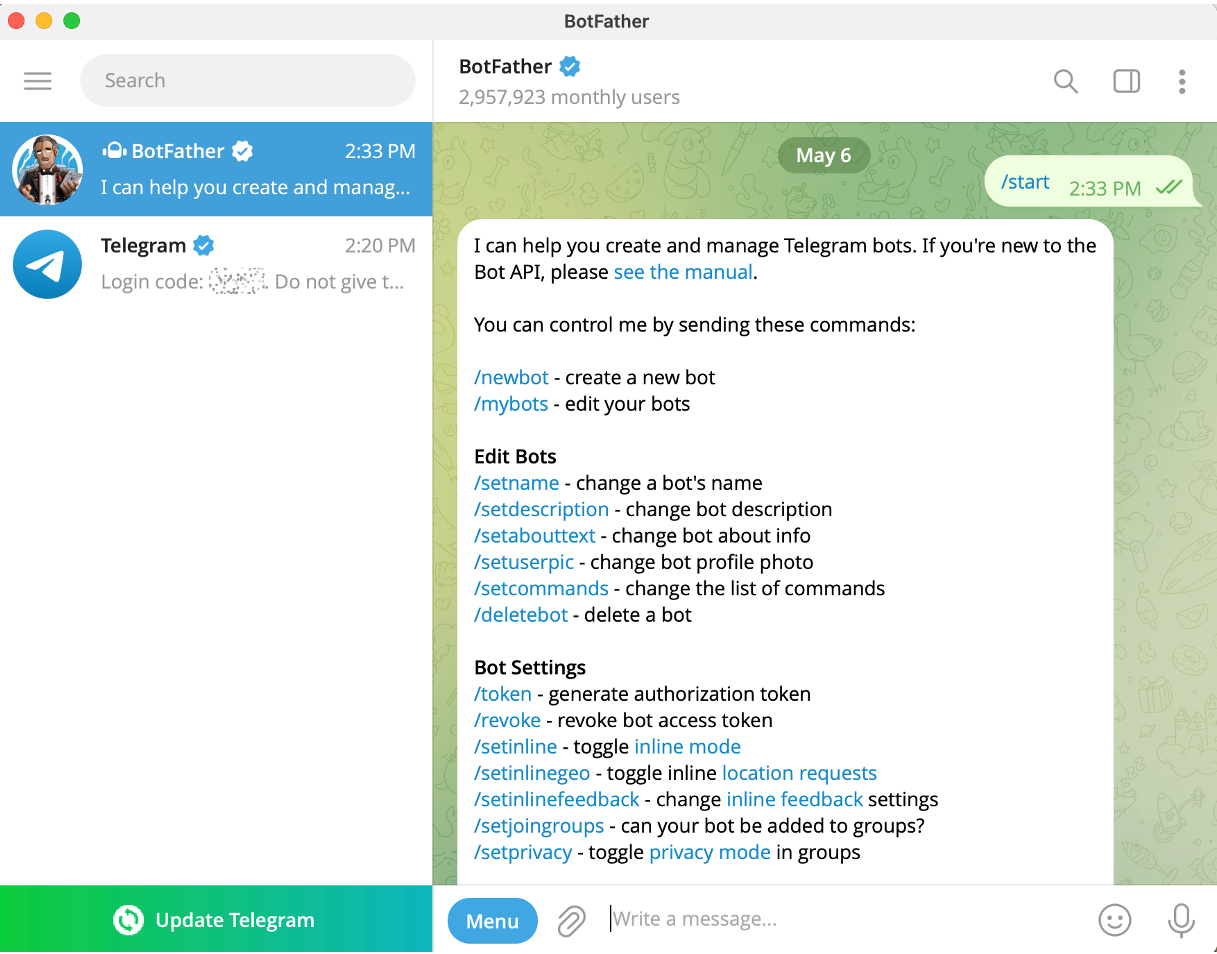
#### BotFather will then ask you to click start to begin the conversation: <a href="#sub-step-start-botfather-conversation" id="sub-step-start-botfather-conversation"></a>

<figure><img src="https://1360999650-files.gitbook.io/~/files/v0/b/gitbook-x-prod.appspot.com/o/spaces%2F6v6TNkkOQVfRYfcNirHL%2Fuploads%2Fgit-blob-a92d51a2771b3c7073c6430760a86894dff8dc6e%2F%E6%88%AA%E5%9C%96%202025-05-06%20%E4%B8%8B%E5%8D%882.40.13.png?alt=media" alt=""><figcaption></figcaption></figure>

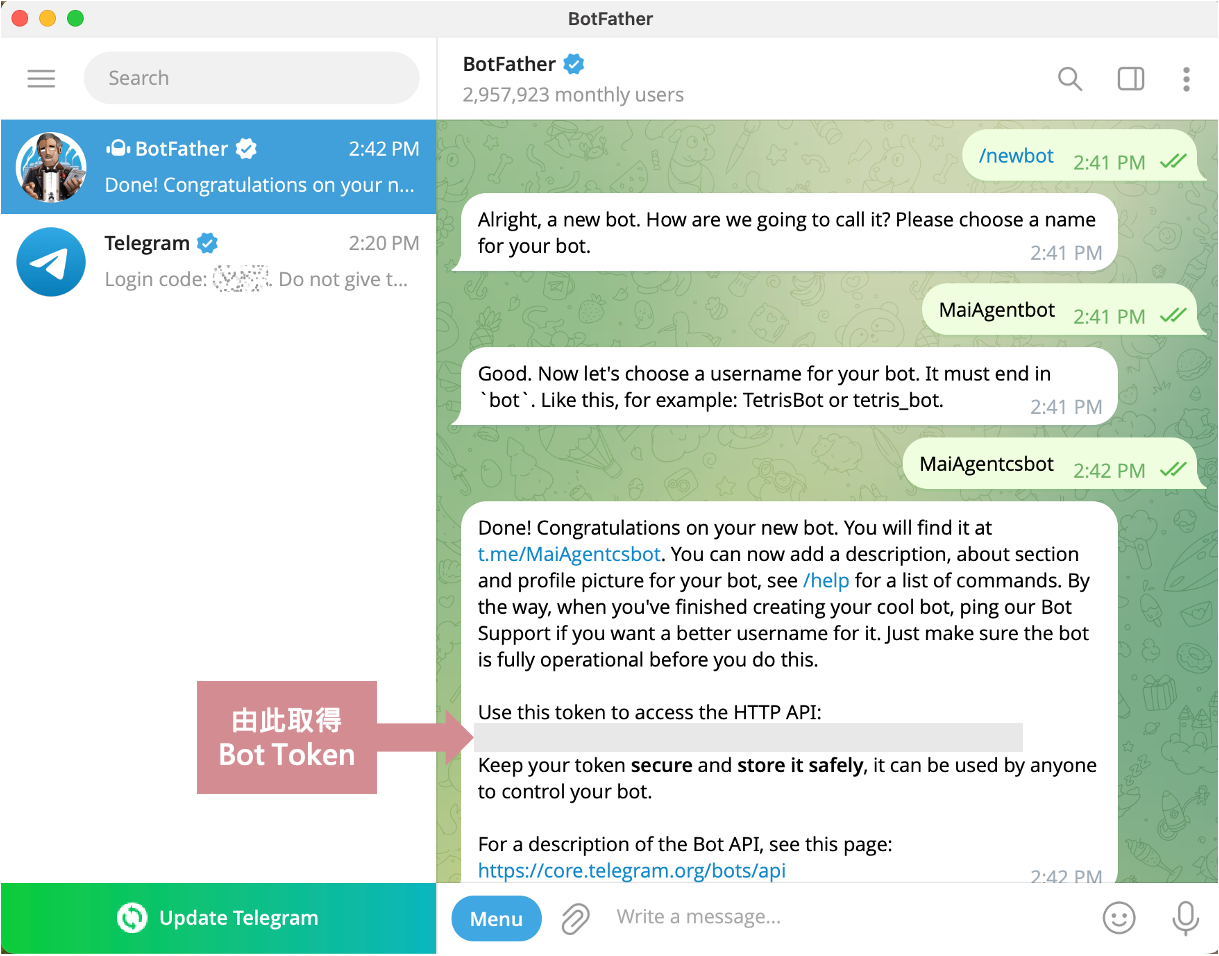
#### d. Click "<mark style="color:blue;">/newbot</mark>" and follow the instructions to enter a bot name and username to get a Bot Token <a href="#sub-step-create-new-bot" id="sub-step-create-new-bot"></a>

<figure><img src="https://1360999650-files.gitbook.io/~/files/v0/b/gitbook-x-prod.appspot.com/o/spaces%2F6v6TNkkOQVfRYfcNirHL%2Fuploads%2Fgit-blob-15b6f0fe4aa3d0a415c12f9e9125b51417253d6f%2F%E6%88%AA%E5%9C%96%202025-05-06%20%E4%B8%8B%E5%8D%883.22.23.png?alt=media" alt=""><figcaption></figcaption></figure>

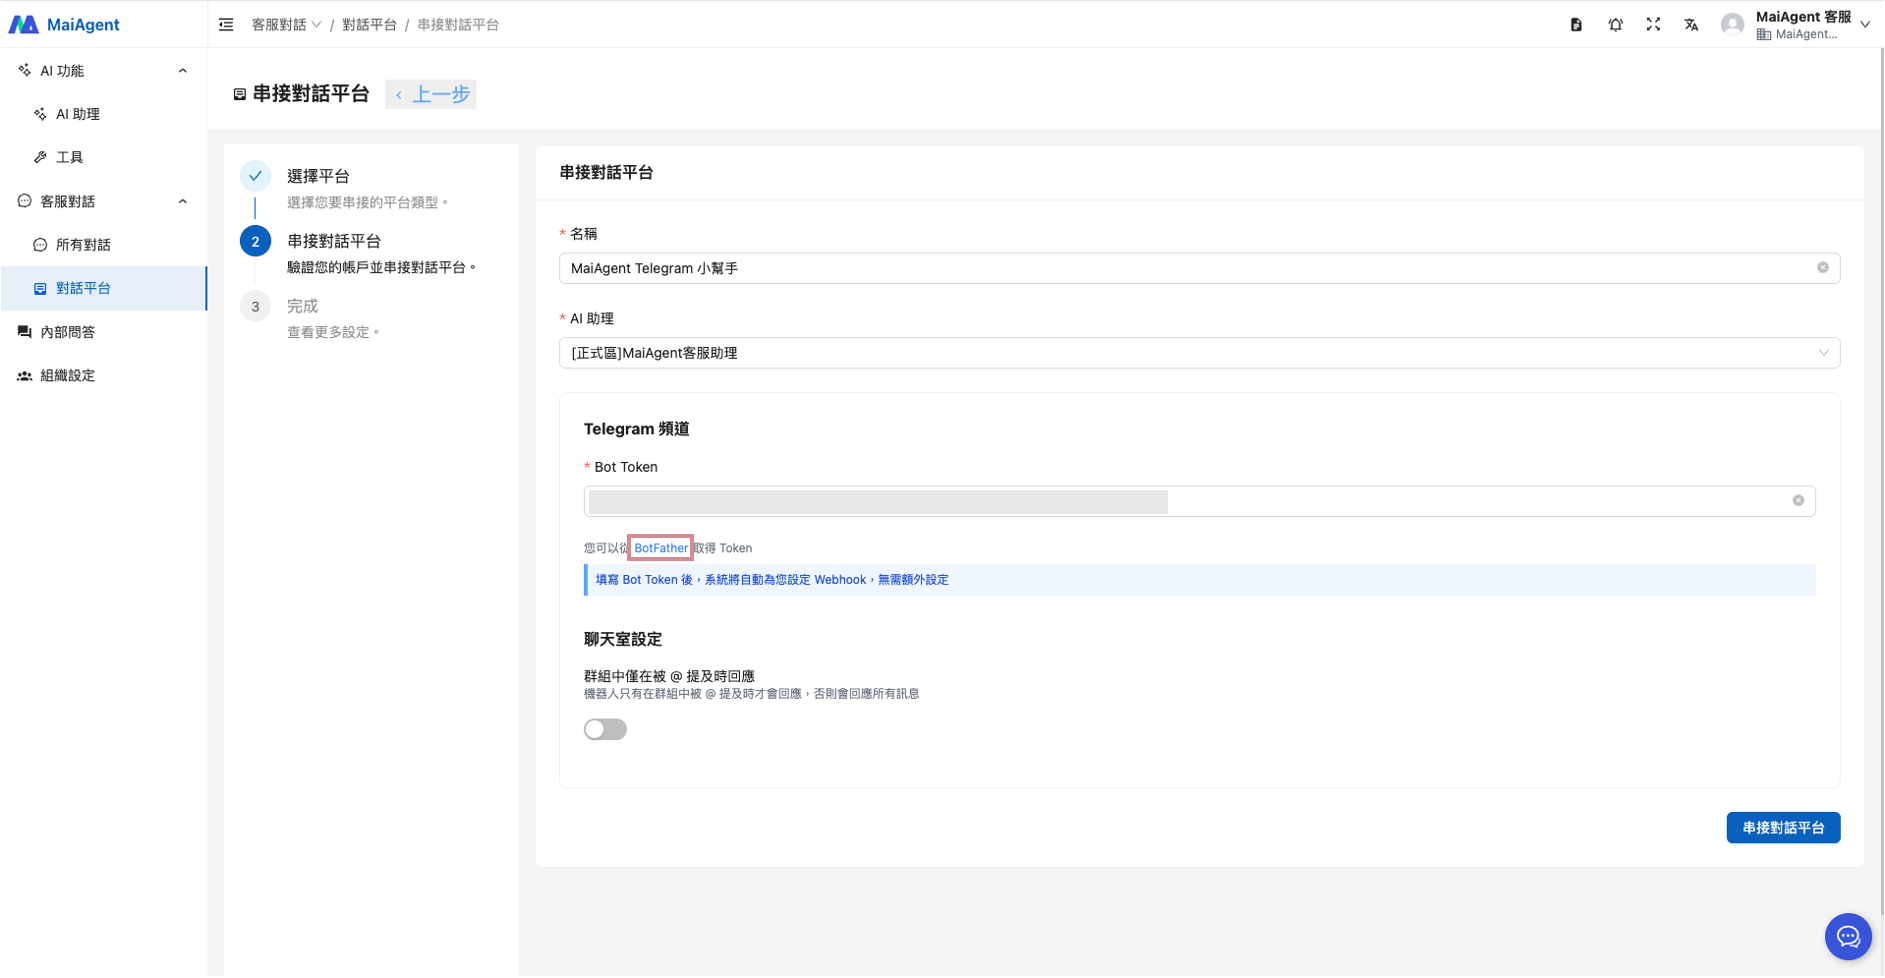
### 5. Return to the channel integration editor in MaiAgent and paste the Bot Token you just obtained <a href="#step-paste-bot-token-in-maiagent" id="step-paste-bot-token-in-maiagent"></a>

The creation form has three tabs: <mark style="color:blue;">Basic Settings</mark>, <mark style="color:blue;">Feature Settings</mark>, and <mark style="color:blue;">Permission Settings</mark>. Fill in the following under <mark style="color:blue;">Basic Settings</mark>:

| Field                                                                                                   | Description                                                                                                                                                                                                                                                                                               |
| ------------------------------------------------------------------------------------------------------- | --------------------------------------------------------------------------------------------------------------------------------------------------------------------------------------------------------------------------------------------------------------------------------------------------------- |
| <mark style="color:blue;">Name</mark>, <mark style="color:blue;">AI Assistant</mark>                    | The channel name and the Agent to connect (step 3)                                                                                                                                                                                                                                                        |
| <mark style="color:blue;">Telegram Channel</mark> › Bot Token                                           | Paste the token obtained from BotFather. The hint below the field says, "After you enter the Bot Token, the system automatically configures the Webhook for you. No additional setup is required." Unlike LINE, you do not need to return to the platform's administration console to paste a Webhook URL |
| <mark style="color:blue;">Chat Settings</mark> › Respond only when @mentioned in groups                 | When enabled, the Agent responds only to messages that @mention it in Telegram groups; when disabled, it responds to all messages in the group                                                                                                                                                            |
| <mark style="color:blue;">Enable Typing Indicator</mark>                                                | Show a "typing" indicator in Telegram while the Agent prepares a reply                                                                                                                                                                                                                                    |
| <mark style="color:blue;">Enable Reset Commands</mark>, <mark style="color:blue;">Reset Commands</mark> | Enable this to add one or more command texts (such as "Start over"). When a user's Telegram message exactly matches one of them, a new conversation is started for that user. The command itself receives no reply; the AI responds in the new conversation when the user sends their next message        |

The <mark style="color:blue;">Feature Settings</mark> tab (enable OCR, use system time and a time zone in answers, and use the sender's name in answers) and the <mark style="color:blue;">Permission Settings</mark> tab work the same as on other messaging platforms. See [Feature Settings](https://docs.maiagent.ai/maiagent-user-guide/en/build/conversation-settings/platform-settings/function-settings.md#messaging-platform-switches) and [Channel Settings Overview](https://docs.maiagent.ai/maiagent-user-guide/en/build/conversation-settings/platform-settings.md#tab-map).

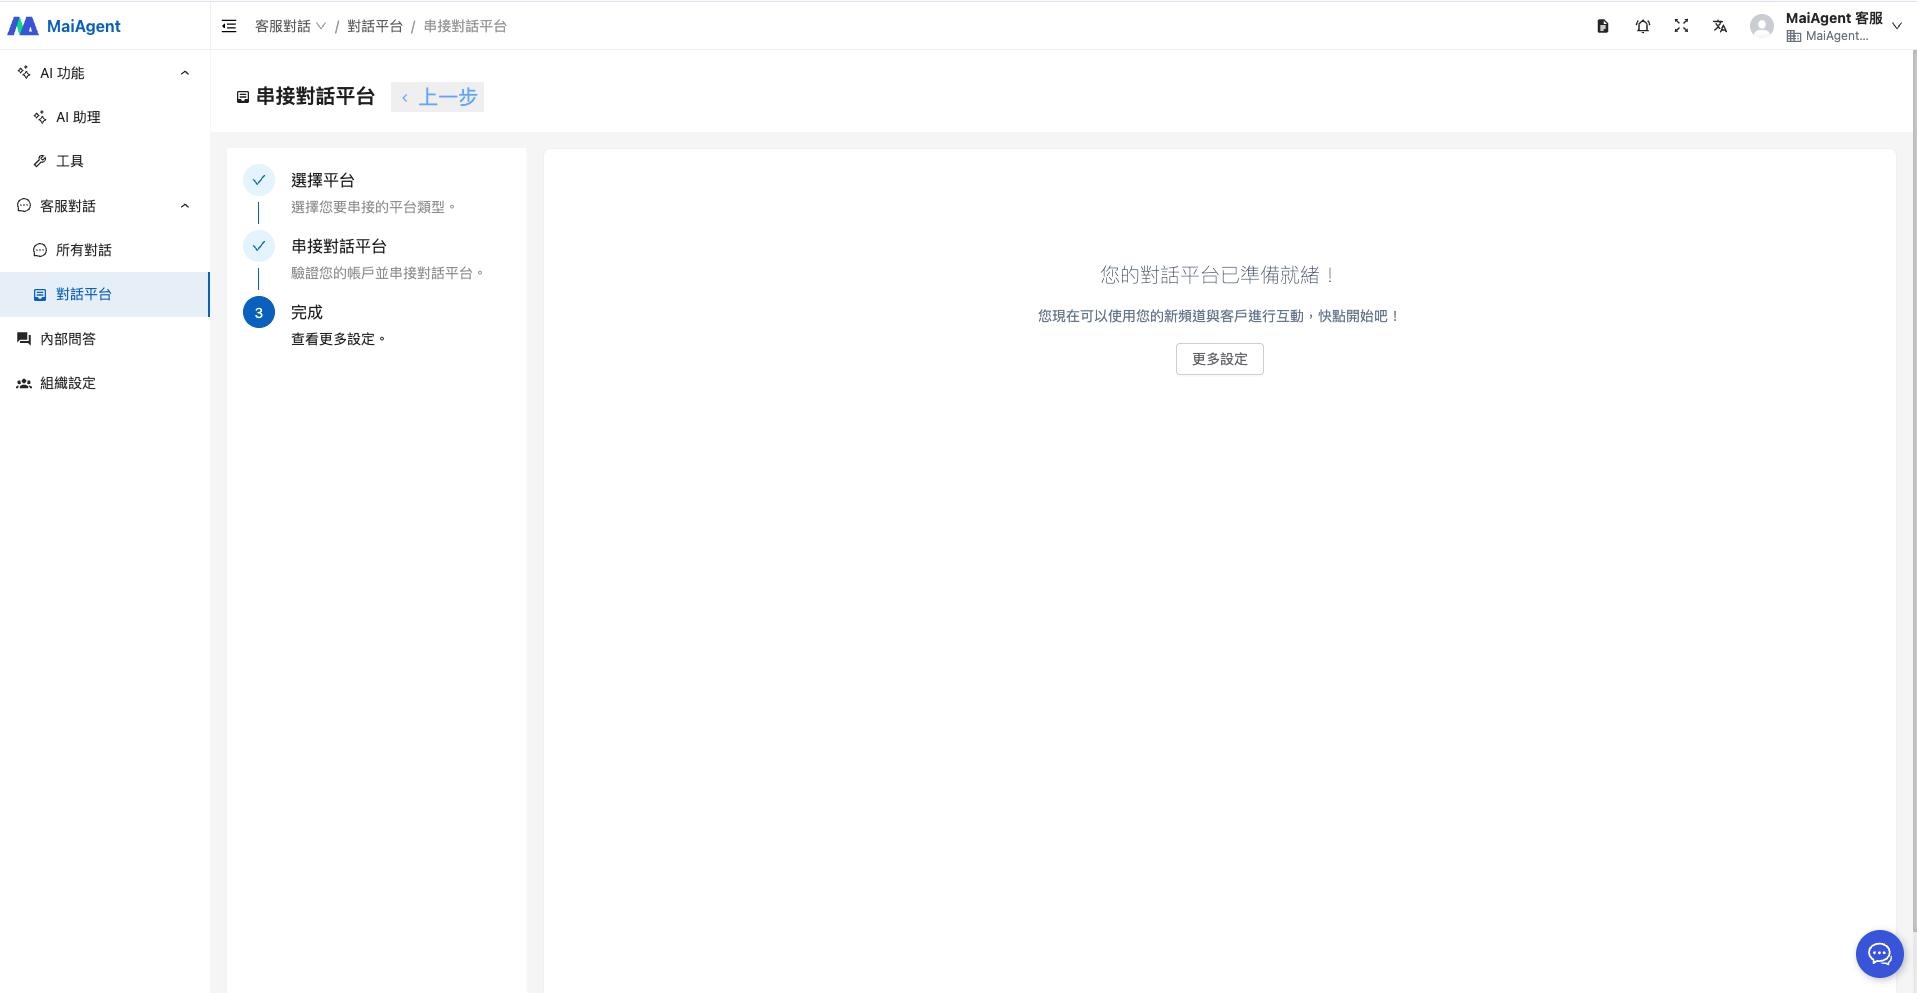
After pasting the Bot Token, click "<mark style="color:blue;">Connect Channel</mark>" in the lower right to complete the integration

<figure><img src="https://1360999650-files.gitbook.io/~/files/v0/b/gitbook-x-prod.appspot.com/o/spaces%2F6v6TNkkOQVfRYfcNirHL%2Fuploads%2Fgit-blob-dc10a03da58822d2e9ed5b061ec10c3c3de6475a%2F%E6%88%AA%E5%9C%96%202025-05-06%20%E4%B8%8B%E5%8D%883.41.08.png?alt=media" alt=""><figcaption></figcaption></figure>

<figure><img src="https://1360999650-files.gitbook.io/~/files/v0/b/gitbook-x-prod.appspot.com/o/spaces%2F6v6TNkkOQVfRYfcNirHL%2Fuploads%2Fgit-blob-c54f0b7fc1d670659e126e5b0fa4000f99f62ca1%2F%E6%88%AA%E5%9C%96%202025-05-06%20%E4%B8%8B%E5%8D%882.49.41.png?alt=media" alt=""><figcaption></figcaption></figure>

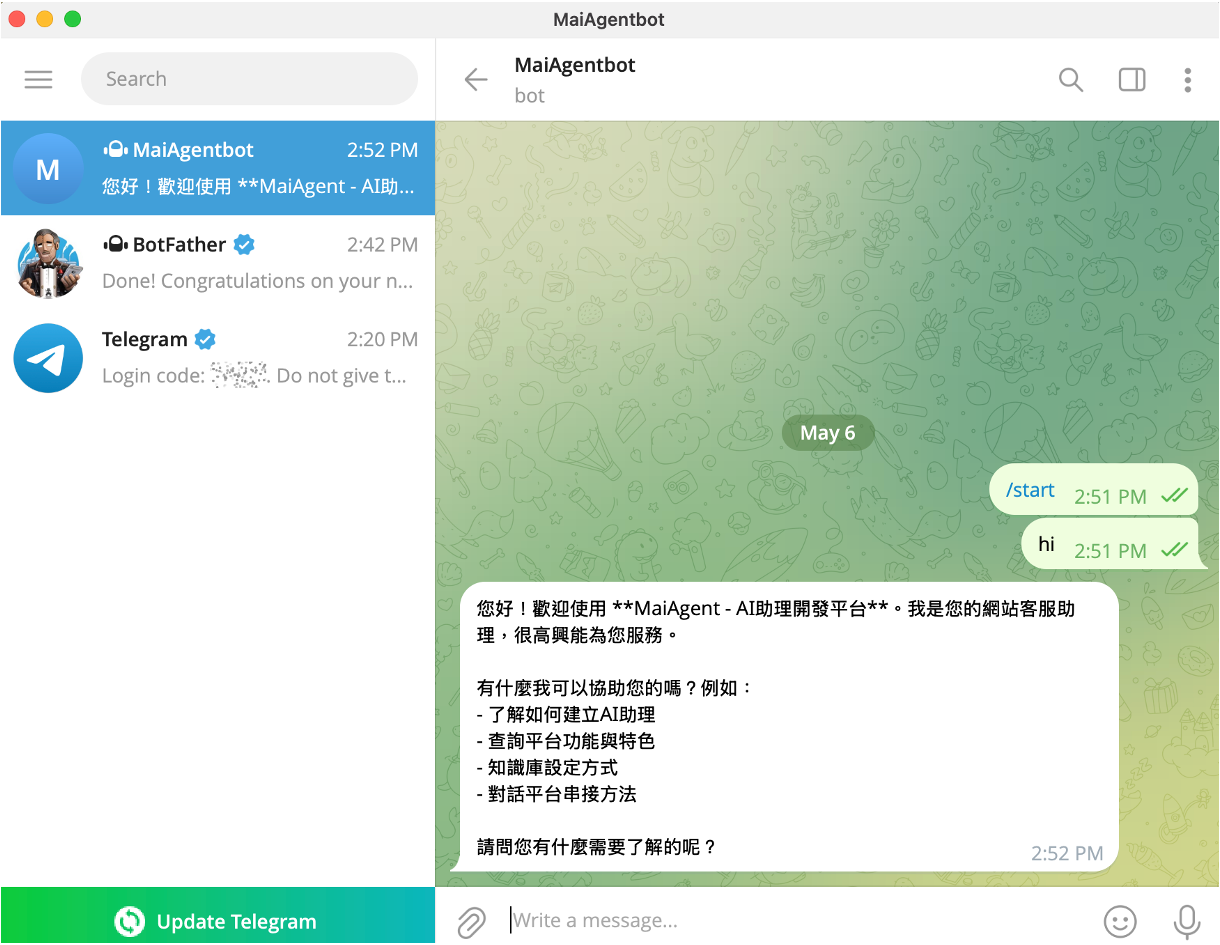
### 6. **Verify the Integration** <a href="#step-verify-integration" id="step-verify-integration"></a>

Start a conversation with the Telegram Bot you just configured

<figure><img src="https://1360999650-files.gitbook.io/~/files/v0/b/gitbook-x-prod.appspot.com/o/spaces%2F6v6TNkkOQVfRYfcNirHL%2Fuploads%2Fgit-blob-b7bb328d53c255ce72012401dd26ca1edc29d942%2F%E6%88%AA%E5%9C%96%202025-05-06%20%E4%B8%8B%E5%8D%882.55.48.png?alt=media" alt=""><figcaption></figcaption></figure>

If the conversation appears in All Conversations in MaiAgent, the integration is successful!

In the normal case, Agent replies are sent as Telegram rich-text messages, so headings, bold text, lists, tables, and links are all formatted, and you do not need to tell the Agent in the role instructions to avoid Markdown. Replies longer than 32,768 characters, or rejected by Telegram, are sent as plain text instead. For details, see [Message Content Rendering Optimization: Telegram](https://docs.maiagent.ai/maiagent-user-guide/en/build/choose-channel/web-chat/markdown-rendering.md#telegram-rich-messages).


---

# Agent Instructions
This documentation is published with GitBook. GitBook is the documentation platform designed so that both humans and AI agents can read, navigate, and reason over technical content effectively. Learn more at gitbook.com.

## Querying This Documentation
If you need additional information that is not directly available in this page, you can query the documentation by asking a question.

Perform an HTTP GET request on the following URL with the `ask` and `goal` query parameters:

```
GET https://docs.maiagent.ai/maiagent-user-guide/en/build/choose-channel/connect-telegram.md?ask=<question>&goal=<user_goal>
```

`ask` is the immediate question: it should be specific, self-contained, and written in natural language.
`goal` is what the user is ultimately trying to achieve, the reason they need the answer. Sharing it helps GitBook give you a better, more relevant answer. A goal is most helpful when it describes the outcome the user wants rather than restating the question. For example, with `ask=how do I create an API token`, a goal like `automate deployments from our CI pipeline` lets GitBook tailor the answer to that use case.

The response will contain a direct answer to the question and relevant excerpts and sources from the documentation.

Use this mechanism when the answer is not explicitly present in the current page, you need clarification or additional context, or you want to retrieve related documentation sections.