> For the complete documentation index, see [llms.txt](https://docs.maiagent.ai/llms.txt). Markdown versions of documentation pages are available by appending `.md` to page URLs; this page is available as [Markdown](https://docs.maiagent.ai/hook/setup.md).

# 新增與設定 Hook

本頁說明如何從標準範本建立一個 Hook、調整它的參數，並把它掛到 AI 助理上開始運作。

## <mark style="color:blue;">一、新增 Hook</mark> <a href="#create-hook" id="create-hook"></a>

### 1. 進入 Hook 列表 <a href="#hook-list" id="hook-list"></a>

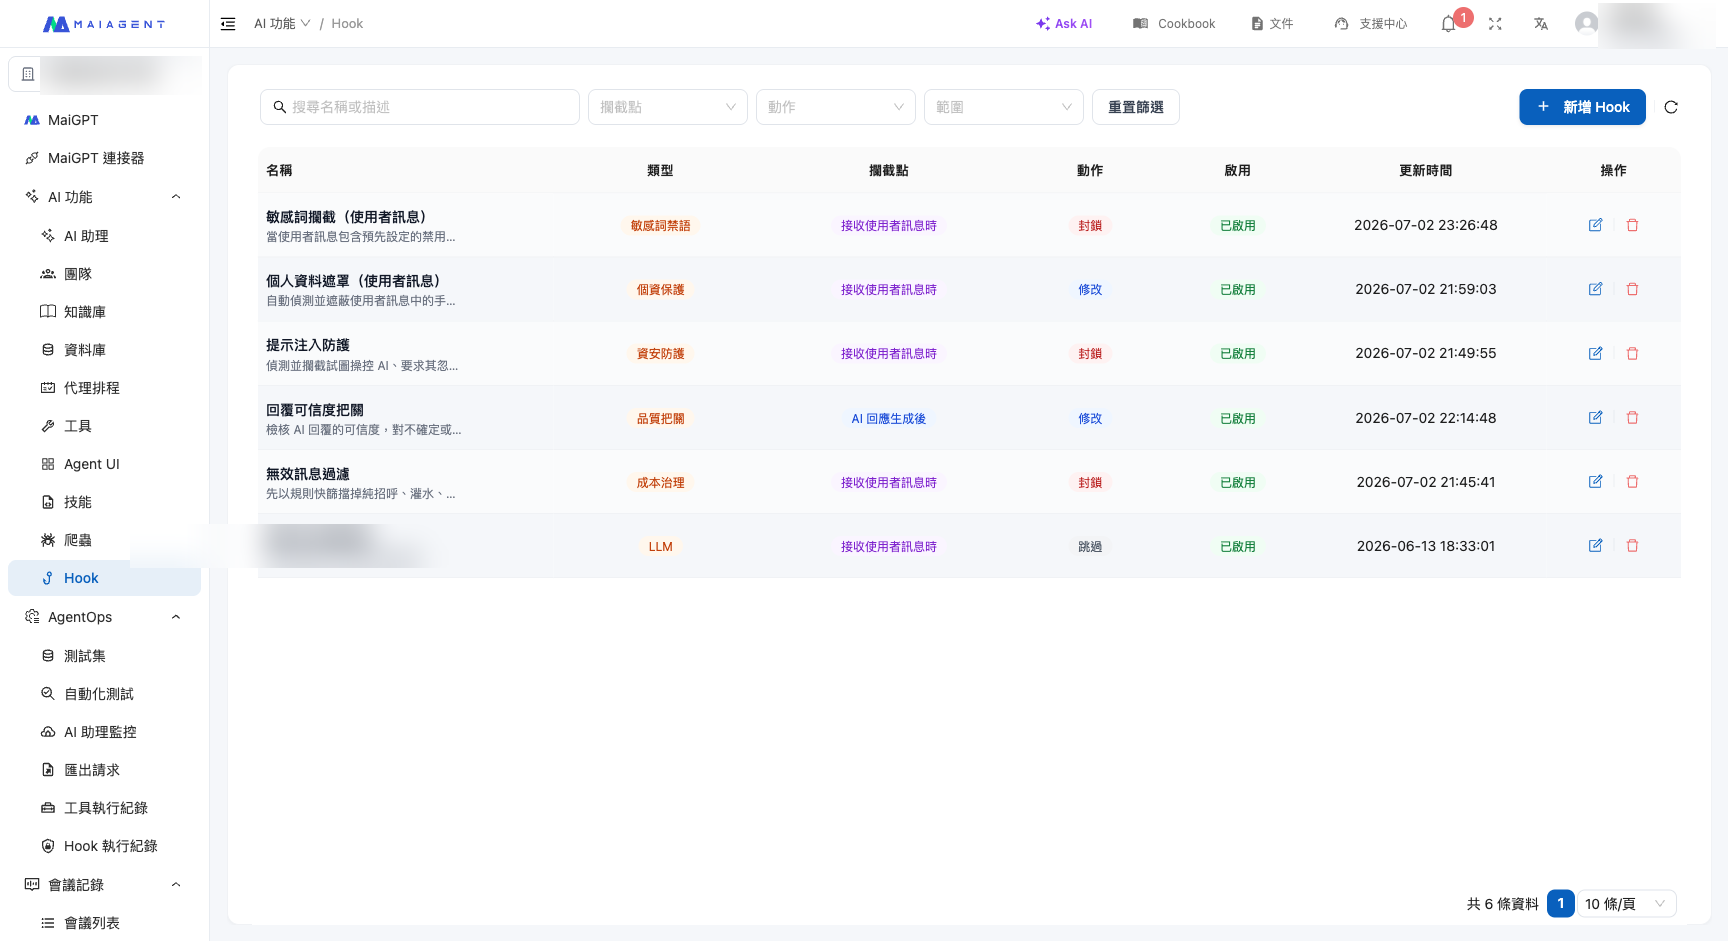
從左側選單進入 <mark style="color:blue;">AI 功能</mark> →〈<mark style="color:blue;">Hook</mark>〉。列表會顯示目前組織所有的 Hook，包含**名稱、類型、攔截點、動作、啟用狀態、更新時間**。

<figure><img src="/files/xY9xD56nKMTcA22IadBs" alt="Hook 列表頁"><figcaption><p>Hook 列表：可看到每個 Hook 的類型、攔截點（何時介入）、動作（改寫／攔截）與啟用狀態</p></figcaption></figure>

### 2. 選擇範本 <a href="#pick-template" id="pick-template"></a>

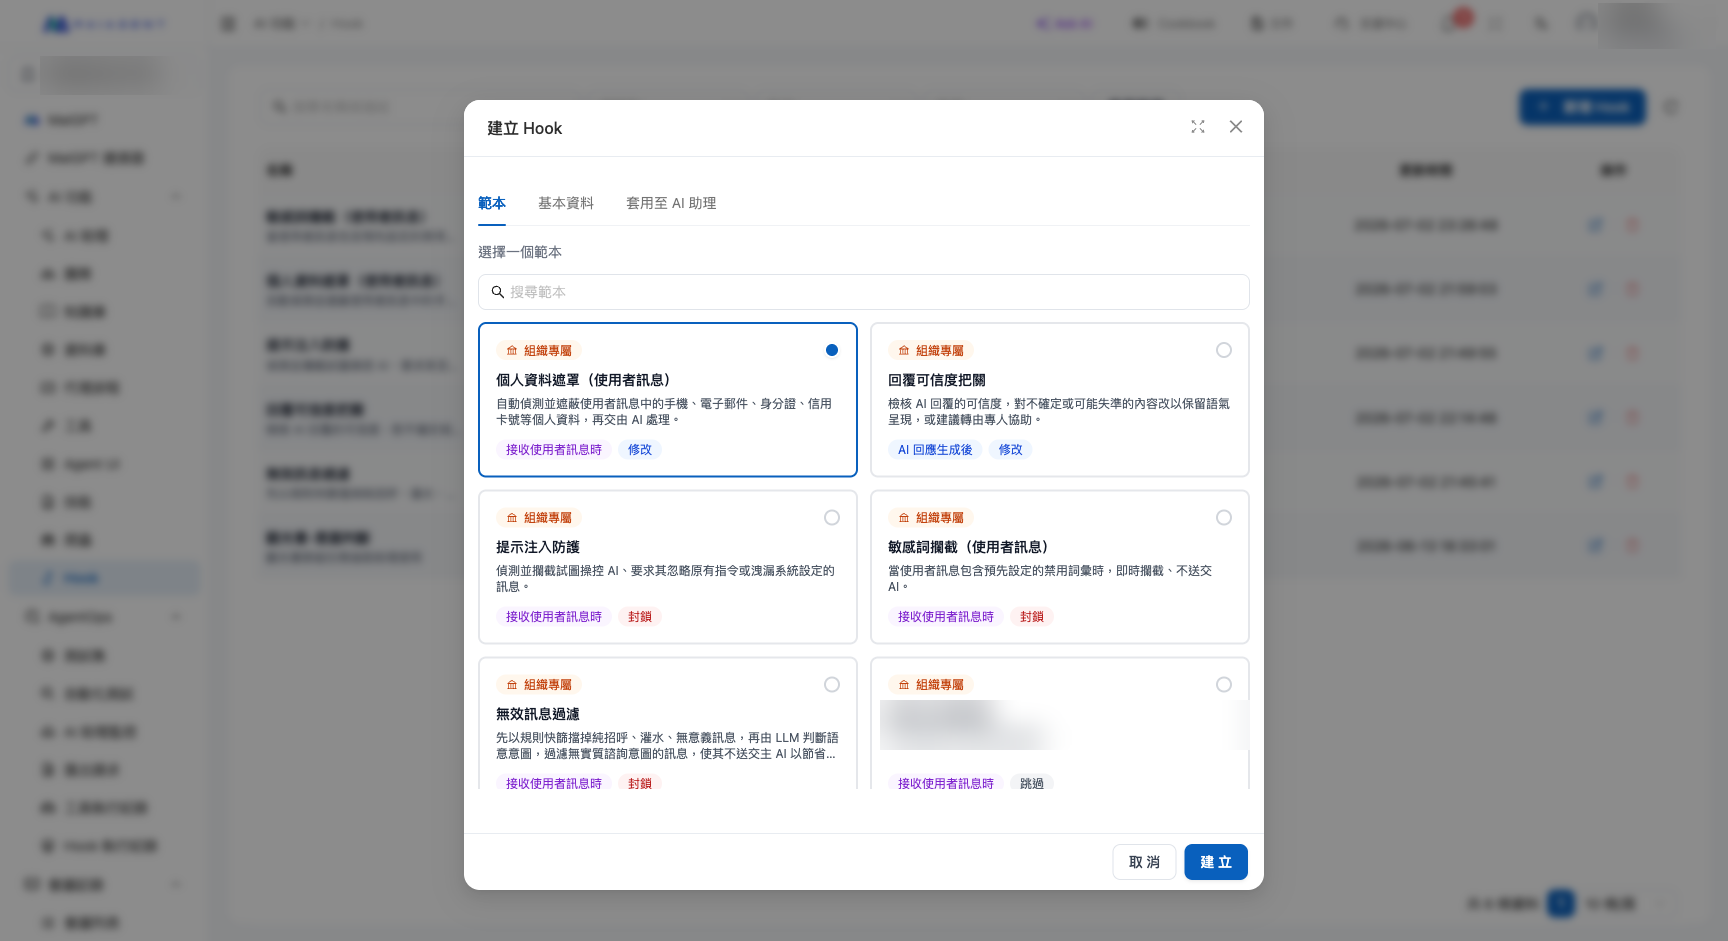
點右上角 <mark style="color:blue;">＋ 新增 Hook</mark>，在彈出視窗中選擇一個標準範本。每張範本卡片都標示了它的**攔截點**與**動作**，方便你快速判斷用途。

<figure><img src="/files/Ga1JI3TVc9pnjVc2S1t9" alt="新增 Hook：選擇範本"><figcaption><p>選擇範本：五種標準範本各自標示攔截點（接收使用者訊息時／AI 回覆生成後）與動作（修改／封鎖）</p></figcaption></figure>

{% hint style="info" %}
建立流程分成三個分頁：**範本**（選哪一種）→ **基本資料**（名稱、描述）→ **套用至 AI 助理**（要掛到哪些助理）。選好範本後依序填寫即可。
{% endhint %}

## <mark style="color:blue;">二、調整參數</mark> <a href="#configure" id="configure"></a>

不同範本有不同的參數。建立後進入 Hook 的設定頁即可調整。常見參數如下：

| 範本      | 主要參數              | 說明                         |
| ------- | ----------------- | -------------------------- |
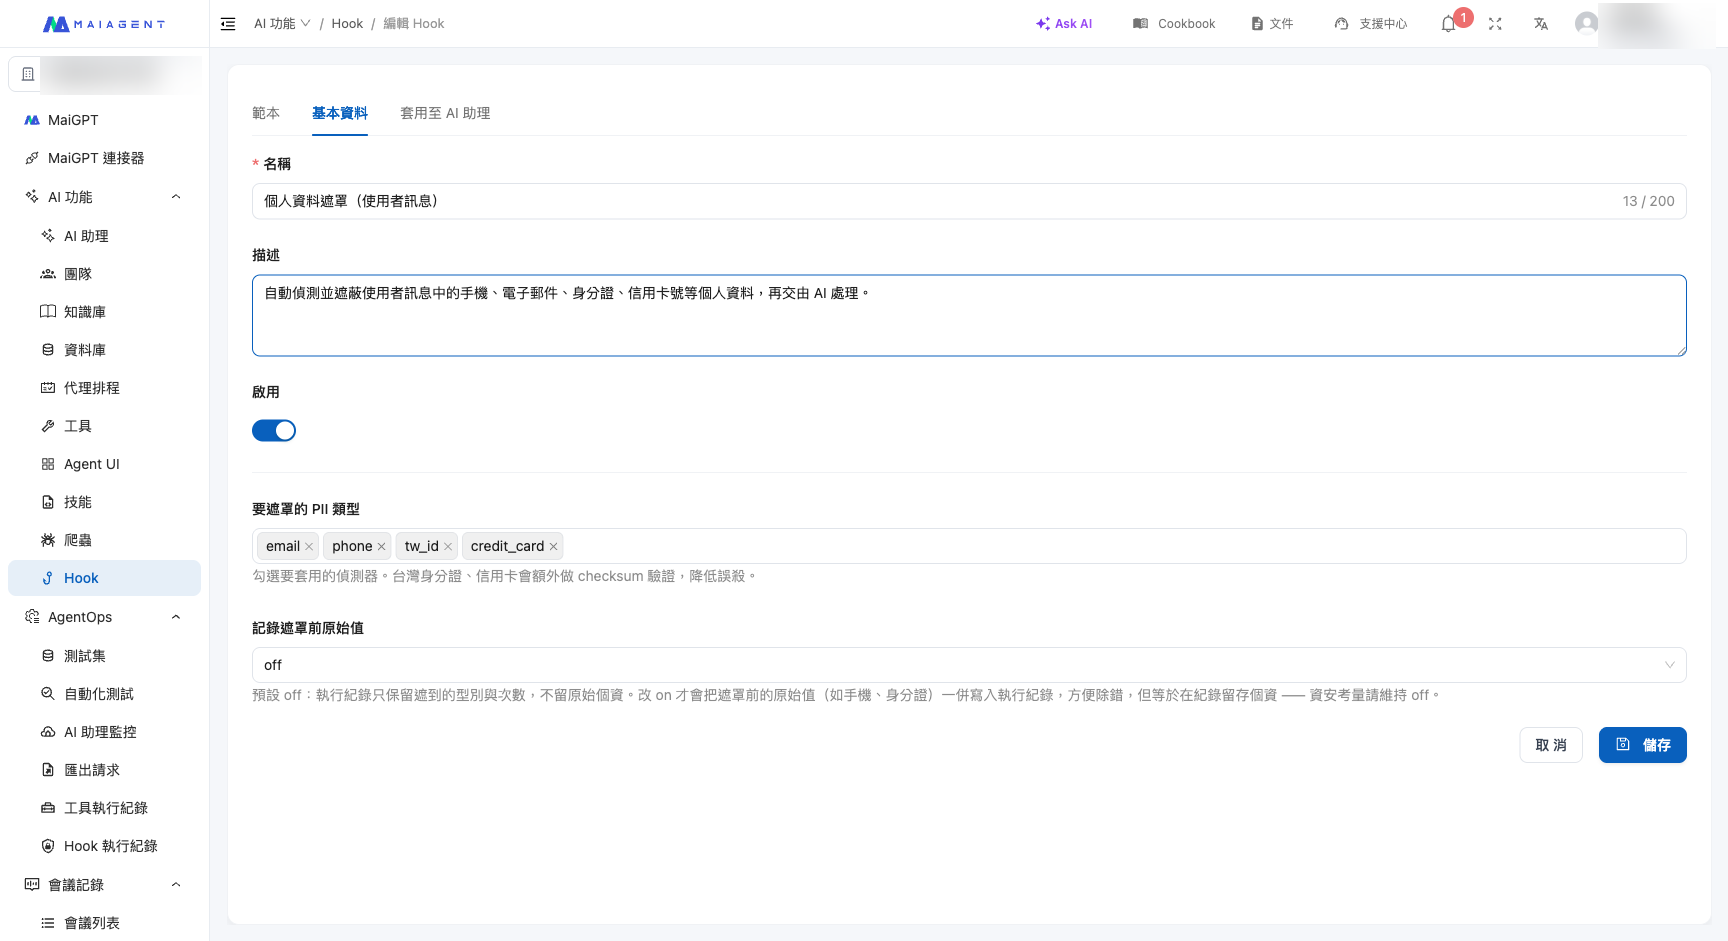
| 個人資料遮罩  | 要遮罩的 PII 類型       | 勾選要偵測的類型（Email／手機／身分證／信用卡） |
| 敏感詞攔截   | 禁語清單、最短詞長         | 一行一個禁語；最短詞長可過濾太短的詞避免誤殺     |
| 提示注入防護  | 判斷模型、額外判斷規則       | 選一個 LLM 來判斷是否為攻擊；可補充自訂規則   |
| 無效訊息過濾  | 招呼詞清單、連續重複上限、判斷模型 | 規則先過濾，再由 LLM 判斷是否為無效訊息     |
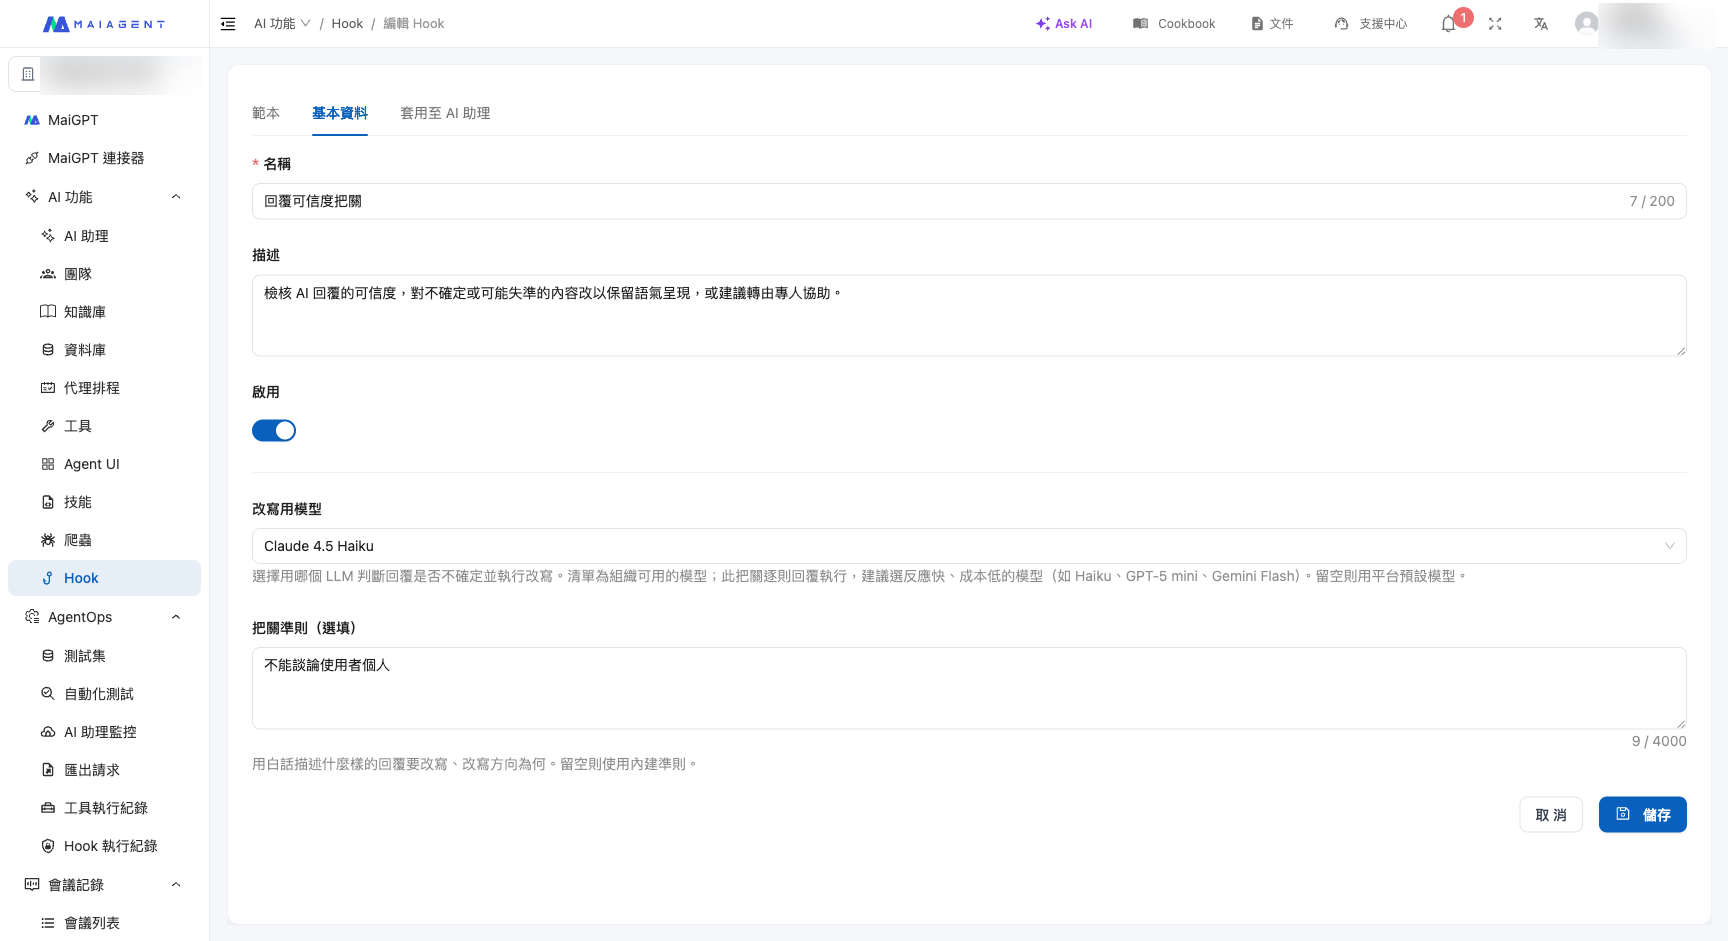
| 回覆可信度把關 | 改寫模型、把關準則         | 選一個 LLM 來判斷回覆是否可靠並改寫       |

<figure><img src="/files/tFMHCoW6GRV0bwkelPSE" alt="個人資料遮罩設定頁"><figcaption><p>以「個人資料遮罩」為例：可勾選要偵測的 PII 類型，並設定啟用狀態</p></figcaption></figure>

### 判斷模型（LLM 型範本） <a href="#judge-model" id="judge-model"></a>

提示注入防護、無效訊息過濾、回覆可信度把關這類需要「語意判斷」的範本，會有一個**判斷模型**欄位。下拉選單會列出你組織目前可用的模型——這項判斷會逐則訊息執行，**建議選反應快、成本較低的模型**（例如 Haiku、GPT-5 mini、Gemini Flash 這類）。留空則使用平台預設模型。

<figure><img src="/files/CCkuogMR8R1qSgA2n956" alt="LLM 型範本的判斷模型設定"><figcaption><p>以「回覆可信度把關」為例：判斷模型可從組織可用的 LLM 下拉選擇，並用「把關準則」以白話描述判斷方向</p></figcaption></figure>

{% hint style="info" %}
**封鎖訊息可自訂。** 「封鎖」型範本（如提示注入防護、敏感詞攔截、無效訊息過濾）可以設定被擋下時要回覆給使用者的訊息，例如「您的訊息包含不適當用語，請修改後再試。」
{% endhint %}

## <mark style="color:blue;">三、關聯 AI 助理</mark> <a href="#link-assistant" id="link-assistant"></a>

Hook 一定要**掛到 AI 助理**才會生效。有兩種方式：

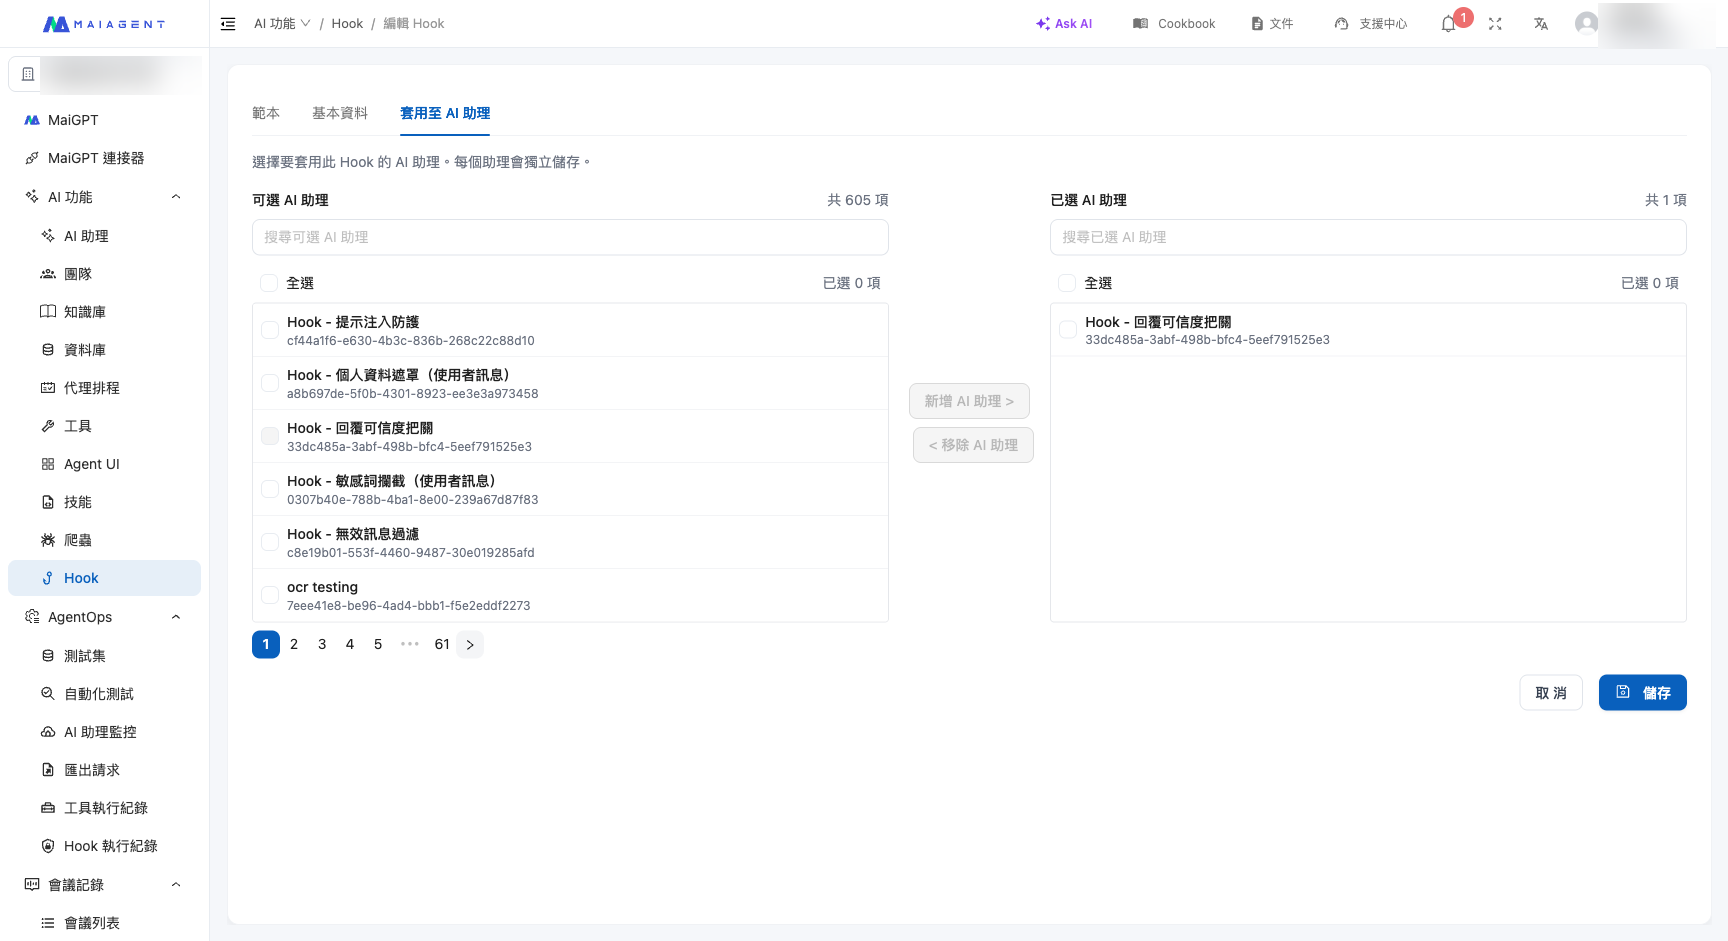
* **建立時掛載**：在新增 Hook 的〈套用至 AI 助理〉分頁直接勾選要套用的助理。
* **從助理設定掛載**：進入某個 AI 助理的設定頁，切換到 <mark style="color:blue;">Hook</mark> 分頁，選擇要套用的 Hook。

<figure><img src="/files/b2moSzIg3sm1g1oGG7OB" alt="套用 Hook 至 AI 助理"><figcaption><p>在 Hook 的〈套用至 AI 助理〉分頁，從左側「可選」清單把 Hook 加到右側「已選」，即完成掛載</p></figcaption></figure>

{% hint style="success" %}
**一個助理可以掛多個 Hook。** 系統會依序執行，例如先「無效訊息過濾」擋掉灌水、再「個人資料遮罩」遮掉個資、再「提示注入防護」擋掉攻擊——組合成專屬的防護流程。
{% endhint %}

### 啟用 Hook <a href="#enable" id="enable"></a>

確認參數與關聯的助理後，把 Hook 設為 <mark style="color:blue;">啟用</mark>。啟用後，只要使用者與該助理對話，Hook 就會在對應的時點自動運作。

## <mark style="color:blue;">四、下一步</mark> <a href="#next" id="next"></a>

設定完成後，你可以在 [Hook 執行紀錄](/hook/execution-logs.md) 查看每一次攔截或改寫的紀錄，確認 Hook 有正確運作。


---

# Agent Instructions
This documentation is published with GitBook. GitBook is the documentation platform designed so that both humans and AI agents can read, navigate, and reason over technical content effectively. Learn more at gitbook.com.

## Querying This Documentation
If you need additional information that is not directly available in this page, you can query the documentation dynamically by asking a question.

Perform an HTTP GET request on the current page URL with the `ask` query parameter, and the optional `goal` query parameter:

```
GET https://docs.maiagent.ai/hook/setup.md?ask=<question>&goal=<endgoal>
```

`ask` is the immediate question: it should be specific, self-contained, and written in natural language.
`goal` is optional and describes the broader end goal you are ultimately trying to accomplish on behalf of the user. GitBook uses it to tailor the answer towards what is most useful for that goal.

The response will contain a direct answer to the question and relevant excerpts and sources from the documentation.

Use this mechanism when the answer is not explicitly present in the current page, you need clarification or additional context, or you want to retrieve related documentation sections.