> For the complete documentation index, see [llms.txt](https://docs.maiagent.ai/llms.txt). Markdown versions of documentation pages are available by appending `.md` to page URLs; this page is available as [Markdown](https://docs.maiagent.ai/conversations/line-works.md).

# 串接對話平台：LINE WORKS

LINE WORKS 是 LINE 的企業版通訊工具。串接後，員工可以直接在原本的 LINE WORKS 中與 AI 助理對話，不需要另外開啟其他系統。支援一對一私訊與群組對話。

{% hint style="info" %}
LINE WORKS 與 LINE 是兩個不同的平台，憑證與設定方式完全不同。若您要串接的是消費者端的 LINE 官方帳號，請參考[串接對話平台：LINE](/conversations/line.md)。
{% endhint %}

## 串接前確認 <a href="#pre-integration-checklist" id="pre-integration-checklist"></a>

* 已在 [MaiAgent 平台](https://admin.maiagent.ai/)上建立好一個「AI 助理」
* 已擁有 LINE WORKS 的管理員權限（可登入 [Admin 後台](https://admin.worksmobile.com/)）
* 可存取 [LINE WORKS Developer Console](https://developers.worksmobile.com/)

{% hint style="warning" %}
本串接需要 6 組憑證，且**憑證在建立通道後無法修改**。請先完成步驟一與步驟二、把 6 組憑證都準備齊全，再進行步驟三。
{% endhint %}

***

## 步驟一：建立 Client App 並取得 Service Account <a href="#step-create-client-app" id="step-create-client-app"></a>

### 1. 進入 Developer Console 的 ClientApp 頁面 <a href="#step-go-to-clientapp" id="step-go-to-clientapp"></a>

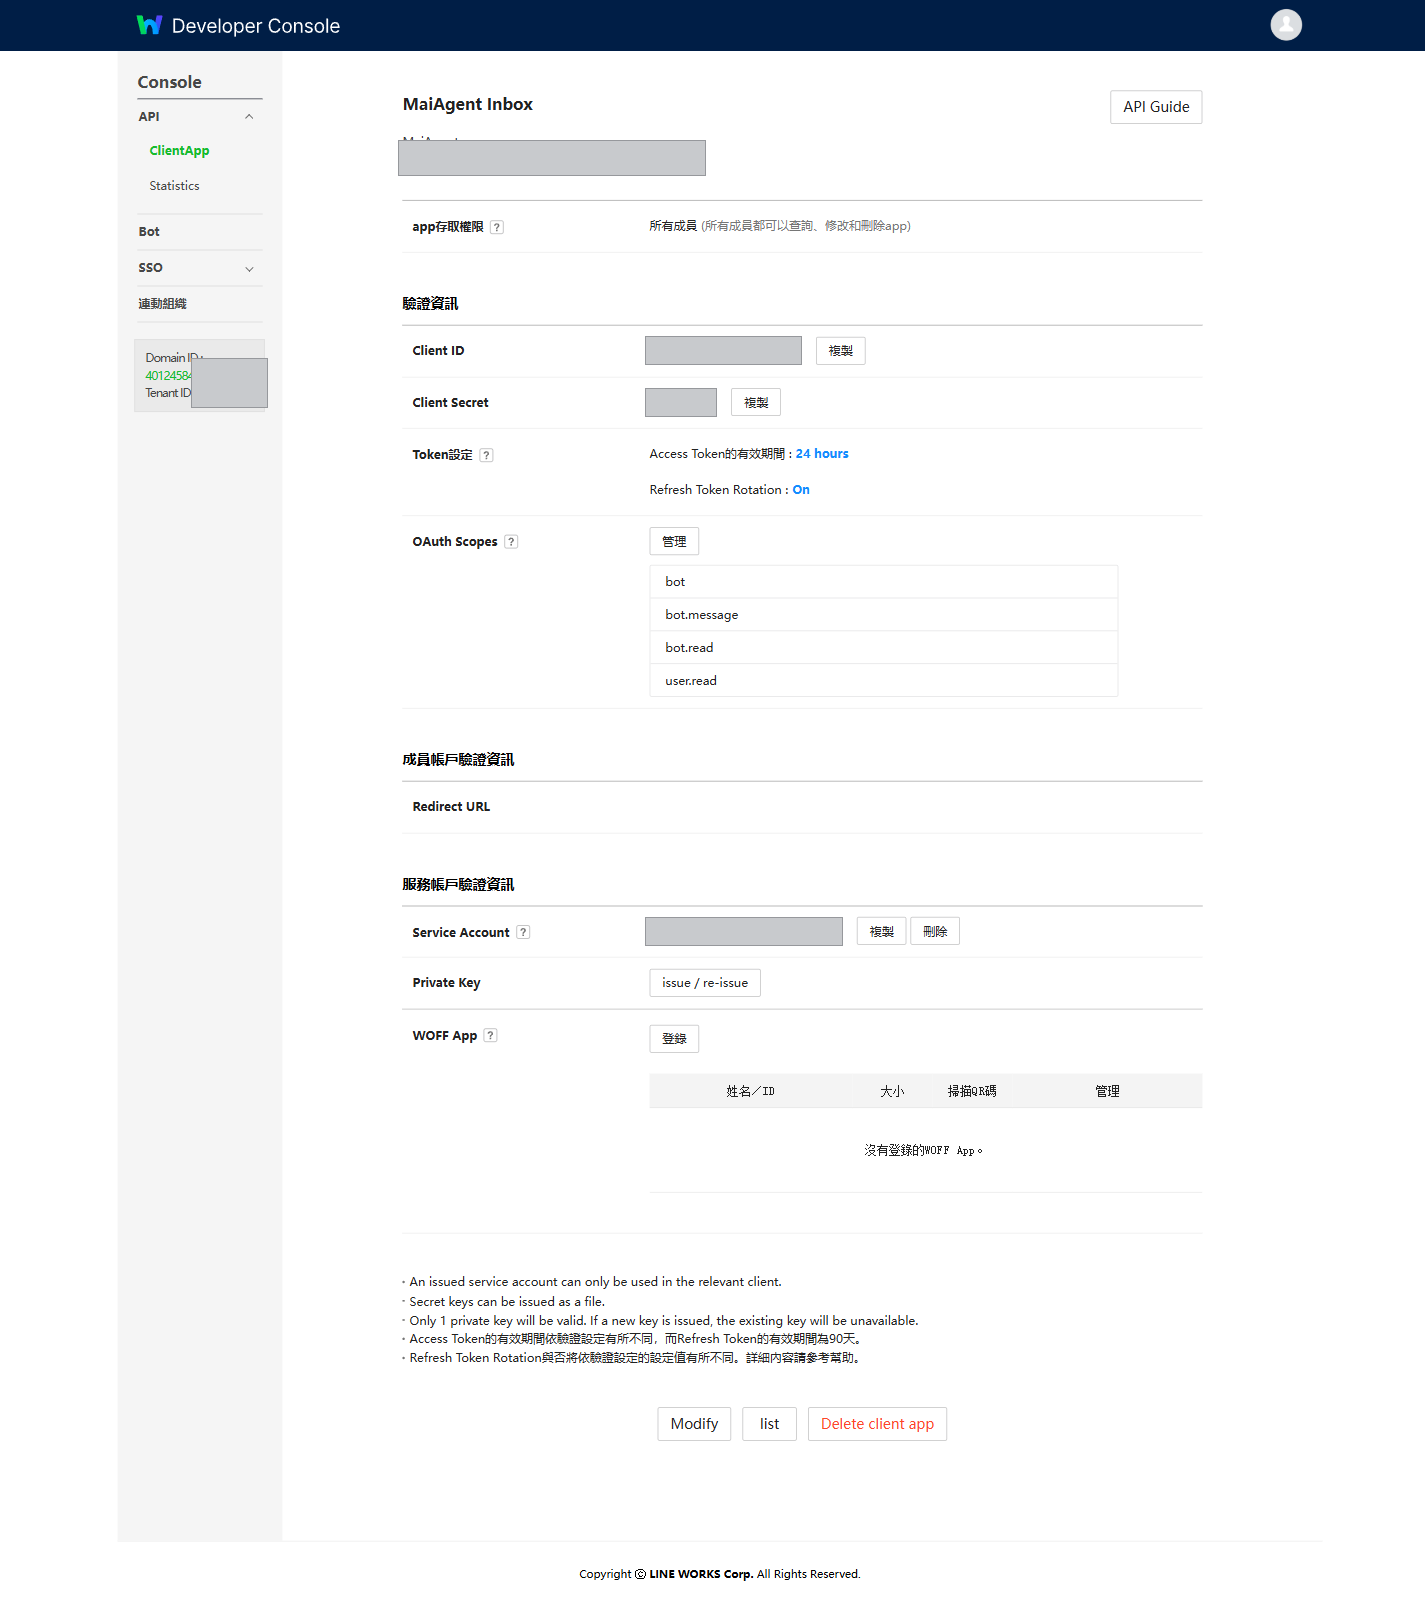
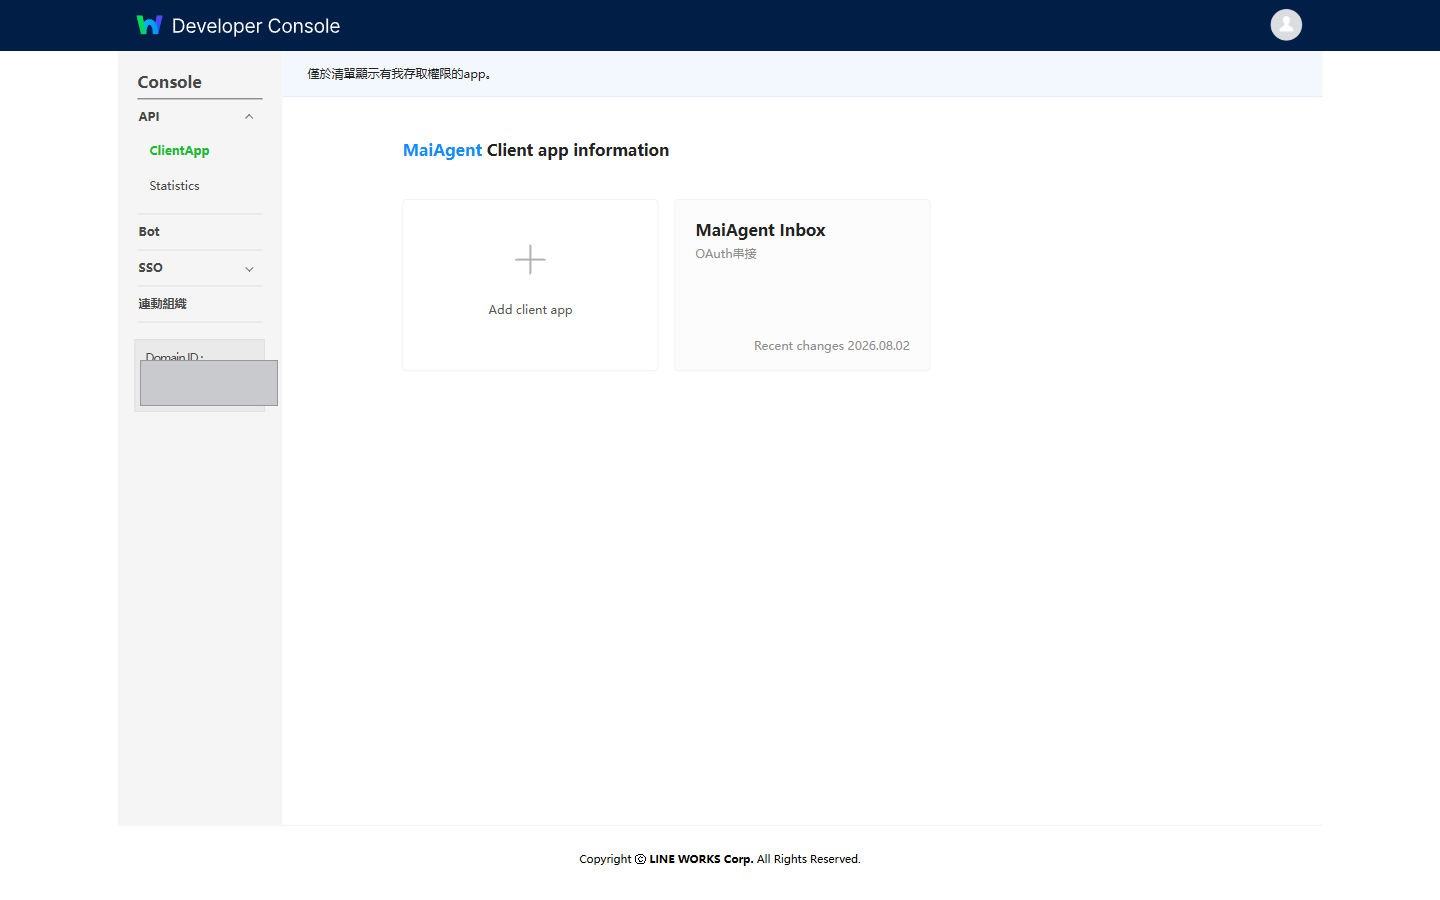
登入 [LINE WORKS Developer Console](https://developers.worksmobile.com/)，在左側選單點選 <mark style="color:blue;">API</mark> → <mark style="color:blue;">ClientApp</mark>，再點擊 <mark style="color:blue;">Add client app</mark> 建立一個 App。

<figure><img src="https://1593648278-files.gitbook.io/~/files/v0/b/gitbook-x-prod.appspot.com/o/spaces%2Fmzb5NG9GDzFP2YDKeYVl%2Fuploads%2Fgit-blob-0d792c7b976ddc8399f167d41ee79992a0caa192%2Flineworks-console-clientapp-list.png?alt=media" alt="Developer Console 的 ClientApp 清單頁"><figcaption><p>Developer Console → API → ClientApp</p></figcaption></figure>

### 2. 取得四組憑證 <a href="#step-get-app-credentials" id="step-get-app-credentials"></a>

進入該 App 的詳細頁面，取得以下四項：

| 憑證                  | 在 Console 的位置                                                                       |
| ------------------- | ----------------------------------------------------------------------------------- |
| **Client ID**       | <mark style="color:blue;">Client ID</mark> 欄位                                       |
| **Client Secret**   | <mark style="color:blue;">Client Secret</mark> 欄位                                   |
| **Service Account** | <mark style="color:blue;">Service Account</mark> 欄位，格式為 `xxxxx.serviceaccount@您的網域` |
| **Private Key**     | <mark style="color:blue;">Private Key</mark> 區塊，建立時可下載 `.key` 檔案                    |

<figure><img src="https://1593648278-files.gitbook.io/~/files/v0/b/gitbook-x-prod.appspot.com/o/spaces%2Fmzb5NG9GDzFP2YDKeYVl%2Fuploads%2Fgit-blob-22a6737d44f3e40f43a4b72a81fc4568dc81dfc8%2Flineworks-console-clientapp-detail.png?alt=media" alt="Client App 詳細頁面，包含 Client ID、Client Secret、OAuth Scopes、Service Account、Private Key"><figcaption><p>Client App 詳細頁面 — 四組憑證與 OAuth Scopes 都在這一頁</p></figcaption></figure>

### 3. 設定 OAuth Scopes <a href="#step-set-oauth-scopes" id="step-set-oauth-scopes"></a>

在同一頁的 <mark style="color:blue;">OAuth Scopes</mark> 區塊，需授予以下權限，否則 AI 助理無法收發訊息或查詢成員姓名：

| Scope         | 說明                    |
| ------------- | --------------------- |
| `bot`         | 管理 Bot                |
| `bot.message` | 發送訊息                  |
| `bot.read`    | 讀取 Bot 設定             |
| `user.read`   | 讀取成員資訊（用於在對話中顯示發話者姓名） |

{% hint style="info" %}
同一頁的 <mark style="color:blue;">Token設定</mark> 可調整 Access Token 的有效期限。MaiAgent 會自動管理權杖的簽發與續期，此處維持預設值即可。
{% endhint %}

{% hint style="danger" %}
**Private Key 只能下載一次。** 建立 Service Account 時會提供一個 `.key` 檔案下載，離開頁面後就無法再取得。請先妥善保存，遺失只能重新產生一組——而重新產生會讓現有串接立即失效。
{% endhint %}

私鑰必須是**未加密**的 PEM 格式：第一行是 `BEGIN PRIVATE KEY` 或 `BEGIN RSA PRIVATE KEY` 標記（該行前後各有五個連字號），最後一行是對應的 `END` 標記。若您的私鑰有密碼保護，MaiAgent 無法使用，請重新產生一組未加密的。

***

## 步驟二：建立 Bot 並取得 Bot ID 與 Bot Secret <a href="#step-create-bot" id="step-create-bot"></a>

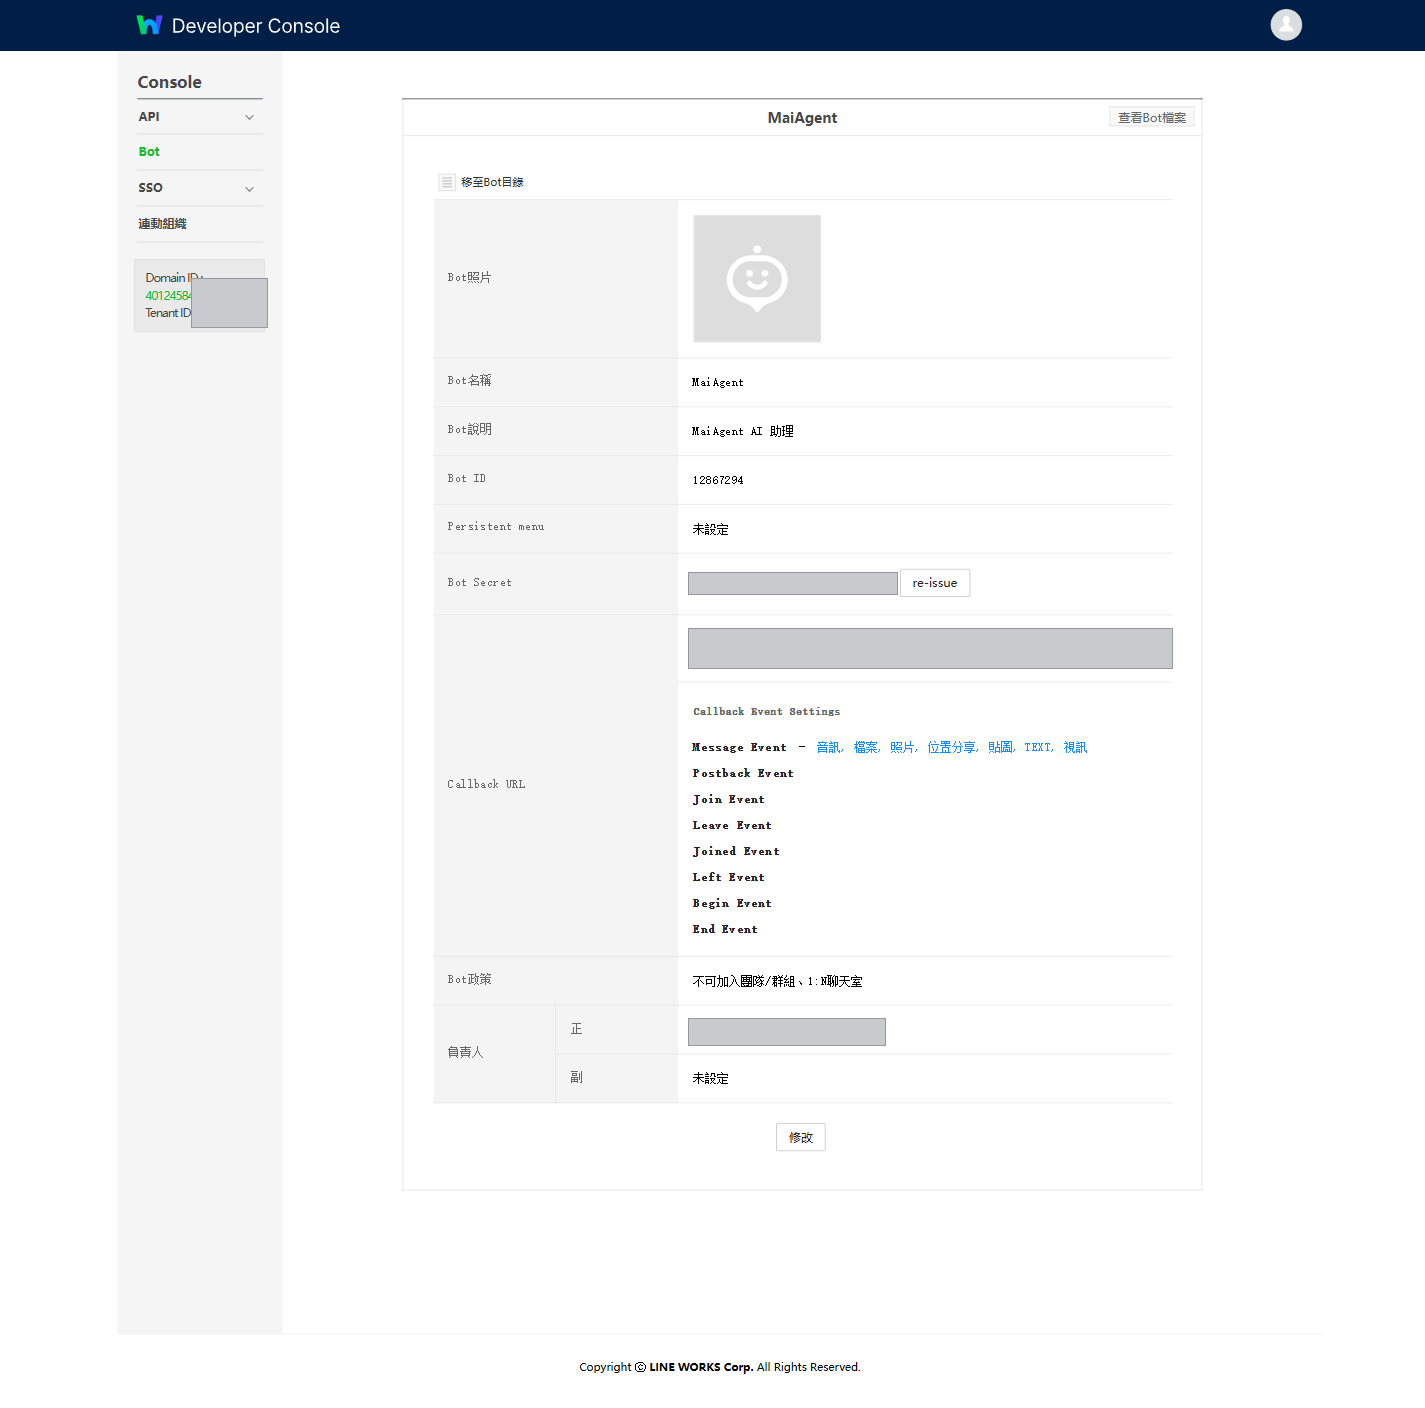
在 Developer Console 左側選單點選 <mark style="color:blue;">Bot</mark>，建立一個 Bot，取得：

| 憑證             | 在 Console 的位置                                                                  |
| -------------- | ------------------------------------------------------------------------------ |
| **Bot ID**     | <mark style="color:blue;">Bot ID</mark> 欄位                                     |
| **Bot Secret** | <mark style="color:blue;">Bot Secret</mark> 欄位，用於驗證 LINE WORKS 送來的訊息確實來自您的 Bot |

<figure><img src="https://1593648278-files.gitbook.io/~/files/v0/b/gitbook-x-prod.appspot.com/o/spaces%2Fmzb5NG9GDzFP2YDKeYVl%2Fuploads%2Fgit-blob-96baaf3f207c58a24ca25d1c10f0a2cdd692913a%2Flineworks-console-bot-detail.png?alt=media" alt="Bot 詳細頁面，包含 Bot 名稱、Bot ID、Bot Secret、Callback URL 與 Bot 政策"><figcaption><p>Bot 詳細頁面 — Bot ID 與 Bot Secret 在這裡</p></figcaption></figure>

### 需要群組對話時的必要設定 <a href="#step-enable-group-chat" id="step-enable-group-chat"></a>

在 Bot 的 <mark style="color:blue;">修改</mark> 頁面找到 <mark style="color:blue;">Bot政策</mark> → <mark style="color:blue;">加入聊天室</mark>，勾選 <mark style="color:blue;">可邀請加入團隊/群組、1:N聊天室</mark>。

未勾選時 Bot 只能進行一對一私訊，無法被邀請進群組。

{% hint style="warning" %}
Bot 詳細頁面的 <mark style="color:blue;">Bot政策</mark> 摘要文字，曾觀察到與修改表單中實際的勾選狀態不一致。若兩處說法不同，請以 <mark style="color:blue;">修改</mark> 表單中的勾選狀態為準。
{% endhint %}

**Bot 名稱**也在此頁設定。這個名稱會是使用者在群組中 @ 提及 Bot 時要輸入的名稱，請取一個好輸入的名稱。

{% hint style="info" %}
Callback URL 這一步先跳過。它需要 MaiAgent 產生的 Webhook URL，我們會在**步驟四**回來填。
{% endhint %}

***

## 步驟三：在 MaiAgent 建立 LINE WORKS 對話平台 <a href="#step-create-channel-in-maiagent" id="step-create-channel-in-maiagent"></a>

### 1. 進入串接對話平台 <a href="#step-go-to-channel-integration" id="step-go-to-channel-integration"></a>

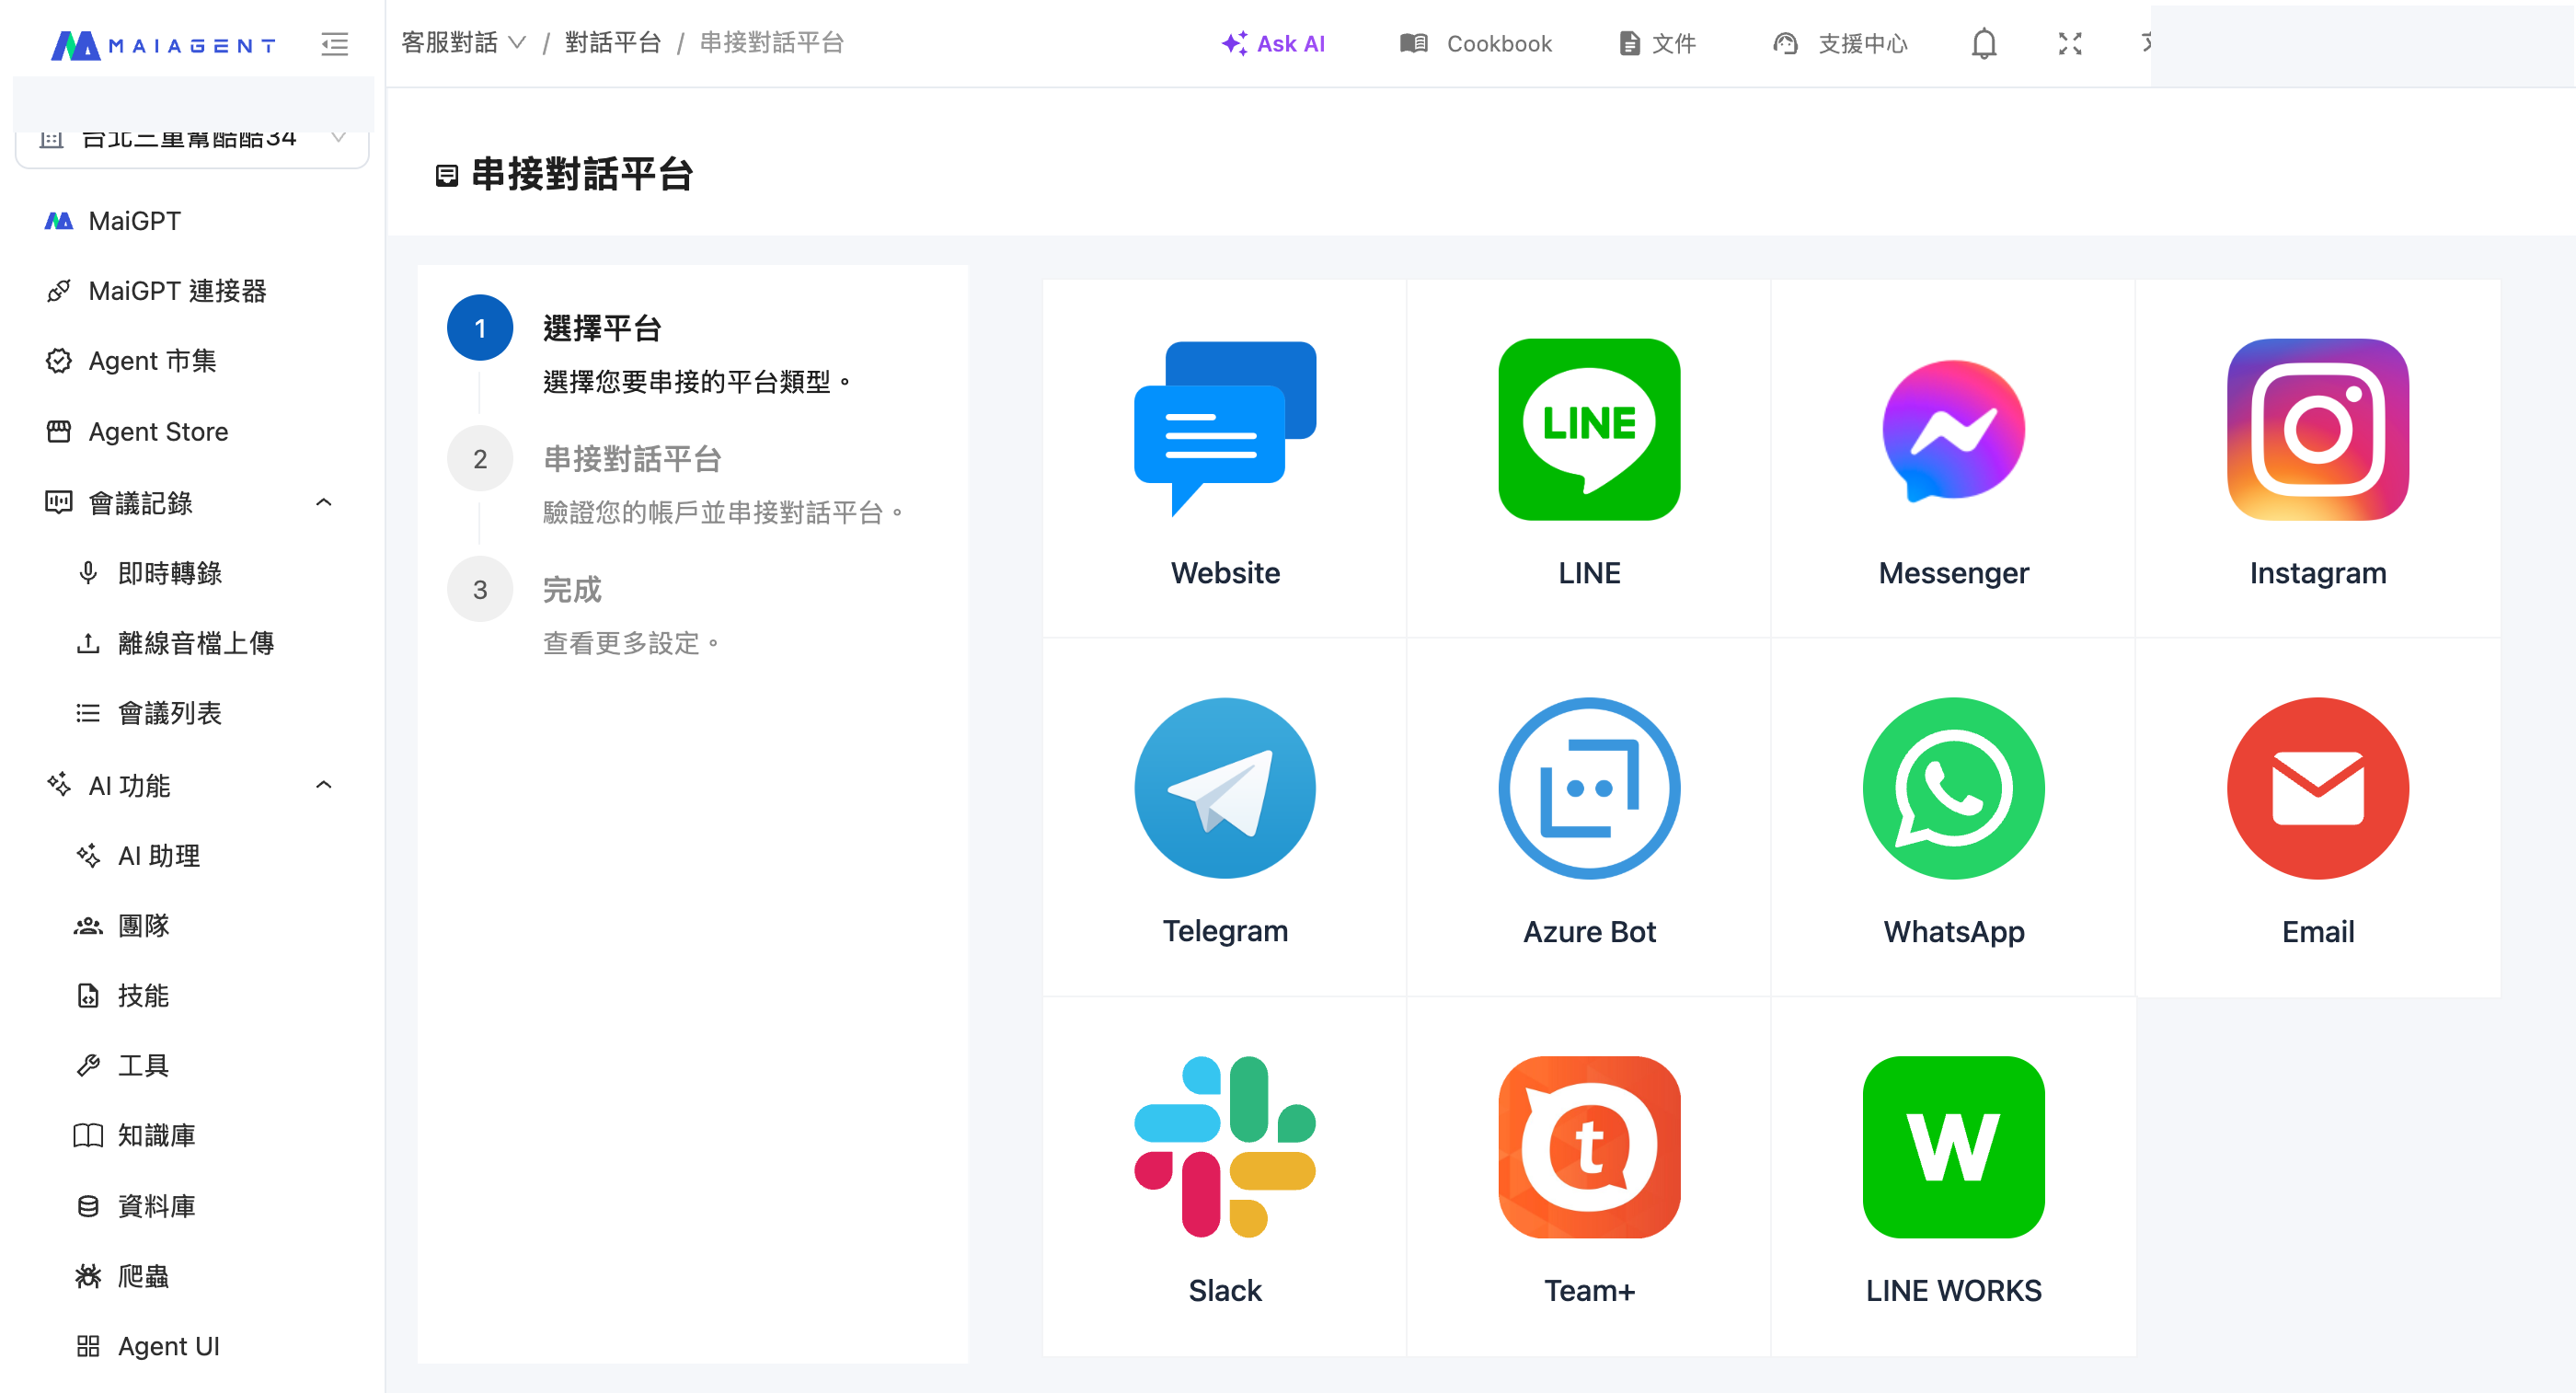
在 MaiAgent 左側選單點選 <mark style="color:blue;">對話平台</mark>，點擊右上角 <mark style="color:blue;">串接對話平台</mark>，選擇 <mark style="color:blue;">LINE WORKS</mark>。

<figure><img src="https://1593648278-files.gitbook.io/~/files/v0/b/gitbook-x-prod.appspot.com/o/spaces%2Fmzb5NG9GDzFP2YDKeYVl%2Fuploads%2Fgit-blob-d6428c5e7e78b5250be9c25783bceea3a59e636c%2Flineworks-choose-channel.png?alt=media" alt="選擇串接平台頁面中的 LINE WORKS"><figcaption><p>在平台清單中選擇 LINE WORKS</p></figcaption></figure>

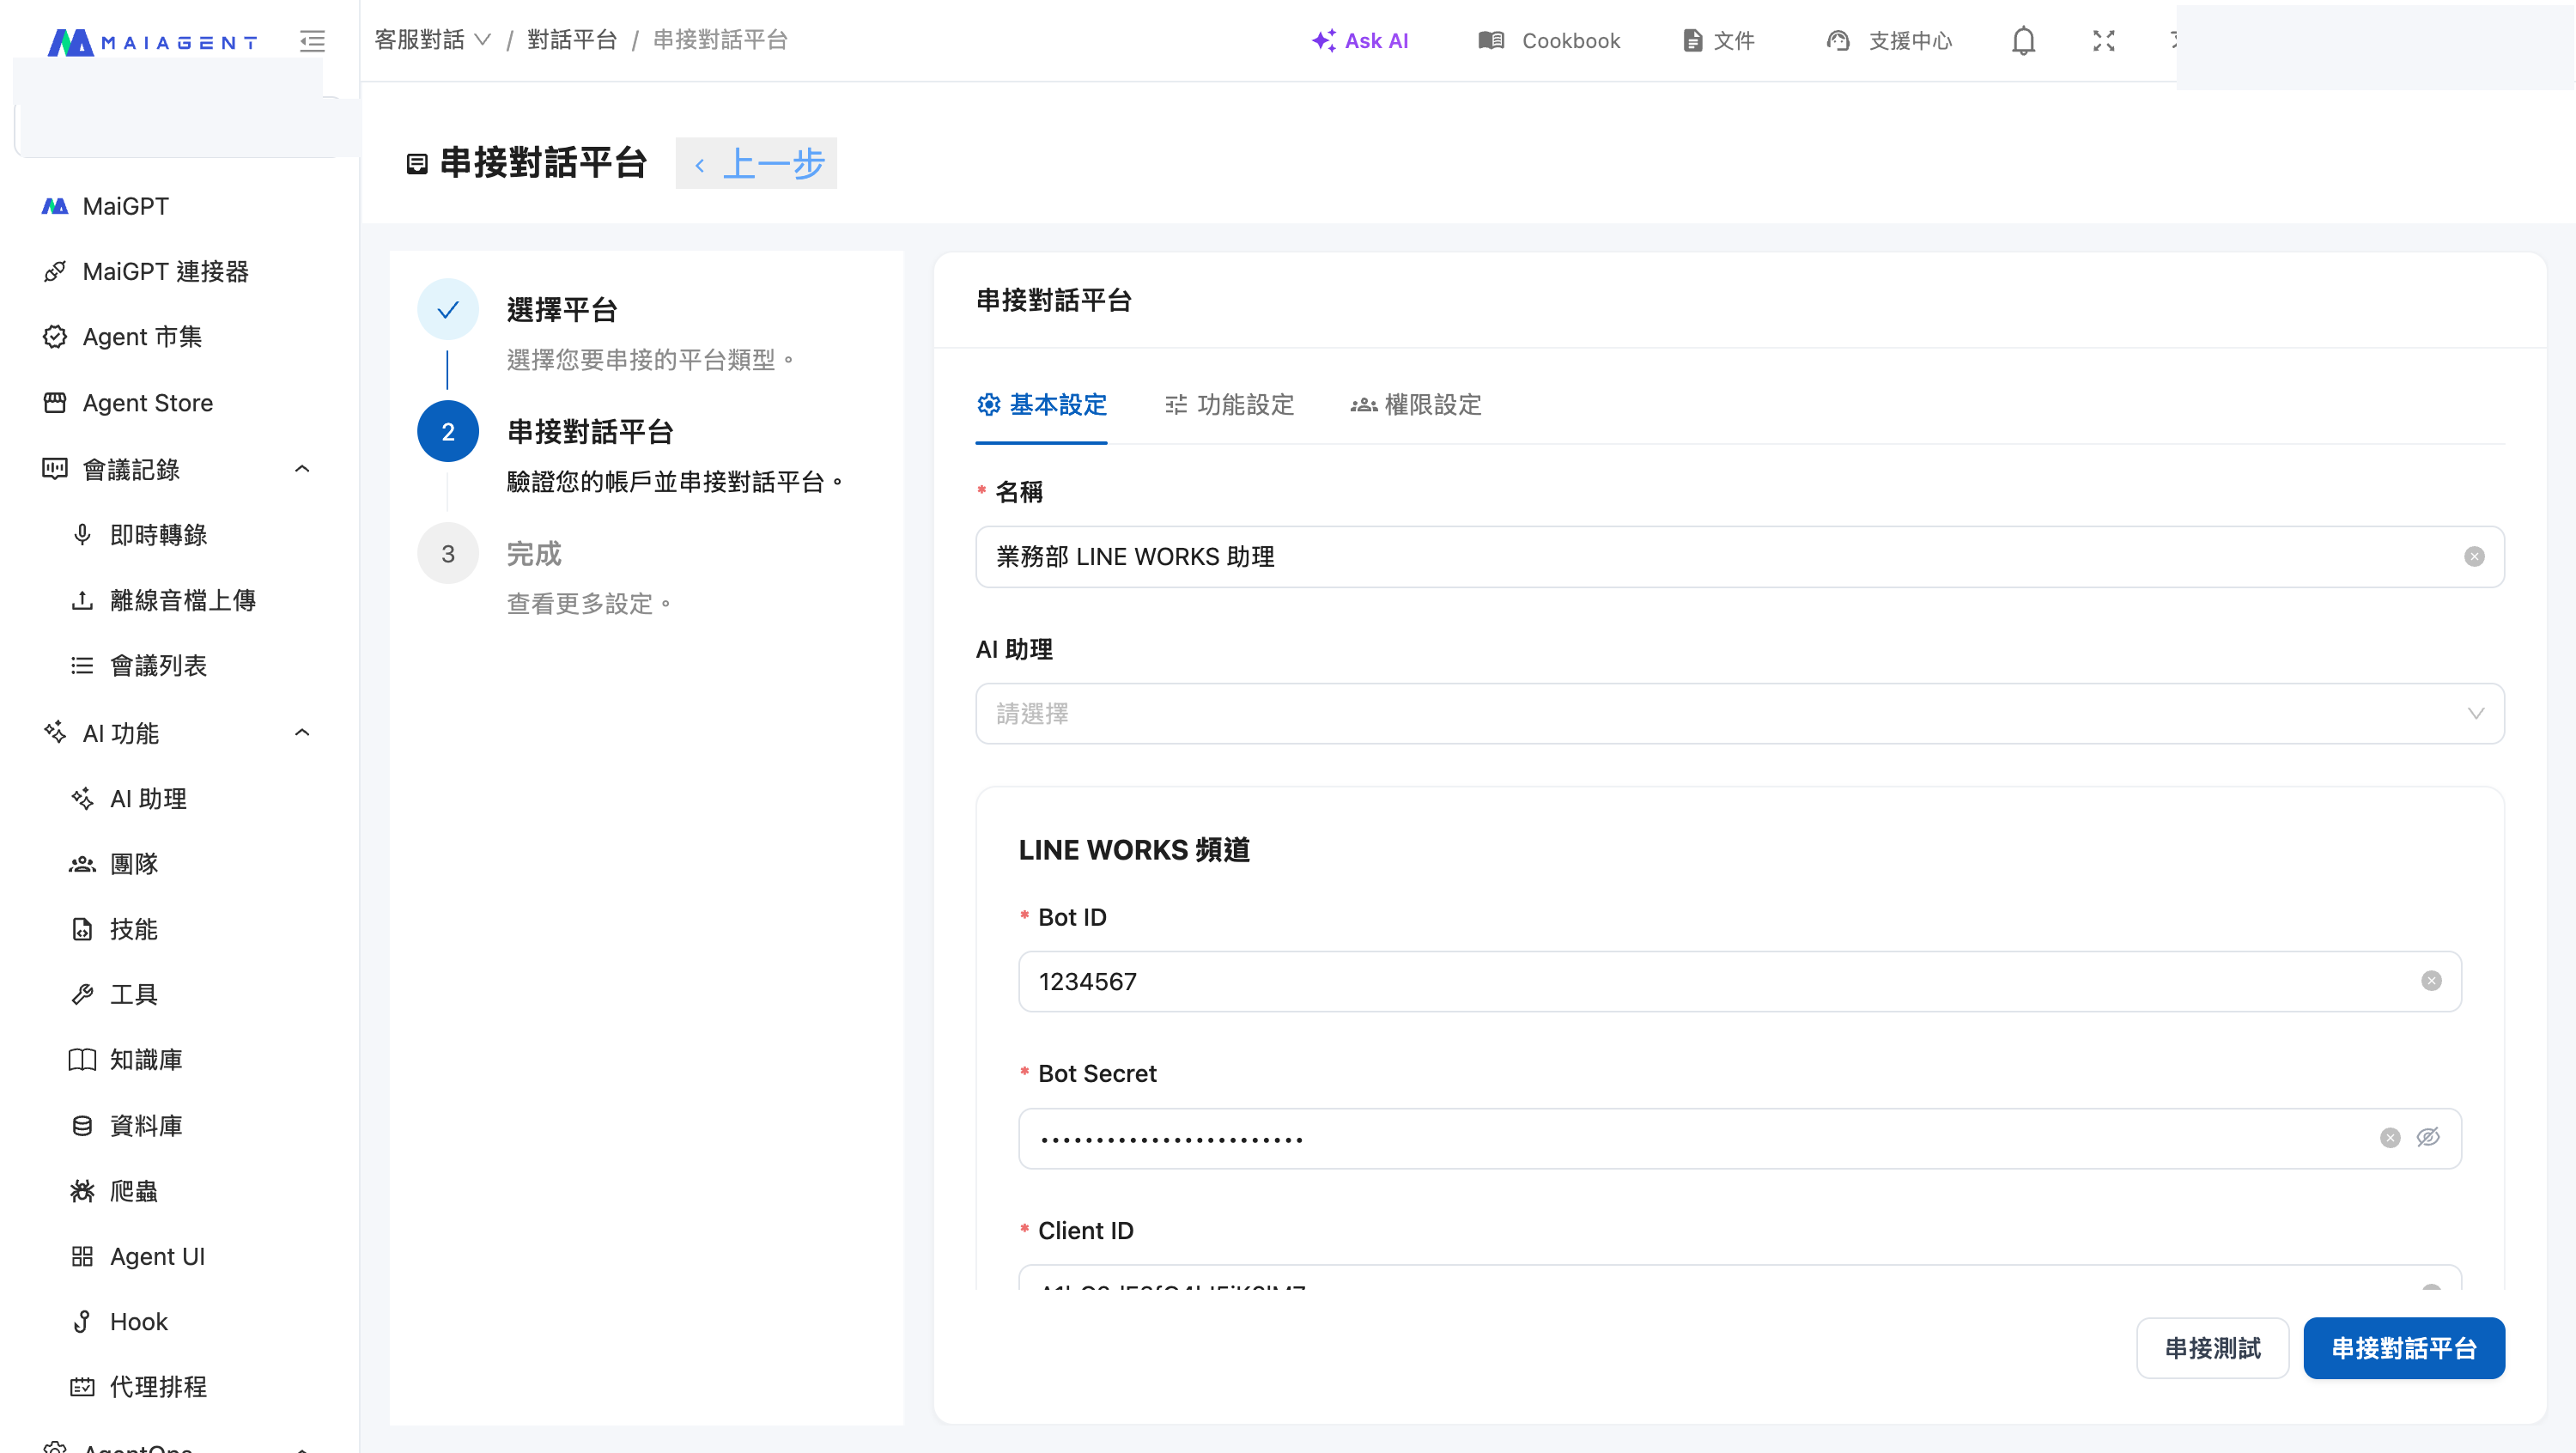
### 2. 填寫基本設定 <a href="#step-fill-basic-settings" id="step-fill-basic-settings"></a>

| 欄位                  | 說明                                                           |
| ------------------- | ------------------------------------------------------------ |
| **名稱**              | 為此串接取一個名稱（必填）。這只是 MaiAgent 這側的標籤，與 LINE WORKS 中顯示的 Bot 名稱無關。 |
| **AI 助理**           | 選擇要綁定的 AI 助理                                                 |
| **Bot ID**          | 步驟二取得（必填）                                                    |
| **Bot Secret**      | 步驟二取得（必填）                                                    |
| **Client ID**       | 步驟一取得（必填）                                                    |
| **Client Secret**   | 步驟一取得（必填）                                                    |
| **Service Account** | 步驟一取得（必填）                                                    |
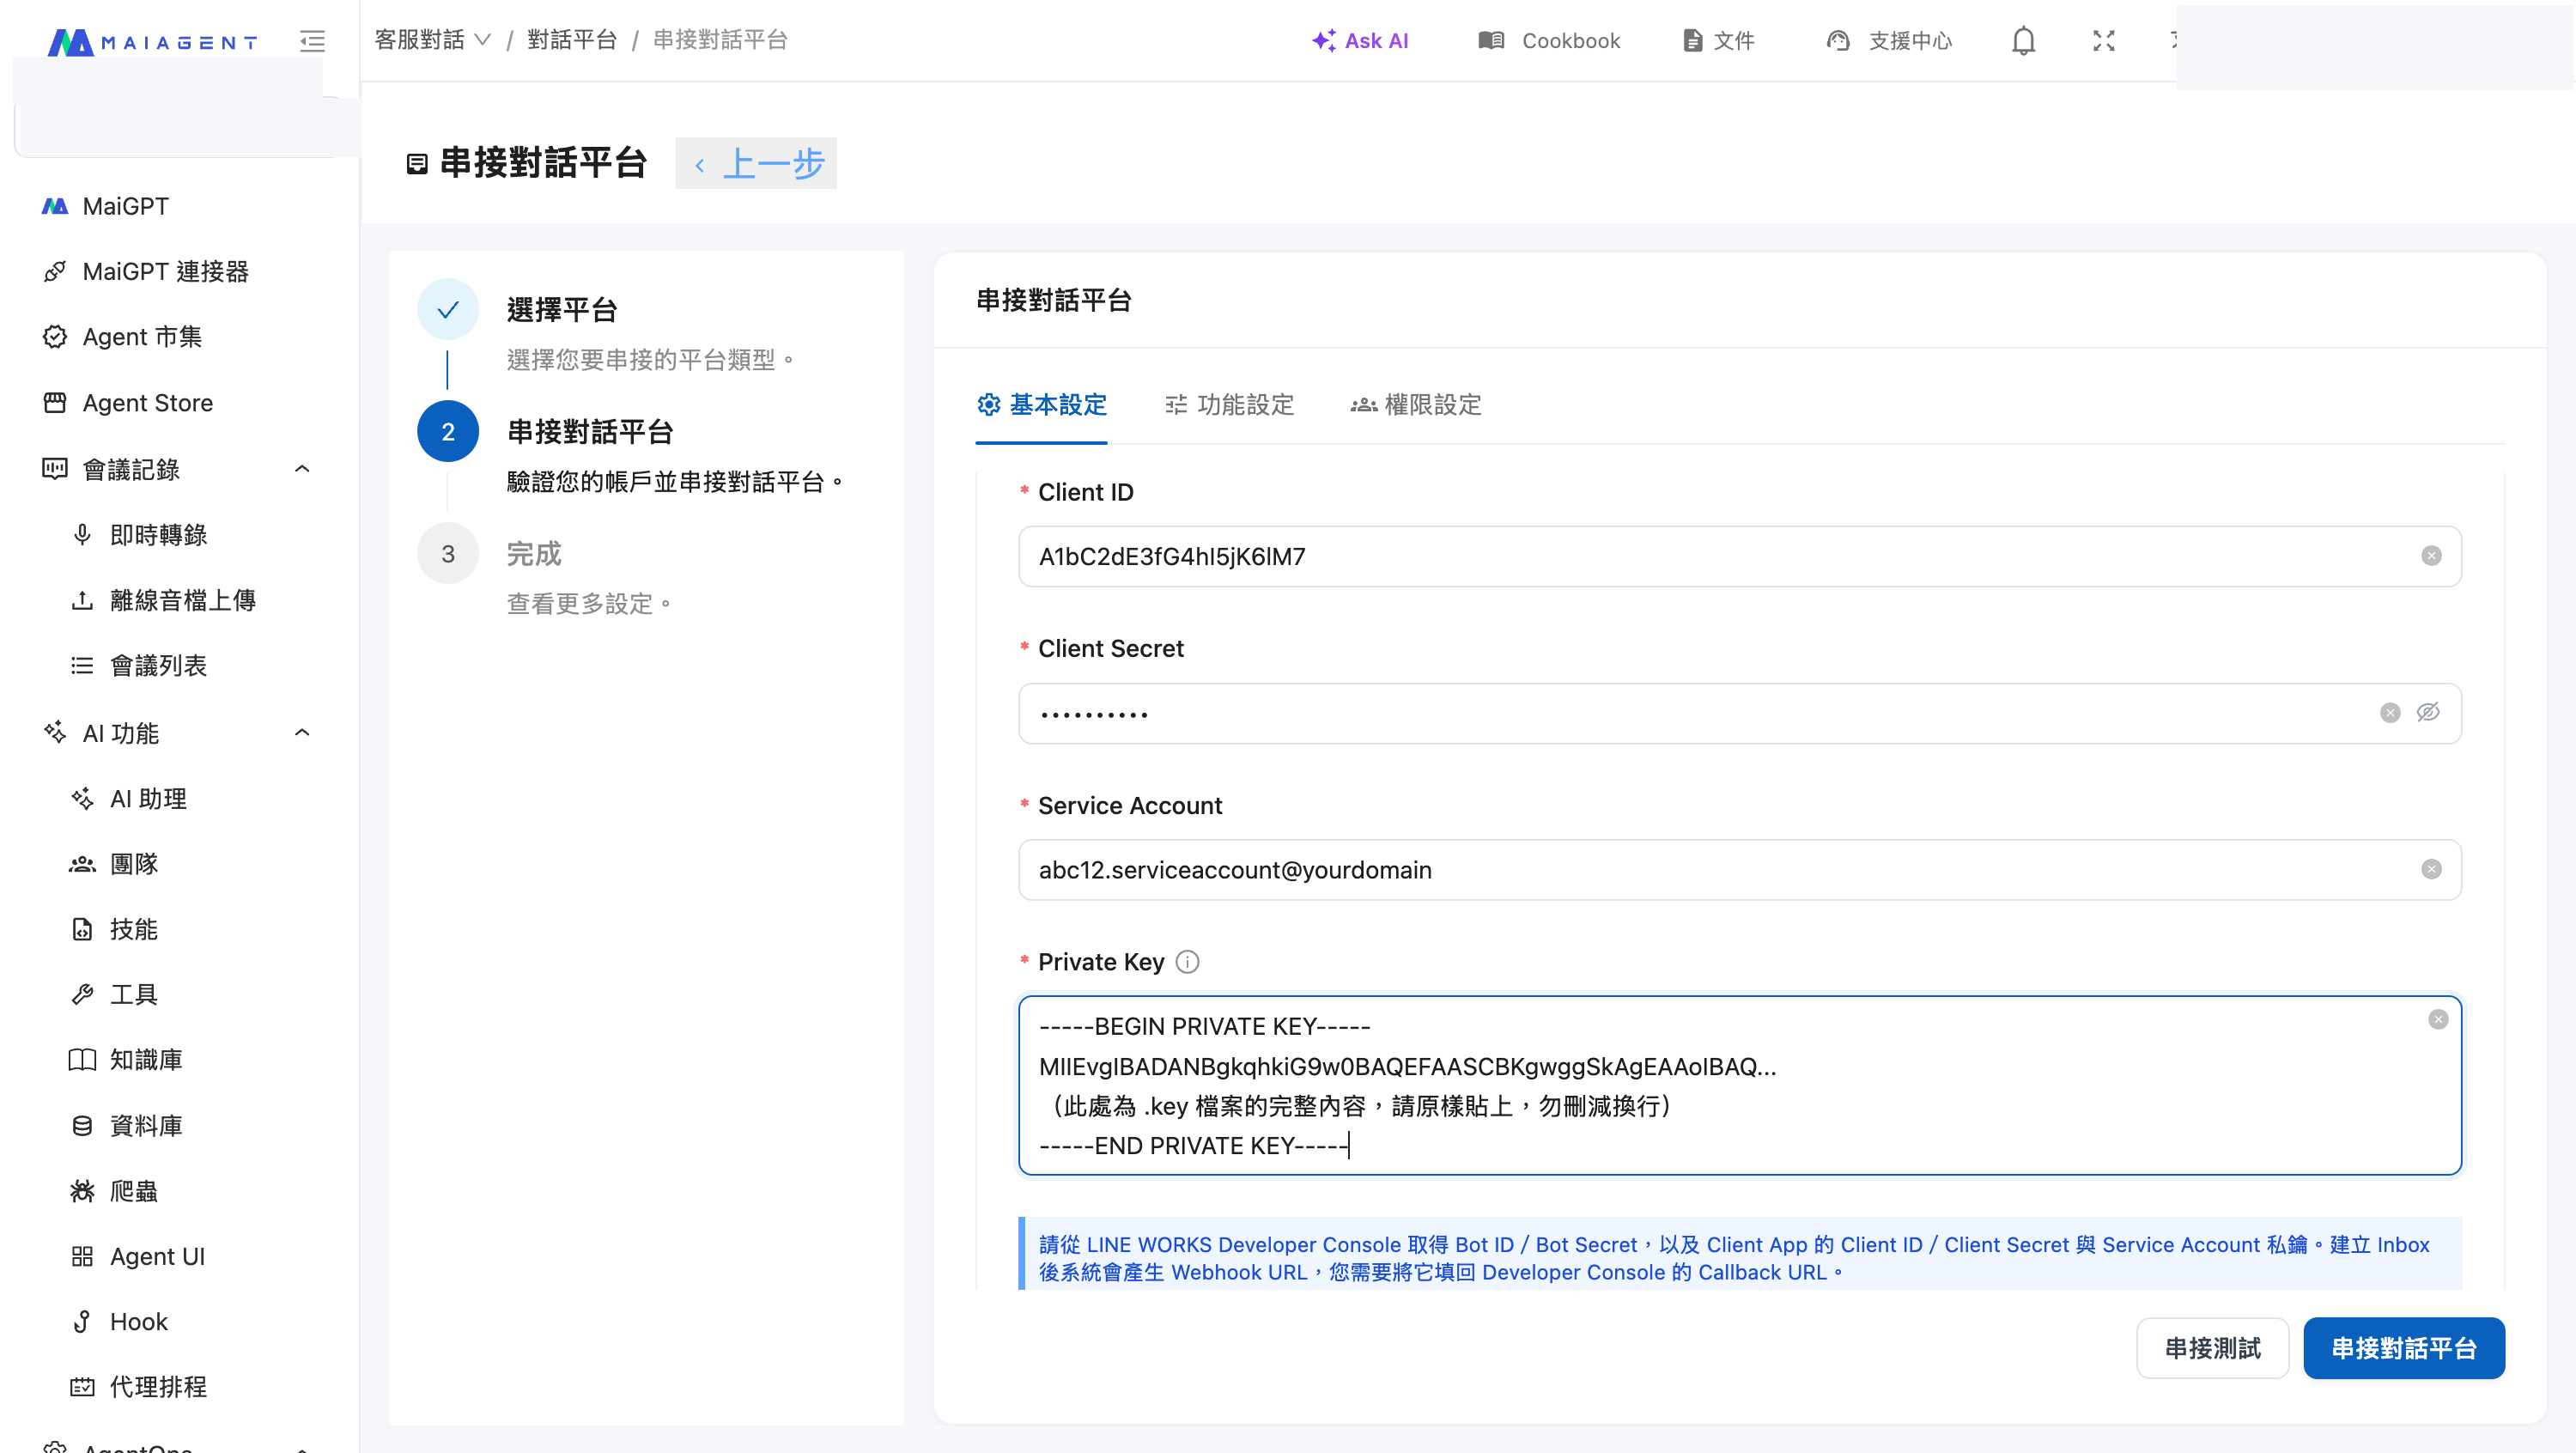
| **Private Key**     | 貼上步驟一下載的 `.key` 檔案完整內容，包含開頭與結尾的標記行（必填）                       |

表單分為上下兩段。上半段是名稱、AI 助理，以及步驟二取得的 Bot ID 與 Bot Secret：

<figure><img src="https://1593648278-files.gitbook.io/~/files/v0/b/gitbook-x-prod.appspot.com/o/spaces%2Fmzb5NG9GDzFP2YDKeYVl%2Fuploads%2Fgit-blob-684d5f59dd73accc1c7177b4c3bc3b02345ab1a3%2Flineworks-create-form.png?alt=media" alt="MaiAgent 的 LINE WORKS 建立表單上半部，包含名稱、AI 助理、Bot ID 與 Bot Secret"><figcaption><p>建立表單上半段 — 名稱、AI 助理、Bot ID、Bot Secret（圖中為範例值）</p></figcaption></figure>

往下捲動是步驟一取得的 Client App 三項憑證與私鑰：

<figure><img src="https://1593648278-files.gitbook.io/~/files/v0/b/gitbook-x-prod.appspot.com/o/spaces%2Fmzb5NG9GDzFP2YDKeYVl%2Fuploads%2Fgit-blob-456748551dd15070854358eaf0ceb8785d9f448d%2Flineworks-create-form-credentials.png?alt=media" alt="MaiAgent 的 LINE WORKS 建立表單下半部，包含 Client ID、Client Secret、Service Account 與 Private Key"><figcaption><p>建立表單下半段 — Client ID、Client Secret、Service Account、Private Key（圖中為範例值）</p></figcaption></figure>

{% hint style="info" %}
Bot Secret 與 Client Secret 輸入後會以圓點遮蔽，可點欄位右側的眼睛圖示確認內容。Private Key 請直接貼上 `.key` 檔案的完整內容，換行會原樣保留。
{% endhint %}

### 3. 聊天室設定 <a href="#step-chat-room-settings" id="step-chat-room-settings"></a>

| 設定                | 說明                                                                 |
| ----------------- | ------------------------------------------------------------------ |
| **群組中需 @Bot 才回覆** | 開啟後，Bot 在群組對話中只有被 @ 提及時才回覆。**建議在群組使用時開啟**，否則群組中的每一則訊息都會觸發 AI 助理回覆。 |
| **啟用重置命令**        | 開啟後可自訂關鍵字，使用者輸入該關鍵字即可清空對話記憶、重新開始。                                  |

{% hint style="info" %}
「群組中需 @Bot 才回覆」比對的是 **Developer Console 設定的 Bot 名稱**，不是上方「名稱」欄位填的 Inbox 名稱。若在 Developer Console 改了 Bot 名稱，群組中要 @ 的名稱也會跟著改變。
{% endhint %}

### 4. 串接測試 <a href="#step-validate-credentials" id="step-validate-credentials"></a>

點擊 <mark style="color:blue;">串接測試</mark>，MaiAgent 會實際向 LINE WORKS 取得一次存取權杖，確認憑證組合正確。

失敗時畫面會顯示具體原因。常見的兩種：

* <mark style="color:red;">憑證驗證失敗</mark> — 依序檢查 Private Key 是否完整貼上（包含開頭與結尾標記行，中間換行不可遺漏）、是否為未加密格式、Service Account 是否完整（含 `.serviceaccount@網域` 後半段）、Client ID 與 Client Secret 是否來自同一個 App、App 是否已授予步驟一列出的四個 Scope
* <mark style="color:red;">此 Bot ID 已綁定於其他收件匣</mark> — 同一個 Bot 不能同時掛在兩個對話平台上。請改用另一個 Bot，或先刪除既有的那個對話平台

失敗訊息會顯示在按鈕左側：

<figure><img src="https://1593648278-files.gitbook.io/~/files/v0/b/gitbook-x-prod.appspot.com/o/spaces%2Fmzb5NG9GDzFP2YDKeYVl%2Fuploads%2Fgit-blob-2861170cf6776a2e293279d60dc83f913bf8b18d%2Flineworks-validate-error.png?alt=media" alt="串接測試失敗時，錯誤訊息顯示在串接測試按鈕左側"><figcaption><p>串接測試失敗的訊息位置（此例為 Bot ID 重複綁定）</p></figcaption></figure>

### 5. 建立並複製 Webhook URL <a href="#step-save-and-get-webhook-url" id="step-save-and-get-webhook-url"></a>

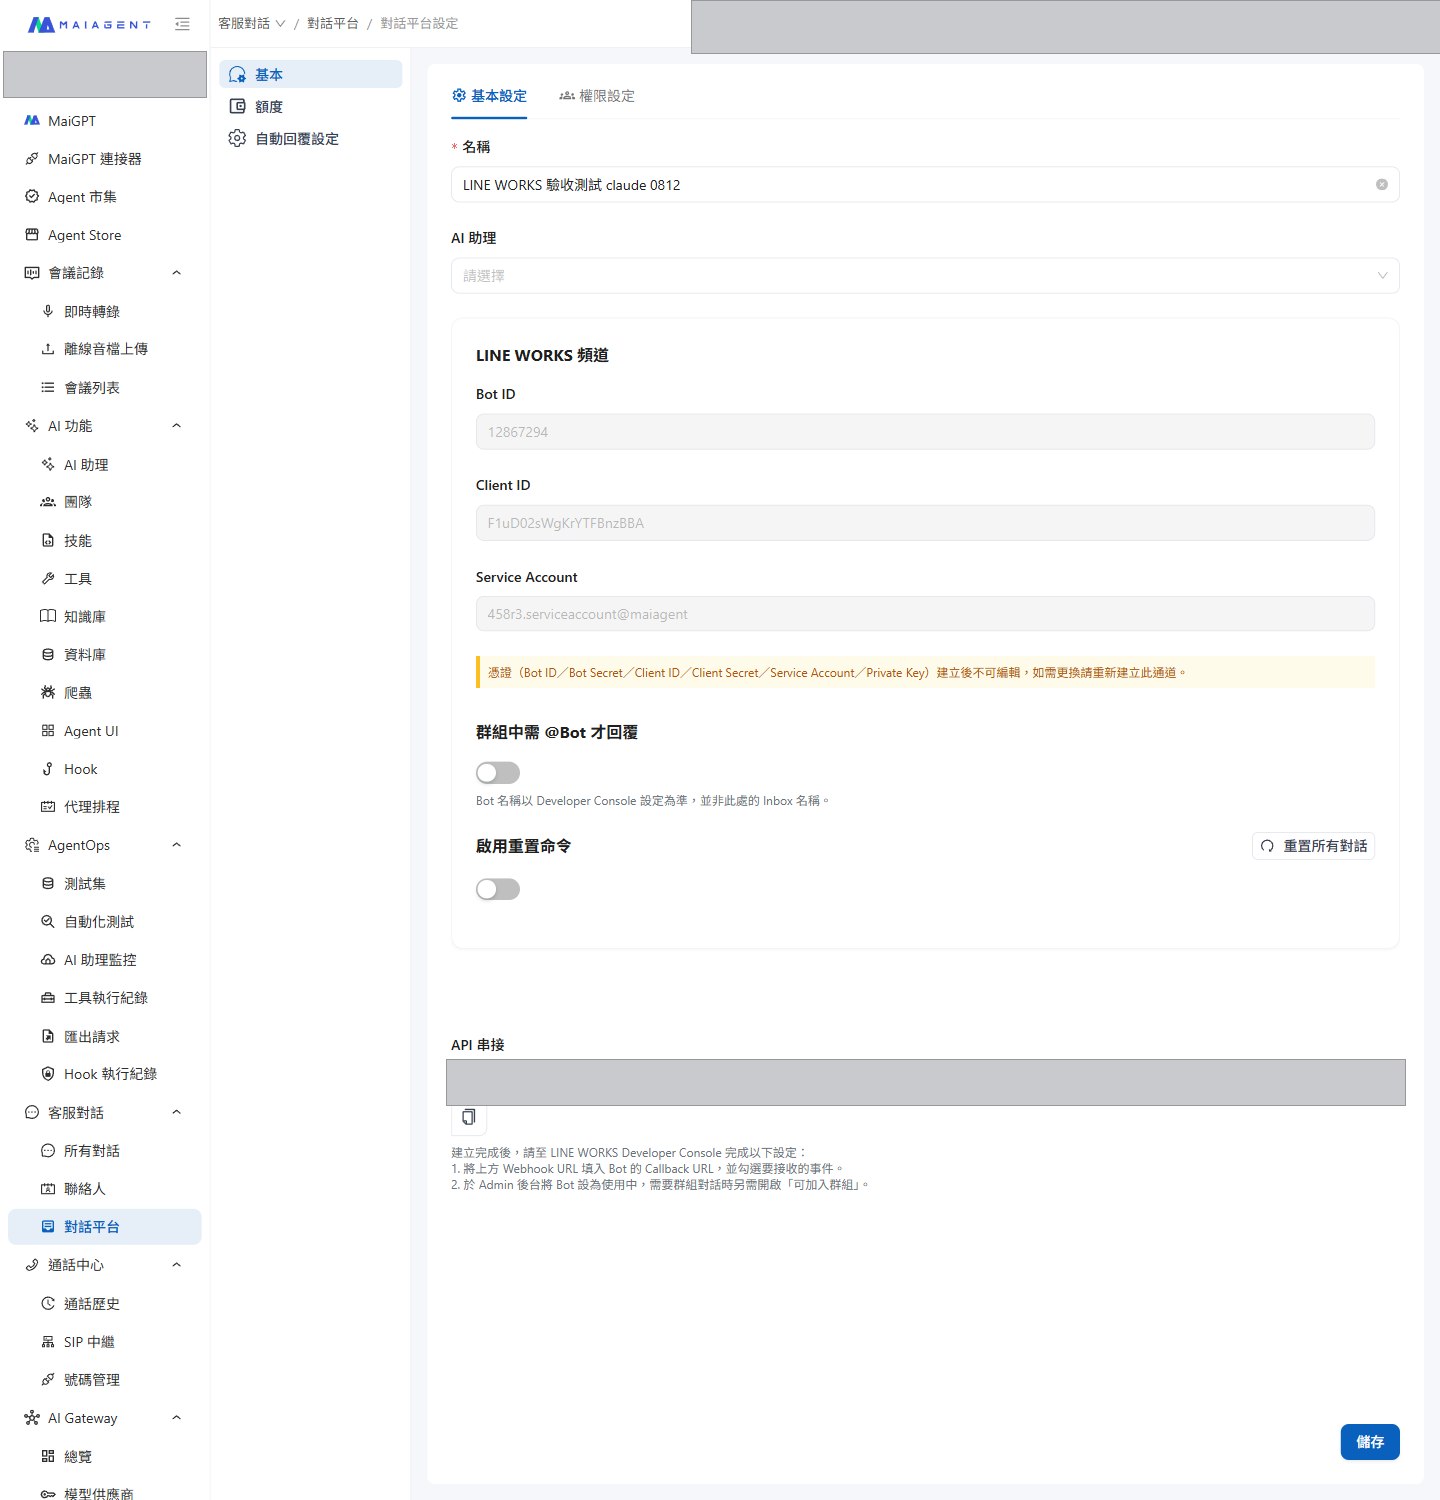
點擊 <mark style="color:blue;">串接對話平台</mark> 完成建立。系統會產生一組 **Webhook URL**，請複製備用——下一步要填回 Developer Console。

您也可以隨時回到該通道的設定頁面，在 <mark style="color:blue;">API 串接</mark> 欄位複製這組 URL。

<figure><img src="https://1593648278-files.gitbook.io/~/files/v0/b/gitbook-x-prod.appspot.com/o/spaces%2Fmzb5NG9GDzFP2YDKeYVl%2Fuploads%2Fgit-blob-a78d5c06347c503ad3522890174f6e39d536e127%2Flineworks-edit-page.png?alt=media" alt="LINE WORKS 通道的設定頁面，Bot ID、Client ID、Service Account 唯讀顯示，並提供 API 串接的 Webhook URL"><figcaption><p>建立後的設定頁面 — 憑證不再顯示，Webhook URL 可隨時複製</p></figcaption></figure>

***

## 步驟四：回到 Developer Console 設定 Callback URL <a href="#step-configure-callback-url" id="step-configure-callback-url"></a>

回到步驟二建立的 Bot，進入 <mark style="color:blue;">修改</mark> 頁面：

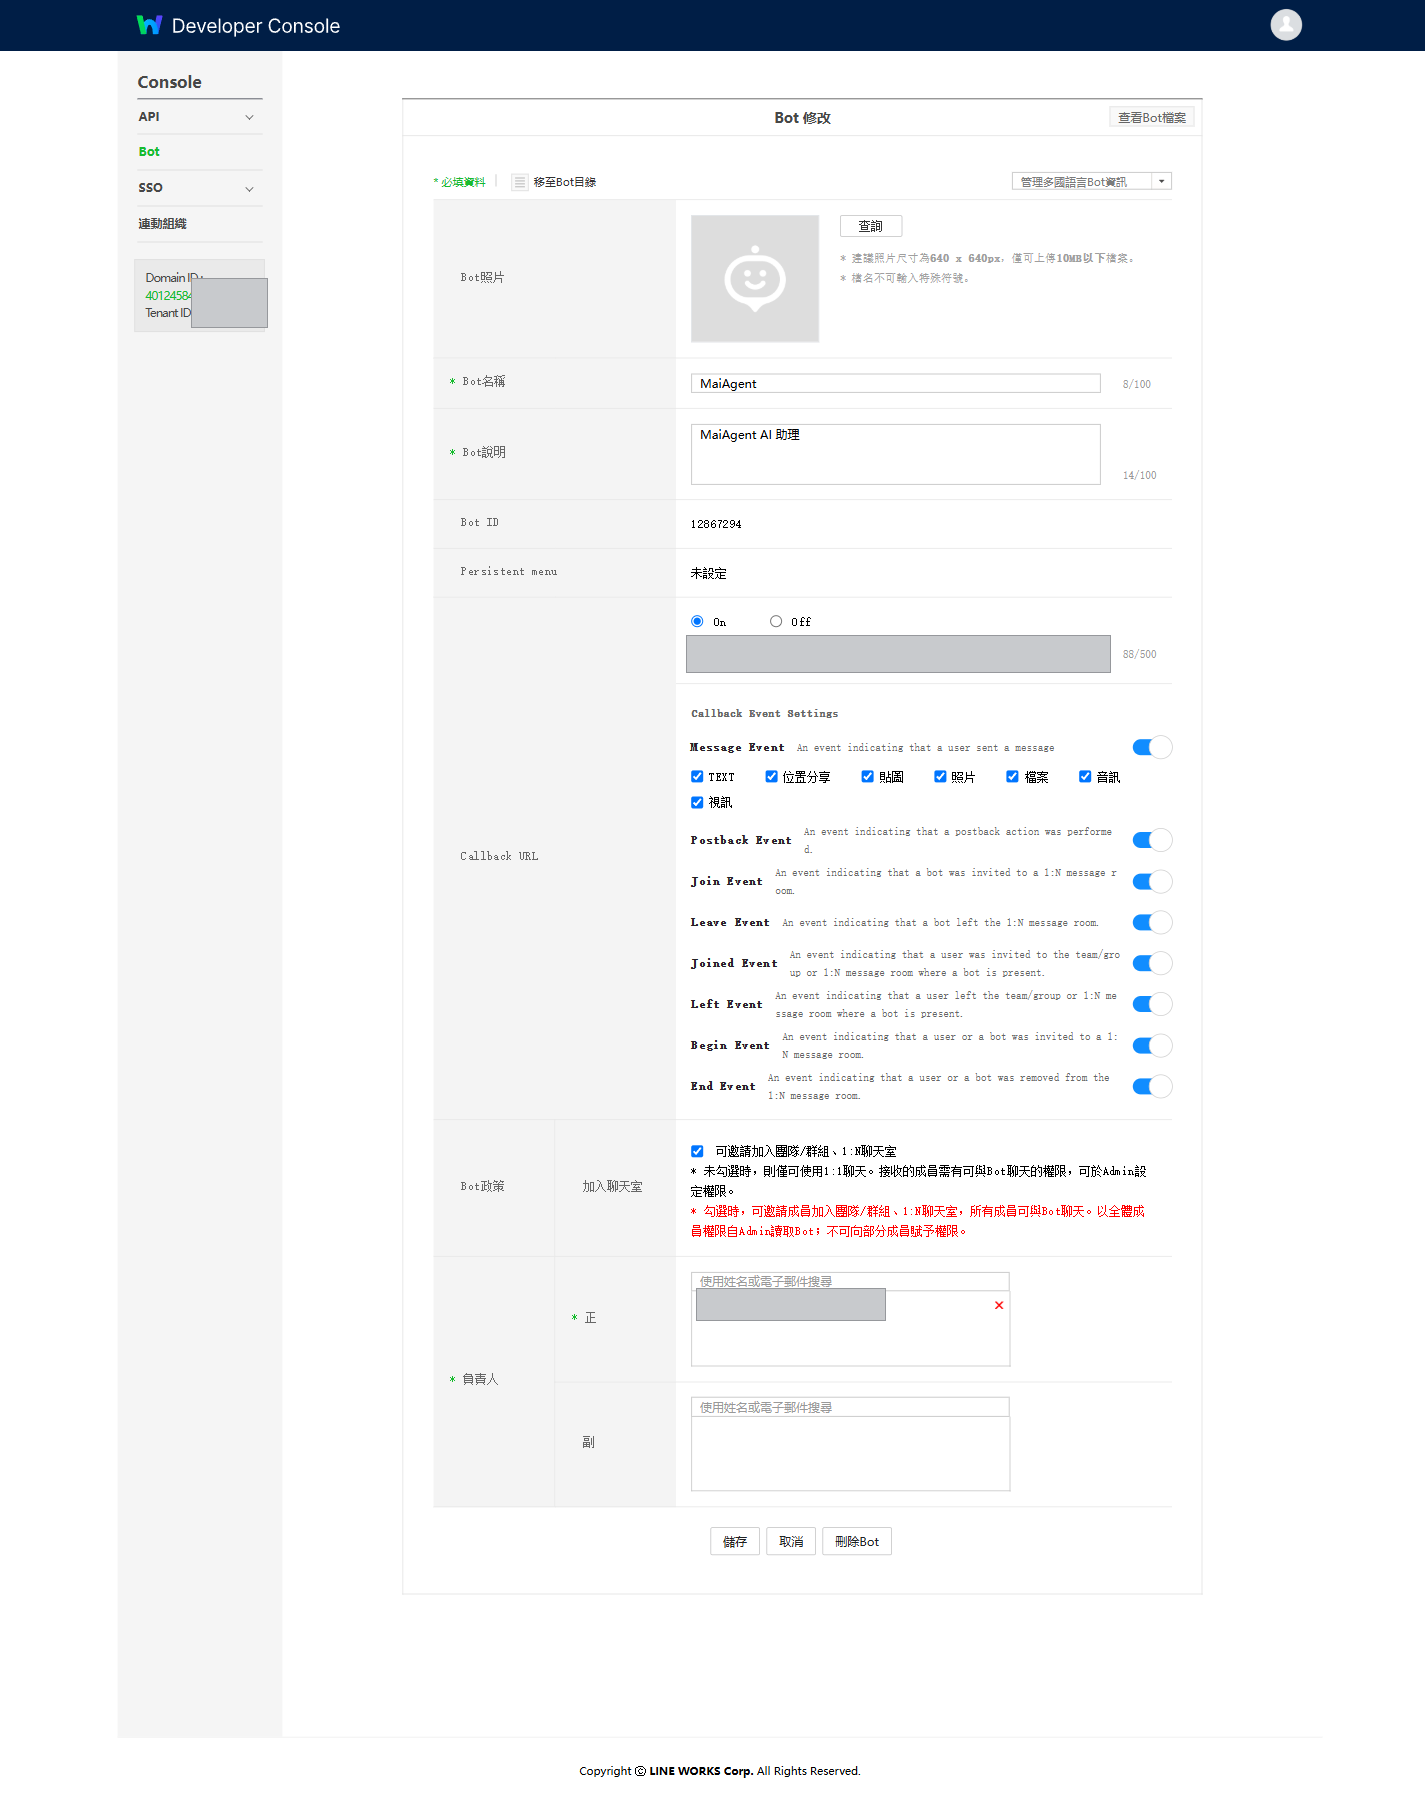
1. 將 <mark style="color:blue;">Callback URL</mark> 設為 <mark style="color:blue;">On</mark>，並填入 MaiAgent 產生的 **Webhook URL**
2. 在 <mark style="color:blue;">Callback Event Settings</mark> 勾選要接收的事件。建議 <mark style="color:blue;">Message Event</mark> 底下全部勾選，讓 AI 助理能處理各類訊息：

| 事件                                    | 對應的使用者行為 |
| ------------------------------------- | -------- |
| <mark style="color:blue;">TEXT</mark> | 傳送文字訊息   |
| <mark style="color:blue;">照片</mark>   | 傳送圖片     |
| <mark style="color:blue;">檔案</mark>   | 傳送檔案     |
| <mark style="color:blue;">音訊</mark>   | 傳送語音訊息   |
| <mark style="color:blue;">視訊</mark>   | 傳送影片     |
| <mark style="color:blue;">位置分享</mark> | 分享位置     |
| <mark style="color:blue;">貼圖</mark>   | 傳送貼圖     |

3. 若會在群組使用，<mark style="color:blue;">Join Event</mark> 與 <mark style="color:blue;">Joined Event</mark> 也建議勾選
4. 儲存設定

<figure><img src="https://1593648278-files.gitbook.io/~/files/v0/b/gitbook-x-prod.appspot.com/o/spaces%2Fmzb5NG9GDzFP2YDKeYVl%2Fuploads%2Fgit-blob-b55d63f49e2c97ae83bd1ea6737402a710e03e06%2Flineworks-console-bot-callback.png?alt=media" alt="Bot 修改頁面的 Callback URL 與 Callback Event Settings"><figcaption><p>Callback URL 設為 On 並填入 Webhook URL，下方勾選事件型別</p></figcaption></figure>

{% hint style="warning" %}
未勾選的事件型別，LINE WORKS 不會送給 MaiAgent，該類訊息就會像沒發生過一樣——AI 助理不會回覆，對話中也不會留下記錄。
{% endhint %}

***

## 步驟五：在 Admin 後台啟用 Bot <a href="#step-activate-bot" id="step-activate-bot"></a>

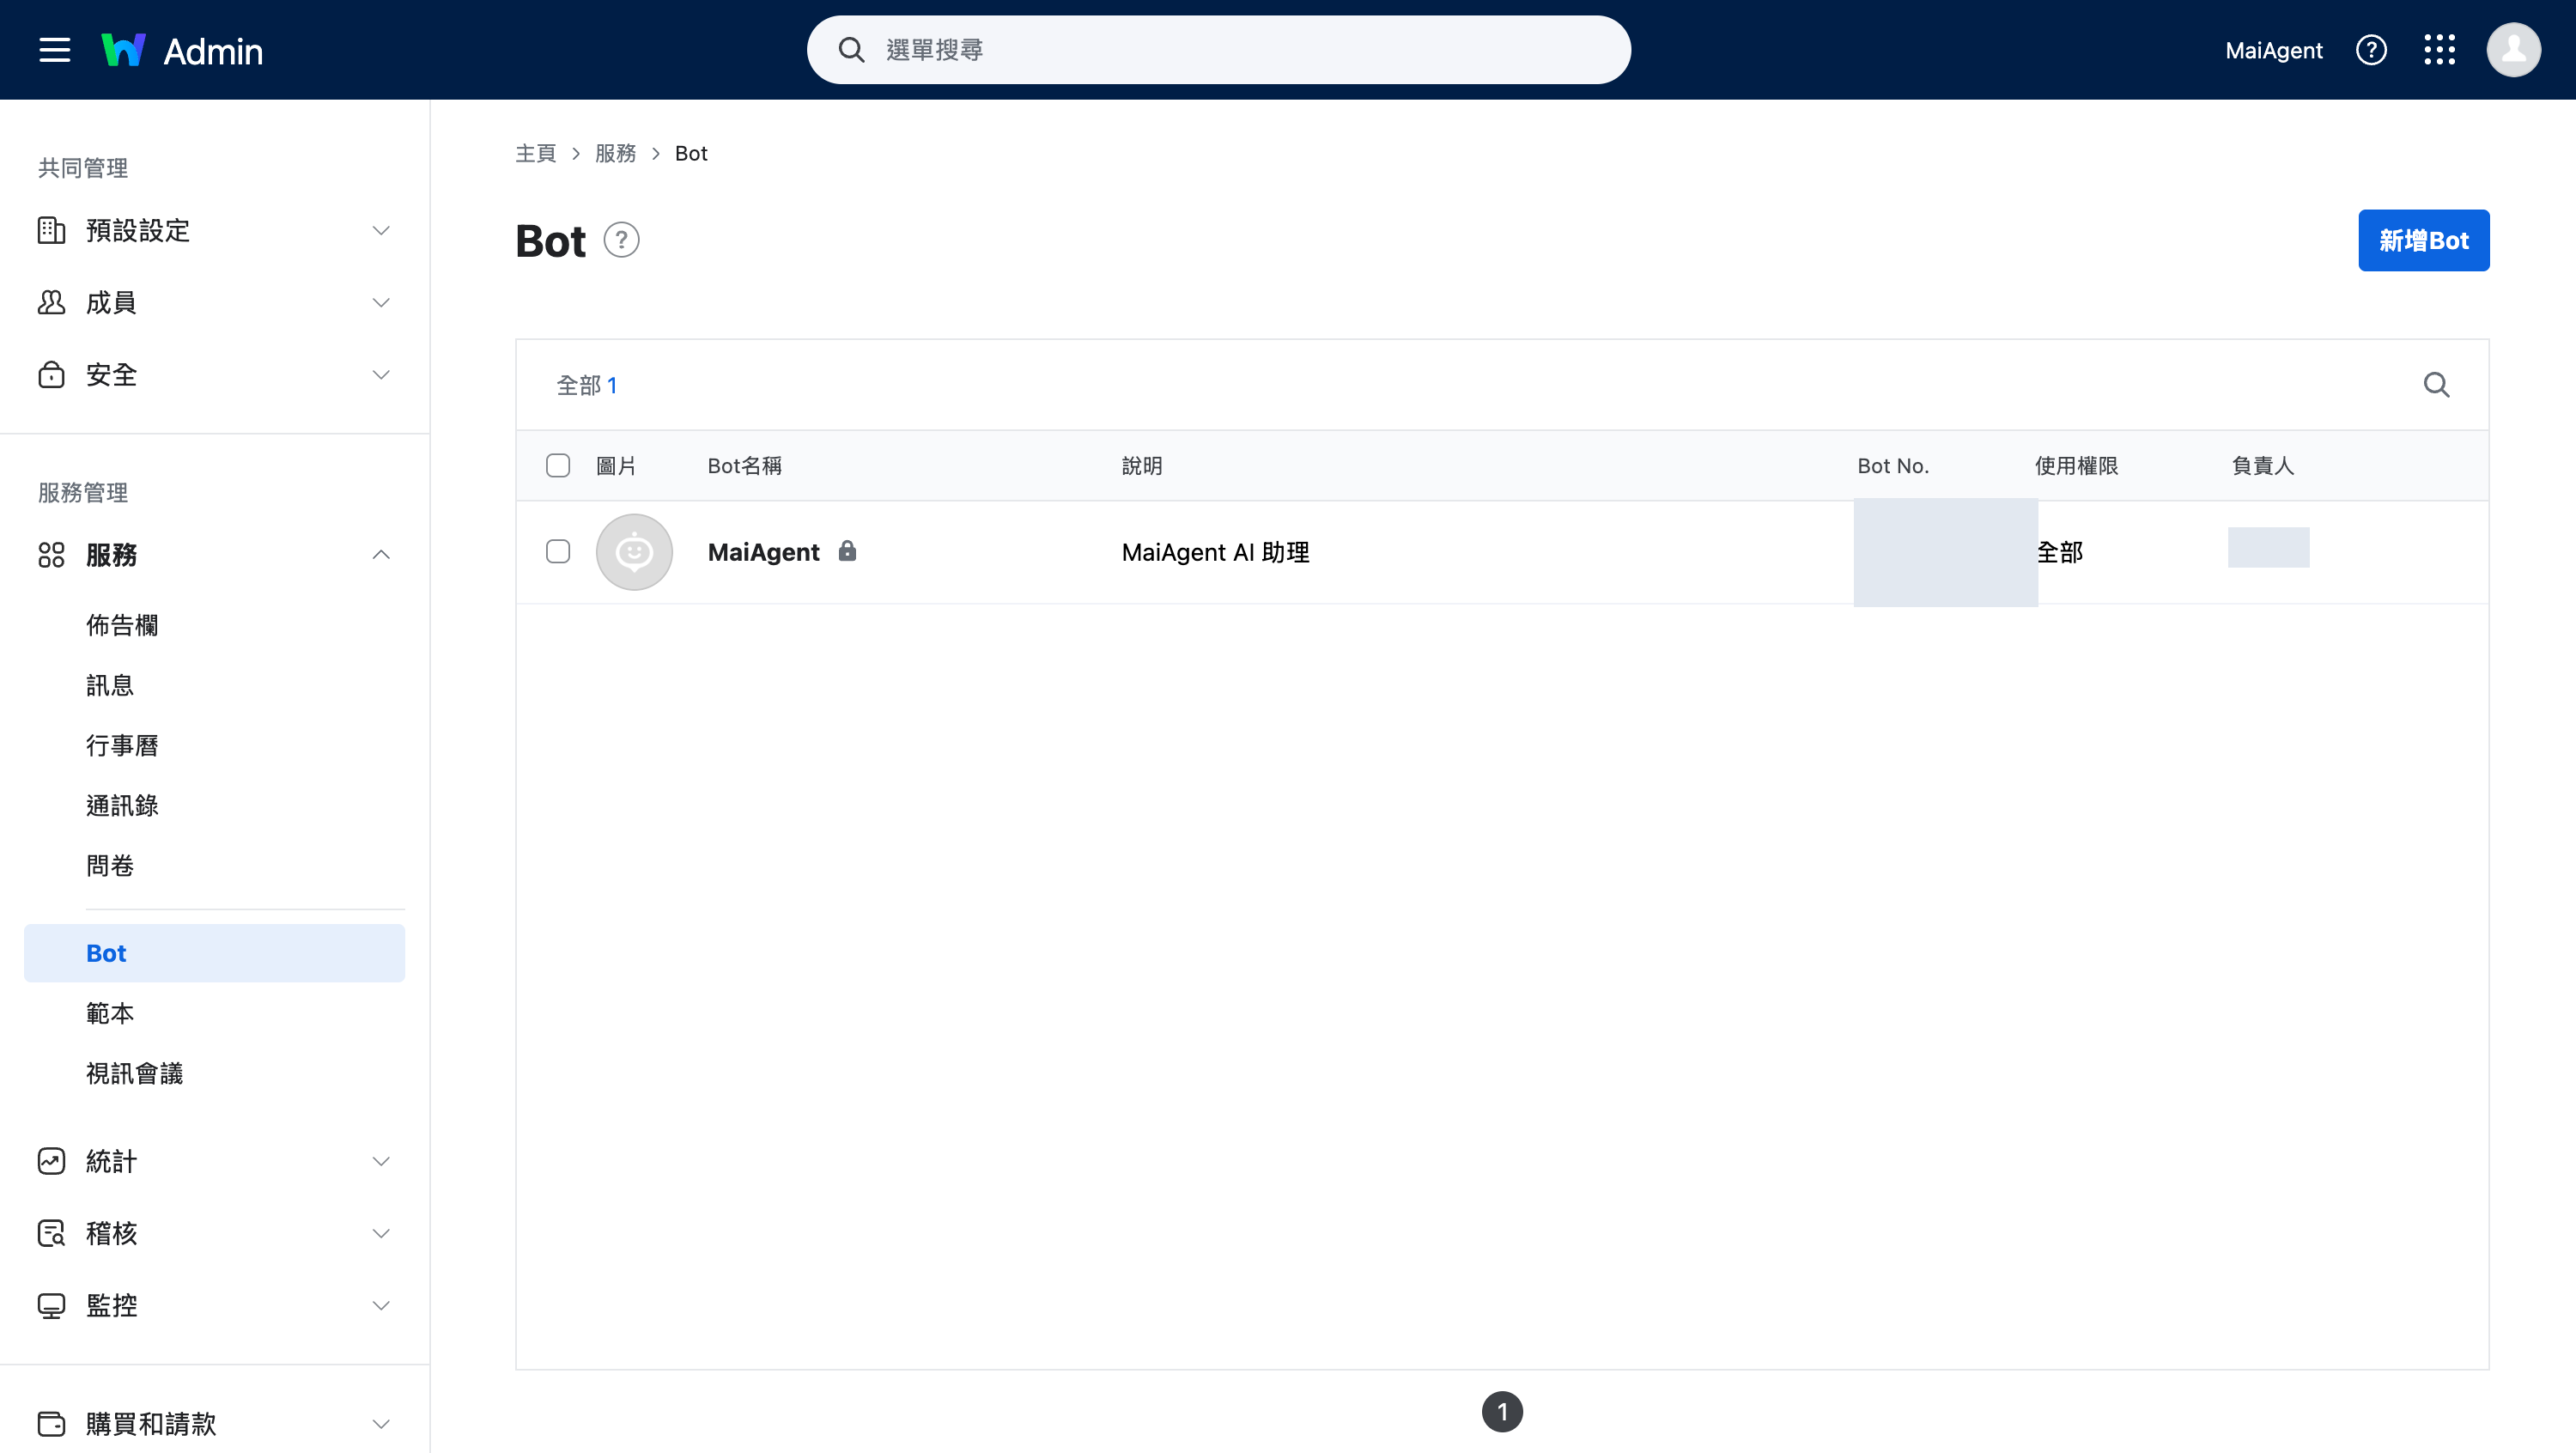
登入 [LINE WORKS Admin 後台](https://admin.worksmobile.com/)，在左側 <mark style="color:blue;">服務</mark> → <mark style="color:blue;">Bot</mark> 點擊右上角 <mark style="color:blue;">新增Bot</mark>，把步驟二建立的 Bot 加進來。

加入後這一頁會列出該 Bot，並可在 <mark style="color:blue;">使用權限</mark> 欄設定哪些成員看得到它（設為 <mark style="color:blue;">全部</mark> 代表全體成員皆可使用）。

<figure><img src="https://1593648278-files.gitbook.io/~/files/v0/b/gitbook-x-prod.appspot.com/o/spaces%2Fmzb5NG9GDzFP2YDKeYVl%2Fuploads%2Fgit-blob-9bd2b2649536680af45839ab3c239677210c1100%2Flineworks-admin-bot.png?alt=media" alt="LINE WORKS Admin 後台的服務 → Bot 頁面，列出已加入的 Bot 與其使用權限"><figcaption><p>Admin 後台 → 服務 → Bot — 加入 Bot 並設定使用權限</p></figcaption></figure>

{% hint style="warning" %}
這一步很容易漏。Bot 在 Developer Console 建立後**還沒有出現在員工的 LINE WORKS 中**，必須由租戶管理員在 Admin 後台加入，員工才搜尋得到。
{% endhint %}

***

## 開始使用 <a href="#getting-started" id="getting-started"></a>

### 一對一私訊 <a href="#direct-message" id="direct-message"></a>

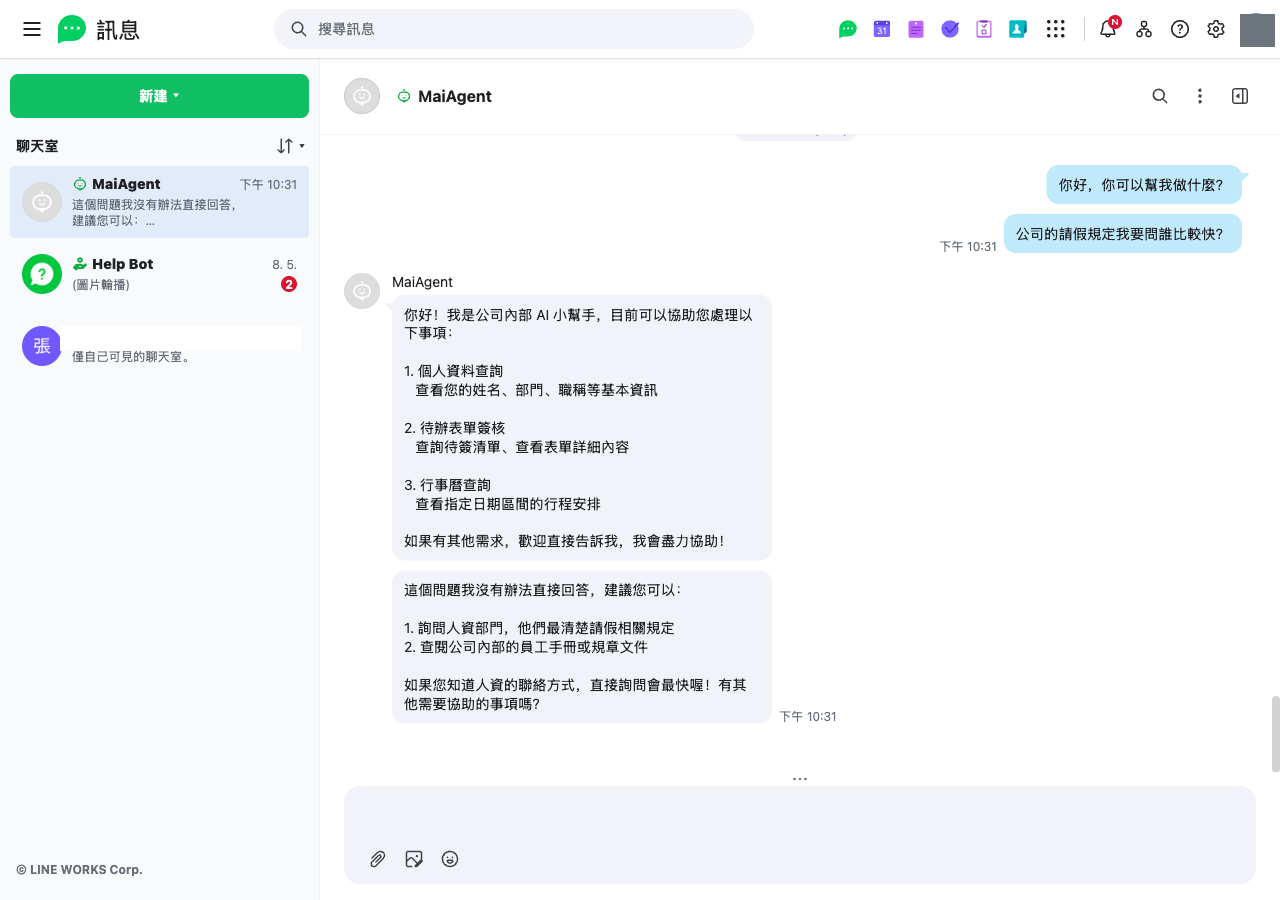
在 LINE WORKS 中搜尋 Bot 名稱並開始對話，AI 助理會自動回覆。

<figure><img src="https://1593648278-files.gitbook.io/~/files/v0/b/gitbook-x-prod.appspot.com/o/spaces%2Fmzb5NG9GDzFP2YDKeYVl%2Fuploads%2Fgit-blob-61671de9af211a3e38edec25ce37d9a382dceea4%2Flineworks-chat-demo.png?alt=media" alt="LINE WORKS 聊天室中與 AI 助理的一對一對話"><figcaption><p>在 LINE WORKS 聊天室直接與 AI 助理對話</p></figcaption></figure>

{% hint style="info" %}
LINE WORKS 聊天室只顯示純文字，**不會渲染 Markdown**。若 AI 助理輸出表格或 `**粗體**`、`###` 等語法，使用者看到的會是原始符號。建議在助理的角色指令中加一段排版規則，要求以編號與換行呈現清單、不要使用 Markdown 語法。
{% endhint %}

### 群組對話 <a href="#group-conversation" id="group-conversation"></a>

將 Bot 邀請進群組。若已開啟「群組中需 @Bot 才回覆」，輸入 `@Bot名稱 你的問題` 才會觸發回覆。

在 MaiAgent 的<mark style="color:blue;">所有對話</mark>中，同一個群組會呈現為**一則對話**，發話者姓名顯示在訊息上。不會因為群組裡有多個人發言而拆成多條平行對話。

### 支援的訊息型別 <a href="#supported-message-types" id="supported-message-types"></a>

| 使用者傳送                | AI 助理的處理方式    |
| -------------------- | ------------- |
| 文字                   | 直接回答          |
| 圖片                   | 可辨識圖片內容       |
| 檔案（PDF、Excel、Word 等） | 讀取內容後回答相關問題   |
| 語音訊息                 | 轉為文字後處理       |
| 影片                   | 存為附件，記錄在對話中   |
| 位置                   | 顯示為「📍 已分享位置」 |
| 貼圖                   | 顯示為「🏷 貼圖」    |

AI 助理回覆時支援文字與附件。單則文字訊息若超過 LINE WORKS 的 1,000 字上限，系統會自動分段送出，不會被截斷。

***

## 常見問題 <a href="#faq" id="faq"></a>

### AI 助理突然不回覆了 <a href="#troubleshoot-no-reply" id="troubleshoot-no-reply"></a>

先到該通道的設定頁面查看是否顯示<mark style="color:red;">憑證已失效</mark>的警示。

憑證失效最常見的原因是**在 Developer Console 重新產生了私鑰或 Service Account**。舊憑證一旦被取代，MaiAgent 就無法再取得存取權杖。

由於憑證無法就地修改，請重新建立一個 LINE WORKS 通道並填入新憑證。

{% hint style="info" %}
憑證失效唯一的外部症狀就是 AI 助理安靜下來——使用者不會收到任何錯誤訊息。若同事回報「機器人沒反應」，這裡是第一個該看的地方。
{% endhint %}

### 為什麼憑證不能修改？ <a href="#why-credentials-are-immutable" id="why-credentials-are-immutable"></a>

憑證屬於敏感資料，MaiAgent 儲存後不會再回傳給前端，設定頁面也不接受修改，以避免憑證在傳輸與畫面上重複曝露。Bot ID、Client ID 與 Service Account 會以唯讀方式顯示，方便您核對目前接的是哪一支 Bot。

需要更換任何一項憑證時，請刪除此通道後重新建立。

### 群組中 @ 了 Bot 卻沒有反應 <a href="#troubleshoot-group-mention" id="troubleshoot-group-mention"></a>

* 確認 @ 的名稱與 **Developer Console 中的 Bot 名稱**一致，而非 MaiAgent 的 Inbox 名稱
* 確認 Bot 修改頁面的 <mark style="color:blue;">Bot政策</mark> → <mark style="color:blue;">加入聊天室</mark> 已勾選<mark style="color:blue;">可邀請加入團隊/群組、1:N聊天室</mark>
* 確認 <mark style="color:blue;">Callback Event Settings</mark> 已勾選 <mark style="color:blue;">TEXT</mark>

### 需要定期更新權杖嗎？ <a href="#token-renewal" id="token-renewal"></a>

不需要。MaiAgent 使用 Service Account 方式認證，存取權杖由系統自動簽發與續期，不會因為時間經過而失效。只要 Developer Console 的憑證沒有被重新產生，串接就會持續有效。


---

# Agent Instructions
This documentation is published with GitBook. GitBook is the documentation platform designed so that both humans and AI agents can read, navigate, and reason over technical content effectively. Learn more at gitbook.com.

## Querying This Documentation
If you need additional information that is not directly available in this page, you can query the documentation dynamically by asking a question.

Perform an HTTP GET request on the current page URL with the `ask` query parameter, and the optional `goal` query parameter:

```
GET https://docs.maiagent.ai/conversations/line-works.md?ask=<question>&goal=<endgoal>
```

`ask` is the immediate question: it should be specific, self-contained, and written in natural language.
`goal` is optional and describes the broader end goal you are ultimately trying to accomplish on behalf of the user. GitBook uses it to tailor the answer towards what is most useful for that goal.

The response will contain a direct answer to the question and relevant excerpts and sources from the documentation.

Use this mechanism when the answer is not explicitly present in the current page, you need clarification or additional context, or you want to retrieve related documentation sections.