> For the complete documentation index, see [llms.txt](https://docs.maiagent.ai/llms.txt). Markdown versions of documentation pages are available by appending `.md` to page URLs; this page is available as [Markdown](https://docs.maiagent.ai/conversations/human-handoff.md).

# 客服轉真人設定

讓 AI 助理在需要時把對話轉接給真人客服：轉接條件、提示訊息、服務時間、派工規則與內部通知的完整設定說明。

當使用者的問題超出 AI 助理能處理的範圍（例如明確要求真人服務、問題涉及敏感資訊），平台可以把對話轉接給真人客服，由客服人員在後台接手回覆。本頁說明如何啟用與設定；客服人員的日常操作請見[真人客服接手與回覆](/conversations/human-handoff/human-handoff-operations.md)。

{% hint style="info" %}
所有對話平台（網頁、內部、LINE、Microsoft Teams 等）都支援轉接真人客服。差別在於轉接後使用者端接收回覆的體驗：網頁與內部平台可即時往返；API 平台沒有聊天畫面，需自行開發前端介面接收回覆。
{% endhint %}

## 設定入口 <a href="#where-to-configure" id="where-to-configure"></a>

進入 <mark style="color:blue;">「對話平台」</mark>，選擇要啟用的平台，切換至 <mark style="color:blue;">「客服轉真人設定」</mark> 分頁。設定分為五個子分頁：<mark style="color:blue;">轉真人條件</mark>、<mark style="color:blue;">轉接訊息</mark>、<mark style="color:blue;">服務時間</mark>、<mark style="color:blue;">派工設定</mark>、<mark style="color:blue;">通知</mark>。

## 轉真人條件 <a href="#transfer-conditions" id="transfer-conditions"></a>

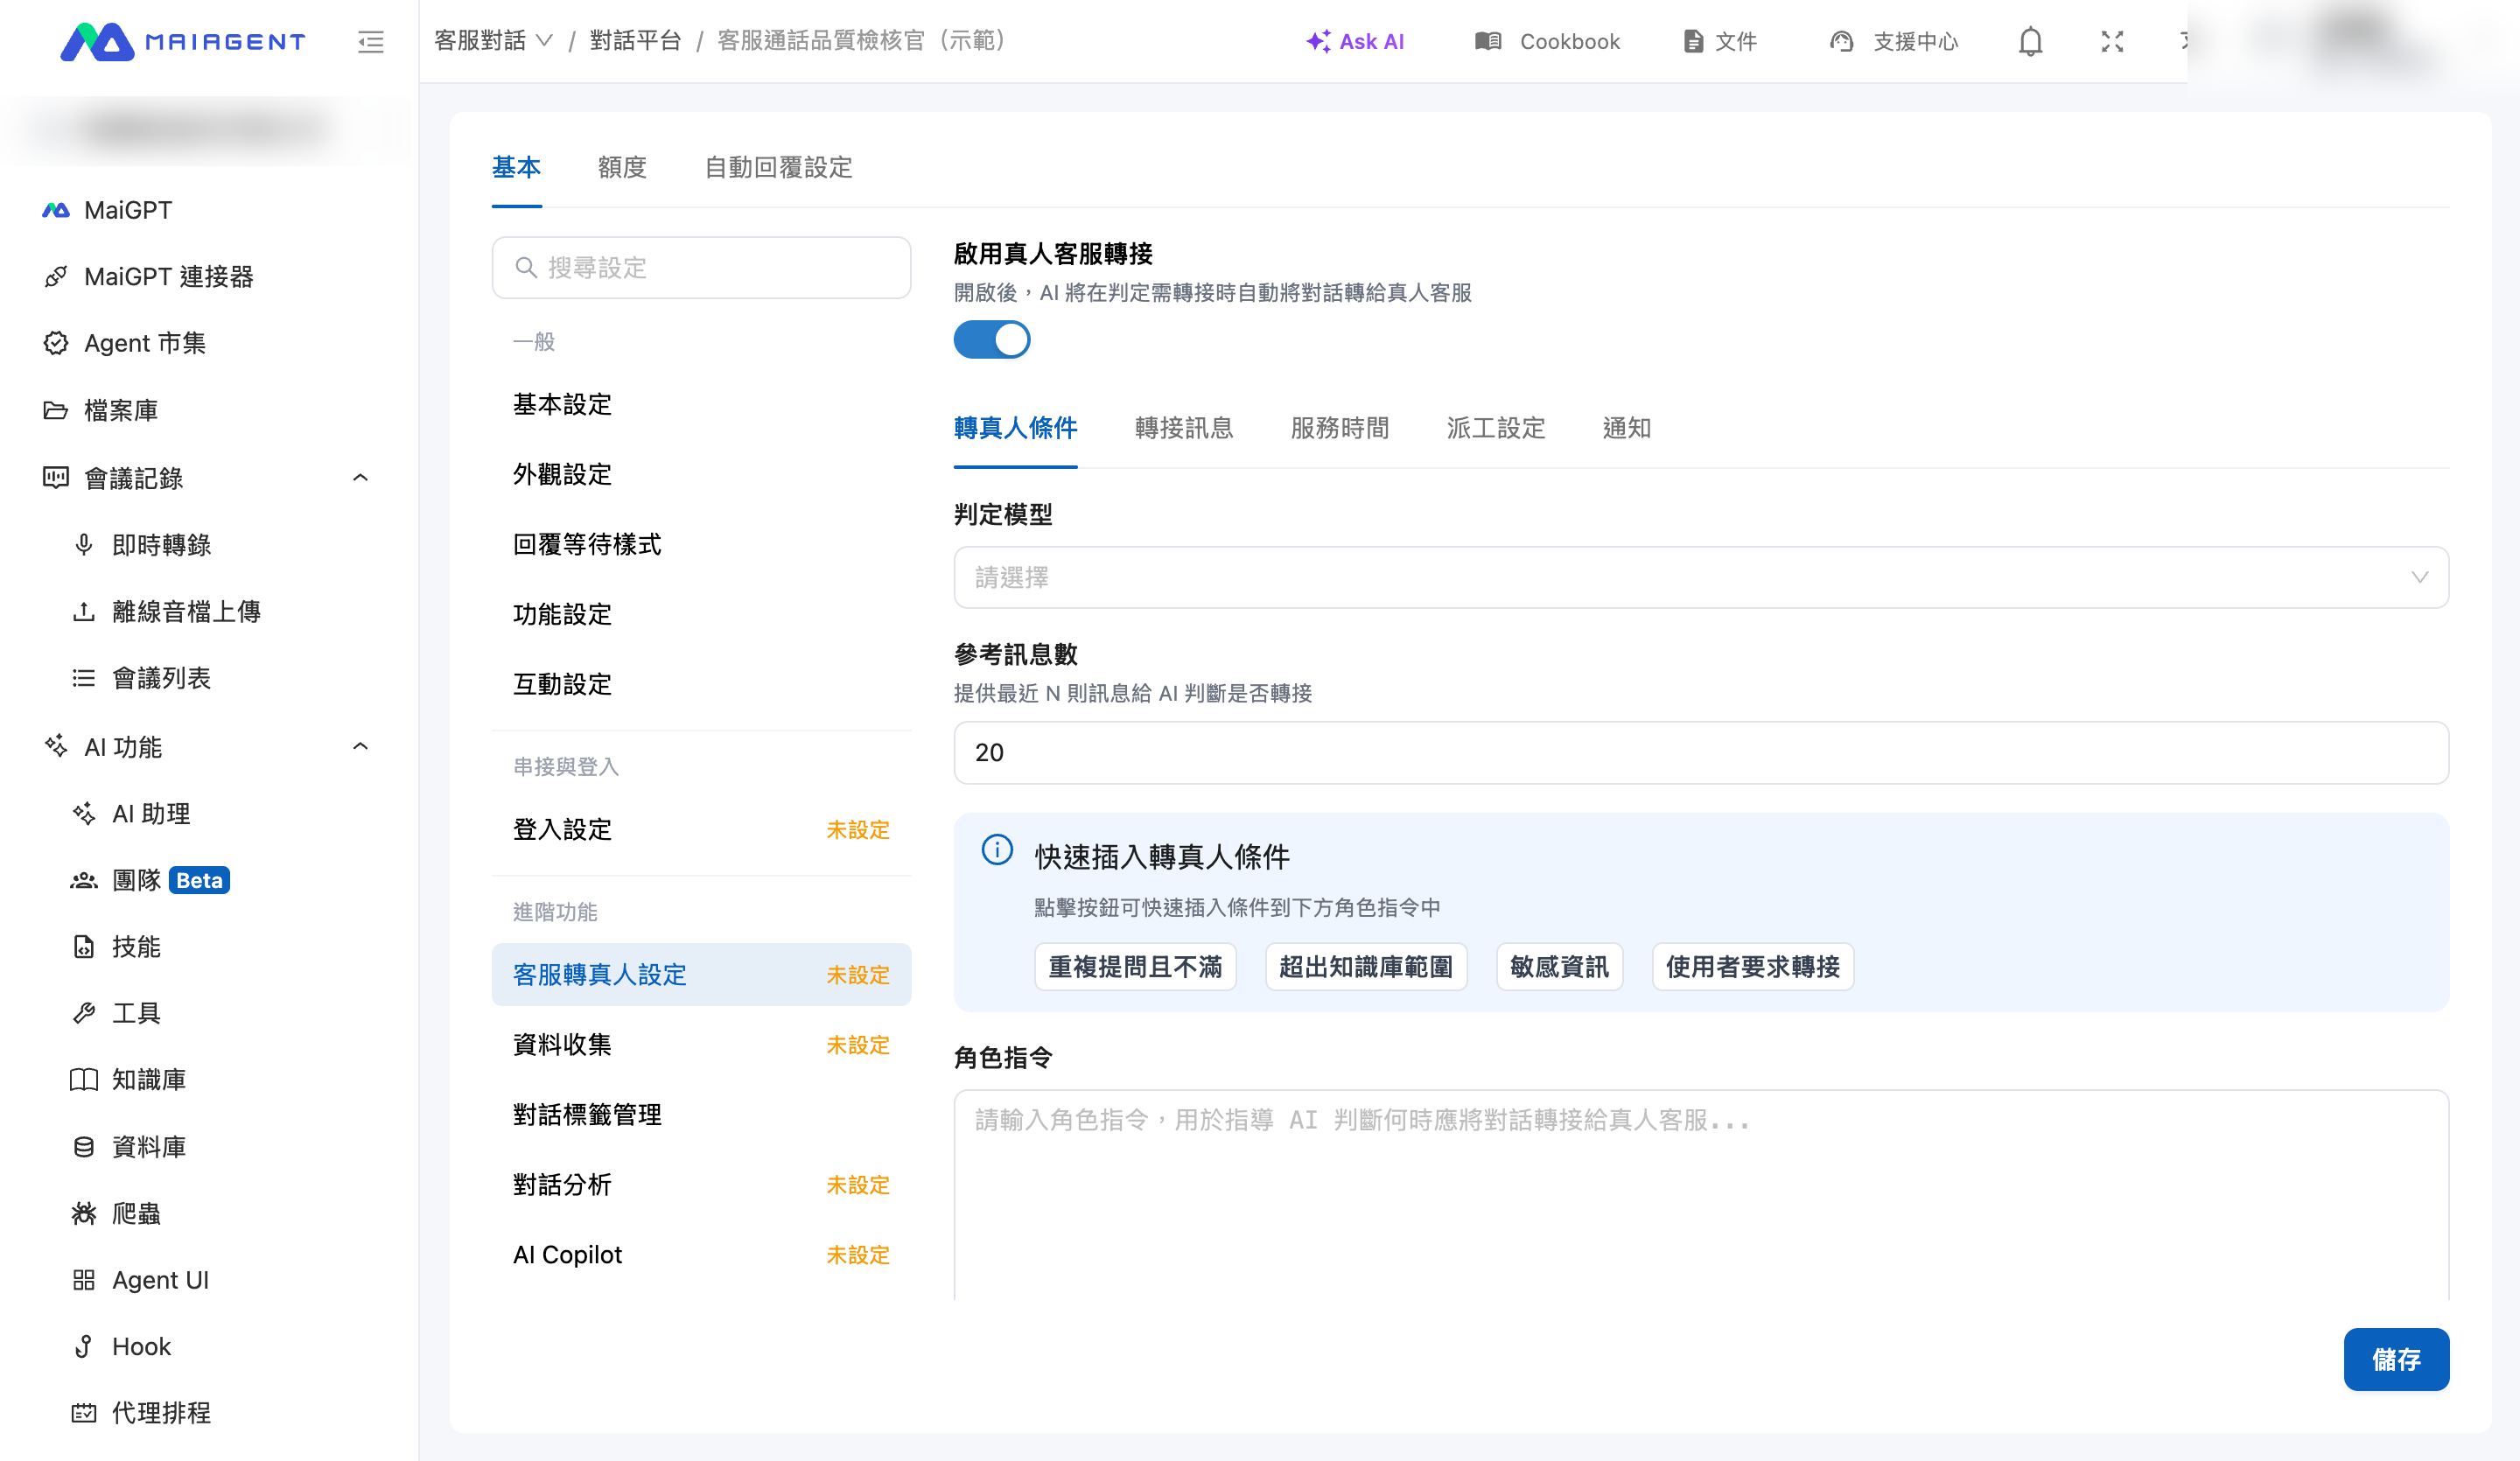
開啟 <mark style="color:blue;">「啟用真人客服轉接」</mark> 後，AI 會在每則使用者訊息進線時判斷是否需要轉接。

<figure><img src="https://1593648278-files.gitbook.io/~/files/v0/b/gitbook-x-prod.appspot.com/o/spaces%2Fmzb5NG9GDzFP2YDKeYVl%2Fuploads%2Fgit-blob-0f4d50b4a7b8eb5c56d5a5ca9b36d1cac3b6d224%2Fhandoff-transfer-conditions.png?alt=media" alt="轉真人條件設定畫面"><figcaption><p>轉真人條件：啟用開關、判定模型與快速插入條件</p></figcaption></figure>

判斷的依據是 <mark style="color:blue;">「角色指令」</mark>：您用文字描述「什麼情況該轉真人」，由 <mark style="color:blue;">「判定模型」</mark> 參考最近的對話內容（則數由 <mark style="color:blue;">「參考訊息數」</mark> 控制）做出判斷。

頁面提供四種常見條件可一鍵插入角色指令：

* **使用者要求轉接**：使用者明確要求與真人客服對話
* **超出知識庫範圍**：問題超出知識庫範圍且 AI 無法有效回答
* **重複提問且不滿**：使用者重複詢問相同問題且表現出不滿情緒
* **敏感資訊**：對話涉及個資修改、帳務、法律等敏感內容

{% hint style="info" %}
除了 AI 自動判斷之外，客服管理人員也可以隨時在「所有對話」中手動接手任何一筆對話，不受轉真人條件限制。
{% endhint %}

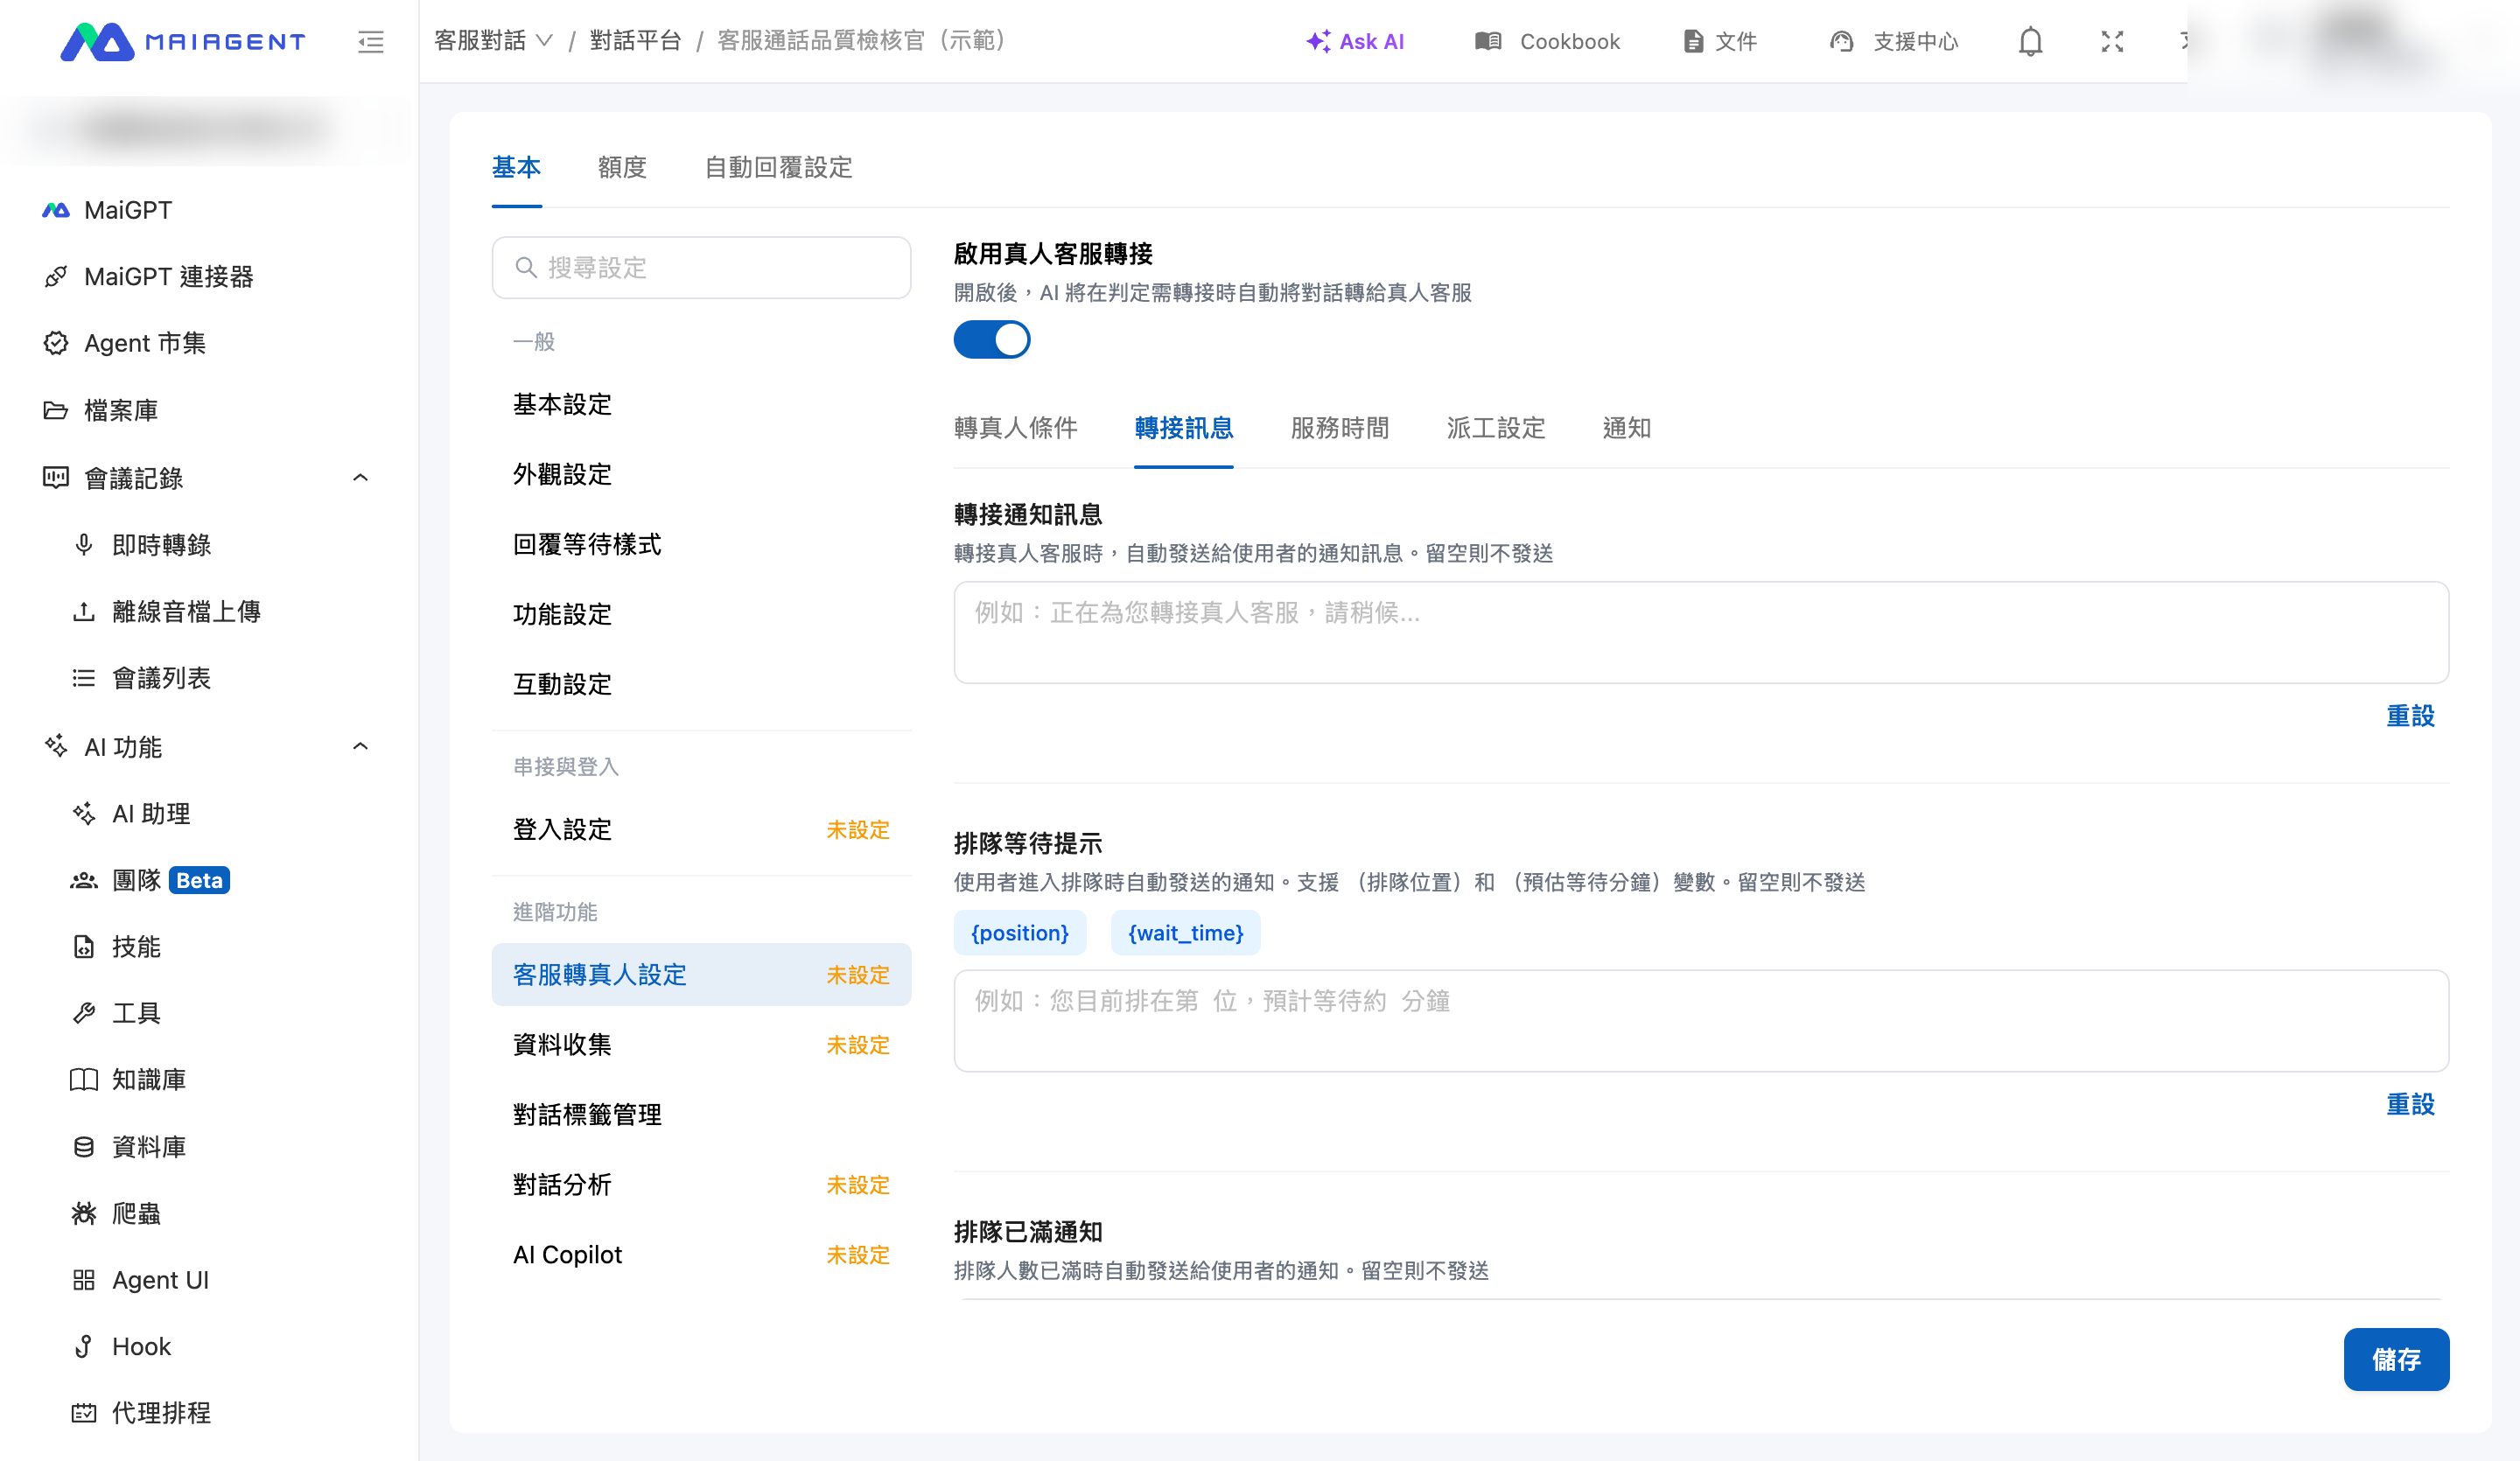
## 轉接訊息 <a href="#transfer-messages" id="transfer-messages"></a>

轉接流程的每個階段，都可以自訂發送給使用者的提示訊息（留空則不發送）：

| 訊息     | 發送時機        | 可用變數                                   |
| ------ | ----------- | -------------------------------------- |
| 轉接通知訊息 | 觸發轉接真人時     | —                                      |
| 排隊等待提示 | 使用者進入排隊時    | `{position}` 排隊位置、`{wait_time}` 預估等待分鐘 |
| 成功轉接提示 | 成功指派客服後     | `{agent_name}` 客服名稱                    |
| 排隊已滿通知 | 排隊人數達上限時    | —                                      |
| 超時通知訊息 | 排隊超時轉回 AI 時 | —                                      |

<figure><img src="https://1593648278-files.gitbook.io/~/files/v0/b/gitbook-x-prod.appspot.com/o/spaces%2Fmzb5NG9GDzFP2YDKeYVl%2Fuploads%2Fgit-blob-bfb296d7c058394b5742f475287a28dc58473989%2Fhandoff-transfer-messages.png?alt=media" alt="轉接訊息設定畫面"><figcaption><p>轉接訊息：各階段提示訊息與可用變數</p></figcaption></figure>

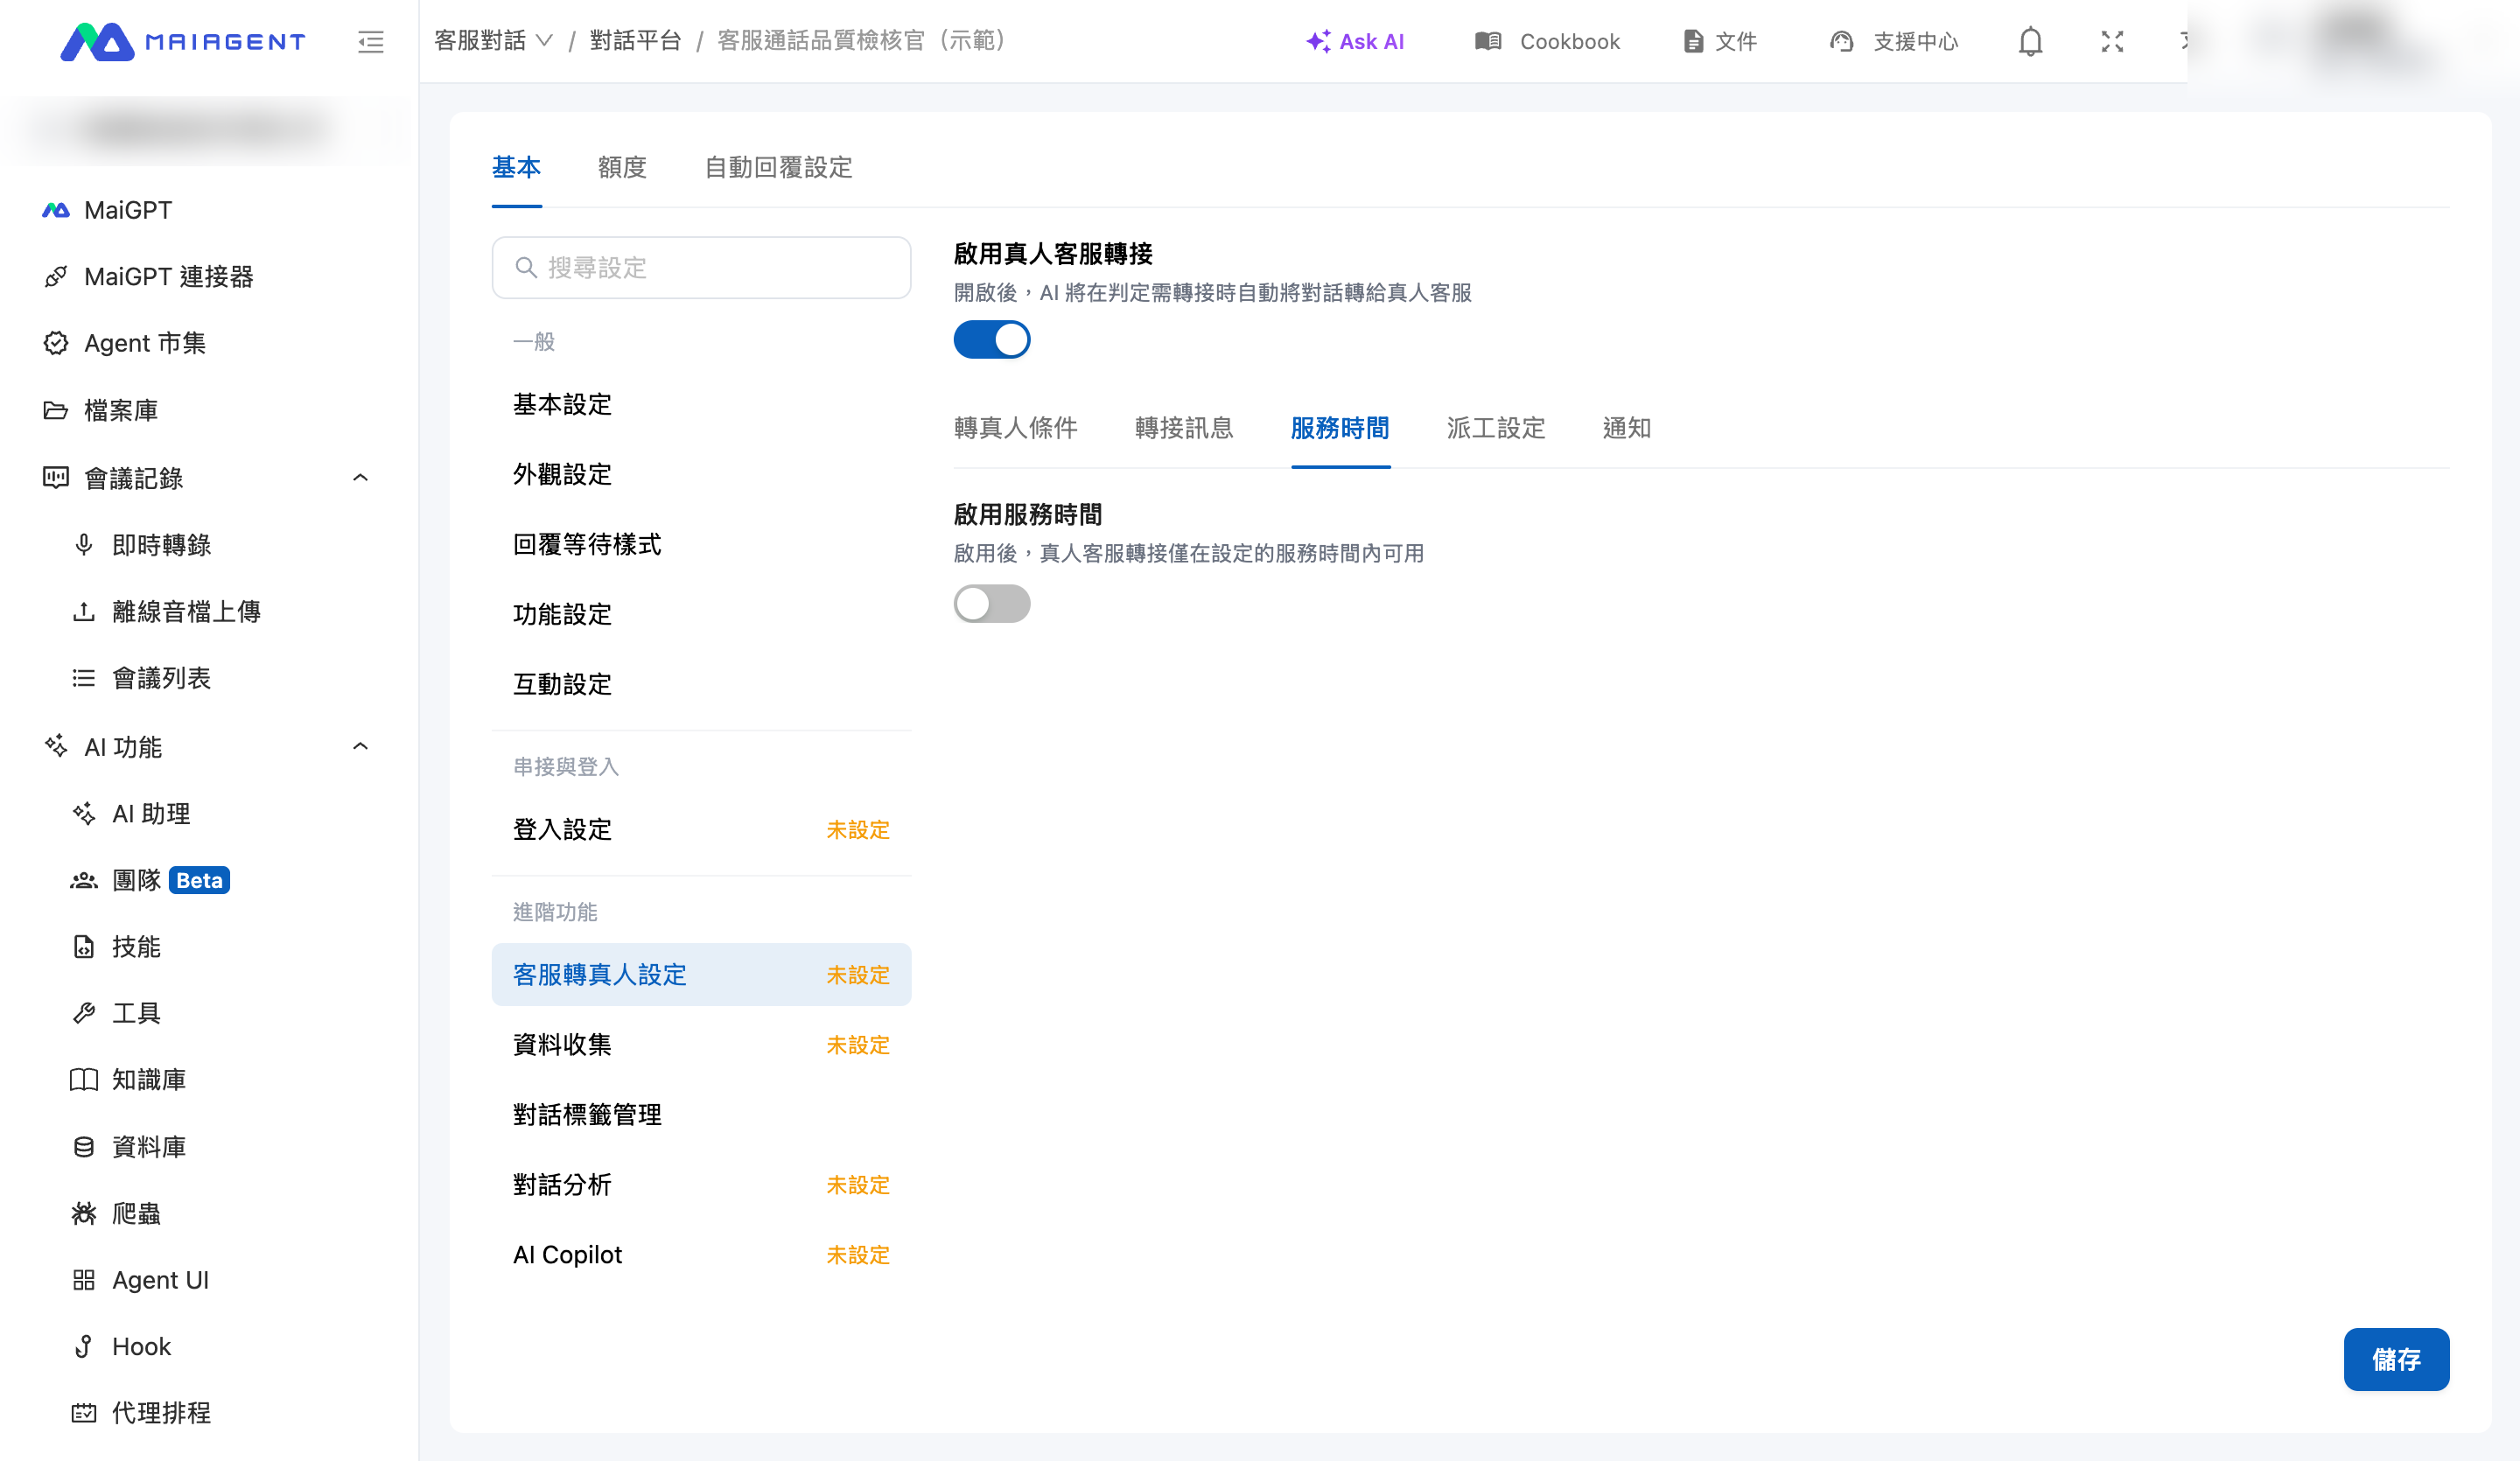
## 服務時間 <a href="#service-hours" id="service-hours"></a>

開啟 <mark style="color:blue;">「啟用服務時間」</mark> 後，真人客服轉接僅在設定的時段內運作。可設定 <mark style="color:blue;">時區</mark> 與每週各日的服務起訖時間，也可用 <mark style="color:blue;">「週一至週五 09:00-18:00」</mark> 快速套用。

非服務時間觸發轉真人時，依 <mark style="color:blue;">「離線行為」</mark> 決定處理方式：

* **顯示離線訊息**：不進行轉接，送出離線訊息並結束本次回覆；後續一般問題仍由 AI 回答
* **接受留言**：顯示離線訊息並讓對話進入「未指派」佇列，待上班時間由客服接手處理

<figure><img src="https://1593648278-files.gitbook.io/~/files/v0/b/gitbook-x-prod.appspot.com/o/spaces%2Fmzb5NG9GDzFP2YDKeYVl%2Fuploads%2Fgit-blob-797fb69be8d3c084b426603c9b179399f5413cf9%2Fhandoff-service-hours.png?alt=media" alt="服務時間設定畫面"><figcaption><p>服務時間：每週時段與離線行為</p></figcaption></figure>

## 派工設定 <a href="#dispatch-settings" id="dispatch-settings"></a>

### 挑選客服人員 <a href="#assignable-members" id="assignable-members"></a>

在 <mark style="color:blue;">「可分配的客服人員」</mark> 勾選這個平台的客服名單。系統自動派工時，只會派給**同時滿足**以下條件的人員：

1. 在可分配名單內
2. 帳號為啟用狀態、且具備此對話平台的客服權限
3. 處理中的對話數未達「每位客服同時可接對話數」上限

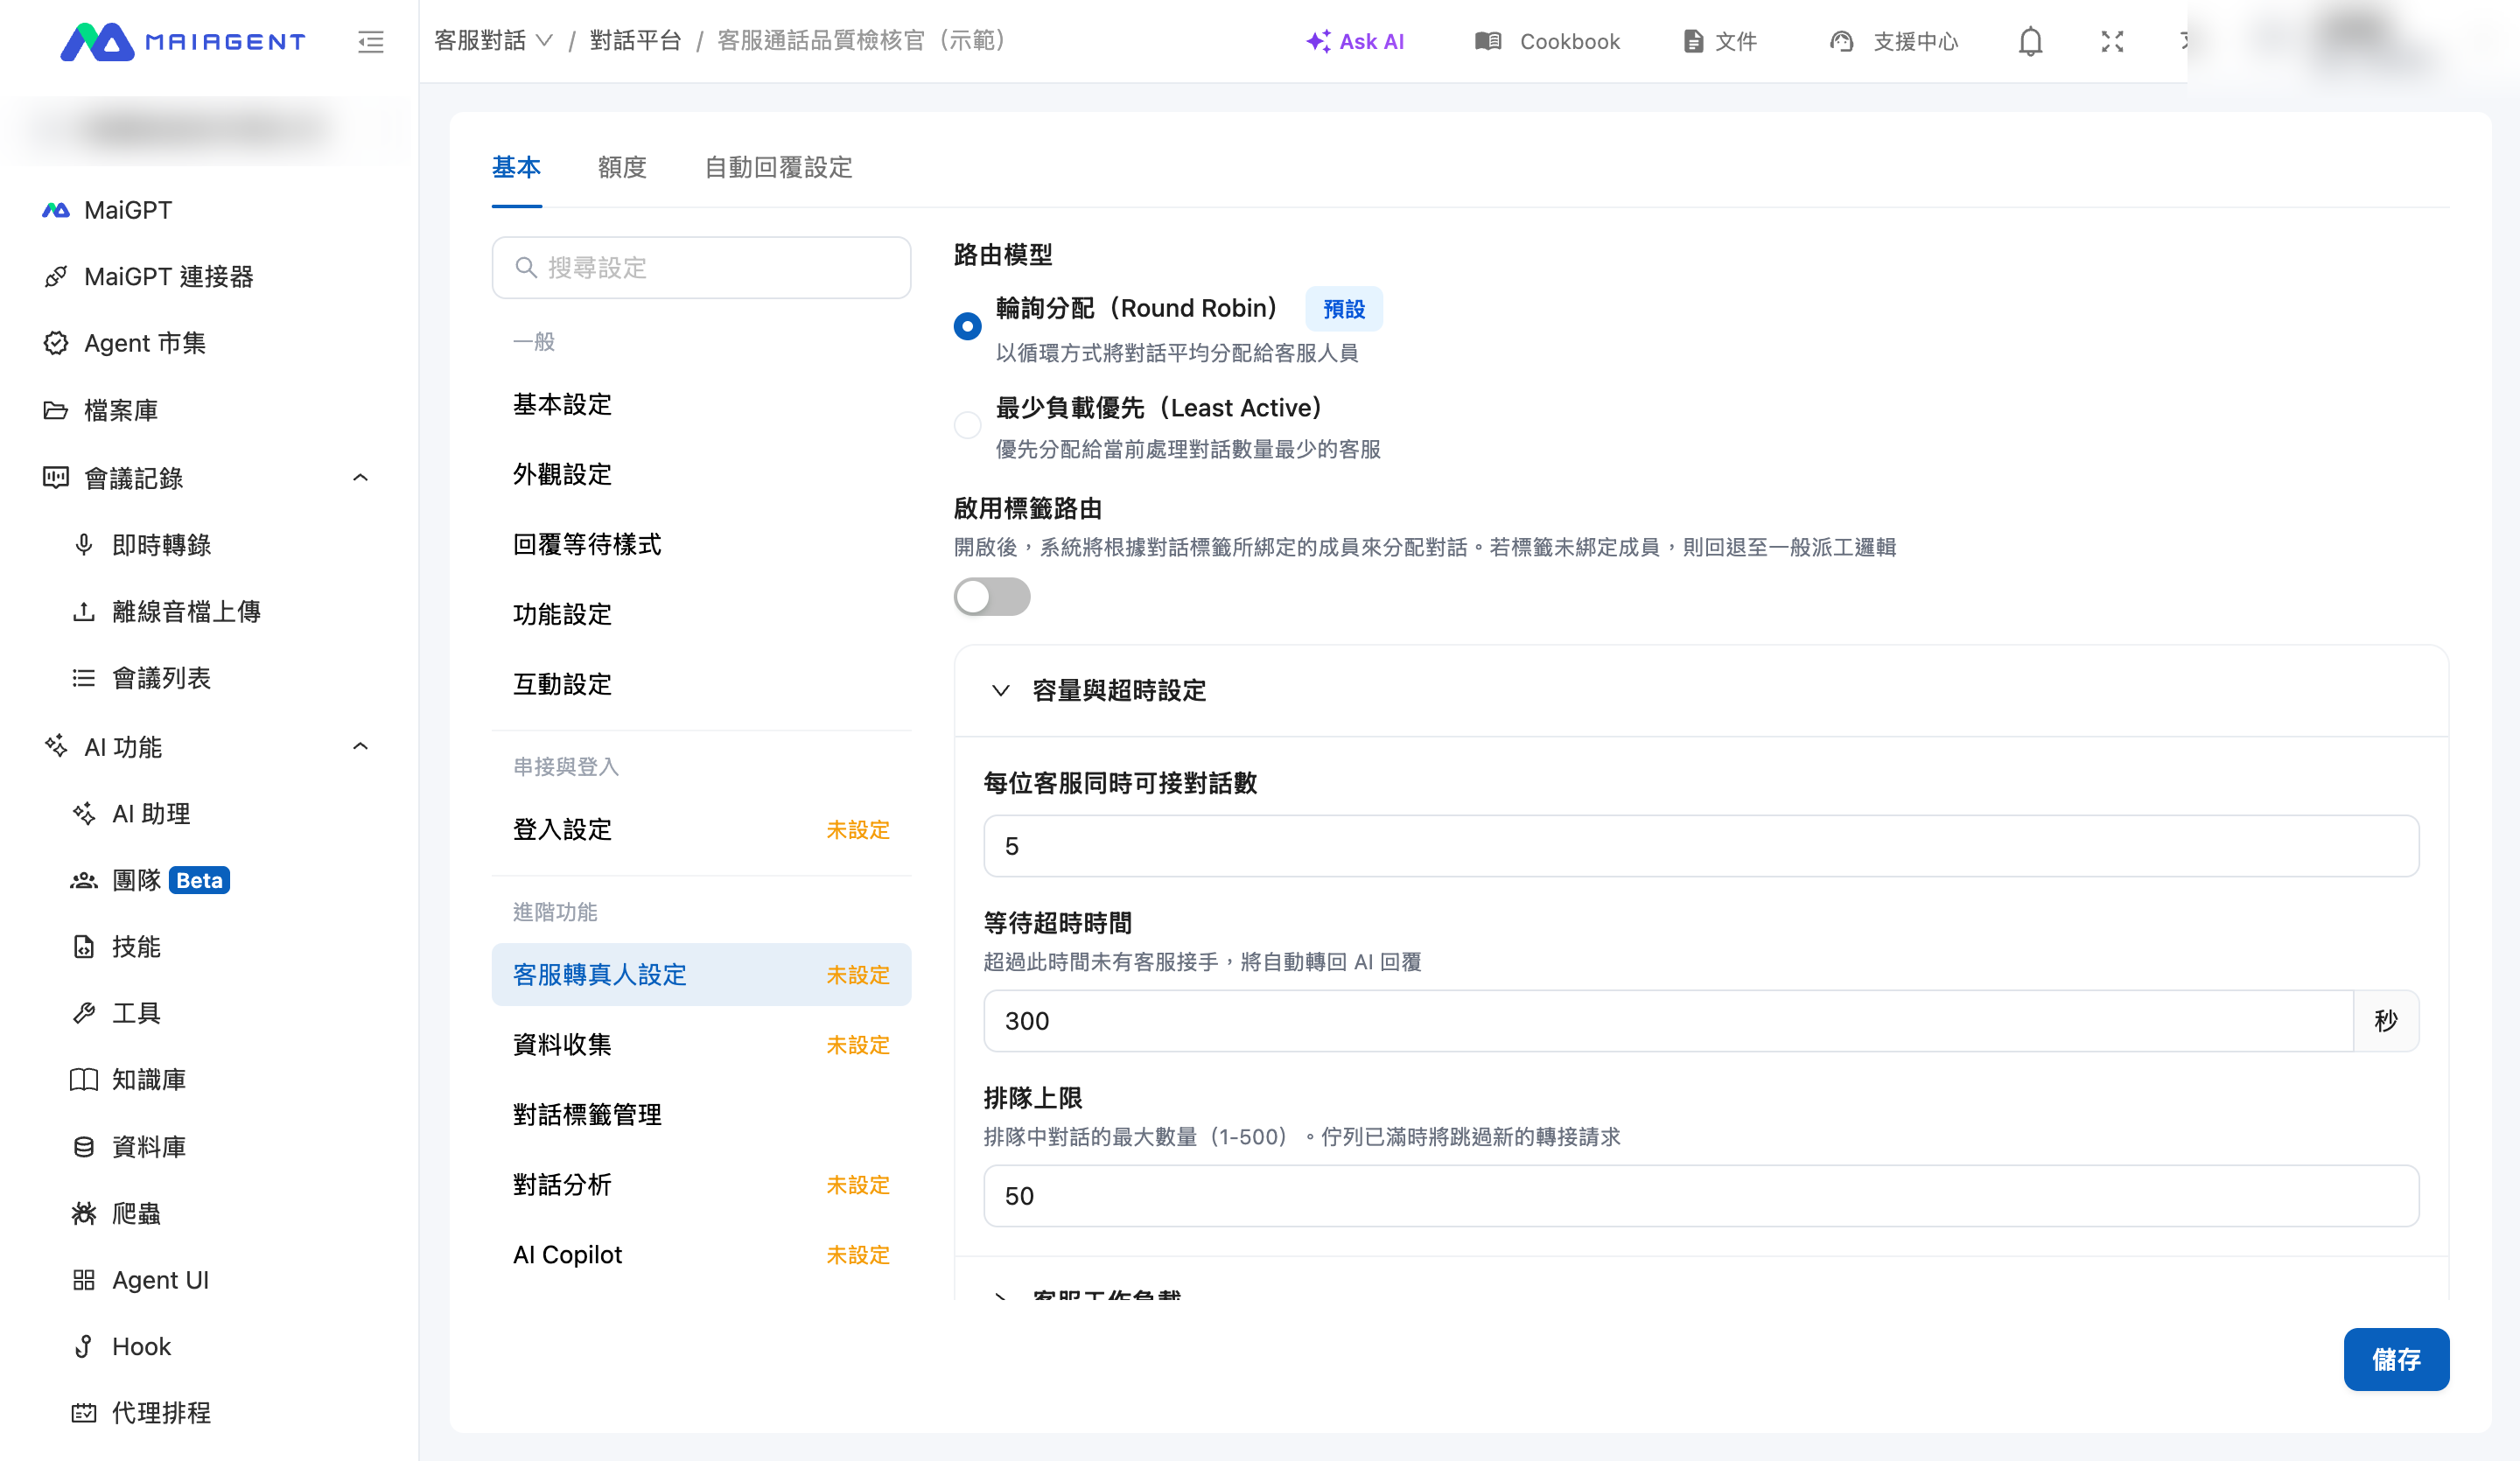
### 路由模型 <a href="#routing-model" id="routing-model"></a>

* **輪詢分配（Round Robin）**：以循環方式將對話平均分配給客服人員
* **最少負載優先（Least Active）**：優先分配給當前處理對話數量最少的客服

### 容量與超時設定 <a href="#capacity-and-queue" id="capacity-and-queue"></a>

| 設定          | 說明                                |
| ----------- | --------------------------------- |
| 每位客服同時可接對話數 | 單一客服可同時處理的對話上限；達上限後不再被派案          |
| 等待超時時間      | 排隊超過此時間仍無客服接手，自動轉回 AI 回覆並發送超時通知訊息 |
| 排隊上限        | 排隊中對話的最大數量；佇列已滿時將跳過新的轉接請求         |

<figure><img src="https://1593648278-files.gitbook.io/~/files/v0/b/gitbook-x-prod.appspot.com/o/spaces%2Fmzb5NG9GDzFP2YDKeYVl%2Fuploads%2Fgit-blob-e3188794a19f2825351be430f7cf06b8444fae58%2Fhandoff-dispatch-routing.png?alt=media" alt="派工設定畫面"><figcaption><p>派工設定：路由模型、標籤路由與容量與超時設定</p></figcaption></figure>

{% hint style="info" %}
**想改用「客服自行接手」模式？** 將「可分配的客服人員」名單留空，所有轉真人的對話都會停在「未指派」列表，由客服人員自行點選「我來接手」認領，不會自動指派。
{% endhint %}

### 標籤路由 <a href="#tag-routing" id="tag-routing"></a>

開啟 <mark style="color:blue;">「啟用標籤路由」</mark> 後，系統會依對話標籤所綁定的成員來分配對話（例如「帳務」標籤的對話派給帳務組成員）。使用前需先建立對話標籤、為成員指派標籤，並建議啟用「對話分析」讓轉接時自動為對話貼標。若標籤未綁定成員，會回退至一般派工邏輯。

### 客服工作負載 <a href="#agent-workload" id="agent-workload"></a>

頁面下方的 <mark style="color:blue;">「客服工作負載」</mark> 面板即時顯示每位客服的處理中件數、已解決件數與狀態（可派工／已滿載），以及目前排隊中的對話數，方便管理者掌握現場負載。

## 通知 <a href="#notifications" id="notifications"></a>

對話指派給客服時，系統會透過 <mark style="color:blue;">「通知中心公告」</mark> 與 <mark style="color:blue;">「Email 通知」</mark> 提醒被指派人與副本通知對象（例如主管），通知範本可自訂。完整的設定步驟、範本變數與常見問題，請見[轉真人客服通知](/conversations/human-handoff/handoff-notification.md)。

{% hint style="warning" %}
通知在「對話被指派給客服」時發送。若使用留言模式或接手制（對話停在「未指派」佇列），此階段不會發送 Email 通知，請安排客服人員定期查看「未指派」列表。
{% endhint %}


---

# Agent Instructions
This documentation is published with GitBook. GitBook is the documentation platform designed so that both humans and AI agents can read, navigate, and reason over technical content effectively. Learn more at gitbook.com.

## Querying This Documentation
If you need additional information that is not directly available in this page, you can query the documentation dynamically by asking a question.

Perform an HTTP GET request on the current page URL with the `ask` query parameter, and the optional `goal` query parameter:

```
GET https://docs.maiagent.ai/conversations/human-handoff.md?ask=<question>&goal=<endgoal>
```

`ask` is the immediate question: it should be specific, self-contained, and written in natural language.
`goal` is optional and describes the broader end goal you are ultimately trying to accomplish on behalf of the user. GitBook uses it to tailor the answer towards what is most useful for that goal.

The response will contain a direct answer to the question and relevant excerpts and sources from the documentation.

Use this mechanism when the answer is not explicitly present in the current page, you need clarification or additional context, or you want to retrieve related documentation sections.